remote-mcp-functions-python
Health Pass
- License — License: MIT
- Description — Repository has a description
- Active repo — Last push 0 days ago
- Community trust — 118 GitHub stars
Code Pass
- Code scan — Scanned 12 files during light audit, no dangerous patterns found
Permissions Pass
- Permissions — No dangerous permissions requested
This project is a quickstart template designed to help developers build and deploy a custom remote Model Context Protocol (MCP) server. It leverages Python and Azure Functions to easily host the server in the cloud or run it locally.
Security Assessment
Overall Risk: Low
The tool uses Microsoft Entra ID for built-in authentication and supports network isolation via VNets, providing strong foundational security for your deployment. An automated code scan of 12 files found no dangerous patterns, hardcoded secrets, or requests for overly permissive privileges. It requires running a local Docker instance for Azurite storage, but standard Python dependencies are used without executing unexpected shell commands.
Quality Assessment
The project is highly maintained, with its most recent code push happening today. It is backed by a healthy level of community trust with 118 GitHub stars. Furthermore, it is completely open-source and distributed under the highly permissive MIT license, allowing for easy adoption and modification.
Verdict
Safe to use.
Getting Started with Remote MCP Servers using Azure Functions (Python)
Getting Started with Remote MCP Servers using Azure Functions (Python)
This is a quickstart template to easily build and deploy a custom remote MCP server to the cloud using Azure Functions with Python. You can clone/restore/run on your local machine with debugging, and azd up to have it in the cloud in a couple minutes.
The MCP server is configured with built-in authentication using Microsoft Entra as the identity provider.
You can also use API Management to secure the server, as well as network isolation using VNET.
If you're looking for this sample in more languages check out the .NET/C# and Node.js/TypeScript versions.
![]()
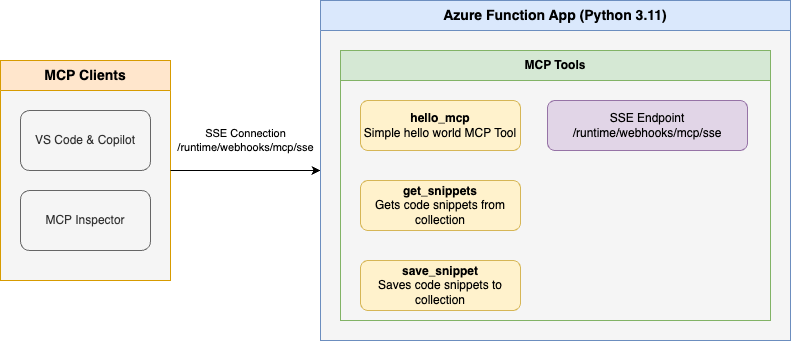
Below is the architecture diagram for the Remote MCP Server using Azure Functions:
Prerequisites
- Python version 3.13 or higher
- Azure Functions Core Tools >=
4.8.0 - Azure Developer CLI
- To use Visual Studio Code to run and debug locally:
Prepare your local environment
An Azure Storage Emulator is needed for this particular sample because we will save and get snippets from blob storage.
Start Azurite
docker run -p 10000:10000 -p 10001:10001 -p 10002:10002 \
    mcr.microsoft.com/azure-storage/azurite
Note if you use Azurite coming from VS Code extension you need to run
Azurite: Startnow or you will see errors.
Run your MCP Server locally from the terminal
Change to the src folder in a new terminal window:
cd srcInstall Python dependencies:
pip install -r requirements.txt
Note it is a best practice to create a Virtual Environment before doing the
pip installto avoid dependency issues/collisions, or if you are running in CodeSpaces. See Python Environments in VS Code for more information.
Start the Functions host locally:
func start
Note by default this will use the webhooks route:
/runtime/webhooks/mcp. Later we will use this in Azure to set the key on client/host calls:/runtime/webhooks/mcp?code=<system_key>
Connect to the local MCP server from a client/host
VS Code - Copilot agent mode
Add MCP Server from command palette and add URL to your running Function app's MCP endpoint:
http://0.0.0.0:7071/runtime/webhooks/mcpList MCP Servers from command palette and start the server
In Copilot chat agent mode enter a prompt to trigger the tool, e.g., select some code and enter this prompt
Say HelloSave this snippet as snippet1Retrieve snippet1 and apply to newFile.pyWhen prompted to run the tool, consent by clicking Continue
When you're done, press Ctrl+C in the terminal window to stop the Functions host process.
MCP Inspector
In a new terminal window, install and run MCP Inspector
npx @modelcontextprotocol/inspectorCTRL click to load the MCP Inspector web app from the URL displayed by the app (e.g. http://0.0.0.0:5173/#resources)
Set the transport type to
Streamable HTTPSet the URL to your running Function app's MCP endpoint and Connect:
http://0.0.0.0:7071/runtime/webhooks/mcp
Note this step will not work in CodeSpaces. Please move on to Deploy to Remote MCP.
- List Tools. Click on a tool and Run Tool.
Verify local blob storage in Azurite
After testing the snippet save functionality locally, you can verify that blobs are being stored correctly in your local Azurite storage emulator.
Using Azure Storage Explorer
- Open Azure Storage Explorer
- In the left panel, expand Emulator & Attached → Storage Accounts → (Emulator - Default Ports) (Key)
- Navigate to Blob Containers → snippets
- You should see any saved snippets as blob files in this container
- Double-click on any blob to view its contents and verify the snippet data was saved correctly
Using Azure CLI (Alternative)
If you prefer using the command line, you can also verify blobs using Azure CLI with the storage emulator:
# List blobs in the snippets container
az storage blob list --container-name snippets --connection-string "DefaultEndpointsProtocol=http;AccountName=devstoreaccount1;AccountKey=Eby8vdM02xNOcqFlqUwJPLlmEtlCDXJ1OUzFT50uSRZ6IFsuFq2UVErCz4I6tq/K1SZFPTOtr/KBHBeksoGMGw==;BlobEndpoint=http://127.0.0.1:10000/devstoreaccount1;"
# Download a specific blob to view its contents
az storage blob download --container-name snippets --name <blob-name> --file <local-file-path> --connection-string "DefaultEndpointsProtocol=http;AccountName=devstoreaccount1;AccountKey=Eby8vdM02xNOcqFlqUwJPLlmEtlCDXJ1OUzFT50uSRZ6IFsuFq2UVErCz4I6tq/K1SZFPTOtr/KBHBeksoGMGw==;BlobEndpoint=http://127.0.0.1:10000/devstoreaccount1;"
This verification step ensures your MCP server is correctly interacting with the local storage emulator and that the blob storage functionality is working as expected before deploying to Azure.
Deploy to Azure for Remote MCP
In the root directory, create a new azd environment. This is going to become the resource group of your Azure resources:
azd env new <reource-group-name>
Configure VS Code as an allowed client application to request access tokens from Microsoft Entra:
azd env set PRE_AUTHORIZED_CLIENT_IDS aebc6443-996d-45c2-90f0-388ff96faa56
Run this azd command to provision the function app, with any required Azure resources, and deploy your code:
azd up
You can opt-in to a VNet being used in the sample. To do so, do this before azd up
azd env set VNET_ENABLED true
Additionally, API Management can be used for improved security and policies over your MCP Server.
Connect to remote MCP server in VS Code - GitHub Copilot
For GitHub Copilot within VS Code, you would just use https://<funcappname>.azurewebsites.net/runtime/webhooks/mcp for the URL. Note mcp.json has already been included in this repo and will be picked up by VS Code. Click Start on the server to be prompted for values including functionapp-name (in your /.azure/*/.env file). The server is configured with buit-in MCP auth, so you'll be asked to login as well.
{
    "inputs": [
        {
            "type": "promptString",
            "id": "functionapp-name",
            "description": "Azure Functions App Name"
        }
    ],
    "servers": {
        "remote-mcp-function": {
            "type": "http",
            "url": "https://${input:functionapp-name}.azurewebsites.net/runtime/webhooks/mcp"
        },
        "local-mcp-function": {
            "type": "http",
            "url": "http://0.0.0.0:7071/runtime/webhooks/mcp"
        }
    }
}
Redeploy your code
You can run the azd up command as many times as you need to both provision your Azure resources and deploy code updates to your function app.
[!NOTE]
Deployed code files are always overwritten by the latest deployment package.
Clean up resources
When you're done working with your function app and related resources, you can use this command to delete the function app and its related resources from Azure and avoid incurring any further costs:
azd down
Troubleshooting
| Error | Solution |
|---|---|
deployment was partially successful / KuduSpecializer restart during azd up |
This is a transient error. Run azd deploy to retry just the deployment step. |
| Connection refused | Ensure Azurite is running (docker run -p 10000:10000 -p 10001:10001 -p 10002:10002 mcr.microsoft.com/azure-storage/azurite) |
| API version not supported by Azurite | Pull the latest Azurite image (docker pull mcr.microsoft.com/azure-storage/azurite) then restart Azurite and the app |
Helpful Azure Commands
Once your application is deployed, you can use these commands to manage and monitor your application:
# Get your function app name from the environment file
FUNCTION_APP_NAME=$(cat .azure/$(cat .azure/config.json | jq -r '.defaultEnvironment')/env.json | jq -r '.FUNCTION_APP_NAME')
echo $FUNCTION_APP_NAME

# Get resource group
RESOURCE_GROUP=$(cat .azure/$(cat .azure/config.json | jq -r '.defaultEnvironment')/env.json | jq -r '.AZURE_RESOURCE_GROUP')
echo $RESOURCE_GROUP

# View function app logs
az webapp log tail --name $FUNCTION_APP_NAME --resource-group $RESOURCE_GROUP

# Redeploy the application without provisioning new resources
azd deploy
Source Code
The function code for the get_snippet and save_snippet endpoints are defined in the Python files in the src directory. The MCP function decorators expose these functions as MCP Server tools.
This sample uses the new first-class MCP decorators available in azure-functions>=1.25.0b2, which dramatically simplify the code by:
- Inferring tool properties directly from function signatures and type hints
- Eliminating the need for manual JSON serialization of tool properties
- Using standard Python decorators (
@app.mcp_tool(),@app.mcp_tool_property(),@app.blob_input(),@app.blob_output())
Here's the actual code from the function_app.py file:
@app.mcp_tool()
def hello_mcp() -> str:
    """Hello world."""
    return "Hello I am MCPTool!"


@app.mcp_tool()
@app.mcp_tool_property(arg_name="snippetname", description="The name of the snippet.")
@app.blob_input(arg_name="file", connection="AzureWebJobsStorage", path=_BLOB_PATH)
def get_snippet(file: func.InputStream, snippetname: str) -> str:
    """Retrieve a snippet by name from Azure Blob Storage."""
    snippet_content = file.read().decode("utf-8")
    logging.info(f"Retrieved snippet: {snippet_content}")
    return snippet_content


@app.mcp_tool()
@app.mcp_tool_property(arg_name="snippetname", description="The name of the snippet.")
@app.mcp_tool_property(arg_name="snippet", description="The content of the snippet.")
@app.blob_output(arg_name="file", connection="AzureWebJobsStorage", path=_BLOB_PATH)
def save_snippet(file: func.Out[str], snippetname: str, snippet: str) -> str:
    """Save a snippet with a name to Azure Blob Storage."""
    if not snippetname:
        return "No snippet name provided"

    if not snippet:
        return "No snippet content provided"

    file.set(snippet)
    logging.info(f"Saved snippet: {snippet}")
    return f"Snippet '{snippet}' saved successfully"
Note that the host.json file also includes a reference to the preview extension bundle, which is required for apps using this feature now:
"extensionBundle": {
  "id": "Microsoft.Azure.Functions.ExtensionBundle.Preview",
  "version": "[4.32.0, 5.0.0)"
}
Weather App Sample
A sample MCP App that displays weather information with an interactive UI.
What Are MCP Apps?
MCP Apps let tools return interactive interfaces instead of plain text. When a tool declares a UI resource, the host renders it in a sandboxed iframe where users can interact directly.
MCP Apps = Tool + UI Resource
The architecture relies on two MCP primitives:
- Tools with UI metadata pointing to a resource URI
- Resources containing bundled HTML/JavaScript served via the
ui://scheme
Azure Functions makes it easy to build both.
Prerequisites for Weather App
- Python version 3.11 or higher
- Node.js (for building the UI)
- Azure Functions Core Tools v4
- An MCP-compatible host (Claude Desktop, VS Code, ChatGPT, etc.)
Getting Started with Weather App
1. Build the UI
The UI must be bundled before running the function app:
cd src/app
npm install
npm run build
cd ../
This creates a bundled src/app/dist/index.html file that the function serves.
2. Run the Function App
In the src directory, run:
func start
The MCP server will be available at http://localhost:7071/runtime/webhooks/mcp.
3. Connect from VS Code
Open .vscode/mcp.json. Find the server called local-mcp-function and click Start above the name. The server is already set up with the running Function app's MCP endpoint:
http://localhost:7071/runtime/webhooks/mcp
4. Prompt the Agent
Ask Copilot: "What's the weather in Seattle?"
Weather App Source Code
The source code is in src/function_app.py. The key concept is how tools connect to resources via metadata.
The Tool with UI Metadata
The get_weather tool uses the metadata parameter in @app.mcp_tool() to declare it has an associated UI:
# Required metadata
TOOL_METADATA = '{"ui": {"resourceUri": "ui://weather/index.html"}}'

@app.mcp_tool()
@app.mcp_tool_property(arg_name="location", description="City name to check weather for (e.g., Seattle, New York, Miami)")
def get_weather(location: str) -> Dict[str, Any]:
    """Returns current weather for a location via Open-Meteo."""
    logging.info(f"Getting weather for location: {location}")

    try:
        result = weather_service.get_current_weather(location)

        if "TemperatureC" in result:
            logging.info(f"Weather fetched for {result['Location']}: {result['TemperatureC']}°C")
        else:
            logging.warning(f"Weather error for {result['Location']}: {result.get('Error', 'Unknown error')}")

        return result
    except Exception as e:
        logging.error(f"Failed to get weather for {location}: {e}")
        return {
            "Location": location or "Unknown",
            "Error": f"Unable to fetch weather: {str(e)}",
            "Source": "api.open-meteo.com"
        }
The resourceUri points to ui://weather/index.html— this tells the MCP host that when this tool is invoked, there's an interactive UI available at that resource URI.
The Resource Serving the UI
The get_weather_widget function serves the bundled HTML at the matching URI:
# Optional UI metadata
RESOURCE_METADATA = '{"ui": {"prefersBorder": true}}'

@app.mcp_resource_trigger(
    arg_name="context",
    uri=WEATHER_WIDGET_URI,
    resource_name=WEATHER_WIDGET_NAME,
    description=WEATHER_WIDGET_DESCRIPTION,
    mime_type=WEATHER_WIDGET_MIME_TYPE,
    metadata=RESOURCE_METADATA
)
def get_weather_widget(context) -> str:
    """Get the weather widget HTML content."""
    logging.info("Getting weather widget")

    try:
        # Get the path to the widget HTML file
        current_dir = Path(__file__).parent
        file_path = current_dir / "app" / "dist" / "index.html"

        if file_path.exists():
            return file_path.read_text(encoding="utf-8")
        else:
            # Return a fallback HTML if file not found
            return """<!DOCTYPE html>
<html>
<head><title>Weather Widget</title></head>
<body>
  <h1>Weather Widget</h1>
  <p>Widget content not found. Please ensure the app/dist/index.html file exists.</p>
</body>
</html>"""
    except Exception as e:
        logging.error(f"Error reading weather widget file: {e}")
        return """<!DOCTYPE html>
<html>
<head><title>Weather Widget Error</title></head>
<body>
  <h1>Weather Widget</h1>
  <p>Error loading widget content.</p>
</body>
</html>"""
How It Works Together
- User asks: "What's the weather in Seattle?"
- Agent calls the
get_weathertool - Tool returns weather data (JSON) and the host sees the
ui.resourceUrimetadata - Host fetches the UI resource from
ui://weather/index.html - Host renders the HTML in a sandboxed iframe, passing the tool result as context
- User sees an interactive weather widget instead of plain text
The UI (TypeScript)
The frontend in src/app/src/weather-app.ts receives the tool result and renders the weather display. It's bundled with Vite into a single index.html that the resource serves.
Next Steps
- Add API Management to your MCP server (auth, gateway, policies, more!)
- Add built-in auth to your MCP server
- Enable VNET using VNET_ENABLED=true flag
- Learn more about related MCP efforts from Microsoft
Reviews (0)
Sign in to leave a review.
Leave a reviewNo results found