yaicli
Health Pass
- License — License: Apache-2.0
- Description — Repository has a description
- Active repo — Last push 0 days ago
- Community trust — 18 GitHub stars
Code Pass
- Code scan — Scanned 12 files during light audit, no dangerous patterns found
Permissions Pass
- Permissions — No dangerous permissions requested
This is a Python-based command-line AI assistant and MCP server. It connects to over 25 Large Language Model (LLM) providers to offer interactive chats, quick queries, and AI-driven shell command generation directly in your terminal.
Security Assessment
Risk Rating: Medium. This tool inherently performs significant actions that require user awareness. It constantly makes external network requests to various third-party AI APIs to function. Additionally, it explicitly features an "Execute Mode" designed to generate and run OS-specific shell commands. Although the documentation states that it verifies commands before safely running them, giving an AI assistant the ability to execute commands automatically elevates the risk. A light code scan found no hardcoded secrets or dangerous hidden patterns, and the tool requests no excessive system permissions. However, the very nature of the software—connecting to external APIs and executing terminal commands—requires standard caution.
Quality Assessment
The project demonstrates strong health and active maintenance, with its most recent code push occurring today. It uses the permissive Apache-2.0 license and has a clear, detailed description. While it is a newer tool with a small community footprint (18 GitHub stars), the codebase appears well-organized and cleanly structured based on the initial audit of 12 core files.
Verdict
Use with caution due to its inherent ability to execute shell commands and transmit data to external AI APIs.
YAICLI: A powerful command-line AI assistant with 25+ LLM providers. Features chat, command execution, quick queries, function calling, MCP support, and persistent history. Seamlessly integrates into workflows with smart environment detection.
YAICLI: Your AI assistant in command line.
![]()


YAICLI is a powerful yet lightweight command-line AI assistant that brings the capabilities of Large Language Models (
LLMs) like GPT-5 directly to your terminal. Interact with AI through multiple modes: have natural conversations,
generate and execute shell commands, or get quick answers without leaving your workflow.
Supports both standard and deep reasoning models across all major LLM providers.

[!NOTE]
YAICLI is actively developed. While core functionality is stable, some features may evolve in future releases.
We support MCP since v0.7.0!
We support Function Call since v0.5.0!
✨ Key Features
🔄 Multiple Interaction Modes
- 💬 Chat Mode: Engage in persistent conversations with full context tracking
- 🚀 Execute Mode: Generate and safely run OS-specific shell commands
- ⚡ Quick Query: Get instant answers without entering interactive mode
🧠 Smart Environment Awareness
- Auto-detection: Identifies your shell (bash/zsh/PowerShell/CMD) and OS
- Safe Command Execution: Verification before running any command
- Flexible Input: Pipe content directly (
cat log.txt | ai "analyze this")
🖼️ Image Input (Vision)
- Local Images: Pass local image files with
--image/-i(JPEG, PNG, GIF, WebP) - URL Images: Pass image URLs directly to vision-capable models
- Multi-Image: Specify
--imagemultiple times for comparison tasks - 30+ Providers: Automatic format conversion for OpenAI, Anthropic, Gemini, Ollama families
🔌 Universal LLM Compatibility
- OpenAI-Compatible: Works with any OpenAI-compatible API endpoint
- Multi-Provider Support: Support multiple providers
💻 Enhanced Terminal Experience
- Real-time Streaming: See responses as they're generated with cursor animation
- Rich History Management: Manage histories with 500 entries by default
- Syntax Highlighting: Beautiful code formatting with customizable themes
🛠️ Developer-Friendly
- Layered Configuration: Environment variables > Config file > Sensible defaults
- Debugging Tools: Verbose mode with detailed API tracing
📚 Function Calling & MCP
- Function Calling: Enable function/MCP calling in API requests
- Function Output: Show the output of functions/MCP
Full document: https://belingud.github.io/yaicli/
📦 Installation
Prerequisites
- Python 3.10 or higher
Quick Install
# Using pip (recommended for most users)
pip install yaicli

# Using pipx (isolated environment)
pipx install yaicli

# Using uv (faster installation)
uv tool install yaicli
Yaicli has several optional dependencies group, you can copy below commands to install specific dependencies.
# install all denpendencies
pip install 'yaicli[all]'

# install with specific provider support
pip instsall 'yaicli[ollama,cohere,doubao,huggingface,gemini,mistral,anthropic]'
Install by uv.
# install all denpendencies
uv tool install 'yaicli[all]'

# install with specific provider support
uv tool instsall 'yaicli[ollama,cohere,doubao,huggingface,gemini,mistral,anthropic]'
Install from Source
git clone https://github.com/belingud/yaicli.git
cd yaicli
pip install .
Buildin Supported Providers
- AI21
- Anthropic/Claude
- Anthropic Bedrock
- Anthropic Vertex
- Cerebras
- Chatglm
- Chuts
- Cohere
- Cohere Badrock
- Cohere Sagemaker
- Deepseek
- Doubao
- Fireworks
- Gemini
- Groq
- Huggingface
- Longcat
- Longcat Anthropic Format
- Minimax
- Mistral
- ModelScope
- Ollama
- Openai
- Openai Azure
- Sambanova
- Siliconflow
- Spark
- Targon
- Together
- Vertex ai
- X AI
- Yi
- Unlimited OpenAI-compatible providers
⚙️ Configuration
YAICLI uses a simple configuration file to store your preferences and API keys.
First-time Setup
- Run
aionce to generate the default configuration file - Edit
~/.config/yaicli/config.inito add your API key - Customize other settings as needed
Configuration File Structure
The default configuration file is located at ~/.config/yaicli/config.ini. You can use ai --template to see default
Configuration Options Reference
| Option | Description | Default | Env Variable |
|---|---|---|---|
PROVIDER |
LLM provider (openai, claude, cohere, etc.) | openai |
YAI_PROVIDER |
BASE_URL |
API endpoint URL | - | YAI_BASE_URL |
API_KEY |
Your API key | - | YAI_API_KEY |
MODEL |
LLM model to use | gpt-5.2 |
YAI_MODEL |
DEFAULT_ROLE |
Default role | DEFAULT |
YAI_DEFAULT_ROLE |
SHELL_NAME |
Shell type | auto |
YAI_SHELL_NAME |
OS_NAME |
Operating system | auto |
YAI_OS_NAME |
STREAM |
Enable streaming | true |
YAI_STREAM |
TIMEOUT |
API timeout (seconds) | 60 |
YAI_TIMEOUT |
EXTRA_HEADERS |
Extra headers | - | YAI_EXTRA_HEADERS |
EXTRA_BODY |
Extra body | - | YAI_EXTRA_BODY |
REASONING_EFFORT |
Reasoning effort | - | YAI_REASONING_EFFORT |
INTERACTIVE_ROUND |
Interactive mode rounds | 25 |
YAI_INTERACTIVE_ROUND |
CODE_THEME |
Syntax highlighting theme | monokai |
YAI_CODE_THEME |
TEMPERATURE |
Response randomness | 0.7 |
YAI_TEMPERATURE |
FREQUENCY_PENALTY |
Repeat pubnish | 0.0 |
YAI_FREQUENCY_PENALTY |
TOP_P |
Top-p sampling | 1.0 |
YAI_TOP_P |
MAX_TOKENS |
Max response tokens | 1024 |
YAI_MAX_TOKENS |
MAX_HISTORY |
Max history entries | 500 |
YAI_MAX_HISTORY |
AUTO_SUGGEST |
Enable history suggestions | true |
YAI_AUTO_SUGGEST |
SHOW_REASONING |
Enable reasoning display | true |
YAI_SHOW_REASONING |
JUSTIFY |
Text alignment | default |
YAI_JUSTIFY |
CHAT_HISTORY_DIR |
Chat history directory | <tempdir>/yaicli/chats |
YAI_CHAT_HISTORY_DIR |
MAX_SAVED_CHATS |
Max saved chats | 20 |
YAI_MAX_SAVED_CHATS |
ROLE_MODIFY_WARNING |
Warn user when modifying role | true |
YAI_ROLE_MODIFY_WARNING |
ENABLE_FUNCTIONS |
Enable function calling | true |
YAI_ENABLE_FUNCTIONS |
SHOW_FUNCTION_OUTPUT |
Show function output when calling function | true |
YAI_SHOW_FUNCTION_OUTPUT |
ENABLE_MCP |
Enable MCP tools | false |
YAI_ENABLE_MCP |
SHOW_MCP_OUTPUT |
Show MCP output when calling mcp | true |
YAI_SHOW_MCP_OUTPUT |
MAX_TOOL_CALL_DEPTH |
Max tool calls in one request | 8 |
YAI_MAX_TOOL_CALL_DEPTH |
LLM Provider Configuration
YAICLI works with major LLM providers. The default configuration is set up for OpenAI, but you can easily switch to
other providers.
Note: blank BASE_URL (or no BASE_URL) means use provider default url.
Pre-configured Provider Settings
| Provider | BASE_URL |
|---|---|
| OpenAI (default) | https://api.openai.com/v1 |
| Claude (native API) | https://api.anthropic.com/v1 |
| Claude (OpenAI-compatible) | https://api.anthropic.com/v1/openai |
| Cohere | https://api.cohere.com |
| Gemini | https://generativelanguage.googleapis.com/v1beta/openai |
Note: Many providers offer OpenAI-compatible endpoints that work with the default settings.
- Google Gemini: https://ai.google.dev/gemini-api/docs/openai
- Claude: https://docs.anthropic.com/en/api/openai-sdk
If you not sure about base_url or just use the default provider base_url, just leave it blank or delete BASE_URL.
[core]
PROVIDER=cohere
BASE_URL=
API_KEY=xxx
MODEL=command-r-plus
Openai
Yaicli use openai as provider as default provider, gpt-5.2 as default model, you can add your api key to use as it is.
PROVIDER=openai
BASE_URL=
API_KEY=
MODEL=gpt-5.2
Extra params:
# REASONING_EFFORT: [high, midium, low]
REASONING_EFFORT=
See official for more details: https://platform.openai.com/docs/guides/reasoning?api-mode=chat
Openai Azure
PROVIDER=openai-azure
BASE_URL=
API_KEY=
MODEL=gpt-5.2
Support config keys:
AZURE_AD_TOKEN=
AZURE_ENDPOINT=
AZURE_DEPLOYMENT=
API_VERSION=
Support environment variables:
AZURE_OPENAI_API_KEY=
AZURE_OPENAI_AD_TOKEN=
AZURE_OPENAI_ENDPOINT=
If API_KEY not set in config, will look for AZURE_OPENAI_API_KEY environment variable.
If AZURE_AD_TOKEN not set in config, will look for AZURE_OPENAI_AD_TOKEN environment variable.
If BASE_URL and AZURE_ENDPOINT not set in config, will look for AZURE_OPENAI_ENDPOINT environment variable.
Anghropic/Claude
PROVIDER=anthropic
API_KEY=
MODEL=claude-sonnet-4-20250514
If you want to access Anthropic bedrock, you need to set AWS_SECRET_ACCESS_KEY, AWS_ACCESS_KEY_ID, AWS_SESSION_TOKEN and AWS_REGION
in config or environment variables.
PROVIDER=anthropic-bedrock
AWS_SECRET_ACCESS_KEY=
AWS_ACCESS_KEY_ID=
AWS_SESSION_TOKEN=
AWS_REGION=
MODEL=anthropic.claude-opus-4-20250514-v1:0
Support ANTHROPIC_BEDROCK_BASE_URL env or BASE_URL in config file, with same effect.
Also support Anthropic vertex with key PROJECT_ID and CLOUD_ML_REGION in config or environment variables.
PROVIDER=anthropic-vertex
PROJECT_ID=
CLOUD_ML_REGION=
You can set anthropic base url by ANTHROPIC_VERTEX_BASE_URL env, or set BASE_URL in config file, same effect.
Deepseek
PROVIDER=deepseek
API_KEY=
MODEL=deepseek-chat
OpenRouter
PROVIDER=openrouter
API_KEY=
MODEL=deepseek/deepseek-chat-v3-0324
Mistral
PROVIDER=mistral
API_KEY=
MODEL=codestral-latest
Gemini
Basic config:
PROVIDER=gemini
API_KEY=
MODEL=gemini-2.5-flash
Extra params:
TOP_K=
PRESENCE_PENALTY=
FREQUENCY_PENALTY=
SEED=
THINKING_BUDGET=
API_VERSION=
BASE_URL=
Vertex AI
PROVIDER=vertexai
MODEL=gemini-2.5-flash
PROJECT=
LOCATION=
Huggingface
Default HF_PROVIDER is auto.
HF_PROVIDER=auto
PROVIDER=huggingface
API_KEY=
MODEL=deepseek-ai/DeepSeek-R1-0528
See official docs for HF_PROVIDER: https://huggingface.co/docs/inference-providers/index
Groq
PROVIDER=groq
API_KEY=
MODEL=llama-3.3-70b-versatile
LongCat
PROVIDER=longcat
API_KEY=
MODEL=LongCat-Flash-Chat
BASE_URL=https://api.longcat.chat/openai
XAI
PROVIDER=xai
API_KEY=
MODEL=grok-3
Minimax
PROVIDER=minimax
API_KEY=
MODEL=MiniMax-M2.1
Extra params:
# Enable/disable interleaved thinking (default: true)
MINIMAX_REASONING_SPLIT=true
MiniMax-M2.1 supports Interleaved Thinking - the model can reason before each tool use. When enabled, reasoning content is preserved in conversation history and displayed alongside responses.
Chatglm
PROVIDER=chatglm
API_KEY=
MODEL=glm-4-plus
Extra params:
Check offcial docs: https://bigmodel.cn/dev/api/normal-model/glm-4
# true or false
DO_SAMPLE=
Chutes
PROVIDER=chutes
API_KEY=
MODEL=deepseek-ai/DeepSeek-V3-0324
Cerebras
PROVIDER=cerebras
API_KEY=
MODEL=llama3.3-70b
AI21
PROVIDER=ai21
API_KEY=
MODEL=jamba-large-1.6
Sambanova
PROVIDER=sambanova
API_KEY=
MODEL=DeepSeek-V3-0324
Only a few models support tool call as below:
- Meta-Llama-3.1-8B-Instruct
- Meta-Llama-3.1-405B-Instruct
- Meta-Llama-3.3-70B-Instruct
- Llama-4-Scout-17B-16E-Instruct
- DeepSeek-V3-0324
See official docs for more detail: https://docs.sambanova.ai/cloud/docs/capabilities/function-calling
ModelScope
PROVIDER=modelscope
API_KEY=
MODEL=deepseek-ai/DeepSeek-V3-0324
Inifiniai
PROVIDER=infiniai
; BASE_URL=https://cloud.infini-ai.com/maas/v1
API_KEY=
MODEL=deepseek-v3
Siliconflow
PROVIDER=siliconflow
API_KEY=
MODEL=Qwen/Qwen3-32B
Yi
PROVIDER=yi
API_KEY=
MODEL=yi-lightning
Cohere
You have to install cohere dependencies, pip install 'yaicli[cohere]'
PROVIDER=cohere
API_KEY=
MODEL=command-a-03-2025
Check official docs: https://docs.cohere.com/docs/text-gen-quickstart
Support keys:
ENVIRONMENT=
For private deploy and Azure api, you need to set BASE_URL.
PROVIDER=cohere
API_KEY=
MODEL=command-a-03-2025
BASE_URL=<YOUR_ENDPOINT>
For Bedrock and Sagemaker cohere api, you have to set below keys:
See https://docs.cohere.com/docs/text-gen-quickstart.
PROVIDER=cohere-bedrock
; PROVIDER=cohere-sagemaker
API_KEY=
MODEL=command-a-03-2025

AWS_REGION=xx
AWS_ACCESS_KEY_ID=xx
AWS_SECRET_ACCESS_KEY=xx
AWS_SESSION_TOKEN=xx
Note MODEL for Sagemaker should be endpoint name
MODEL=<YOUR_ENDPOINT_NAME>
Doubao
You have to install doubao dependencies, pip install 'yaicli[doubao]'
Use doubao OpenAI compatible api, you can just set API_KEY.
PROVIDER=doubao
API_KEY=
MODEL=doubao-1-5-lite-32k-250115
If you are using access key, you have to set AK and SK.
PROVIDER=doubao
MODEL=doubao-1-5-lite-32k-250115
AK=XXX
SK=XXX
Ollama
You have to install ollama dependencies, pip install 'yaicli[ollama]'
PROVIDER=ollama
; BASE_URL=http://localhost:11434
MODEL=qwen3:32b
Support options:
TEMPERATURE=
TOP_P=
SEED=
NUM_PREDICT=
NUM_CTX=
NUM_BATCH=
NUM_GPU=
MAIN_GPU=
LOW_VRAM=
F16_KV=
LOGITS_ALL=
VOCAB_ONLY=
USE_MMAP=
USE_MLOCK=
NUM_THREAD=
NOTE: Ollama provider not support extra body
Bailian
Only support model API call, not support application API call.
PROVIDER=bailian
API_KEY=
MODEL=qwen-plus
Bailian Intl
Bailian international platform.
PROVIDER=bailian-intl
API_KEY=
MODEL=qwen-plus
Nvida nim
PROVIDER=nvida
API_KEY=
MODEL=qwen/qwen3-235b-a22b
EXTRA_BODY={"chat_template_kwargs": {"thinking": false}}
chat_template_kwargsis for Qwen3 and ibm/granite models, you disable thinking as above config.
Together
Using together openai-compatible capabilities
PROVIDER=together
API_KEY=
MODEL=Qwen/Qwen3-235B-A22B-fp8-tput
Spark
PROVIDER=spark
API_KEY=
MODEL=4.0Ultra
Or you can use your APP_ID and API_SECRET.
PROVIDER=spark
APP_ID=
APP_SECRET=
MODEL=4.0Ultra
🚀 Usage
Quick Start
# Get a quick answer
ai "What is the capital of France?"

# Start an interactive chat session
ai --chat

# Generate and execute shell commands
ai --shell "Create a backup of my Documents folder"

# Generate code snippets, default in Python
ai --code "Write a Python function to sort a list"

# Analyze code from a file
cat app.py | ai "Explain what this code does"
# or use @
ai '@Justfile What does this file do'

# Send an image to a vision model
ai --image photo.jpg "What is in this image?"

# Send multiple images
ai -i img1.png -i img2.png "Compare these two screenshots"

# Send an image URL
ai --image https://example.com/photo.jpg "Describe this"

# Debug with verbose mode
ai --verbose "Explain quantum computing"
Interactive Mode Features
|
Commands
Keyboard Shortcuts
|
Chat Mode (💬)
Execute Mode (🚀)
|
Chat Persistent
The <PROMPT> parameter in the chat mode will be used as a title to persist the chat content to the file system, with
the save directory being a temporary directory, which may vary between machines, and it is determined on the first run.
If the <PROMPT> parameter is not specified when entering chat mode, the session will be treated as a temporary
session and will not be persisted. Of course, you can also manually call the /save <title> command to save during the
chat.
When you run the same chat command again, the previous session will be automatically loaded.
$ ai --chat "meaning of life"
!NOTE: Chat mode is not supported when you redirect input to
aicommand.$ cat error.log | ai --chat "Explain this error"The above command will be parsed as
ai "cat error.log | ai "Explain this error".
Start a temporary chat session
$ ai --chat
Start a persistent chat session
$ ai --chat "check disk usage"
Load a saved chat session
$ ai --chat hello
Chat title: hello

 ██    ██  █████  ██  ██████ ██      ██
  ██  ██  ██   ██ ██ ██      ██      ██
   ████   ███████ ██ ██      ██      ██
    ██    ██   ██ ██ ██      ██      ██
    ██    ██   ██ ██  ██████ ███████ ██

Welcome to YAICLI!
Current: Persistent Session: hello
Press Shift+Tab to switch mode
/clear             : Clear chat history
/his               : Show chat history
/list              : List saved chats
/save <title>      : Save current chat
/load <index>      : Load a saved chat
/del <index>       : Delete a saved chat
/exit|Ctrl+D|Ctrl+C: Exit
/mode chat|exec    : Switch mode (Case insensitive)
───────────────────────────────────────────────────────────────────────────────────────────────────────────────────────
 💬 > /his
Chat History:
1 User: hi
    Assistant:
    Hello! How can I assist you today?
───────────────────────────────────────────────────────────────────────────────────────────────────────────────────────
 💬 >
Image Input
Send images to vision-capable models (GPT-5.2, Claude 4.5, Gemini, Llama 4 Vision, etc.) directly from the CLI.
Local image file
ai --image photo.jpg "What is in this image?"
Multiple images
ai -i screenshot1.png -i screenshot2.png "Compare these two UIs"
Image URL
ai --image https://example.com/diagram.png "Explain this architecture diagram"
Image without text prompt
ai --image photo.jpg
Supported formats: JPEG (.jpg, .jpeg), PNG (.png), GIF (.gif), WebP (.webp).
Note: Image input is currently supported in single-shot mode only, not in interactive
--chatmode. Providers without vision support (Cohere, HuggingFace, ChatGLM, ModelScope) will receive a warning and the images will be stripped.
Input Methods
Direct Input
ai "What is the capital of France?"
Piped Input
echo "What is the capital of France?" | ai
File Analysis
cat demo.py | ai "Explain this code"
Combined Input
cat error.log | ai "Why am I getting these errors in my Python app?"
File Context
YAICLI supports adding files and directories to the conversation context for better understanding of your codebase.
Temporary @ References
Use @ to reference files in your query:
# Reference a single file
ai '@README.md What is this project about?'

# Reference multiple files
ai '@src/main.py @config.yaml Explain the architecture'

# Use quotes for paths with spaces
ai @"my document.txt" Summarize this
Persistent Context
Add files/directories to context for the entire session:
ai --chat
💬 > /add src/
💬 > /context list
# Shows all files in context

💬 > Explain the codebase structure
# AI can now see all files in src/

💬 > /context remove src/
💬 > /context clear
# Remove or clear context
Features
- Auto-completion: Type
@and pressTabto browse files - Smart ignores: Automatically skips
.git,node_modules,__pycache__, etc. - Directory support: Add entire directories (2-level depth by default)
- Path flexibility: Use relative or absolute paths
📱 Examples
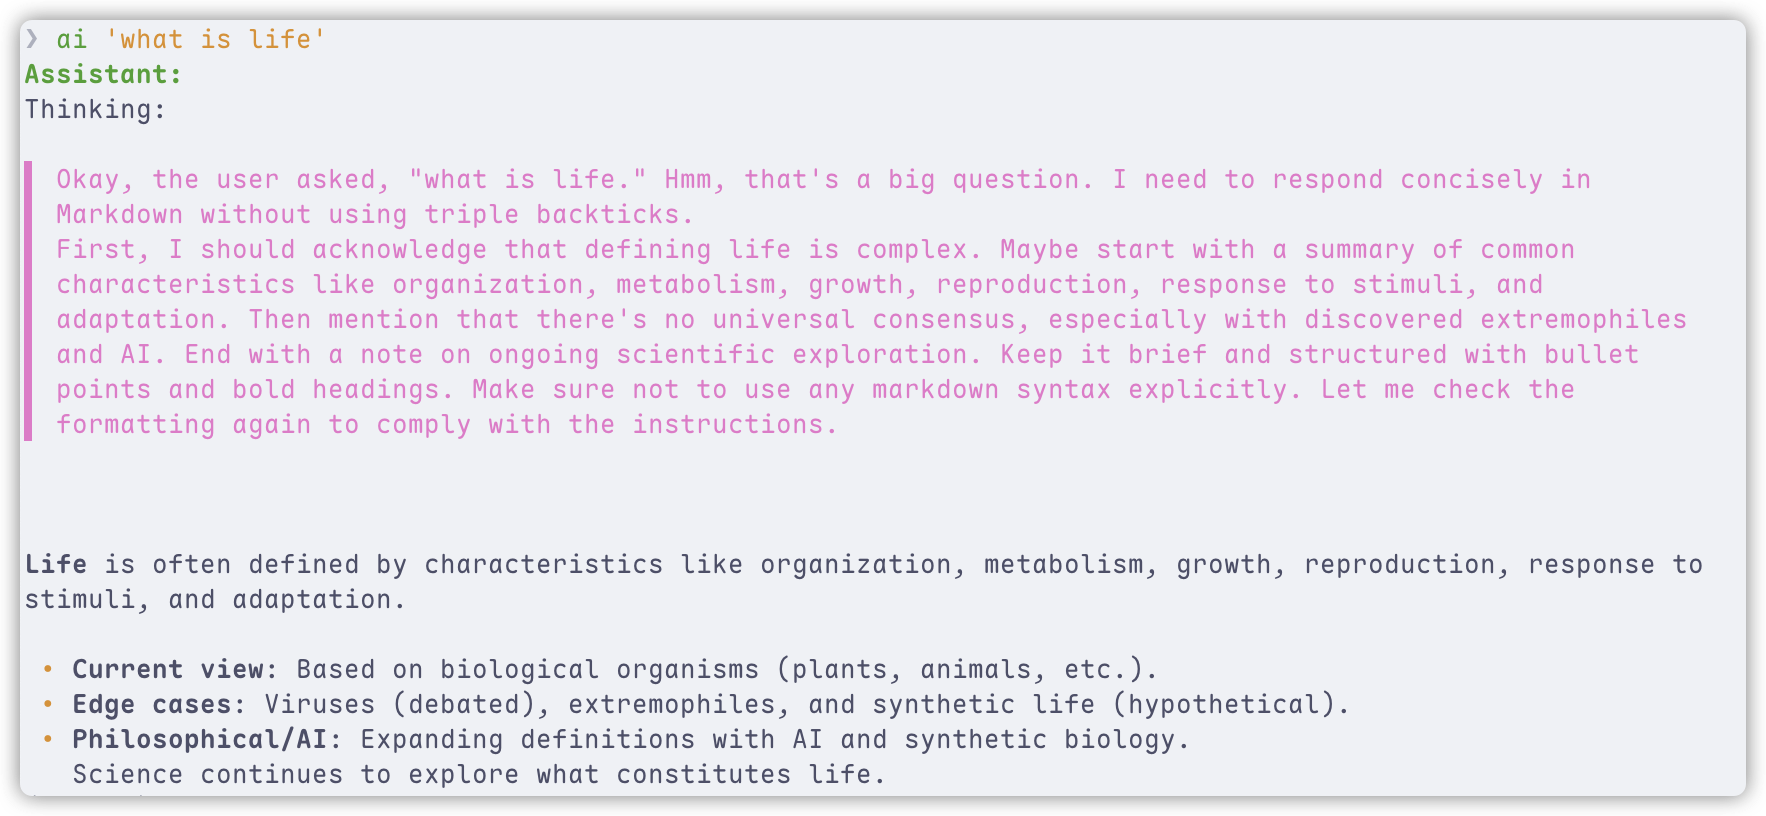
Quick Answer Mode
$ ai "What is the capital of France?"
Assistant:
The capital of France is Paris.
Command Generation & Execution
$ ai -s 'Check the current directory size'
Assistant:
du -sh .
╭─ Command ─╮
│ du -sh .  │
╰───────────╯
Execute command? [e]dit, [y]es, [n]o (n): e
Edit command, press enter to execute:
du -sh ./
Output:
109M    ./
Code Generation
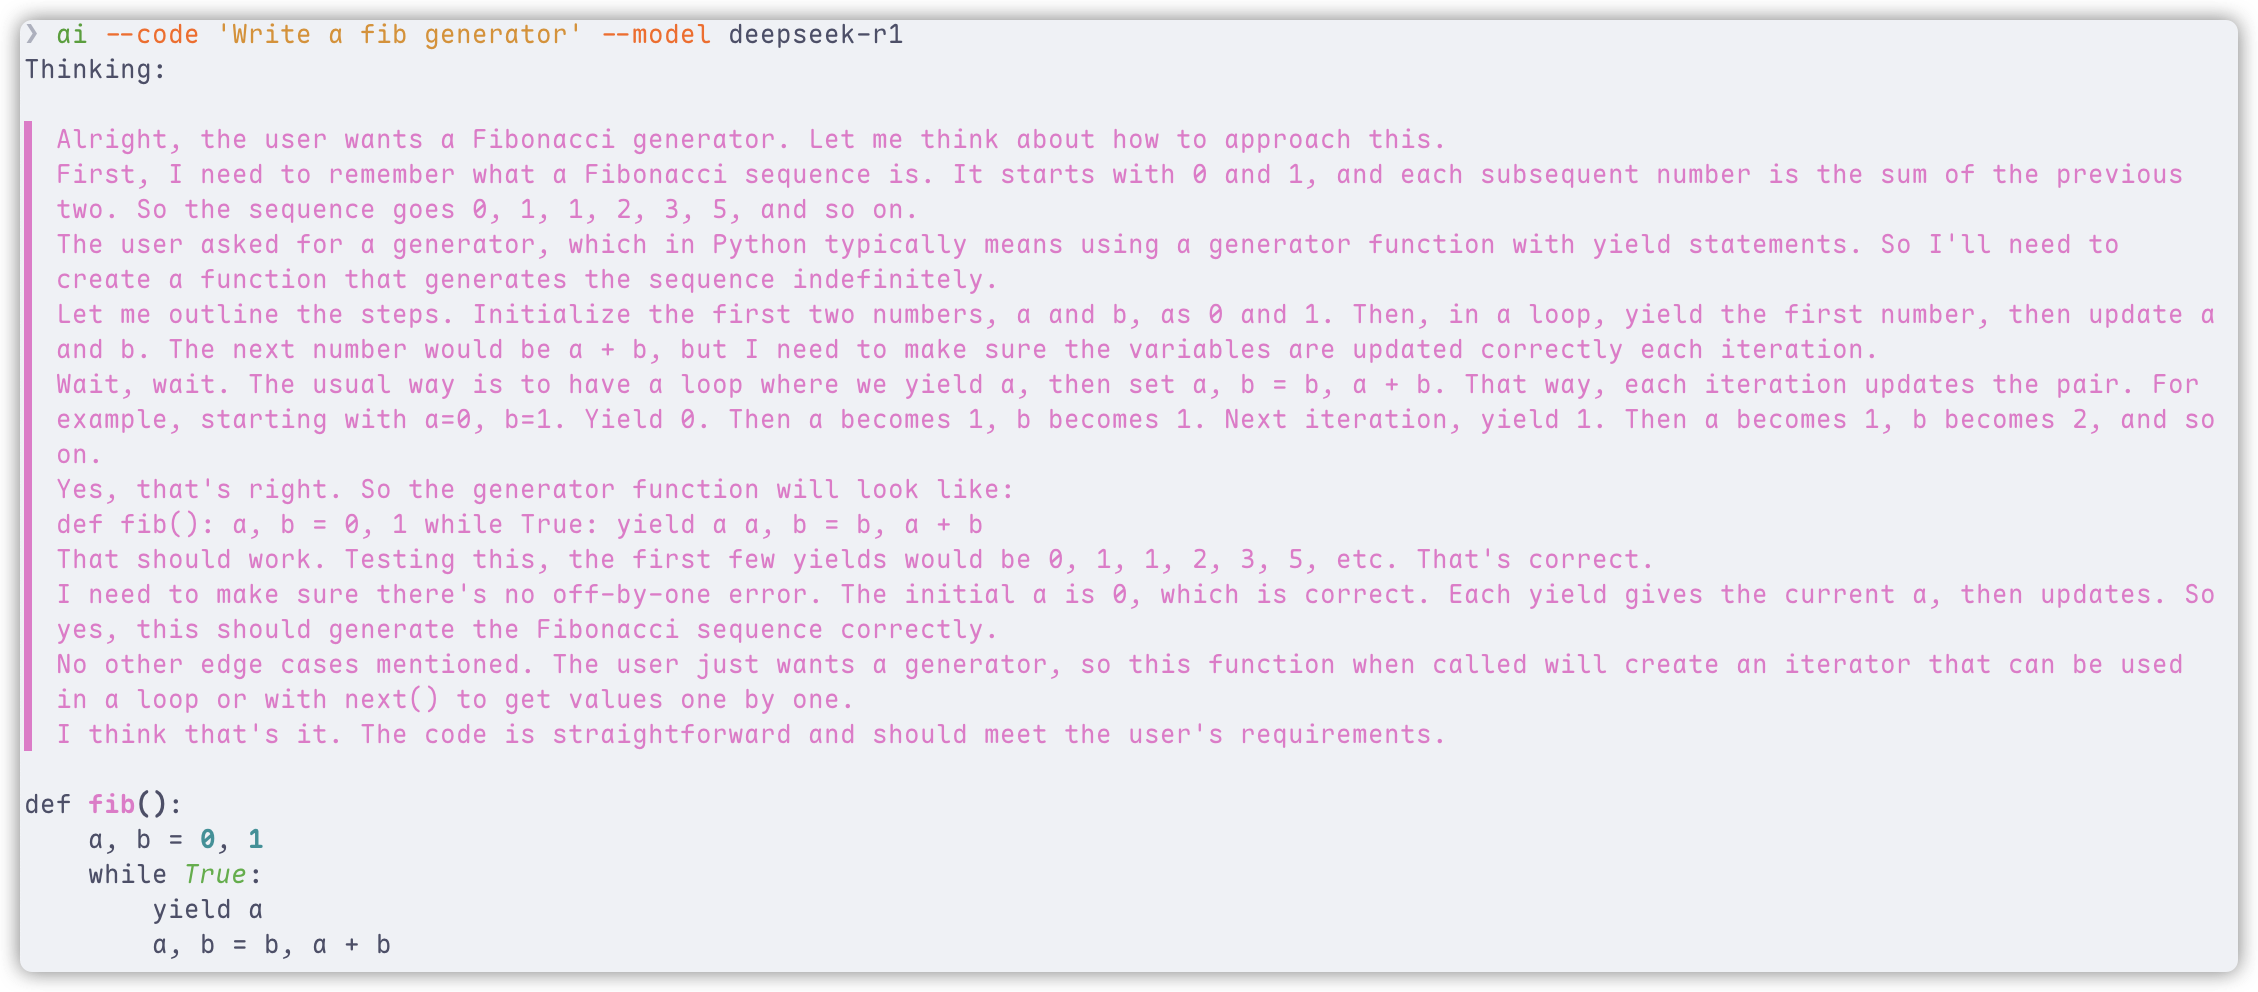
In code mode, select the language for code generation. If none is specified, Python is the default.
The --code mode outputs plain text, making it easy to copy, paste, or redirect to a file, especially when using the standard model.
When using a deep reasoning model, the thinking content is displayed with syntax highlighting. To disable this, use the --no-show-reasoning option or set SHOW_REASONING to false in the configuration.
$ ai --code 'Write a fib generator'
def fib_generator():
    a, b = 0, 1
    while True:
        yield a
        a, b = b, a + b
Chat Mode Example
$ ai --chat
Starting a temporary chat session (will not be saved automatically)

 ██    ██  █████  ██  ██████ ██      ██
  ██  ██  ██   ██ ██ ██      ██      ██
   ████   ███████ ██ ██      ██      ██
    ██    ██   ██ ██ ██      ██      ██
    ██    ██   ██ ██  ██████ ███████ ██

Welcome to YAICLI!
Current: Temporary Session (use /save to make persistent)
Press Shift+Tab to switch mode
/clear             : Clear chat history
/his               : Show chat history
/list              : List saved chats
/save <title>      : Save current chat
/load <index>      : Load a saved chat
/del <index>       : Delete a saved chat
!<command>         : Execute shell command directly (e.g., !ls -al)
/exit|Ctrl+D|Ctrl+C: Exit
/mode chat|exec    : Switch mode (Case insensitive)
───────────────────────────────────────────────────────────────────────────────────────────────────────────────────────
 💬 > Tell me about the solar system

Assistant:
Solar System Overview

 • Central Star: The Sun (99% of system mass, nuclear fusion).
 • Planets: 8 total.
    • Terrestrial (rocky): Mercury, Venus, Earth, Mars.
    • Gas Giants: Jupiter, Saturn.
    • Ice Giants: Uranus, Neptune.
 • Moons: Over 200 (e.g., Earth: 1, Jupiter: 95).
 • Smaller Bodies:
    • Asteroids (between Mars/Venus), comets ( icy, distant), * dwarf planets* (Pluto, Ceres).
 • Oort Cloud: spherical shell of icy objects ~1–100,000天文單位 (AU) from Sun).
 • Heliosphere: Solar wind boundary protecting Earth from cosmic radiation.

Key Fact: Earth is the only confirmed habitable planet.

🚀 > Check the current directory size
Assistant:
du -sh .
╭─ Suggest Command ─╮
│ du -sh .          │
╰───────────────────╯
Execute command? [e]dit, [y]es, [n]o (n): e
Edit command: du -sh ./
--- Executing ---
 55M    ./
--- Finished ---
🚀 >
Execute Mode Example
$ ai --shell "Find all PDF files in my Downloads folder"
Assistant:
find ~/Downloads -type f -name "*.pdf"
╭─ Suggest Command ───────────────────────╮
│ find ~/Downloads -type f -iname "*.pdf" │
╰─────────────────────────────────────────╯
Execute command? [e]dit, [y]es, [n]o (n): y
Output:

/Users/username/Downloads/document1.pdf
/Users/username/Downloads/report.pdf
...
Code Mode Example
$ ai --code "write a fib generator" --model deepseek-r1
Function Call
To use function call, you need to install default functions by ai --install-functions.
After that, you can check the functions by ai --list-functions.
You can also define your own functions by adding them to the config folder in ~/.config/yaicli/functions/ (C:\Users\<user>\.config\yaicli\functions on Windows).
❯ ai --list-functions
/Users/xxx/.config/yaicli/functions/fs_file_operations.py
/Users/xxx/.config/yaicli/functions/fs_list_directory.py
/Users/xxx/.config/yaicli/functions/fs_read_file.py
/Users/xxx/.config/yaicli/functions/fs_write_file.py
/Users/xxx/.config/yaicli/functions/fs_search_files.py
/Users/xxx/.config/yaicli/functions/fetch_webpage.py
/Users/xxx/.config/yaicli/functions/get_weather.py
/Users/xxx/.config/yaicli/functions/fs_edit_file.py
/Users/xxx/.config/yaicli/functions/fs_get_filesystem_info.py
/Users/xxx/.config/yaicli/functions/web_search.py
/Users/xxx/.config/yaicli/functions/fs_read_image.py
/Users/xxx/.config/yaicli/functions/execute_shell_command.py
--enable-functions option is corresponds to the configuration key ENABLE_FUNCTIONS.
ai 'check the current dir total size' --enable-functions
Assistant:
Thinking:

▌ Okay, the user wants to check the current directory's total size. Hmm, how do I do that in macOS with zsh?
▌ I remember that the command to get disk usage is usually 'du'. But wait, the default 'du' might not give the total size of the
▌ current directory directly. Let me think. Oh right, if I use 'du -sh' with the current directory, that should give the total size
▌ in human-readable format.
▌ Wait, but sometimes the -s option summarizes the directory. So 'du -sh .' would calculate the total size of the current directory
▌ and its subdirectories. That should work. Let me confirm the syntax. Yeah, 'du -sh .' is the right command here.
▌ The user is using zsh, but the 'du' command is standard, so it should be available. I need to execute this shell command. The
▌ function provided is execute_shell_command, so I'll call that with the shell command 'du -sh .' as the argument.
▌ I should make sure the parameters are correctly formatted. The function requires a shell_command string. Alright, that's all.
▌ Let's generate the tool call.

{"index":0,"finish_reason":"tool_calls","delta":{"role":"assistant","content":null,"audio":null,"tool_calls":[{"id":"call_202505141526
36cc3f776ae8f14b56_0","index":0,"type":"function","function":{"name":"execute_shell_command","arguments":"{"shell_command": "du -sh
."}","outputs":null},"code_interpreter":null,"retrieval":null,"drawing_tool":null,"web_browser":null,"search_intent":null,"search_resu
lt":null}],"tool_call_id":null,"attachments":null,"metadata":null}}
@Function call: execute_shell_command({"shell_command": "du -sh ."})
╭─ Function output ─────╮
│ Exit code: 0, Output: │
│ 156M    .             │
│                       │
╰───────────────────────╯
Thinking:

▌ Okay, the user asked to check the current directory's total size. I used the 'du -sh .' command, which stands for disk usage,
▌ summarize, and current directory. The output was "156M". So I need to present this in a concise way.
▌ First, confirm the command was executed. Then, report the result clearly. Since the user didn't ask for extra details, keep it
▌ simple. Just state the total size as 156MB. Maybe mention the command used for transparency. Alright, that should cover it without
▌ overcomplicating.

Current directory size: 156M (using du -sh .).
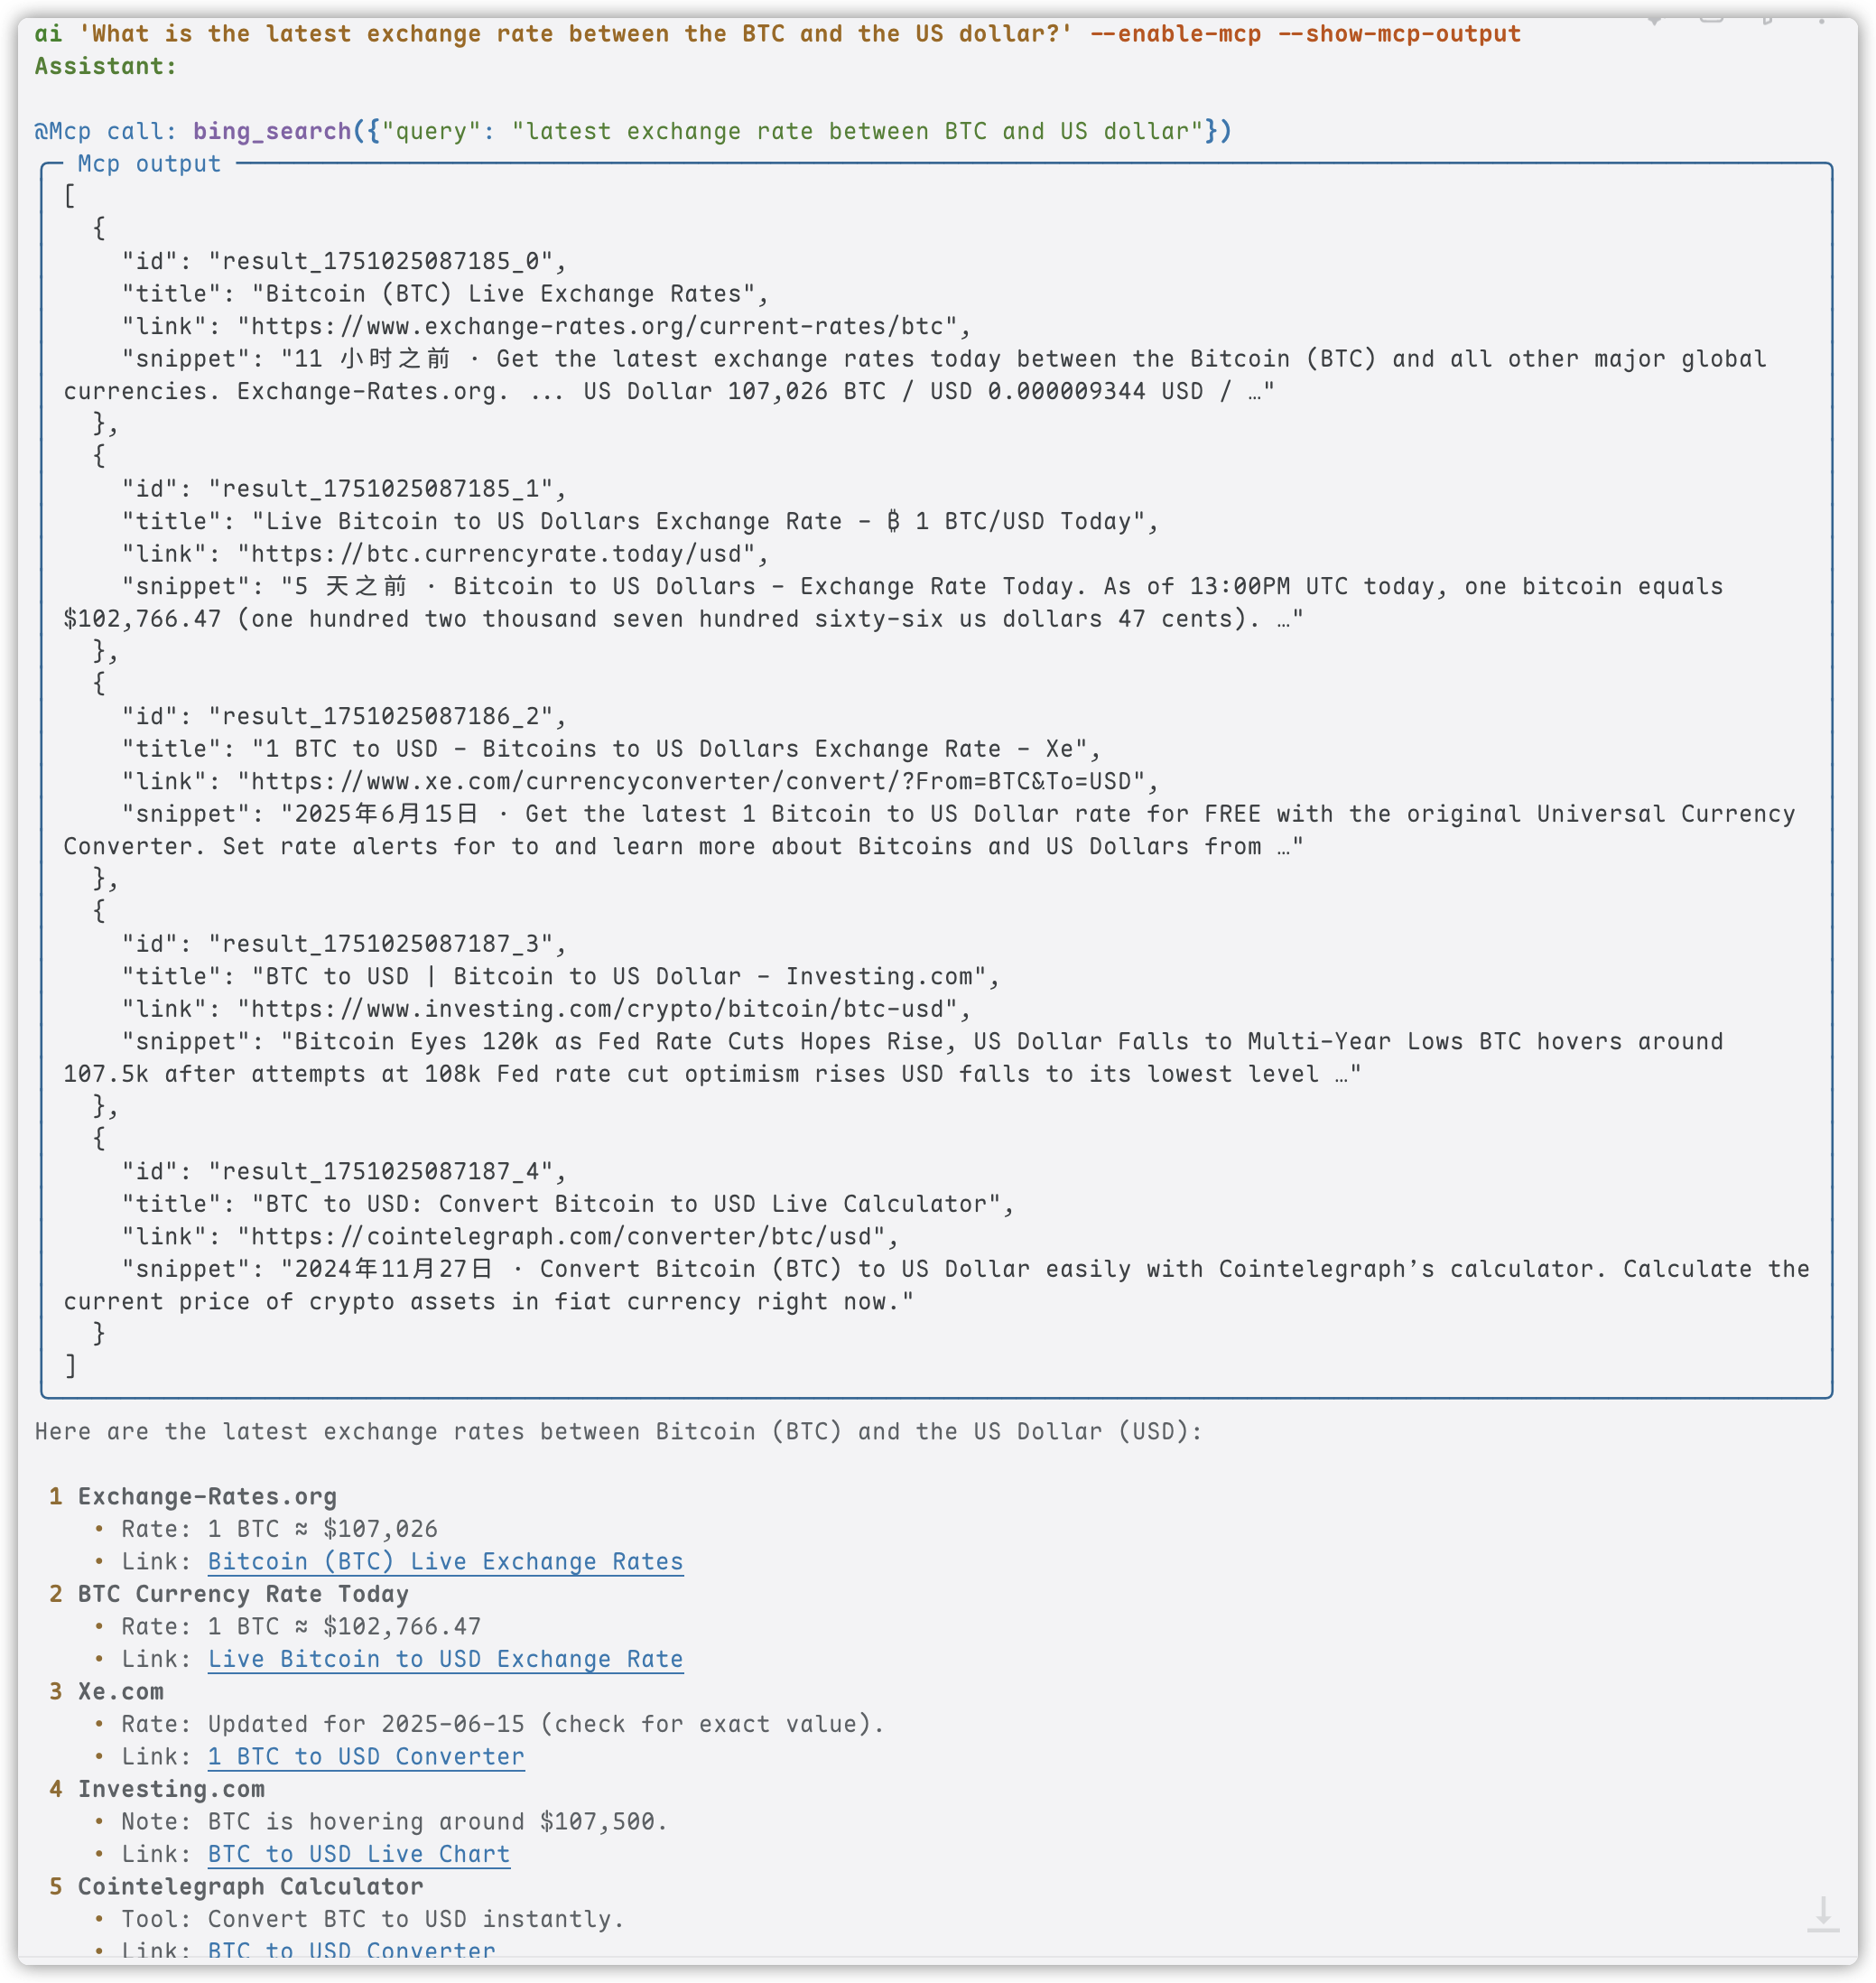
MCP
Add your MCP config in ~/.config/yaicli/mcp.json (C:\Users\<user>\.config\yaicli\mcp.json on Windows.).
--enable-mcp option is corresponds to the configuration key ENABLE_MCP.
Example:
ai 'What is the latest exchange rate between the BTC and the US dollar?' --enable-mcp --show-mcp-output

Assistant:

@Mcp call: bing_search({"query": "latest exchange rate between BTC and US dollar"})
╭─ Mcp output ──────────────────────────────────────────────────────────────────────────────────────────────────────────────╮
│ [                                                                                                                         │
│   {                                                                                                                       │
│     "id": "result_1751024997243_0",                                                                                       │
│     "title": "BTC to USD - Bitcoin to US Dollar Conversion - Exchange Rates",                                             │
│     "link": "https://www.exchange-rates.org/converter/btc-usd",                                                           │
│     "snippet": "11 小时之前 · 1 Bitcoin = 107,304 US Dollars as of June 27, 2025 03:00 AM UTC. You can get live exchange  │
│ rates between Bitcoin and US Dollars using exchange-rates.org, which aggregates …"                                        │
│   },                                                                                                                      │
╰───────────────────────────────────────────────────────────────────────────────────────────────────────────────────────────╯
Here are some current exchange rates for Bitcoin (BTC) to US Dollar (USD):

 1 Exchange-Rates.org:
   ₿1 Bitcoin = 💵107,304 US Dollars (as of June 27, 2025, 03:00 AM UTC).
   Link
 2 BTC.CurrencyRate.Today:
   Live Bitcoin to US Dollars exchange rate.
   Link
 3 Xe.com:
   Latest conversion rate and information about Bitcoin to US Dollars.
   Link
 4 BestExchangeRates.com:
   Current BTC to USD market data, including charts and historic rates.
   Link
 5 Investing.com:
   Bitcoin price analysis and live BTC to USD updates.
   Link

For the most accurate and up-to-date rate, I recommend checking one of these sources directly.
💻 Technical Details
Architecture
YAICLI is designed with a modular architecture that separates concerns and makes the codebase maintainable:
- CLI Module: Handles user interaction and command parsing
- API Client: Manages communication with LLM providers
- Config Manager: Handles layered configuration
- History Manager: Maintains conversation history with LRU functionality
- Printer: Formats and displays responses with rich formatting
Dependencies
| Library | Purpose |
|---|---|
| Typer | Command-line interface with type hints |
| Rich | Terminal formatting and beautiful display |
| prompt_toolkit | Interactive input with history and auto-completion |
| json-repair | Repair llm function call arguments |
👨💻 Contributing
Contributions are welcome! Here's how you can help:
- Bug Reports: Open an issue describing the bug and how to reproduce it
- Feature Requests: Suggest new features or improvements
- Code Contributions: Submit a PR with your changes
- Documentation: Help improve or translate the documentation
📃 License
YAICLI - Your AI Command Line Interface
Reviews (0)
Sign in to leave a review.
Leave a reviewNo results found