NTSCRT
Health Pass
- License — License: MIT
- Description — Repository has a description
- Active repo — Last push 0 days ago
- Community trust — 498 GitHub stars
Code Pass
- Code scan — Scanned 12 files during light audit, no dangerous patterns found
Permissions Pass
- Permissions — No dangerous permissions requested
No AI report is available for this listing yet.
Vintage analog TV/VHS image tool for macOS: ntsc-rs signal emulation + RetroArch CRT shaders (librashader), glued together with SwiftUI/Metal
NTSCRT
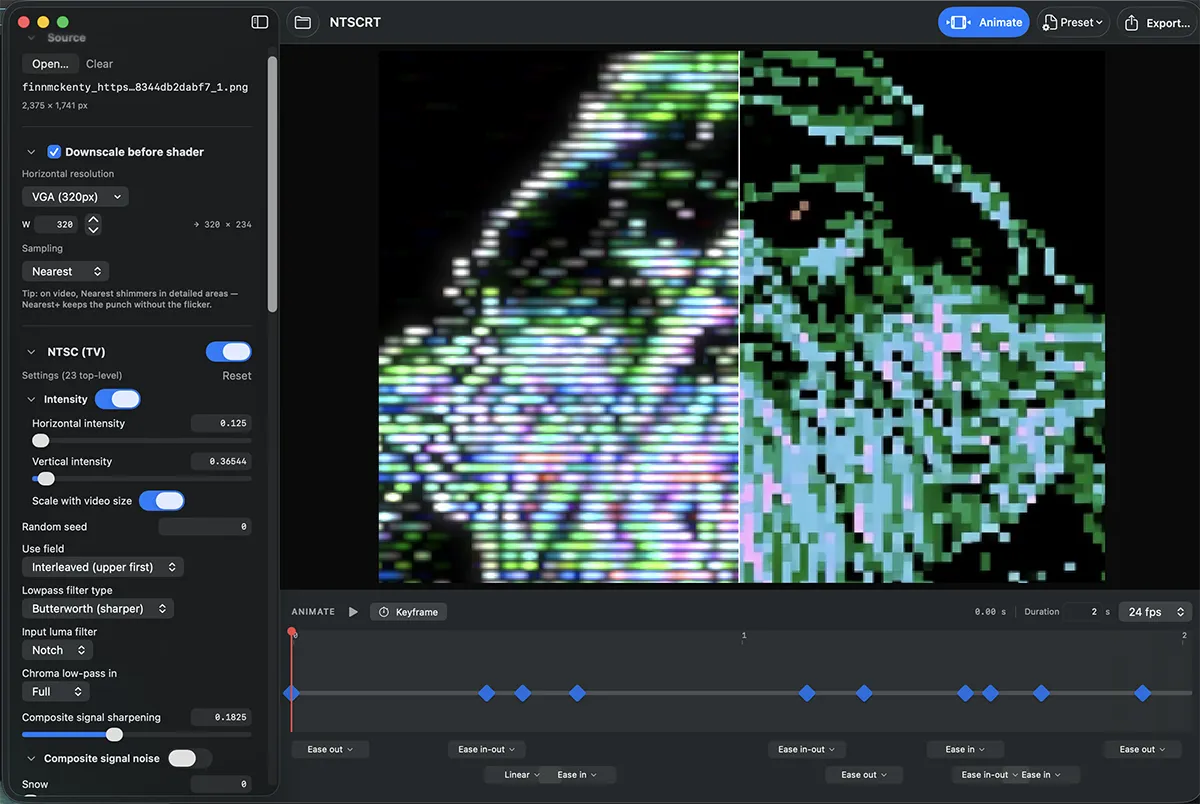
Make any image or video look like it's playing on a 1980s TV. NTSCRT runs your media through an optional digital camera and codec (webcam, video call, MiniDV), an analog signal emulation (ntsc-rs: composite artifacts, chroma bleed, noise), a simulated VHS tape and deck, a simulated TV for the dramatic glitches, and the CRT shaders RetroArch uses (via librashader: scanlines, phosphor masks, glow).
Full disclosure: the two hardest parts aren't mine. The signal emulation is ntsc-rs, and the CRT look is the RetroArch shader community's work. NTSCRT is the native Mac app built around them: it joins them into one pipeline and adds its own pieces on top, including the Digital video, VCR and Glitch stages, Screen Loop video feedback, cropping, a keyframe timeline, video and GIF export, a command-line renderer, and an MCP server for AI apps.
Works with Claude and other AI apps (MCP). NTSCRT includes a built-in MCP server, so Claude Desktop, Claude Code, Cursor and other MCP clients can make analog video looks for you. Describe "a moldy rental tape in a dirty VCR, played on an old TV", and the AI previews frames, adjusts the VHS, CRT and glitch settings, animates them if you ask, and renders the video on your Mac. One click sets it up: NTSCRT > Connect to Claude…. See Using NTSCRT from Claude.
your image/video → crop → digital camera + codec → NTSC/VHS signal (full res) → downscale to retro resolution → VHS tape and deck → TV glitches → CRT shader → screen
Download
Grab the DMG from Releases, open it, and drag NTSCRT to Applications.
Requirements: macOS 14 or later. The app is a universal binary (Apple Silicon + Intel).
Windows (preview): the same release has NTSCRT-<version>-windows-x64.zip.
- Unzip it anywhere and run
ntscrt.exe. 64-bit Windows 10 or 11. - It isn't code-signed yet, so Windows may warn about it: click More info, then Run anyway.
- Every feature of the Mac app except ProRes export, the command line and the MCP server. Looks and presets are the same files on both.
- It's a preview: please open an issue if something misbehaves.
Updates: NTSCRT checks GitHub for a newer version once a day and offers to open its download page. Check for Updates… is in the NTSCRT menu on the Mac and the Help menu on Windows, where the daily check can be turned off. The check only asks GitHub for the latest version number.
Intel note: I build and test NTSCRT on Apple Silicon and haven't personally tested the Intel build. Intel support exists thanks to a contributed fix (#1) verified by its author on an Intel iMac Pro — if something misbehaves on your Intel Mac, please open an issue.
Using the app
Open an image or video (⌘O, or drop it on the Source panel), shape the look in the sidebar, and export (⌘E).
The pipeline (sidebar)
The sidebar runs top to bottom in signal order. A section's checkbox or switch turns that stage off.
- Source: the loaded image (PNG, JPEG, HEIC) or video (MP4, MOV).
- Crop: cuts the picture to an aspect ratio (square, or portrait and landscape shapes from 3:4 to 1:2) before anything else sees it. Drag the picture in the preview to move the crop, or a corner to zoom in (to cut black borders, say); double-click to center.
- Downscale: the retro resolution the CRT sees (SNES 256 px, VGA 320 px, or any width). Chunky keeps hard pixel edges; Smooth is softer and steadier on video.
- Digital video (off by default): a digital camera and codec ahead of the analog signal, like webcam footage dubbed to VHS. See Digital video below.
- NTSC (TV): the analog signal, with composite noise, chroma bleed and about fifty more settings. They're ntsc-rs's own, so presets paste both ways with the ntsc-rs app. (Its VHS settings are retired: the VCR replaces them. Older looks that use them still render the same.)
- VCR (off by default): the picture recorded onto a simulated VHS tape and played back by a simulated deck. See VCR below.
- Glitch: a simulated TV, for dramatic failures like rolling, tearing, bending and snow. The circuits themselves are simulated, so glitches combine the way real ones did. With every knob healthy, the picture is untouched.
- CRT: seven RetroArch CRT shaders (crt-royale, crt-hyllian, crt-aperture, crt-easymode, two crtglow variants, crtsim) with every parameter exposed. A grayed-out control shows which switch turns it on.
VCR
- Pick a tape and a deck: Brand new, Used, Worn out, Moldy, Vaselined, Chewed, Sticky or Bootleg; Clean, Dirty or Worn heads, Worn transport, or Neglected. Then adjust the knobs under each.
- Nothing is drawn: the picture is recorded as VHS records it (FM luminance, color-under) on the tape's slanted tracks, and read back through what the tape and heads are doing to it.
- The tape is a real surface: flaws, scratches, creases, mold and Vaseline sit at places on it, so they come back in the same spot, sweep through the picture as the heads cross them, and differ between cassettes (Another).
- The heads have a history: a shedding tape clogs an uncleaned deck as it plays; clogs knock loose; Vaseline rubs off onto the heads. Each head has its own dirt and wear, so alternate fields differ.
- Spacing hurts detail first: anything holding the heads off the tape costs the picture far more than the color, so the picture breaks into noise while the color smears on.
- The tape moves for real: a tracking servo follows the control track at the tape's bottom edge, so a chewed edge makes the tracking wander. Tension skews the top of the picture, a sticky tape jerks it, and a worn transport makes it wobble. Turning Tracking too far brings out noise bands, and Search sweeps the heads across the tracks.
- Neighboring tracks bleed in: the heads read their neighbors at the wrong azimuth, which mostly cancels the picture but not the color. The deck's comb filter cancels the color, at the cost of half its vertical detail.
- SP, LP and EP: slower speeds give narrower tracks, a slightly noisier picture, more crosstalk and less tolerance for tracking errors and skew; flaws last longer, since the tape moves slower.
- Copies: Generation dubs the picture from tape to tape up to three times, over a composite cable, recording and playing it back again each time.
Digital video
Footage recorded digitally before it goes out as an analog signal. It runs real codecs, so blocks, smears and datamoshing come out of the compression rather than being drawn.
- Formats are in the toolbar's Preset menu, under Digital video: Webcam (2005), Video call, MiniDV (the VX1000 skate-video look), Early web video, CD-ROM (Video 1), and Datamosh. Each switches the stage on and sets its controls and the Downscale width.
- Compression: the Codec (DCT like MPEG and DV, or Block colors: Microsoft Video 1's flat two-tone 4×4 blocks and banded 15-bit color, the early CD-ROM look), quality, keyframe interval, fixed bitrate, plus color resolution and deblocking for DCT.
- Capture: frame rate, sensor noise, Low-light noise (grain that grows in dark scenes as the camera turns up its gain), noise reduction, and Aliasing, which turns fine stripes into rainbow moiré. The broad rainbow bands need a source at least twice the Downscale width.
- Fields: One field (the default) sends the CRT one field: half the lines, each twice as tall, with a scanline per line (the 240p look). With the CRT off, each line shows twice.
- Picture: CCD response gives a 90s camcorder's tone (bright exposure, highlights that clip color by color, milky gray blacks), plus white balance, tint, saturation and sharpening. Halo width sets how far the sharpening's outlines reach: tight for a pro camera's crunch, wide for a cheap camcorder's soft rims.
- Errors: data loss (DV dropouts, or packet-loss smears that last until the next keyframe) and, for DCT, datamosh, which needs a keyframe interval above 0.
Preview
- Compare splits the view: full pipeline on the left, the original on the right. Drag the line to move the split.
- Integer scale snaps the picture to whole-pixel multiples, for perfectly even scanlines.
- The sparkles button keeps tape noise and jitter moving. Leave it on for the real experience.
- Zoom with the slider or ⌥-scroll; hold Space and drag to pan.
- Videos get a transport bar with play/pause and a frame-accurate scrubber. While a video is paused, the app renders ahead (the green line under the scrubber), so that stretch then plays back smoothly.
- The palette fades when the mouse is idle; move the mouse to bring it back.
Animating (timeline)
Click Animate in the toolbar to keyframe the whole effect chain, then export it as video.
- Move the playhead, set a look, and press Keyframe; repeat. Settings you don't change between keys hold still.
- With the playhead on a keyframe, any change you make updates that keyframe.
- Drag a diamond to retime it, and pick its easing (linear, ease in, ease out, ease in-out or hold) from the menu below it.
- Set the length and frame rate in the timeline. Changing the length stretches the whole animation.
- Space plays and pauses. On a video, the timeline is the clip: scrubbing seeks the footage.
- A still can export video even without keyframes; the tape noise and jitter move on their own.
Exporting
Click Export (⌘E). Exports use the same switches as the preview, and the same settings always give the same pixels.
- PNG: the picture, or the frame under the playhead on a video.
- Viewport: exactly what the preview shows, zoom and all, at your screen's real pixels (2× on a Retina display). Use it for close-ups that show off the scanlines.
- Video: H.264 or HEVC .mp4, or ProRes .mov, with audio. Scanlines are hard on codecs, so use High quality or above, or ProRes for editing.
- GIF: its own width and frame rate. The panel estimates the file size and warns past about 10 MB (a 5-second, 480 px GIF is around 8 MB).
- Loop repeats the content inside the file (3 turns a 6-second clip into 18 seconds), for places that don't loop video.
- Snap size to scanline grid picks a nearby size where every scanline lands evenly. Without it, exports still avoid banding by rendering larger and scaling down.
Screen Loop
Video feedback, the analog way: a camcorder filming a TV that shows the camcorder's own picture. The 1963 Doctor Who titles were made like this. Click Screen Loop in the toolbar.
- Your picture becomes a tunnel of copies. Each copy has been through your whole look once more than the one around it, so noise and color errors compound.
- Drag the green dot on the preview to set the vanishing point. Pull the blue ring out of it to make the point drift during the render.
- Zoom sets how deep the tunnel goes. Other knobs set the camera angle, handheld shake, push, spin, softness, color, and a luma key that keeps your subject solid.
- Seamless loop makes every move go out and back, so a GIF loops without a jump.
- A short draft re-renders as you work. Render… writes the full file with your export settings.
- Screen Loop presets are saved separately from looks.
Presets
- Preset in the toolbar saves or loads your whole setup as a JSON file: every section, plus the timeline and its keyframes.
- The bundled presets are listed in the same menu. Loading one with keyframes opens the timeline.
- The Digital video formats at the bottom of the menu set only that section (and the Downscale width), leaving the rest of your look alone.
- A preset saved with a crop brings it back. One without a crop leaves yours alone.
- Presets from older versions open looking the way they did, even where a control has since changed.
Command line and AI tools
NTSCRT renderrenders without opening the window. Run it from inside the app bundle:/Applications/NTSCRT.app/Contents/MacOS/NTSCRT render clip.mp4 -o out.mp4 --look "90s VHS bootleg"- Every section has flags:
--look,--crop,--downscale,--digital,--ntsc,--glitch,--vcr,--tape,--deck,--crt, each with a-set key=valuepartner (--vcr-set tape_speed=EP,tracking_offset=0.4).NTSCRT helplists them. - Output follows the file name: .mp4, .mov (ProRes), .gif, or .png.
--time 1,3,5saves the frames at those times; a still becomes a video of--durationseconds. NTSCRT describelists every control as JSON, with its range and what it does.NTSCRT lookslists the presets, tapes, decks and formats.
Using NTSCRT from Claude (MCP)
NTSCRT can act as an MCP server: a background helper that gives an AI app new tools. Claude can then preview looks, adjust them, render videos and save presets for the app. Rendering happens on your Mac; Claude sees only the preview frames it asks for.
The easy way: put NTSCRT in your Applications folder, open it, and choose NTSCRT > Connect to Claude…. Click Connect next to Claude Desktop or Claude Code, then quit and reopen Claude Desktop (⌘Q). NTSCRT backs up Claude's settings first and leaves your other servers alone.
Claude Desktop, by hand
- Put NTSCRT in your Applications folder.
- In Claude, open Settings > Developer and click Edit Config. Finder shows a file called
claude_desktop_config.json; open it in TextEdit. - If the file is empty or only
{}, replace everything with:
If it already has an{ "mcpServers": { "ntscrt": { "command": "/Applications/NTSCRT.app/Contents/MacOS/NTSCRT", "args": ["mcp"] } } }"mcpServers"section, add the"ntscrt": {…}entry inside it, with a comma after the entry before it. - Save, quit Claude completely (⌘Q), and open it again. NTSCRT now shows in the chat's tools menu.
Claude Code: run claude mcp add --scope user ntscrt -- /Applications/NTSCRT.app/Contents/MacOS/NTSCRT mcp.
Other apps that support MCP servers (Cursor, Windsurf, …) take the same command and mcp argument in their settings. ChatGPT can't: it only connects to servers on the internet.
Using it
- Give Claude the file's path, not an attachment: NTSCRT reads the file from your Mac. In Finder, select the file and press ⌥⌘C to copy its path.
- Then describe what you want: "Make /Users/me/Movies/skate.mp4 look like a moldy rental tape in a dirty VCR, played on an old TV." Claude previews a few frames, adjusts, and renders.
- It can animate too: "clean for two seconds, then the picture starts to roll and the tape gets chewed". It sets keyframes, as on the app's timeline, and saved looks open with them.
- Claude asks before using each tool the first time; allow it.
- Videos go to
~/Movies/NTSCRTunless you say where; saved presets go to~/Movies/NTSCRT/Looksand open with Preset > Load Preset…. - Mac only for now.
Tips
- Every number next to a slider is a text field: click it and type.
- Double-click a slider's knob to reset it.
- Analog artifacts show best on contrast: dark backgrounds, bright sprites, hard edges.
- For high-resolution sources, turn on Intensity → Scale with video size in the NTSC panel, so artifacts keep their size.
- Scanlines need room: each line needs three or more screen pixels to show. If they vanish, especially on tall or portrait clips, lower the Downscale width, use One field, or zoom in.
Limitations
- The Intel half of the universal build is community-tested, not author-tested (see the note up top).
- The NTSC stage runs on the CPU at your source's full resolution, so 4K sources slow the preview down. Exports always render every frame.
- Video playback runs in real time and drops the occasional frame under heavy settings. The render-ahead cache holds up to a quarter of memory (at most 1 GB).
- Screen Loop doesn't apply the Digital video stage yet.
- Some CRT shaders, like crt-hyllian, switch their scanlines off for pictures taller than about 400 lines, treating them as interlaced.
- A few crt-royale parameters are switched off inside the shader itself (marked "static in this shader build"). They do nothing in RetroArch either.
- No undo. Save a preset before big experiments.
Building from source
See DEVELOPMENT.md for the full developer setup (Swift + Rust toolchains, vendored dependencies, CLI tools, release pipeline).
Credits
- ntsc-rs — the NTSC/VHS signal emulation (MIT/ISC/Apache-2.0)
- librashader by SnowflakePowered — the RetroArch-compatible shader runtime (MPL-2.0)
- vhs-decode — the VHS format numbers (carriers, emphasis, filters) the VCR simulation is built to (GPL-3.0; numbers only, no code)
- analogtv by Trevor Blackwell (xscreensaver) — the design the Glitch stage's receiver simulation follows: glitches as the response of simulated TV circuits
- libretro/slang-shaders and the RetroArch community — the CRT shaders themselves: crt-royale by TroggleMonkey, crt-easymode and crt-aperture by EasyMode, crt-hyllian by Hyllian, crtsim, crtglow (various licenses, largely GPL)
License
NTSCRT is released under the MIT License: use it, change it, and share it, including commercially, as long as the copyright notice comes along.
The bundled ntsc-rs, librashader and RetroArch shaders keep their own licenses. THIRD_PARTY_NOTICES.md lists them, and the full texts ship inside the app.
Reviews (0)
Sign in to leave a review.
Leave a reviewNo results found