many-ai-cli
Health Warn
- License — License: MIT
- Description — Repository has a description
- Active repo — Last push 0 days ago
- Low visibility — Only 5 GitHub stars
Code Fail
- rm -rf — Recursive force deletion command in .github/workflows/release.yml
Permissions Pass
- Permissions — No dangerous permissions requested
No AI report is available for this listing yet.
Run Claude Code, Codex, Copilot, Cursor, and Grok CLIs in parallel — approve every session from one browser tab, even from your phone.
many-ai-cli



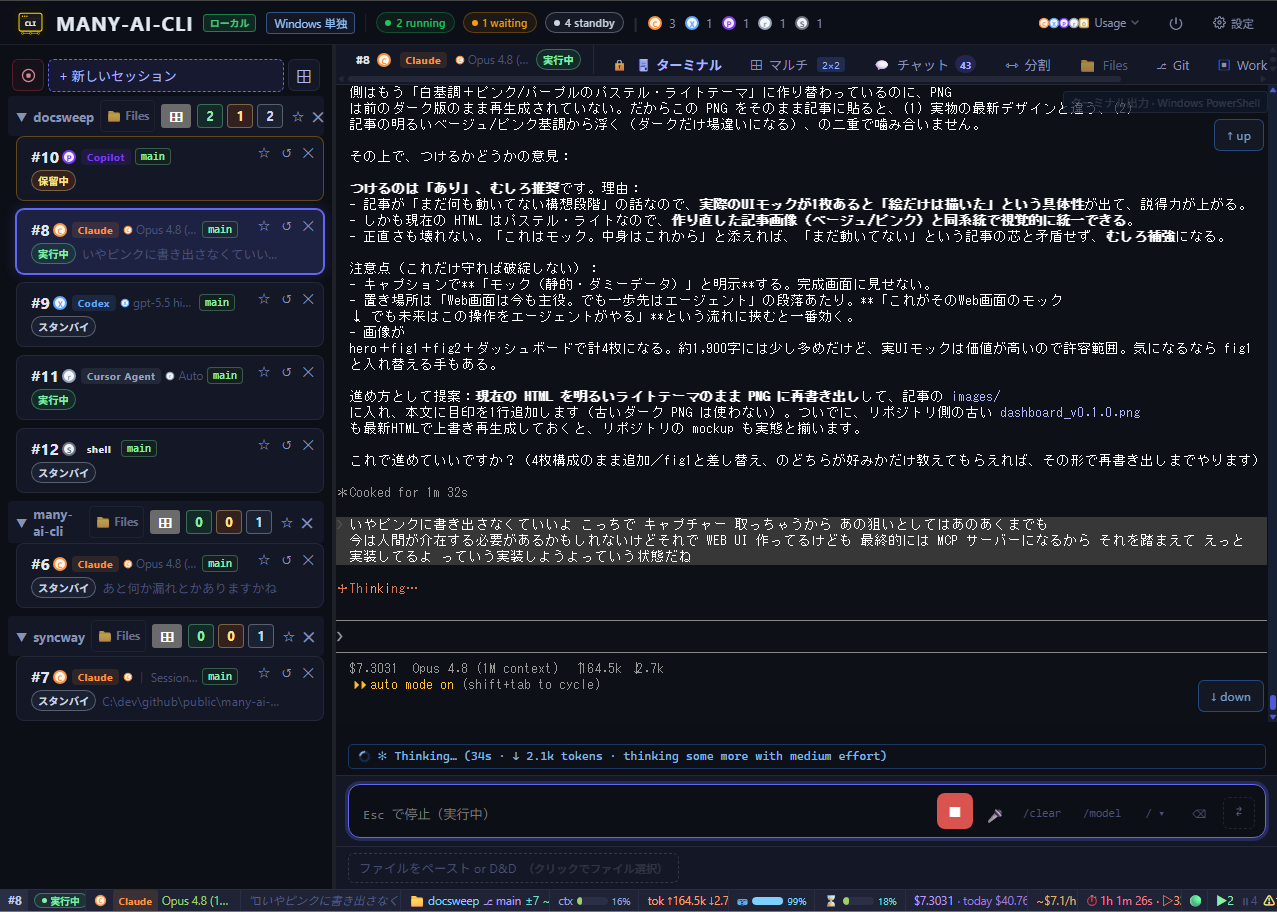
Never miss an approval prompt — even from your phone. Run Claude Code, Codex CLI, GitHub Copilot CLI, Cursor Agent CLI, and Grok Build CLI in parallel; many-ai-cli watches every session in a PTY and pushes a notification to your desktop or phone the moment any one is blocked waiting for your approval — so you don't have to babysit terminals. It also gives you a local web dashboard to handle approvals, monitoring, and terminals across multiple sessions in one place.
Overview
When you run several AI coding CLIs in parallel across multiple terminals, it's easy to lose track of which session is blocked waiting for your approval — so you end up checking the terminals over and over. many-ai-cli wraps each CLI in a PTY and notifies your desktop or phone the moment it detects an approval prompt. It also lets you handle approvals and monitor progress from a single browser-based Hub UI. The CLI itself works exactly as before; many-ai-cli only adds notifications and an approval GUI on top.
Terminal pane #1              Terminal pane #2
┌────────────────────┐        ┌────────────────────┐
│ many-ai-cli claude  │        │ many-ai-cli codex   │
│  (PTY passthrough) │        │  (PTY passthrough) │
└────────┬───────────┘        └────────┬───────────┘
         │ WebSocket                   │ WebSocket
         └─────────────┬───────────────┘
                       ▼
            ┌──────────────────┐
            │ many-ai-cli serve │  http://127.0.0.1:47777
            │  (Hub daemon)    │
            └────────┬─────────┘
                     │
                     ▼
            ┌──────────────────┐
            │  Browser Hub UI  │
            │  approval popover│
            │  session list    │
            └──────────────────┘
Each pane can run any supported provider — claude, codex, copilot, cursor-agent, or grok; two are shown for illustration.
Supported providers
many-ai-cli wraps these AI coding CLIs in a PTY (install the ones you use separately):
| Provider | Subcommand | Notes |
|---|---|---|
| Claude Code | claude |
Anthropic |
| Codex CLI | codex |
OpenAI |
| GitHub Copilot CLI | copilot |
official CLI; OAuth tokens / PATs / credentials are never read, stored, or proxied |
| Cursor Agent CLI | cursor-agent |
official CLI; sign in first |
| Grok Build CLI | grok |
xAI's official terminal coding agent; sign in first (requires a SuperGrok or X Premium+ subscription — base X Premium does not include it) |
| opencode | opencode |
community CLI; sign in first. Instead of pattern-scraping approval prompts, the Hub writes opencode.json (permission: ask for interactive sessions, permission: allow for orchestration children) into the session cwd and restores the original file on session end |
Ollama is not a separate wrapper. Run Ollama models through the claude or codex wrapper — pick Ollama Cloud / Ollama Local in the spawn form's model picker, and the Hub points the Anthropic/OpenAI-compatible endpoint at Ollama (see "Model picker with Ollama routing" in Features).
Gemini CLI is intentionally out of scope.
Features
- Unified approval panel — approve/reject Claude Code, Codex CLI, GitHub Copilot CLI, Cursor Agent CLI, and Grok Build CLI prompts from the browser
- Batch approvals — answer multiple numbered questions from one action bar and submit them together
- Real-time PTY output via xterm.js over WebSocket
- Chat history and split view — read a bubble-style conversation history, search/filter it, or keep it beside the live terminal
- Multi-pane tab — watch multiple live sessions at once in a configurable grid
- Detached Session Grid — pop AI or Shell sessions out into a separate browser window as a standalone grid view; the Hub keeps managing approvals and session state
- Shell sessions — spawn a plain interactive shell (PowerShell / bash / sh) as a regular Hub session alongside AI sessions; AI-specific features (approval injection, Chat, token bar) are automatically disabled for shell sessions
- Files tab — browse project files, preview Markdown/code, copy paths, create folders, save text files with conflict detection, rename/move, and delete empty folders from the Hub
- Git view — inspect branch history, commit details, changed files, diffs, fetch refs, and run
git pull --ff-onlywithout leaving the Hub - Commit all — stage all current working-tree changes and create a local commit after an explicit review step
- Light orchestration API — a conductor session can spawn child AI sessions, share
~/.many-ai-cli/orchestration/<id>/board.md, and keep child work isolated in git worktrees by default - File and image attach — paste or drag-and-drop images and files into the terminal session
- Voice input — dictate prompts through Browser recognition or local Whisper, with Windows x64 managed Whisper install
- PWA + opt-in Web Push — install the Hub as a local web app and receive approval notifications after explicitly enabling push in Settings
- Approval pattern profiles — keep official remote-synced trigger phrases separate from local custom edits
- Server-side user preferences — keep voice, notification, favorites, session order, spawn defaults, and avatar settings in
config.yaml - Spawn new sessions from the UI (
/api/spawn) - Model picker with Ollama routing — pick Anthropic / OpenAI / Ollama Cloud / Ollama Local models from the spawn form; the Hub auto-injects the right
ANTHROPIC_*/OPENAI_*env vars per session, no shell setup required. If the Ollama daemon runs on another host, setollama.base_urlinconfig.yaml
Light orchestration
POST /api/sessions/:id/spawn-child lets a conductor session create a child session with a role, provider, model, initial prompt, and optional cwd. The Hub creates ~/.many-ai-cli/orchestration/<orchestration_id>/board.md, injects the board path into the child prompt, and watches the board for appended progress and ## DONE <role> session=<child_id> markers.
By default, child sessions run in separate git worktrees under .many-ai-cli/worktrees/<orchestration_id>/<role> when the parent cwd is a git repository. The Hub does not auto-merge child branches; the conductor or user decides what to merge after reviewing the board and branch.
Known limits: this is intentionally lightweight. Board changes are detected by 2-second polling and delivered with an immediate Enter-backed inject, so a board notification can interrupt an active conductor turn. Completion depends on the child writing ## DONE <role> session=<child_id>, and there is no job DAG, retry queue, or automatic merge.
- Unified launcher (Windows / Linux / macOS) —
many-ai-cli-launcherconnects to a Hub via saved profiles and opens your default browser: SSHserve/tunnelprofiles work on every OS, and WSL profiles start a Hub inside WSL on Windows - Remote server / Docker deployment assets — run one Hub container per user from GHCR with loopback-only port publishing and an opt-in auto-update script
- Clean transcript generation — write readable
.txttranscripts automatically, or regenerate them withlog-clean - Language switching (English / Japanese)
- Local-first UI — Hub HTTP/WebSocket server binds to
127.0.0.1only; no telemetry frommany-ai-cliitself - Remote access protection — Settings → "Remote access protection" offers a Revoke all access kill switch (regenerates the token and auth cookie when a device is lost), an optional PIN required only for non-loopback access (off by default, with lockout), and new-device connection notifications
Requirements
| Item | Requirement |
|---|---|
| Go | 1.25+ (build time) |
| OS | Windows 10/11, macOS, Linux |
| Browser | Chrome / Edge / Firefox / Safari |
| AI CLI | Claude Code, Codex CLI, GitHub Copilot CLI, Cursor Agent CLI, Grok Build CLI (install the providers you intend to use separately) |
Platform verification
- Verified in real environments: Windows local Hub and the Windows unified launcher (
wsl/ SSH tunnel profiles) - Not yet fully verified in real environments: native Linux, native macOS
Linux/macOS builds are expected to work, but they have not been fully validated in real environments yet. Please use at your own discretion and report any issues.
Quick Download
Install via a package manager
Developer install (npm registry — recommended):
pnpm add -g many-ai-cli
Fallbacks (same registry, pick whichever you already have):
bun install -g many-ai-cli
npm install -g many-ai-cli
Once installed → next: Getting started (right after install). If your shell has not picked up the global bin yet, pnpm exec many-ai-cli setup still creates the shortcuts.
Published to the npm registry since v0.3.0. The package ships the native Go binary for your platform as an optional dependency, so nothing is downloaded in a browser — the launcher is generated locally at install time and carries no Mark-of-the-Web, which avoids that SmartScreen trigger. This is not a substitute for Authenticode signing: Smart App Control / WDAC / AppLocker / EDR / antivirus policies are handled separately. If the global command is not found after install, run
pnpm setup(or reopen your shell) so the global bin directory is on yourPATH.
Windows (winget) — one-line paste:
winget install ishizakahiroshi.many-ai-cli; & "$env:LOCALAPPDATA\Microsoft\WinGet\Links\many-ai-cli.exe" setup
Once installed → Getting started.
Immediately after
winget install, the current window does not have the newPATH, sosetupis invoked through the winget shim directory with its full path (opening a fresh terminal and runningmany-ai-cli setupworks too).
Available once the first winget manifest PR is merged intomicrosoft/winget-pkgs. Until then, use the zip download below.
On Windows, the package-manager path is preferred when available because it avoids the browser-downloaded zip/exe flow that commonly carries Mark-of-the-Web. It is still not a substitute for Authenticode code signing or organization allowlisting.
macOS (Homebrew) — one-line paste:
brew install --cask ishizakahiroshi/tap/many-ai-cli && many-ai-cli setup
Once installed → Getting started.
Linux — Debian / Ubuntu (.deb) and RHEL-family (.rpm):
Download the package from GitHub Releases, then:
sudo dpkg -i many-ai-cli_<version>_amd64.deb && many-ai-cli setup   # Debian / Ubuntu
sudo rpm -i many-ai-cli-<version>.x86_64.rpm && many-ai-cli setup   # RHEL family
Once installed → Getting started.
Manual download (all platforms)
Get the latest release from GitHub Releases.
| Platform | Download |
|---|---|
| Windows (x64) | many-ai-cli-<version>-windows-x64.zip |
| macOS (Intel) | many-ai-cli-<version>-macos-intel.zip |
| macOS (Apple Silicon) | many-ai-cli-<version>-macos-apple-silicon.zip |
| Linux (x64) | many-ai-cli-<version>-linux-x64.zip |
Extract the zip and place the binary somewhere on your PATH.
Settings and logs are stored in
~/.many-ai-cli/(created on first run).
Session logs contain user input and AI output. Treat them as sensitive data.
Windows Security Warnings
The Windows release binaries are not currently Authenticode-signed.SHA256SUMS.txt verifies release integrity, but it is not code signing for the.exe files. Windows blocks can come from several different systems:
- Mark-of-the-Web: downloaded zip/exe files can carry an internet-zone mark.
After extracting the Windows zip, rununblock-windows.cmdfrom the extracted
folder. It uses PowerShellUnblock-Fileonly onmany-ai-cli*.exein that
same folder, does not require administrator rights, does not change system
policy permanently, and does not launch the app. - SmartScreen: Windows may warn that the app is uncommon or from an unknown
publisher. Only continue if you intentionally downloaded the release and, when
needed, verified the checksum/signature. - Smart App Control: on some Windows 11 PCs this can fully block unsigned
apps.unblock-windows.cmdcannot bypass that; unsigned.exedistribution
has no supported workaround for this case. - Organization policy: AppLocker, WDAC, EDR, antivirus, or other managed-PC
policies can block local tools independently. Follow your organization's
allowlisting process rather than disabling those controls.
When winget is available, prefer it over manual zip download on Windows. The
manual zip remains supported for users who need direct release artifacts.
The Hub itself binds to 127.0.0.1 only, so normal local use does not require
opening the server to the LAN or adding a public Windows Firewall exception.
Recommended Windows zip flow:
- Download
many-ai-cli-<version>-windows-x64.zipfrom GitHub Releases - Verify
SHA256SUMS.txt/ cosign signature if required - Extract the zip
- Run
unblock-windows.cmd - Start
many-ai-cli.exeormany-ai-cli-launcher.exemanually
Double-clicking many-ai-cli.exe directly (not recommended)
Not recommended: browser-downloaded zip / exe files are the main trigger for Mark-of-the-Web and SmartScreen warnings. When possible, use a package manager install plus
many-ai-cli setup(see Getting started) instead.
If you still want to use the exe straight from the extracted zip, the previous flow is:
- Extract the zip and, if needed, run
unblock-windows.cmd - Double-click
many-ai-cli.exe(or runmany-ai-cliwith no arguments)- The Hub starts and your browser opens automatically at
http://127.0.0.1:47777/?token=<token> - If a Hub is already running, your browser is reopened against the existing instance
- The Hub starts and your browser opens automatically at
- In the Hub UI, click "+ New Session" to launch a wrapped AI CLI session
- To stop the Hub intentionally, use the
⏻button in the top-right of the Hub UI, or runmany-ai-cli stopfrom another terminal
Verify Release Artifacts (Checksum + Signature)
v0.1.2 and later releases include:
SHA256SUMS.txtSHA256SUMS.txt.sigSHA256SUMS.txt.pem
- Verify the signature on
SHA256SUMS.txt:
cosign verify-blob \
  --certificate SHA256SUMS.txt.pem \
  --signature SHA256SUMS.txt.sig \
  --certificate-identity-regexp "https://github.com/ishizakahiroshi/many-ai-cli/.github/workflows/release.yml@refs/tags/v.*" \
  --certificate-oidc-issuer "https://token.actions.githubusercontent.com" \
  SHA256SUMS.txt
- Verify your downloaded binary against the checksums:
sha256sum -c SHA256SUMS.txt
Getting started (right after install)
Whichever install path you used, the next steps are the same.
Run this once:
many-ai-cli setupIt creates "Many AI Hub Start" and "Many AI Hub Stop" shortcuts on your desktop (
.lnkon Windows,.commandon macOS,.desktopon Linux).From now on, just double-click "Many AI Hub Start" on your desktop. A console window opens alongside your browser at
http://127.0.0.1:47777/?token=<token>.In the Hub UI, click "+ New Session" in the lower left to launch one of the wrapped AI CLIs (claude / codex / copilot / cursor-agent / opencode / grok). When an approval prompt appears, an action bar shows up under the input — click a button or use the keyboard.
To stop, use "Many AI Hub Stop" on your desktop, the ⏻ button in the top-right of the Hub UI, or many-ai-cli stop from another terminal. If you prefer a terminal, many-ai-cli serve --open still works.
⚠ About the console window
Launching "Many AI Hub Start" opens a console window alongside the browser. That console is the Hub server process — closing it with×terminates the Hub. If it gets in the way, minimize it instead of closing it.
If the Hub does go down (whether by×, a crash, or a manual restart), running AI sessions wait up to 60 minutes for the Hub to come back before terminating themselves (configurable inconfig.yamlup to 24 hours — extend it for long-running autonomous tasks). A Web UI bug or restart will not silently kill your work. See Shutdown, zombie protection & Hub crash resilience for details.
On Linux (GNOME), the first time you use a.desktopshortcut on the desktop, right-click it and choose "Allow Launching" (this is an OS-level requirement).
Unified launcher (Windows / Linux / macOS)
many-ai-cli-launcher (many-ai-cli-launcher.exe on Windows) is a unified launcher that manages connection profiles for both WSL and remote server targets. Connection profiles are stored in ~/.many-ai-cli/launcher-profiles.yaml.
The launcher binary ships for all platforms. ssh profiles (serve / tunnel) work on Windows, Linux, and macOS; wsl profiles are Windows-only and report a clear error on other operating systems. On Linux the launcher opens the browser with xdg-open, and on macOS with open.
How it works
The launcher reads your saved profiles and connects to the right Hub — starting one if needed — then opens the browser automatically. Two profile types are supported:
| Type | Use case |
|---|---|
wsl |
Start many-ai-cli serve inside WSL and open it from the Windows browser (Windows only) |
ssh |
Connect to a remote machine (e.g. a remote server or home machine) over SSH (any OS) |
ssh profiles additionally support two connection modes:
| Mode | Use case |
|---|---|
serve |
SSH into a remote server and start many-ai-cli serve on the remote side |
tunnel |
Port-forward to a Hub already running on the remote side (kept resident via systemd / tmux / Docker compose, etc.) |
In both modes, the Hub continues to bind to 127.0.0.1 only on the remote. The SSH local forward (-L 127.0.0.1:<port>:127.0.0.1:<port>) makes it reachable from the Windows browser without exposing the Hub to the network.
A wsl profile calls wsl.exe internally to start the Linux binary (many-ai-cli serve) inside WSL; as soon as the Linux side prints the Hub URL, the Windows default browser opens automatically. The shell is launched with bash -ilc (login + interactive), so ~/.bashrc entries — including nvm, pnpm, cargo, etc. — are fully loaded and in PATH. If a port collision is detected on the Windows side (e.g. many-ai-cli.exe already holds 47777), the launcher picks the next available port automatically.
Setup
The launcher binary is bundled in every release archive next to the main binary (and in the deb/rpm/Homebrew packages). On Windows, download many-ai-cli-<version>-windows-x64.zip, extract many-ai-cli-launcher.exe, and place it on your PATH. On Linux/macOS, extract many-ai-cli-launcher from your platform's archive (or install via the package manager) and put it on your PATH.
Create ~/.many-ai-cli/launcher-profiles.yaml:
version: 1
profiles:
  # WSL profile — starts the Hub inside WSL
  - name: my-wsl
    type: wsl
    distro: Ubuntu-22.04  # omit to use the default WSL distro
    hub_port: 0           # 0 = auto-select to avoid Windows-side collisions

  # Remote server profile (serve mode) — SSH in and start many-ai-cli serve
  - name: my-remote
    type: ssh
    mode: serve
    host: remote.example.com
    user: your-user
    hub_port: 47777

  # Remote server profile (tunnel mode) — forward to a resident Hub (systemd / tmux / Docker)
  - name: remote-docker
    type: ssh
    mode: tunnel
    host: remote.example.com
    user: your-user
    hub_port: 47801
    token_command: "docker exec many-ai-cli-user1 sh -c 'grep ^token ~/.many-ai-cli/config.yaml | cut -d\" \" -f2'"
WSL profile prerequisite: the Linux binary inside WSL
A wsl profile requires the Linux many-ai-cli binary somewhere on the WSL PATH. Download many-ai-cli-<version>-linux-x64.zip from the releases page, extract it, and place the binary:
unzip many-ai-cli-<version>-linux-x64.zip

# Using ~/.local/bin (per-user, no sudo required)
mkdir -p ~/.local/bin
mv many-ai-cli ~/.local/bin/many-ai-cli
chmod +x ~/.local/bin/many-ai-cli

# Verify ~/.local/bin is on PATH
echo $PATH | grep -q "$HOME/.local/bin" && echo "OK" || echo "Add ~/.local/bin to PATH"
If ~/.local/bin is not on your PATH, add it to ~/.bashrc:
export PATH="$HOME/.local/bin:$PATH"
Or, to install system-wide (requires sudo):
sudo mv many-ai-cli /usr/local/bin/many-ai-cli
sudo chmod +x /usr/local/bin/many-ai-cli
Verify inside WSL:
many-ai-cli --version
Tunnel mode: end-to-end setup
tunnel mode connects to a Hub that keeps running on the remote — closing the launcher window only drops the SSH tunnel, while the Hub and your AI sessions keep running. Reconnect later and pick up exactly where you left off. Here is the full flow from zero.
A. Remote side (one-time)
Place the Linux
many-ai-clibinary on the remote machine and make it executable.Start the Hub with a fixed port (auto-select is not allowed in tunnel mode) and keep it resident — systemd, tmux/screen, or Docker all work:
many-ai-cli serve --port 47777On first start a random access token is generated and saved to
~/.many-ai-cli/config.yaml(token:key).Decide the command that prints that token — this becomes
token_commandin the profile. Example:awk '/^token:/{print $2}' ~/.many-ai-cli/config.yamlRun it once over SSH and confirm it prints a single token line.
B. Windows side (one-time)
Set up SSH key-based authentication. The launcher runs
ssh.exewith-o BatchMode=yes(no interactive prompts), so password authentication will not work. Make suressh your-user@hostlogs in without a password prompt.Create a profile — either in the launcher UI (Type: SSH / Mode: tunnel) or directly in
launcher-profiles.yaml:Field Value Required nameany name yes typesshyes modetunnelyes hostremote IP / hostname yes userSSH login user (empty = ssh default) no ssh_portnon-22 port if needed (0 = default) no identity_fileempty = default key / agent no hub_portthe port from step 2 (e.g. 47777) — must matchyes token_commandthe command from step 3 yes
C. Daily use
- Start the launcher and pick the profile. It automatically establishes the tunnel, fetches the token via
token_command, waits for the Hub to respond, and opens the browser. - Work in the Hub UI as usual (spawn sessions, approve, etc.).
- When done, just close the launcher window — only the tunnel drops; remote sessions keep running.
- Next time, reconnect with the same profile and continue where you left off.
Common pitfalls
- Port mismatch — the remote
serve --portand the profile'shub_portmust be the same number. - Password prompt — BatchMode fails immediately; key authentication is mandatory.
- Empty
token_commandoutput — the Hub must have been started at least once on the remote, otherwiseconfig.yamlhas no token yet. - Docker — publish the container's Hub port to the host's
127.0.0.1(the tunnel terminates at the remote machine's127.0.0.1:<hub_port>).
Launch
many-ai-cli-launcher.exe            # auto-connect if only one profile; otherwise open selection UI
many-ai-cli-launcher.exe --profile my-remote   # connect to a specific profile
many-ai-cli-launcher.exe --last     # reconnect using the last-used profile
many-ai-cli-launcher.exe --ui       # always open the selection UI
Security
The launcher does not change the Hub's security model:
- The Hub binds to
127.0.0.1only — no0.0.0.0binding, no reverse proxy exposure - SSH forwarding uses
127.0.0.1-to-127.0.0.1local forward only (no-gorGatewayPorts) - Passwords and key passphrases are never saved; key-based authentication is required (
-o BatchMode=yes) - The token retrieved by
token_commandis used only for the current session and is not written tolauncher-profiles.yaml
For the full profile schema and connection flow details, see docs/v0.3.x-many-ai-cli-design.md — §13.
If Windows blocks the launcher: remote-server access without local .exe
If Windows SmartScreen or company policy prevents many-ai-cli-launcher.exe from running, users can still connect to a remote-hosted Hub without running any many-ai-cli executable on Windows. This route uses only:
- the Windows built-in OpenSSH client (
ssh.exe) - a normal browser
- the Linux
many-ai-clibinary or Docker container on the remote server
The tradeoff is that setup is more manual: the user keeps one SSH tunnel window open, then opens the Hub URL in the browser.
Simpler routes that avoid the SmartScreen dialog
Launching from a terminal (via CreateProcess) does not go through Explorer's reputation check, so the SmartScreen "Windows protected your PC" dialog generally does not appear. Two terminal-launched routes use the main many-ai-cli binary and never require double-clicking many-ai-cli-launcher.exe:
- Hub 🖥 Server button — run
many-ai-cli serve(or just start the Hub), open the dashboard, and click 🖥 Server in the header. Manage connection profiles and connect/disconnect there; a successful connection opens the target Hub in a new tab. The SSH/WSL child process is held by the Hub itself, so no extra console window stays open. many-ai-cli connect—many-ai-cli connect --profile <name>(or--last) runs the same connection flow as the launcher straight from the terminal.
If you still hit a SmartScreen dialog (not an actual virus detection), clear the Mark-of-the-Web first: run unblock-windows.cmd from the extracted folder, or Unblock-File the binaries in PowerShell. Note this only dismisses the reputation prompt — if Microsoft Defender actually quarantines the binary (Go binaries are sometimes false-positives), code signing / an exclusion / a false-positive report is needed instead. Installing via a package manager avoids the Mark-of-the-Web entirely (the binary is built locally).
What is saved where
| Item | Saved on | Notes |
|---|---|---|
| SSH host, user, key path | Windows %USERPROFILE%\.ssh\config |
Safe to keep locally; this is normal SSH configuration |
| Hub token | Remote server ~/.many-ai-cli/config.yaml |
Do not paste it into public chats, issues, or screenshots |
| Hub preferences, favorites, spawn defaults | Remote server ~/.many-ai-cli/config.yaml |
Persist across reconnects because the Hub runs on the remote server |
| Logs and attachments | Remote server ~/.many-ai-cli/logs/, ~/.many-ai-cli/attachments/ |
They are not stored on the Windows PC |
| Working repositories | Remote server filesystem | The Hub edits the remote server's files, not files on the Windows PC |
A. Choose and prepare the remote server
Use any provider that gives you a Linux VM with SSH access. A small Ubuntu 22.04/24.04 machine is enough to start; 1 GB RAM is a practical minimum, and 2 GB+ is more comfortable once provider CLIs and long sessions are running. Free tiers can work, but check whether they sleep, reset disks, or block long-lived SSH connections.
Keep the firewall/security group simple:
- allow SSH only (
22/tcp, or your custom SSH port) - do not open
47777,47877, or any Hub port to the internet - do not put the Hub behind nginx, Caddy, Cloudflare Tunnel, or a public reverse proxy
Install the Linux many-ai-cli binary on the remote server. One common per-user layout is:
mkdir -p ~/.local/bin
# Download and unzip many-ai-cli-<version>-linux-x64.zip from GitHub Releases.
mv many-ai-cli ~/.local/bin/many-ai-cli
chmod +x ~/.local/bin/many-ai-cli
echo 'export PATH="$HOME/.local/bin:$PATH"' >> ~/.bashrc
source ~/.bashrc
many-ai-cli --version
Also install and sign in to the provider CLIs you plan to use (claude, codex, copilot, cursor-agent, grok) on the remote server, because sessions run there.
B. Start the Hub on a fixed loopback port
For a first test, run it in a normal SSH shell:
mkdir -p ~/work
cd ~/work
many-ai-cli serve --port 47777
For daily use, keep it resident with tmux, screen, systemd, or Docker. The simplest manual option is tmux:
tmux new -s many-ai-cli
cd ~/work
many-ai-cli serve --port 47777
Detach from tmux with Ctrl+B, then D. Later, reattach with:
tmux attach -t many-ai-cli
Confirm the Hub is listening only on loopback:
ss -ltnp | grep ':47777'
Expected: 127.0.0.1:47777. If you see 0.0.0.0:47777 or the remote server's public IP, stop and fix the setup before connecting.
Get the token:
awk '/^token:/{print $2}' ~/.many-ai-cli/config.yaml
C. Save the SSH connection on Windows
Create or edit %USERPROFILE%\.ssh\config:
Host remote-host
  HostName remote.example.com
  User ubuntu
  Port 22
  IdentityFile C:\Users\you\.ssh\id_ed25519
  ServerAliveInterval 30
Test it from PowerShell:
ssh remote-host
If SSH asks for a password every time, set up key authentication first. The tunnel can be kept open with password auth, but key auth is much less error-prone.
D. Open the tunnel
In a Windows PowerShell window, run:
ssh -N -T `
  -o ExitOnForwardFailure=yes `
  -o ServerAliveInterval=30 `
  -L 127.0.0.1:47777:127.0.0.1:47777 `
  remote-host
Keep that window open. It is the private cable between your browser and the remote server's Hub.
Now open this in the Windows browser:
http://127.0.0.1:47777/?token=<token-from-the-remote-server>
Do not replace 127.0.0.1 with the remote server's IP address. The browser should always connect to the local forwarded port.
Optional: a local .cmd tunnel shortcut
Users who do not want to remember the SSH command can create a local file such as connect-many-ai-cli.cmd. This file does not contain the token; it fetches the token over SSH each time and opens the browser after starting the tunnel.
@echo off
set HOST=remote-host
set PORT=47777

for /f "tokens=2" %%T in ('ssh %HOST% "cat ~/.many-ai-cli/config.yaml" ^| findstr /b token:') do set TOKEN=%%T
if "%TOKEN%"=="" (
  echo Failed to read Hub token from %HOST%.
  pause
  exit /b 1
)

start "many-ai-cli tunnel" ssh -N -T -o ExitOnForwardFailure=yes -o ServerAliveInterval=30 -L 127.0.0.1:%PORT%:127.0.0.1:%PORT% %HOST%
timeout /t 2 >nul
start "" "http://127.0.0.1:%PORT%/?token=%TOKEN%"
Close the many-ai-cli tunnel window to disconnect. The remote Hub and any remote sessions continue if you started the Hub with tmux, systemd, or Docker.
Common no-launcher pitfalls
- Browser shows 403/404/blank - the token is wrong or the remote Hub was restarted; fetch the token again from the remote server.
- Terminal area does not connect - local and remote ports must match exactly:
47777:127.0.0.1:47777. ssh: bind: Address already in use- another local process is using the port; choose a different fixed port on both the remote server's Hub and the SSH tunnel.- Files are "missing" - the Hub runs on the remote server, so it sees the remote server's files only. Clone or mount the repository on the remote server.
- Free-tier server disconnected - reconnect SSH and, if needed, reattach/restart the tmux/systemd/Docker Hub.
Using from a smartphone (iPhone / Android)
Note (beta / draft) — The smartphone UI is a preview in v0.3.x. Layout, interactions, and notification behavior may change in future releases. Please share feedback via GitHub Issues.
The Hub UI is mobile-ready (responsive layout, touch-sized buttons, a mobile key panel for Esc/Ctrl/arrows, and PWA support). Because the Hub binds to 127.0.0.1 only, a phone cannot reach it over Wi-Fi by opening the PC's LAN IP — and that is by design. Instead, the phone uses the same pattern as remote PC access: an SSH local forward that points the phone's own 127.0.0.1 at the Hub. No public exposure is required (and none is supported).
What you need on the phone
- An SSH client app that supports local port forwarding (e.g. Termius — the free plan is enough)
- A normal browser (Safari / Chrome)
A. Home PC on the same Wi-Fi
- Enable an SSH server on the PC that runs the Hub
- Windows: Settings → System → Optional features → add OpenSSH Server, then start the
sshdservice - macOS: System Settings → General → Sharing → Remote Login
- Linux: install/enable
sshd
- Windows: Settings → System → Optional features → add OpenSSH Server, then start the
- In Termius, register the PC as a host (its LAN IP, e.g.
192.168.x.x, with your PC user; key auth recommended) - Add a Port Forwarding rule: type Local, phone side
127.0.0.1:47777→ destination127.0.0.1:47777 - Connect the tunnel, then open
http://127.0.0.1:47777/?token=<token>in the phone browser (the token comes from the PC'sserveoutput or~/.many-ai-cli/config.yaml) - Share menu → Add to Home Screen to install it as a PWA — from then on it launches like an app
B. Remote server
Identical to A, with the remote server as the Termius host. If you also use a home PC Hub, give each destination its own phone-side port (next section).
Port allocation for multiple Hubs
A tunnel occupies the phone-side listen port, and on a PC that runs its own Hub, local port 47777 is already taken — so assign one fixed phone-side port per destination:
| Destination | Phone-side URL | Termius local forward |
|---|---|---|
| Home PC | http://127.0.0.1:47777/?token=<PC token> |
47777 → 127.0.0.1:47777 |
| Remote | http://127.0.0.1:47778/?token=<remote token> |
47778 → remote 127.0.0.1:47777 |
The Hub itself stays on 47777 everywhere; only the phone-side listen port differs. Do not reuse one phone-side port for two Hubs: browsers treat the port as part of the origin, so reusing it would make two different Hubs share one PWA install, service worker, cache, and localStorage — and token mismatches after switching tunnels. Separate ports give you two independent home-screen icons ("Home" / "Remote") that never interfere.
Mobile usage notes
- iOS suspends background apps, so the tunnel drops when Termius is backgrounded for a while. Sessions keep running on the host; reopening Termius reconnects, and the PWA picks up where it left off.
- Web Push (if enabled in Settings and subscribed) can still deliver notifications while the tunnel is down — but opening the Hub from a notification requires the tunnel to be reconnected first.
- The token regenerates when the Hub restarts; if the browser shows 403, fetch the current token again.
Receiving approval notifications without the tunnel (ntfy / webhook)
Web Push requires a live browser subscription, which drops with the tunnel. ntfy is an outbound HTTP push service — the Hub POSTs to the ntfy server, and the ntfy app on your phone receives it. No persistent tunnel needed.
Setup (ntfy — recommended for simplest experience)
- Install the ntfy app on your phone (iOS / Android, free)
- In the Hub Settings panel → ntfy / webhook notification → click Configure...
- Click + Add ntfy; leave the URL as
https://ntfy.sh(or enter your self-hosted URL) - Click Generate next to Topic to create a random private topic name, then click Save
- In the ntfy app, subscribe to the same topic (
anyaicli-xxxx) - Click Send test to verify the phone receives the notification
- Tick Approval under Events (default) so the Hub sends a notification on every approval prompt
The Hub token is never included in the ntfy payload. The topic name itself is the only shared secret — use a long random string (the Generate button produces one).
Setup (generic webhook)
Click + Add webhook and enter any URL that accepts a POST request with JSON body {"title":"...", "body":"..."}. Examples: Discord webhooks, Slack incoming webhooks, custom relay servers.
Launching from a terminal (advanced)
If you prefer driving things from a shell — for scripting, shell integration, or muscle memory — these options are equivalent to clicking "+ New Session" in the UI. Use whichever you like.
Option A: provider as a subcommand
many-ai-cli claude      # auto-starts Hub in the background if not running, then launches Claude
many-ai-cli codex       # same
many-ai-cli copilot     # same, using the installed GitHub Copilot CLI
many-ai-cli cursor-agent # same, using the installed Cursor Agent CLI
many-ai-cli grok        # same, using the installed Grok Build CLI
You do not need to run many-ai-cli serve first.
Option B: wrap subcommand (for debugging)
many-ai-cli wrap claude
many-ai-cli wrap codex
many-ai-cli wrap copilot
many-ai-cli wrap cursor-agent
many-ai-cli wrap grok
Functionally identical to Option A; useful when you want to be explicit about the wrapper layer.
Option C: transparent mode (MANY_AI_CLI_AUTO)
Initialize the shell once, then your normal claude / codex / copilot / cursor-agent / grok commands transparently go through the wrapper.
many-ai-cli shell-initemits POSIX shell (bash / zsh) only function definitions. There is no PowerShell snippet — see below for a manual alternative.
# Run once per shell startup (bash / zsh)
eval "$(many-ai-cli shell-init)"

# Turn on per-session — only the shells where you opt in are wrapped
export MANY_AI_CLI_AUTO=1
claude    # → goes through the wrapper, auto-starts Hub if needed
codex     # → same
copilot   # → same
cursor-agent # → same
grok      # → same
Without MANY_AI_CLI_AUTO=1, claude / codex / copilot / cursor-agent / grok behave exactly as the original commands. No global .bashrc modification.
GitHub Copilot support only wraps the official installed CLI in a PTY. many-ai-cli does not read, store, or proxy GitHub OAuth tokens, PATs, or Copilot credentials.
Cursor Agent support only wraps the official installed cursor-agent CLI in a PTY (it assumes you are already signed in). many-ai-cli does not read, store, or proxy Cursor session tokens or credentials.
Grok support only wraps the official installed grok CLI (xAI's Grok Build CLI) in a PTY (it assumes you are already signed in via your grok.com login, which requires a SuperGrok or X Premium+ subscription). many-ai-cli does not read, store, or proxy xAI session tokens or credentials.
OS-specific automation examples
PowerShell (Windows)
Add the following to your $PROFILE (since shell-init does not support PowerShell, the functions are defined directly):
if ($env:MANY_AI_CLI_AUTO -eq '1') {
    function claude { many-ai-cli claude @args }
    function codex  { many-ai-cli codex  @args }
    function copilot { many-ai-cli copilot @args }
    function cursor-agent { many-ai-cli cursor-agent @args }
    function grok { many-ai-cli grok @args }
}
Set MANY_AI_CLI_AUTO=1 on a specific Windows Terminal profile to enable transparent mode only in that tab:
{
  "name": "AI Watch",
  "commandline": "pwsh.exe -NoExit",
  "environment": { "MANY_AI_CLI_AUTO": "1" }
}
iTerm2 (macOS)
- Profiles → Environment → Variables:
MANY_AI_CLI_AUTO=1 - Profiles → General → Send text at start:
eval "$(many-ai-cli shell-init)"
tmux (all OSes)
# ~/.tmux.conf
set-option -g default-command "MANY_AI_CLI_AUTO=1 bash -c 'eval \"$(many-ai-cli shell-init)\"; exec bash'"
Subcommands
| Command | Description |
|---|---|
serve [--open] [--port N] |
Start the Hub. --open opens the browser automatically |
connect --profile <name> | --last |
Connect to a remote Hub from the terminal using a saved launcher profile (SmartScreen-safe alternative to the launcher .exe) |
claude [args...] |
Launch Claude Code through the Hub |
codex [args...] |
Launch Codex CLI through the Hub |
copilot [args...] |
Launch GitHub Copilot CLI through the Hub |
cursor-agent [args...] |
Launch Cursor Agent CLI through the Hub |
grok [args...] |
Launch Grok Build CLI through the Hub |
wrap <provider> [args...] |
Wrap an arbitrary provider (for debugging) |
shell-init |
Emit shell function snippets for transparent mode |
status |
Show whether the Hub is running |
stop |
Stop the Hub |
log-clean <session.jsonl> |
Generate a clean transcript from session history |
uninstall [--purge] |
Remove settings and logs and uninstall; --purge also removes the binary itself |
Hub UI
Open http://127.0.0.1:47777/?token=<token> in your browser.
┌─ MANY-AI-CLI  [1][0][6] │ ● Claude:2  ● Codex:5         [⏻] [Settings] ─┐
├──────────────────────────┬──────────────────────────────────────────────┤
│ [+ New Session]          │ ● Codex  cwd: C:\dev\many-ai-cli  [↑ to top] │
│ 📁 many-ai-cli  [1][0][6] │ Terminal output — Windows PowerShell         │
│ ─────────────────────── │                                              │
│ 📌 #7 ● Codex Running × │   (xterm.js terminal output)                │
│    Last: 00:11:57       │                                              │
│    docs/local/plan_…    │                                              │
│                         │                                              │
│ #6 ● Codex   Standby × │                                              │
│    Last: 00:05:48       │   ┌─ Approval (only when waiting) ──────┐    │
│    docs/local/plan_…    │   │ Command: npm install axios          │    │
│                         │   │ Risk: MEDIUM                        │    │
│ #4 ● Claude  Standby × │   │ [YES (y)] [NO (n)]                  │    │
│    Last: 23:00:38       │   └─────────────────────────────────────┘    │
│    Mostly local exec…   │ ─────────────────────────────────────────── │
│                         │ [📎] Input  auto mode on (shift+tab)        │
│   …(rest omitted)…      │      [Send] [🪄] [/clear] [/model] [/]      │
└──────────────────────────┴──────────────────────────────────────────────┘
  Header chips [1][0][6] = "running / waiting / standby" session counts
Layout
- Header
- Status summary chips
[running][waiting][standby](the waiting chip blinks when > 0) and per-provider connection counts such asClaude:N / Codex:N / Copilot:N / Cursor Agent:N / Grok:N. - Right edge:
⏻(stop the Hub) andSettings(language, theme, timeouts, log dir, etc.).
- Status summary chips
- Left sidebar (session list)
- Top:
+ New Sessionbutton (opens the spawn dialog). - Sessions are grouped by project folder (the directory where the wrapper was launched). Each group shows its own session-count chips and a Files entry.
- Each session card:
📌(pin to the top "Pinned" group) /×(close) / provider-colored dot + ID + state badge (Running / Standby / Waiting / Completed / Error / Disconnected) / branch badge when Git is available / last response time / one-line preview of recent output. - Right-click a card to open the Git view, open the Files tab, activate the session, or copy the session ID.
- Completed and errored sessions stay in the list until you click
×.
- Top:
- Right pane (terminal + input)
- Top bar: active session's provider and cwd, plus
↑ to topto scroll the PTY buffer back to the start. - Center: PTY output rendered live with xterm.js.
- Bottom: multi-line input box, attach / send buttons, slash-command picker (
/clear,/model,/), and the auto-mode toggle hintshift+tab.
- Top bar: active session's provider and cwd, plus
- Tabs: Terminal, Chat, Split, Multi, Files, and Git tabs share the main area. Files and Git tabs are loaded lazily and can be restored after restart.
- Chat / Split: chat view extracts user turns, AI output, approvals, and attachments from the live PTY stream. Split view keeps chat history beside the terminal.
- Multi tab: shows several sessions in a grid and routes focus, input, resize, and approval UI to the active pane.
- Approval action bar: appears above the input when an approval is pending. Single prompts use buttons; multi-question prompts render stacked choices with "Submit all".
- Files tab: left tree + right preview for project files. Markdown/code can be previewed, paths can be copied, and file move/rename actions are available from the context menu.
- Git tab: read-only commit log, ref selector, commit detail, changed files, diff preview, copy actions, and a guarded Commit all modal for local commits.
- Sync with terminal input: if you resolve the prompt by typing
y/ndirectly in the terminal, the action bar disappears automatically. - File and image attach: paste or drag-and-drop into the attach area; the file is materialized locally and a path reference is injected into the PTY on send.
- Status bar (bottom): a single always-on line showing the active session's tokens, cost, context usage, and more. See Status bar (bottom) below (toggle visibility from the settings panel).
Usage notes
- Approval: When an AI CLI requires approval, an action bar appears above the input. Click the button or navigate with
←/→and confirm withEnter. For multi-question approvals, select each section and submit them together. - Chat / Split / Multi: Use the unified tab bar to switch from the terminal to conversation history, side-by-side history, or a multi-session grid.
- Files: Click the project group's Files entry or right-click a session card → Open Files Tab. Preview files in the right pane and use the context menu for copy/open/move/rename actions.
- Git: Click a branch badge or press
Ctrl+Shift+Gto open the Git view for the current session. Commit all stages the whole working tree withgit add -A, then runsgit commitonly after Review. - Terminal input: Type directly in the input field and press
Enterto send. UseShift+Enterfor a newline. - File and image attach: Paste (
Ctrl+V) or drag-and-drop a file onto the attach area to inject a local file path reference into the session. - Voice input: Click the 🎤 button or press
Alt+Vto start/stop voice input. See the Voice Input section for engine selection and details. - Spawn: Click + New Session to start a new AI CLI session from the browser.
Status bar (bottom)
A single always-on line at the bottom of the screen shows the status of one active session (toggle visibility from the settings panel). Segments are laid out left to right; any segment whose data is unavailable is hidden automatically.
#6 │ ●Standby │ Claude Opus 4.8 │ "got it…" │ 📁 many-ai-cli ⎇ develop │ tok ↑63.7k ↓1.1k │ ⛁ 100% │ $0.8134 · today $12.3460 │ ~$5.4/h │ ⏱ 8m 58s │ 🟢 │ ▶1 ⏸6
- #N — session number
- State pill — running / standby / waiting (for approval) / error, color-coded (green = running, amber = waiting, red = error/disconnected)
- Provider + model — provider icon and label, plus the model in use
- Work label — a summary of the latest user input or AI output (dimmed)
- 📁project ⎇branch ±git — project folder name, Git branch, and number of changed files
- ctx — context-window usage gauge. It goes green → amber (80%) → red (90%); red is a danger signal that the window is nearly full. Click to copy
used/limit(shown only when the model's limit is known) - tok ↑in ↓out — input / output token counts. Click to copy the values
- ⛁ — prompt-cache hit rate. Higher is more cost-efficient (high is good, informational only)
- Cost — estimated cost for the current session plus today's total (
· today …). Click to open a per-session breakdown popover. Shows$ —when cost is unknown - burn — burn rate (
$/hortok/min), shown after the first 10 seconds - ⏱ elapsed — session elapsed time; while running,
▷also shows the current turn's elapsed time - Connection — WebSocket state to the Hub (🟢 open / 🟡 connecting / 🔴 closed)
- Fleet badge — totals across all sessions (▶ running / ⏸ standby / ⚠ waiting). Click ⚠ to jump to a session awaiting approval
Token- and cost-related segments (ctx / tok / ⛁ / cost / burn) appear only for Claude / Codex sessions. Codex does not expose exact billing totals through the CLI, so many-ai-cli reads rollout token_count data after the Stop hook and calculates an estimate from its local pricing table and model context limits.
Keyboard Shortcuts
| Key | Action |
|---|---|
Enter |
Send message |
Shift+Enter |
New line in input |
Tab / Shift+Tab |
Switch to next / previous session |
← / → |
Move focus between action bar buttons (when action bar is visible and input is empty) |
Enter |
Click focused action bar button |
Alt+V |
Toggle voice input on/off |
Ctrl+Shift+G |
Open the Git tab for the current session |
Ctrl+Shift+F |
Open the Files tab for the current session |
Ctrl+V |
Paste image into attach area |
Ctrl+C |
Send SIGINT to PTY (or copy selected text) |
Ctrl+D |
Send EOF to PTY |
Ctrl+O |
Expand Claude Code folded content |
Voice Input
You can dictate text into the Hub UI input box.
Choosing an engine
- Whisper (local) — for users who do not want audio leaving the machine. The browser sends the recording through the Hub to a local whisper.cpp server, and nothing goes to a third-party service (as long as
voice.whisper.server_urlpoints at127.0.0.1/localhost). Accuracy depends on the model and CPU. - Browser — Chrome / Edge Web Speech API. Audio is sent to Google / Microsoft recognition servers. Fast and accurate; pick this when convenience and accuracy matter more than privacy.
- Smartphone usage — instead of the Hub's voice engines, you can use the phone OS's voice input or an IME (on iPhone, third-party IMEs like
Gboardare an option too). These are also cloud-based like the Browser engine, but the phone IME path is often more responsive on mobile.
In short: "don't want audio leaving the machine → Whisper", "want convenience and accuracy → Browser or phone IME".
How to use
- In Settings → Voice, choose a recognition engine (
OFF/Browser/Whisper (local)) - Click the 🎤 button or press
Alt+V(macOS:Option+V) to start recording - Speak into the microphone
- Browser mode inserts recognized text as you speak; Whisper mode transcribes after you stop and inserts the result into the input box
- Review the input box and press
Enterto send
Browser: Chrome / Edge (Web Speech API)
Whisper (local): a WAV recorded in the browser is sent through the Hub to a Whisper server. On a Windows x64 Hub, Settings → Voice can install and run a whisper.cpp server and model under~/.many-ai-cli/whisper/. On other platforms, start a Whisper-compatible server yourself and setvoice.whisper.server_url.
Microphone permission is required on first use.
⚠️ Privacy note: In Browser mode, recorded audio is sent to the browser vendor's speech-recognition servers (Google / Microsoft). Whisper mode stays local only when
voice.whisper.server_urlpoints to a local server such ashttp://127.0.0.1:.../http://localhost:...; if you configure an external API URL, audio is sent to that external service. The managed installer downloads whisper.cpp from GitHub Releases and the model from Hugging Face. See "Security / Privacy → Outbound network traffic" and Whisper setup.
Recommended Whisper server settings
Whisper can hallucinate boilerplate phrases on silent or noisy audio. On the Hub UI side, near-silent recordings are discarded before sending, and known hallucination phrases are dropped only when they match the entire result.
On the server side, enable the VAD / no-speech filtering of the whisper.cpp / Whisper-compatible server you use. For whisper.cpp, follow its current docs to specify a Silero VAD model and keep temperature low (deterministic). The Hub tries the OpenAI-compatible /v1/audio/transcriptions endpoint first and falls back to /inference.
Auto-submit trigger
In Settings → Auto-submit trigger, turn on the toggle and set a submit phrase. When the phrase is detected at the end of voice recognition or typed input, the message is sent automatically.
Example: with the phrase set to send
- Saying "fix the bug send" → "fix the bug" is sent automatically
- Typing
fix the bug send→ "fix the bug" is sent automatically
The phrase itself is not sent to the PTY or the AI.
End-of-speech wait time
In Settings → Voice you can change the "end-of-speech wait time". This applies to Browser recognition only. Even after Chrome's recognition auto-stops on silence, it resumes recognition if you speak again within the configured number of seconds. Whisper is batch recognition, so this setting does not apply.
Troubleshooting
If Browser recognition stops responding (button press has no effect, or the microphone picks up audio but no text appears):
- Fully restart Chrome (close all windows and relaunch). Chrome's internal Speech Recognition state can get stuck and a full restart clears it — this is the most common fix.
- If that doesn't help, paste
chrome://settings/content/all?searchSubpage=127.0.0.1into the address bar, reset the microphone permission for127.0.0.1, and allow it again. - If it still fails, delete all site data for
127.0.0.1from the same page.
If voice input works in Incognito with the same Hub URL, the issue is in your normal Chrome profile's internal state. The steps above will recover it.
Use Settings → Voice → Diagnose to identify the problem and copy a diagnostic log.
For Whisper, Whisper server is not installed / Whisper server is not configured / cannot connect means either run Settings → Voice → Install on a Windows x64 Hub or configure voice.whisper.server_url to a manually started local server. The managed server log is written to ~/.many-ai-cli/whisper/whisper-server.log.
Settings
The config file is auto-created on first run.
| OS | Path |
|---|---|
| Windows | %USERPROFILE%\.many-ai-cli\config.yaml |
| macOS / Linux | ~/.many-ai-cli/config.yaml |
hub:
  port: 47777               # default port (auto-probes 47778, 47779... on collision)
  open_browser: false       # true = open the browser automatically on serve
  auto_shutdown: true       # stop the Hub once all wrappers exit
  log_dir: ""               # empty = ~/.many-ai-cli/logs
  idle_timeout_min: 60      # minutes before idle sessions are auto-disconnected (0 = disabled)
  wrapper_reconnect_grace_sec: 3600  # how long wrapped sessions wait for a crashed/restarted Hub (0–86400)

ollama:
  base_url: ""              # empty = http://localhost:11434. For another host, use e.g. http://<host-ip>:11434

voice:
  whisper:
    managed: false          # true = Hub manages a local whisper.cpp server
    model: "small"            # default; pick large-v3-turbo-q5_0 on a fast CPU / GPU server
    server_url: ""          # e.g. http://127.0.0.1:8080 (auto-set in managed mode)
    server_port: 0          # 0 = auto-pick
    request_path: ""        # empty = try /v1/audio/transcriptions then /inference
    language: "ja"          # ja / en / auto, etc.
    timeout_seconds: 60

log:                        # hub.log rotation (lumberjack)
  enabled: true
  max_size_mb: 10           # max size per file
  max_backups: 3            # number of rotated files to keep
  compress: false           # gzip rotated files

token: ""                   # empty = randomly generated on startup (URL stays stable across restarts)
To reset the token, delete the token: line and restart the Hub.
ollama.base_url is the Ollama daemon endpoint as seen from the Hub process. It is not specific to Hyper-V, WSL, Docker, or another VM setup: any host/guest relationship works as long as the Hub can reach that HTTP URL. The model picker reads <base_url>/api/tags, Claude Code Ollama sessions receive ANTHROPIC_BASE_URL=<base_url>, and Codex Ollama sessions receive OPENAI_BASE_URL=<base_url>/v1. Do not include /v1 or /api/tags in base_url; the Hub appends the provider-specific suffix when needed.
The
approval/spawn/slash_cmd_sources/approval_pattern_sources/approval_profiles/user_prefssections may be appended automatically by UI actions (no hand-editing required).
Where settings are saved
Settings are split into three categories:
| Category | Examples | Storage |
|---|---|---|
| D1: UI display state (per-device is natural) | theme, font size, language, sidebar width | Browser localStorage |
| D2: User feature settings (shared across devices / ports) | voice, trigger, notification sound, approval auto-switch, quick commands, usage links, favorites, session order, spawn defaults | ~/.many-ai-cli/config.yaml under user_prefs:, read/written via GET/PUT /api/user-prefs |
| D3: Server operation settings | hub port, log config, approval enable/disable, slash command sources, approval pattern sources, token | ~/.many-ai-cli/config.yaml (direct edit or dedicated Settings UI) |
user_prefs: (D2) survives port changes (e.g. the WSL launcher shifting from 47777 to 47877) because it is stored server-side rather than in per-origin localStorage.
Voice engine selection is the exception: off / browser / whisper stays in each browser's localStorage so a PC can keep Browser recognition while an iPhone uses Whisper.
On first load the browser mirrors D2 values from the server. Subsequent changes are written to both localStorage (as a cache) and the server simultaneously. Any existing localStorage values are pushed to the server automatically on first run.
Approval detection patterns have an official / custom profile per provider. official is fetched and cached at startup from resources/approval-patterns/{claude,codex,copilot,cursor-agent,grok,common}.md on GitHub; custom is for your own edits.
Custom notification sounds are stored as a binary file at ~/.many-ai-cli/notify_sound_custom.bin, with the MIME type recorded in user_prefs.notify_sound.custom_mime.
Image transfer
You can send image files from the Hub UI to a wrapped session.
Steps
- Start
many-ai-cli serve - Open the Hub UI in a browser
- With a session card selected, send an image in one of these ways:
- Paste:
Ctrl+V - Drag & drop: drop onto the area at the bottom of the sidebar
- Click to choose: click the area to open a file dialog
- Paste:
- The Hub saves it under
~/.many-ai-cli/attachments/<session-id>/and injects the path into the PTY- Claude:
@<saved-path>form - Codex:
<saved-path>form
- Claude:
Verification script (Windows / PowerShell 7)
pwsh scripts/test_attach.ps1          # run test (auto-start Hub → WS connect → send PNG)
pwsh scripts/test_attach.ps1 -KeepHub # keep the Hub running
Shutdown, zombie protection & Hub crash resilience
Two goals are balanced here:
- Don't let child AI sessions keep running — and billing — when the user has clearly walked away.
- Don't lose in-flight AI work just because the Hub Web UI hit a bug, was restarted, or its console window was closed.
When the wrapper's WebSocket to the Hub drops, the wrapper probes the Hub's HTTP endpoint to tell intentional disconnects from Hub crashes:
| Scenario | Wrapper behavior |
|---|---|
Intentional disconnect — UI × (dismiss), "stop everything", or idle-timeout fired(Hub HTTP responds normally) |
Kill the PTY child (claude / codex / copilot / cursor-agent / grok) immediately. No grace period. |
Hub crash / .exe console closed(Hub HTTP unreachable) |
Retry dial+register every 2 s for up to wrapper_reconnect_grace_sec (default 3600 s = 60 min).• If Hub comes back: re-register as a new session, replay the last 64 KB of PTY output to the UI, and resume. • If the grace expires with Hub still down: kill the PTY. |
| Browser closed but Hub still running (no UI connected) | After idle_timeout_min minutes (default 60), the Hub force-disconnects every wrapper, which is then handled as the "intentional disconnect" row above. |
Why: this lets you recover from a Hub-side bug, panic, or manual restart without losing your AI session — as long as the Hub comes back within the grace window. For long-running autonomous tasks (multi-hour agent loops), bump
wrapper_reconnect_grace_secup to e.g. 12 h (43200). Cases where the user meant to stop (dismiss, "stop everything", browser closed and forgotten) still terminate sessions promptly.
Configuration knobs in ~/.many-ai-cli/config.yaml:
hub.wrapper_reconnect_grace_sec—0disables reconnect (legacy "kill immediately" behavior). Range0–86400seconds (up to 24 h). Default3600(60 min). Also editable in Settings (in minutes). Applies to new sessions only — running sessions keep the value they were spawned with.hub.idle_timeout_min— how long the Hub keeps wrappers alive when no UI is connected.0disables. Range0–1440minutes. Also editable in Settings.
For a clean shutdown, prefer the ⏻ button in the Hub UI top-right or many-ai-cli stop; closing the console window now leaves wrappers waiting for the Hub to come back rather than killing them right away.
Architecture
AI CLI (claude / codex / copilot / cursor-agent / grok)
    └─ many-ai-cli wrap  <── PTY wrapper
           │ WebSocket
    ┌──────▼──────┐
    │  Hub Server │  127.0.0.1:47777
    └──────┬──────┘
           │ WebSocket
    ┌──────▼──────┐
    │ Browser UI  │  xterm.js / Vanilla JS
    └─────────────┘
The Hub server acts as a relay between PTY sessions and the browser UI. Each AI CLI runs inside a PTY wrapper that forwards I/O over WebSocket to the Hub, which in turn serves the browser UI.
Logs
Session logging is OFF by default (opt-in). No per-session
.log/.jsonl/.txtfile is written, and no transcript content is stored in the SQLite history, until you turn it on in Settings → Log → Session log (or setlog.session_enabled: trueinconfig.yaml). The reason is security: the raw.logstream records exactly what the terminal showed, including any API keys, tokens, or passwords that appeared on screen — and these cannot be reliably masked (a password liketest1234is indistinguishable from ordinary text). The.jsonl/.txtfiles do pass through a heuristic token redactor, but that is best-effort only. Enable session logging only if you understand and accept that anything shown in the session may be persisted to disk in clear text. The Hub's own diagnostic log (hub.log) is independent and does not contain session content.
| Type | Path | Content |
|---|---|---|
| Hub log | ~/.many-ai-cli/logs/hub.log |
Hub server runtime logs (rotated by lumberjack; configured via the log: section). Independent of session logging |
| Session raw log | ~/.many-ai-cli/logs/sessions/<provider>_<YYYY-MM-DD_HHMMSS>_<folder>_s<id>.log |
Raw PTY stream for each wrapped session (includes ANSI sequences) |
| Session history | ~/.many-ai-cli/logs/sessions/<provider>_<YYYY-MM-DD_HHMMSS>_<folder>_s<id>.jsonl |
Structured session events (session_start, user_input, pty_output, attach, session_end, session_dismiss) |
| Clean transcript | ~/.many-ai-cli/logs/sessions/<provider>_<YYYY-MM-DD_HHMMSS>_<folder>_s<id>.txt |
Human-readable text (ANSI / spinners / control bytes stripped). Generated automatically on session end; any sessions missed due to a Hub crash are reconstructed at the next serve startup |
Each wrapped session produces three files that share the same basename (.log / .jsonl / .txt) on purpose — they are not duplicates but serve different access patterns:
.logis the raw, unmodified PTY byte stream. It still contains the terminal control codes (ANSI color, cursor moves, screen clears) that the CLI emitted, so it looks "garbled" in a plain editor — that is expected. It is NOT redacted: any secret shown on screen is written verbatim. It exists because it can be replayed to re-render the colored output and supports fast byte-range reads for the UI scrollback..jsonlis the structured event timeline (input, output, session boundaries, timestamps). The output bytes are stored escaped here, so it also looks noisy when read directly. Output and input pass through the heuristic token redactor before being written. It is the source of truth and the input for regenerating the transcript and for crash recovery..txtis the one meant for humans: control codes are stripped, and (because it is derived from.jsonl) known token patterns are masked. Read this one unless you specifically need the colored replay or the structured events.
Session logs are local private storage (0700 directories / 0600 files where applicable), but they can still contain prompts, file paths, and other user-provided text. Known token patterns are redacted before .jsonl / .txt content and user-input history are stored, but this is heuristic and the raw .log is not redacted at all — which is the main reason session logging is opt-in. Remove ~/.many-ai-cli/logs/ if you accidentally paste sensitive material.
The Hub UI log-path button copies the log directory path to your clipboard.
You can also regenerate a clean transcript manually:
many-ai-cli log-clean ~/.many-ai-cli/logs/sessions/<session>.jsonl -o transcript.txt
Troubleshooting
Session card shows Disconnected immediately after spawn (Windows + pnpm-installed CLI)
If you installed Claude Code, Codex CLI, or another wrapped CLI via a package manager, the Hub may fail to spawn it with the session card flipping to Disconnected within a second and a 0-byte raw log. The card now also shows a short reason such as reason: codex not found in PATH.
The Hub inherits the PATH snapshot of the shell that launched it. If that shell did not have PNPM_HOME exported, the persistent %PNPM_HOME%\bin entry in your USER Path is not expanded by Windows at process start and the pnpm bin directory effectively drops out — so exec.LookPath("<provider>") inside the wrap subprocess fails.
To recover:
many-ai-cli stop- Open an interactive PowerShell where
$env:PNPM_HOMEresolves correctly (verify with$env:PATH -split ';' | Select-String pnpm). - From that shell, run
many-ai-cli claude,many-ai-cli codex,many-ai-cli copilot,many-ai-cli cursor-agent, ormany-ai-cli grok— the Hub will be re-spawned with the freshPATHsnapshot.
Hub diagnostics for each spawn are written to ~/.many-ai-cli/logs/spawn/<provider>-<timestamp>.log and include the resolved PATH, detected package managers, and an explicit hint when executable file not found is the underlying cause.
v0.2.0 and later: The Hub re-expands
%VAR%-style entries in the inherited USERPathjust before spawning a wrap process (readingHKCU\Environmentand falling back to%LOCALAPPDATA%\pnpmwhen the directory exists), so this manual restart is normally no longer needed. The recovery procedure above remains as a fallback when the fix cannot resolve the variable.
Session shows Standby while a workflow (ultracode, etc.) is running
While a session is running a long task that mostly works through background subagents — such as a Claude Code workflow (ultracode) — the session card may show Standby instead of Running. This is not a malfunction; the work is still in progress.
The Hub decides a session's liveness solely from whether the terminal (PTY) produced output within the last few seconds (if output is idle and no approval UI is visible, it is treated as Standby). During a workflow there are frequent quiet periods with no output to the main terminal, so the state momentarily falls back to Standby; it returns to Running automatically once output resumes. Unlike Waiting (an approval prompt), this state is not asking you for input — the terminal is simply quiet.
many-ai-cli does not inspect the internal state of the wrapped CLI (e.g. whether a workflow is in flight), so this is a known limitation of the output-based heuristic. Even when the card reads
Standby, you can open the terminal itself to confirm the task is still running.
Security / Privacy
- The Hub HTTP/WebSocket server binds to
127.0.0.1only — external hosts cannot reach it directly - Random token in URL prevents unauthorized local access
- Token-less access is available only as an explicit opt-in for loopback / trusted private paths such as SSH local forwarding or a per-user WireGuard/Docker gateway. Configure
hub.allow_loopback_without_token: true, narrowhub.trusted_networksvalues such as172.19.0.1/32, andhub.allowed_hostsvalues such as10.8.0.1only when that private path is already protected. Never use it with public bind addresses, reverse proxies, shared shell hosts, or broad CIDRs such as0.0.0.0/0. many-ai-cliitself sends no telemetry or usage data to any service
Local instruction file writes
When Approval Buttons is enabled, many-ai-cli writes only its marked approval-rules block to AI instruction files for active wrapped sessions: ~/.claude/CLAUDE.md for Claude Code, $CODEX_HOME/AGENTS.md or ~/.codex/AGENTS.md for Codex, and the project instruction root AGENTS.md for GitHub Copilot, Cursor Agent, and Grok (Grok reads both CLAUDE.md and AGENTS.md natively as a Claude Code-compatible harness). The block is idempotent and is removed when the last active wrapped session using that file ends, when Approval Buttons is disabled, or when the Hub stops.
Outbound network traffic
many-ai-cli is local-first, but the following outbound HTTPS requests can occur and you should be aware of them:
- Slash command list (Hub itself) — When the slash command picker is opened, the Hub fetches a markdown file from
https://raw.githubusercontent.com/ishizakahiroshi/many-ai-cli/main/resources/slash-commands/{claude,codex,copilot,cursor-agent,grok}.mdand caches it for 24 hours. The source URL can be changed (or pointed to a local file path) in Settings → Slash command sources. - Approval pattern list (Hub itself) — On Hub startup, the official approval detection patterns can be fetched from
https://raw.githubusercontent.com/ishizakahiroshi/many-ai-cli/main/resources/approval-patterns/{claude,codex,copilot,cursor-agent,grok,common}.mdand cached for 24 hours. The source URLs can be overridden in config. - Web Push notifications (Hub itself, opt-in only) — When Push notifications are enabled, the Hub sends encrypted Web Push requests to the browser vendor's push service over HTTPS. Payloads include the session ID/name, provider, and a short approval-question/context excerpt; they do not include the Hub URL token. VAPID keys and subscriptions are stored locally in
~/.many-ai-cli/push_store.json. Notifications can be delivered while an SSH tunnel is down, but opening the Hub from the notification still requires the tunnel and Hub to be reachable. - Voice input (only while in use) — Browser mode uses the Web Speech API; in Chrome / Edge, microphone audio is sent to the browser vendor's speech-recognition servers (Google / Microsoft). Whisper mode sends audio to the Hub and then to the configured Whisper server. Keep
voice.whisper.server_urlon127.0.0.1/localhostfor local-only processing; external API URLs would send audio to that external service. See also the privacy note in the voice input section. - Managed Whisper install (Windows x64 Hub, opt-in only) — Clicking Settings → Voice → Install downloads a whisper.cpp Windows x64 release archive from GitHub Releases and the selected ggml model from Hugging Face into
~/.many-ai-cli/whisper/. The release archive is SHA-256 verified before extraction; model entries without a published hash are downloaded over HTTPS and shown as hash-unverified in the UI. - Wrapped CLI traffic (the CLIs themselves) — The CLIs you wrap (Claude Code, Codex CLI, GitHub Copilot CLI, Cursor Agent CLI, Grok Build CLI) talk directly to their respective vendor APIs (Anthropic, OpenAI, GitHub, Cursor, xAI) over HTTPS.
many-ai-clionly relays PTY I/O via local WebSocket; it does not intercept, log, or proxy these API requests. Whatever network behavior the underlying CLI has applies as-is.
⚠️ Data retention by wrapped CLIs
many-ai-cli does not collect or transmit your data, but the CLIs it wraps do — and each vendor's data-handling rules differ. Because the Hub only relays PTY I/O, the wrapped CLI's policy applies to you as-is.
The table below summarizes each vendor's stance as of 2026. Always verify the current terms before use.
| CLI / Backend | Used for model training by default? | Opt-out / controls | Retention |
|---|---|---|---|
| Claude Code (Anthropic Commercial Terms: API / Claude for Work / Enterprise / Education / Gov) | No — excluded by default under commercial terms | No opt-out needed; Zero Data Retention available via enterprise agreement | API logs up to 30 days, reduced to 7-day auto-delete after 2025-09-14 |
| Codex CLI (OpenAI: via ChatGPT Plus / Pro / Business plans) | Possibly — content from ChatGPT plans can be used for training | "Do not train on my content" toggle in the privacy portal; separate "allow training on full environments" control in Codex Settings | Abuse-monitoring logs up to 30 days; ZDR / Modified Abuse Monitoring available |
| GitHub Copilot CLI (GitHub: Product Specific Terms, March 2026) | Yes — prompts are retained and used to fine-tune your private model | No explicit opt-out documented (verify current terms) | Not specified |
| Cursor Agent CLI (Cursor) | Verify current terms | Verify current terms | Verify current terms |
| Grok Build CLI (xAI) | Verify current terms | Verify current terms | Verify current terms |
⚠️ Terms-of-service change risk
Wrapped-CLI vendors may change their terms — including restricting or prohibiting third-party wrapper / automation access — at any time. If that happens, using the CLI through many-ai-cli could become a terms violation.
- Recent precedent: Google began enforcing a ToS clause in 2026 that forbids accessing Gemini Code Assist through third-party wrappers, resulting in
403 ToSaccount bans for tools like OpenClaw / OpenCode / Antigravity. For this reason, Gemini CLI is intentionally out of scope formany-ai-cli. - The same risk applies to every CLI in the table above. Support for any wrapped CLI may be discontinued without notice if its vendor restricts third-party automation. It is your responsibility to review each CLI's current terms before use.
⚠️ Do not share one account among multiple users
Never share a single AI CLI account (its credentials) among multiple people — for example by installing many-ai-cli on a server and pointing several users at one login. This clearly violates each vendor's terms of service.
- Claude Code (Anthropic): Under the Consumer Terms, accounts are for individual use; sharing or transferring credentials (login / OAuth tokens) is prohibited. Rate limits are designed around individual usage, so multi-user access can be detected as anomalous usage and lead to account suspension (no refund)
- Codex CLI (OpenAI): Sharing a ChatGPT account is likewise prohibited by OpenAI's terms
- GitHub Copilot CLI / Cursor Agent CLI: Both are licensed per seat (per individual); sharing violates the terms
- Grok Build CLI (xAI): Access is tied to an individual SuperGrok / X Premium+ subscription; sharing the account violates xAI's terms
If multiple people need access, use one of the legitimate options instead:
- Each user logs in with their own account (even on a shared server, separate OS users / home directories so each person uses their own credentials)
- Switch to API-key billing (e.g. the Anthropic API) under an organizational agreement
- Use an organizational plan such as Claude for Work (Team / Enterprise) with a seat per member
many-ai-cli itself has no multi-user support either (see the next section, "Localhost-only by design").
⚠️ Important: Localhost-only by design
many-ai-cli is designed to be reached by your browser as localhost. Remote use is supported only when an SSH local forward preserves that localhost-only model. Do not:
- Expose a remote Hub directly from another host; use SSH local forwarding instead
- Modify the bind address to anything other than
127.0.0.1(e.g.0.0.0.0, LAN IP) - Expose the Hub UI through a reverse proxy (nginx / Caddy / etc.)
- Share the Hub URL (with its token) with anyone
The Hub UI exposes APIs that perform host-level actions (e.g. /api/open-dir opens folders in the OS file manager). These are only safe under the localhost assumption — exposing them externally could lead to arbitrary folder access or information disclosure.
Public exposure (unsupported — at your own risk)
The only supported configuration is localhost reachability, as described above. many-ai-cli is distributed under the MIT License and does not technically prevent you from placing a reverse proxy in front of the Hub and exposing it publicly — but by choosing to do so, you agree to the following:
- Public exposure is unsupported. Questions, bug reports, and security consultations about exposed configurations will not be handled
- Reaching the Hub is equivalent to arbitrary command execution on that host. Direct PTY input, auto-approving prompts, and spawning new sessions are all possible; a compromise is not a hijacked web UI — it is a hijacked host
- The URL token alone is not designed to be your security boundary. If you expose the Hub, you must design, operate, and maintain layered defenses yourself — TLS, an independent authentication layer (mTLS / SSO / IP allowlisting, etc.), and rate limiting — with a full understanding of what each provides. If you cannot build such a configuration, do not expose the Hub
- The developers accept no liability whatsoever for any damage arising from public exposure, including but not limited to host compromise; leakage of data, credentials, or API keys; suspension of AI CLI accounts; and damage caused to third parties. See also the Disclaimer
Build from Source
Requires Go 1.25+.
git clone https://github.com/ishizakahiroshi/many-ai-cli.git
cd many-ai-cli

# Build for the current OS
go build -o many-ai-cli.exe ./cmd/many-ai-cli   # Windows
go build -o many-ai-cli ./cmd/many-ai-cli        # macOS / Linux
Cross-compilation
GOOS=windows GOARCH=amd64 go build -o dist/many-ai-cli-windows-x64.exe          ./cmd/many-ai-cli
GOOS=darwin  GOARCH=amd64 go build -o dist/many-ai-cli-macos-intel              ./cmd/many-ai-cli
GOOS=darwin  GOARCH=arm64 go build -o dist/many-ai-cli-macos-apple-silicon      ./cmd/many-ai-cli
GOOS=linux   GOARCH=amd64 go build -o dist/many-ai-cli-linux-x64                ./cmd/many-ai-cli
Remote server / Docker deployment (auto-update)
Docker is not required for remote-server use. For a small team, normal SSH plus tmux, screen, or systemd can work as long as each person signs in with their own AI CLI account and has a separate OS user, home directory, working directory, and Hub port. Try the layout that best fits your team before adopting the Docker setup.
If you do not use Docker, pay attention to these points:
- Do not share one Linux user.
~/.many-ai-cli/, AI CLI credentials, logs, and caches will otherwise be mixed together. - Separate working directories and ports per person. Example: user A uses
/srv/many-ai-cli/work/a+47777, user B uses/srv/many-ai-cli/work/b+47778. - Pin Python / Node / bun tooling per project. Use
venv/uv,nvm/mise, and project-local lockfiles to avoid version conflicts. - Do not share one AI CLI account across users. Each person must sign in with their own account; see "Do not share one account among multiple users" above.
Container assets live under deploy/docker/ (one user = one container; the Hub is published on 127.0.0.1 only and is meant to be reached through an SSH tunnel or similar). Start from deploy/docker/users/example.yaml, copy it to users/<user>.yaml, and replace the example user name and port before adding it to compose.yaml.
Every push to main / develop triggers GitHub Actions (docker-image.yml) to build and publish a container image to GHCR — the server never builds anything itself:
ghcr.io/ishizakahiroshi/many-ai-cli:latest      # follows main (normal operation)
ghcr.io/ishizakahiroshi/many-ai-cli:develop     # follows develop (testing)
ghcr.io/ishizakahiroshi/many-ai-cli:sha-<hash>  # per-commit tag (rollback)
Always run the latest image
Place deploy/docker/aac-update.sh next to your compose.yaml and register it as a daily cron job. It pulls the configured tag and recreates containers only when the image actually changed (no-op otherwise):
# root crontab — daily at 04:30
30 4 * * * /opt/many-ai-cli/aac-update.sh >> /var/log/aac-update.log 2>&1
What an update restart does (and does not) reset
On days with no new image the cron is a complete no-op — nothing restarts. When the image did change, the affected containers are recreated, which restarts the Hub. What that means for each user:
| Item | Why | |
|---|---|---|
| ❌ Lost | Running AI sessions (claude / codex PTY processes) and their session cards in the Hub UI | processes die with the container |
| ✅ Kept | Hub access token (~/.many-ai-cli/config.yaml) |
the home volume persists it — tunnel-mode launcher profiles keep working unchanged |
| ✅ Kept | AI CLI login state (Claude auth, etc.) | same (under home) |
| ✅ Kept | Working repositories / files | bind-mounted work directory |
| ✅ Kept | Session logs (~/.many-ai-cli/logs/) |
same (under home) |
| △ Recoverable | AI conversation history | provider CLIs keep history under home; resume with --resume-style options in a new session |
Shutdown is graceful: stop_grace_period: 40s plus the entrypoint waiting up to 20 s for wrappers to exit.
Operational tips (especially for multi-user servers — the cron recreates every user's container at once):
- Pick the cron time wisely. If users run long overnight AI tasks, 04:30 may cut them off — choose a window nobody works in, and announce it to all users.
- Freeze before important runs.
touch /opt/many-ai-cli/HOLDskips the update (for all users);rm HOLDresumes it. - Tag choice controls frequency.
AAC_TAG=developrestarts on every develop push;latestonly on releases tomain.
Development bypass
The image tag is selected by AAC_TAG in the compose project's .env file (defaults to latest). A HOLD file next to compose.yaml freezes the auto-update cron.
| Mode | .env |
Auto-update cron |
|---|---|---|
Normal (follow main) |
AAC_TAG=latest or unset |
runs |
Follow develop |
AAC_TAG=develop |
runs (keeps pulling develop) |
| Local build on the server | AAC_TAG=dev |
freeze it with touch HOLD |
Local-build example (when you need to test changes without going through GitHub):
cd /opt/many-ai-cli
touch HOLD                            # freeze the auto-update cron
docker build -t ghcr.io/ishizakahiroshi/many-ai-cli:dev \
  -f src/deploy/docker/Dockerfile src # src/ = a checkout of this repo
# set AAC_TAG=dev in .env, then:
docker compose up -d

# back to normal operation:
# set AAC_TAG=latest in .env, then:
docker compose up -d && rm HOLD
Uninstall
Since many-ai-cli is a single binary you download and run directly (no installer), uninstalling is done by running the binary with the uninstall subcommand from wherever you placed it.
Windows — run from the folder containing many-ai-cli.exe:
.\many-ai-cli.exe uninstall          # removes settings and logs (~/.many-ai-cli/)
.\many-ai-cli.exe uninstall --purge  # also removes the binary itself
macOS / Linux / WSL — run from the folder containing many-ai-cli:
./many-ai-cli uninstall          # removes settings and logs (~/.many-ai-cli/)
./many-ai-cli uninstall --purge  # also removes the binary itself
You will be shown exactly what will be deleted and asked to confirm before anything is removed.
| Option | What is removed |
|---|---|
| (none) | ~/.many-ai-cli/ (config, logs, attachments). The binary path is printed — delete it manually. |
--purge |
Everything above, plus the binary itself. |
Manual removal — if you prefer to delete files by hand:
- Delete
~/.many-ai-cli/(Windows:%USERPROFILE%\.many-ai-cli\) - Delete the binary (
many-ai-cli.exe/many-ai-cli)
Browser data is not cleared.
uninstallcannot reach your browser's storage. Most settings (theme, language, font size, favorites, quick commands, etc.) live server-side under~/.many-ai-cli/and are removed, but per-browser display state kept inlocalStorage(files-tree expansion, pane layout, scrollback size) remains. To clear it, open the tab where the Hub was running, pressF12, and runlocalStorage.clear()in the console.
License
MIT — see LICENSE for details.
Third-party dependency notices are provided in THIRD_PARTY_NOTICES.md, and the vendored/browser-side license texts are provided in web/src/vendor/THIRD_PARTY_LICENSES.txt.
Not Official / No Affiliation
many-ai-cli is a third-party, community-maintained tool. It is not affiliated with, endorsed by, or officially supported by Anthropic, OpenAI, GitHub, Cursor, xAI, or Ollama. All trademarks — including "Claude", "Claude Code", "Codex", "ChatGPT", "GitHub Copilot", "Cursor", "Cursor Agent", "Grok", "Ollama", and "Gemini" — are the property of their respective owners and are used here only for descriptive and interoperability purposes.
Third-Party Apps (mobile connection)
The mobile-connection wizard suggests third-party apps (Termius, Tailscale, WireGuard) only as examples of clients that work with this setup. These are independent products; many-ai-cli is not affiliated with, endorsed by, or sponsored by their developers. You may use any equivalent app, and you install and use third-party software at your own risk. All product names are trademarks or registered trademarks of their respective owners. WireGuard is a registered trademark of Jason A. Donenfeld.
Disclaimer
This tool is provided as-is without warranty. Use at your own risk.
Reviews (0)
Sign in to leave a review.
Leave a reviewNo results found