ccpocket
Health Pass
- License — License: NOASSERTION
- Description — Repository has a description
- Active repo — Last push 0 days ago
- Community trust — 462 GitHub stars
Code Pass
- Code scan — Scanned 12 files during light audit, no dangerous patterns found
Permissions Pass
- Permissions — No dangerous permissions requested
No AI report is available for this listing yet.
Mobile client for Claude Code and Codex — control coding agents from your phone via WebSocket bridge
CC Pocket
CC Pocket lets you start and run Codex and Claude Code sessions entirely from your phone. No laptop needed — just open the app, pick a project, and code from anywhere.
CC Pocket is not affiliated with, endorsed by, or associated with Anthropic or OpenAI.
Why CC Pocket?
AI coding agents are getting autonomous enough to write entire features on their own. Your role shifts from writing code to making decisions — approve this tool, answer that question, review the diff.
Decisions don't need a keyboard. They need a screen and a thumb.
CC Pocket is built for this workflow: start a session from your phone, let your machine's Codex or Claude Code do the heavy lifting, and make decisions from wherever you are.
Who It's For
CC Pocket is for people who already rely on coding agents and want an easier way to stay in the loop when they are away from the keyboard.
- Solo developers running long agent sessions on a Mac mini, Raspberry Pi, Linux server, or laptop
- Indie hackers and founders who want to keep shipping while commuting, walking, or away from their desk
- AI-native engineers juggling multiple sessions and frequent approval requests
- Self-hosters who want their code to stay on their own machine instead of a hosted IDE
If your workflow is "start an agent, let it run, step in only when needed," CC Pocket is built for that.
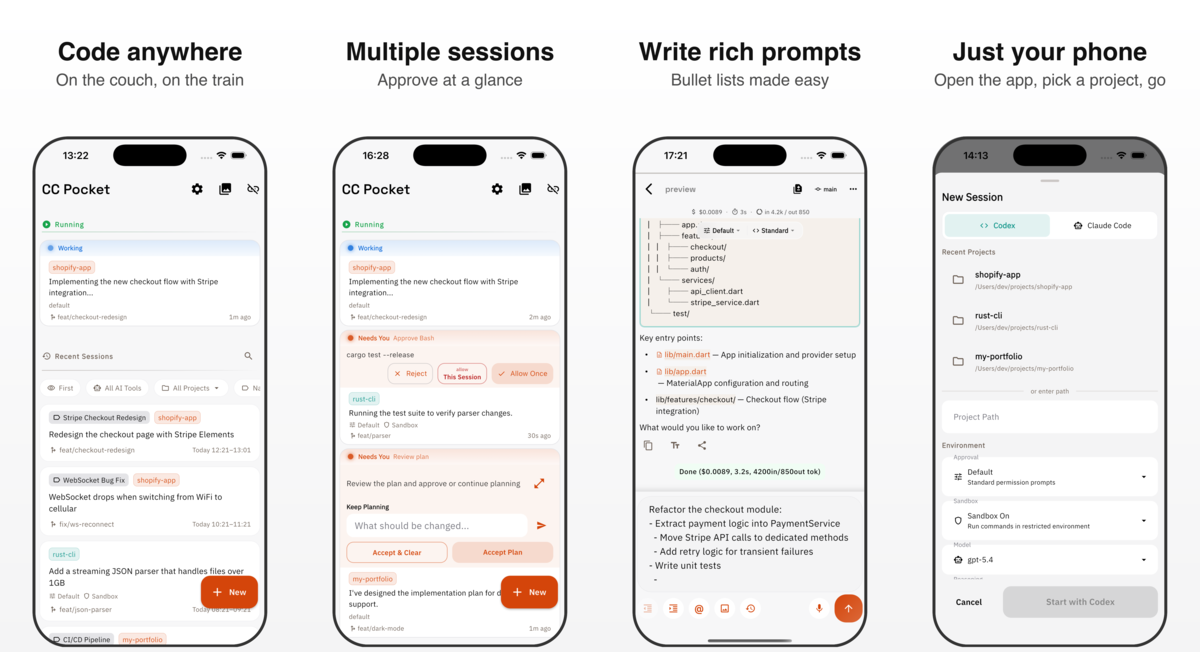
Why People Use It
- Start or resume sessions from your phone once your Bridge Server is reachable
- Handle approvals quickly with a touch-first UI instead of a terminal prompt
- Watch streaming output live including plans, tool activity, and agent responses
- Review diffs more easily with syntax-highlighted code changes and image diff support
- Write better prompts with Markdown, auto-completing bullet lists, and image attachments
- Track multiple sessions with project grouping, search, and approval badges
- Get notified when action is needed with push notifications for approvals and task completion
- Connect however you prefer with saved machines, QR codes, mDNS discovery, or manual URLs
- Manage a remote host over SSH for start, stop, and update flows
CC Pocket vs Remote Control
Claude Code's built-in Remote Control hands off an existing terminal session to your phone — you start on your Mac and continue from mobile.
CC Pocket takes a different approach: sessions start on your phone and run to completion there. Your Mac works in the background; your phone is the primary interface.
| Remote Control | CC Pocket | |
|---|---|---|
| Session origin | Start on Mac, hand off to phone | Start on phone |
| Primary device | Mac (phone joins later) | Phone (Mac runs in background) |
| Use case | Continue a desktop task on the go | Start coding from anywhere |
| Setup | Built into Claude Code | Self-hosted Bridge Server |
What this means in practice:
- You can start a brand-new session and run it entirely from your phone
- You can reopen past sessions from history stored on your Mac
- You cannot attach to a live session that was started directly on your Mac
Getting Started
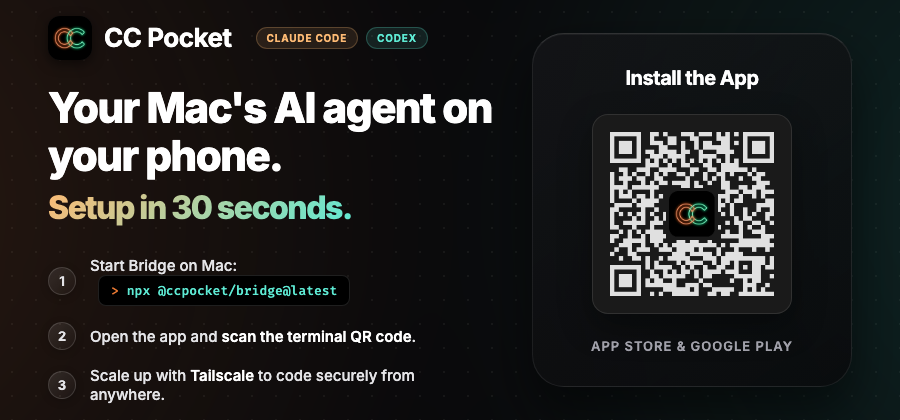
1. Start the Bridge Server
Install Node.js 18+ and at least one CLI provider (Codex or Claude Code) on your host machine, then run:
npx @ccpocket/bridge@latest
The server prints a QR code you can scan from the app to connect instantly.
Warning
@ccpocket/bridgeversions older than1.25.0are deprecated for new installs due to potential Anthropic policy concerns around OAuth-based usage.
Use>=1.25.0and configureANTHROPIC_API_KEYinstead of OAuth.Important: Set your API key via the
ANTHROPIC_API_KEYenvironment variable, not through/loginin the Claude CLI. Keys configured via/loginare indistinguishable from subscription-plan credentials, which may cause issues.
2. Install the Mobile App
Scan the QR code in the banner above, or download directly:
macOS Desktop (Beta)
A macOS native app is also available. It started as an experiment — some users liked the mobile-first UI so much that they asked for the same experience on their Mac.
It's still in beta, but fully functional. Download the latest .dmg from GitHub Releases (look for releases tagged macos/v*).
3. Connect and Start Coding
| Connection Method | Best for |
|---|---|
| QR Code | Fastest first-time setup — scan the terminal QR |
| Saved Machines | Regular use with reconnects and status checks |
| mDNS Auto-Discovery | Same-network discovery without typing IPs |
| Manual Input | Tailscale, remote hosts, or custom ports |
In the app, choose a project, pick your AI tool, and configure session modes.
Claude Code uses a single Permission Mode that controls both approval scope and planning:
| Permission Mode | Behavior |
|---|---|
Default |
Standard interactive mode |
Accept Edits |
Auto-approve file edits, ask for everything else |
Plan |
Draft a plan first, then wait for your approval before executing |
Bypass All |
Auto-approve everything |
Codex separates concerns into independent controls:
| Setting | Options | Description |
|---|---|---|
| Execution | Default / Full Access |
Controls which operations require approval |
| Plan | On / Off | Toggle planning mode independently of execution mode |
| Sandbox | On (default) / Off | Run in a restricted environment for safety |
Codex defaults to Sandbox On for safety. Claude Code defaults to Sandbox Off.
You can also enable Worktree to isolate a session in its own git worktree.
Worktree Configuration (.gtrconfig)
When starting a session, you can enable Worktree to automatically create a git worktree with its own branch and directory. This lets you run multiple sessions in parallel on the same project without conflicts.
Place a .gtrconfig file in your project root to configure file copying and lifecycle hooks:
| Section | Key | Description |
|---|---|---|
[copy] |
include |
Glob patterns for files to copy (e.g. .env, config files) |
[copy] |
exclude |
Glob patterns to exclude from copy |
[copy] |
includeDirs |
Directory names to copy recursively |
[copy] |
excludeDirs |
Directory names to exclude |
[hook] |
postCreate |
Shell command(s) to run after worktree creation |
[hook] |
preRemove |
Shell command(s) to run before worktree deletion |
Tip: Adding .claude/settings.local.json to the include list is especially recommended. This carries over your MCP server configuration and permission settings to each worktree session automatically.
.gtrconfig
[copy]
# Claude Code settings (MCP servers, permissions, additional directories)
include = .claude/settings.local.json

# Speed up worktree setup by copying node_modules
includeDirs = node_modules

[hook]
# Restore Flutter dependencies after worktree creation
postCreate = cd apps/mobile && flutter pub get
Sandbox Configuration (Claude Code)
When sandbox mode is enabled from the app, Claude Code uses its native .claude/settings.json (or .claude/settings.local.json) for detailed sandbox configuration. No Bridge-side config is needed.
See the Claude Code documentation for the full sandbox schema.
Ideal Use Cases
- An always-on host (Mac mini, Raspberry Pi, Linux server) running the agent while you monitor from your phone
- A lightweight review loop on the go where the agent codes and you approve commands or answer questions as needed
- Parallel sessions across projects with one mobile inbox for pending approvals
- Remote personal infrastructure over Tailscale instead of exposing ports publicly
Remote Access and Machine Management
Tailscale
Tailscale is the easiest way to reach your Bridge Server outside your home or office network.
- Install Tailscale on your host machine and phone.
- Join the same tailnet.
- Connect to
ws://<host-tailscale-ip>:8765from the app.
Saved Machines and SSH
You can register machines in the app with host, port, API key, and optional SSH credentials.
When SSH is enabled, CC Pocket can trigger these remote actions from the machine card:
StartStop ServerUpdate Bridge
This flow supports macOS (launchd) and Linux (systemd) hosts.
Service Setup
The setup command automatically detects your OS and registers the Bridge Server as a managed background service.
npx @ccpocket/bridge@latest setup
npx @ccpocket/bridge@latest setup --port 9000 --api-key YOUR_KEY
npx @ccpocket/bridge@latest setup --uninstall

# global install variant
ccpocket-bridge setup
macOS (launchd)
On macOS, setup creates a launchd plist and registers it with launchctl. The service starts via zsh -li -c to inherit your shell environment (nvm, pyenv, Homebrew, etc.).
Linux (systemd)
On Linux, setup creates a systemd user service. It resolves the full path to npx at setup time so that nvm/mise/volta-managed Node.js works correctly under systemd.
Tip: Run
loginctl enable-linger $USERto keep the service running after logout.
Platform Notes
- Bridge Server: works anywhere Node.js and your CLI provider work
- Service setup: macOS (launchd) and Linux (systemd)
- SSH start/stop/update from the app: macOS (launchd) or Linux (systemd) host
- Window listing and screenshot capture: macOS-only host feature
- Tailscale: optional, but strongly recommended for remote access
If you want a clean always-on setup, a Mac mini or a headless Linux box is the best-supported host environment right now.
Host Configuration for Screenshot Capture
If you want to use screenshot capture on macOS, grant Screen Recording permission to the terminal app that runs the Bridge Server.
Without it, screencapture can return black images.
Path:
System Settings -> Privacy & Security -> Screen Recording
For reliable window capture on an always-on host, it also helps to disable display sleep and auto-lock.
sudo pmset -a displaysleep 0 sleep 0
Development
Repository Layout
ccpocket/
├── packages/bridge/    # Bridge Server (TypeScript, WebSocket)
├── apps/mobile/        # Flutter mobile app
└── package.json        # npm workspaces root
Build From Source
git clone https://github.com/K9i-0/ccpocket.git
cd ccpocket
npm install
cd apps/mobile && flutter pub get && cd ../..
Common Commands
| Command | Description |
|---|---|
npm run bridge |
Start Bridge Server in dev mode |
npm run bridge:build |
Build the Bridge Server |
npm run dev |
Restart Bridge and launch the Flutter app |
npm run dev -- <device-id> |
Same as above, with a specific device |
npm run setup |
Register the Bridge Server as a background service (launchd/systemd) |
npm run test:bridge |
Run Bridge Server tests |
cd apps/mobile && flutter test |
Run Flutter tests |
cd apps/mobile && dart analyze |
Run Dart static analysis |
Environment Variables
| Variable | Default | Description |
|---|---|---|
BRIDGE_PORT |
8765 |
WebSocket port |
BRIDGE_HOST |
0.0.0.0 |
Bind address |
BRIDGE_API_KEY |
unset | Enables API key authentication |
BRIDGE_ALLOWED_DIRS |
$HOME |
Allowed project directories, comma-separated |
DIFF_IMAGE_AUTO_DISPLAY_KB |
1024 |
Auto-display threshold for image diffs |
DIFF_IMAGE_MAX_SIZE_MB |
5 |
Max image size for diff previews |
BRIDGE_ENABLE_USAGE |
unset | Enables Claude usage tracking via the Anthropic API. This makes direct API calls to Anthropic outside the Claude Agent SDK. Use at your own risk. |
License
FSL-1.1-MIT — Source available. Converts to MIT on 2028-03-17.
Reviews (0)
Sign in to leave a review.
Leave a reviewNo results found