llm-agents-for-image-annotation
Health Warn
- License — License: Apache-2.0
- Description — Repository has a description
- Active repo — Last push 0 days ago
- Low visibility — Only 5 GitHub stars
Code Pass
- Code scan — Scanned 12 files during light audit, no dangerous patterns found
Permissions Pass
- Permissions — No dangerous permissions requested
No AI report is available for this listing yet.
LLM agents look at your images, draw boxes and polygons, and read printed values. You approve each run.

LLM Agents for Image Annotation
Say what you want annotated and press a button or two. An LLM looks at your images, zooms in, and draws outlines or boxes, reading printed text when you ask.





Install · Demo · What it does · Sample data · Changelog · 日本語
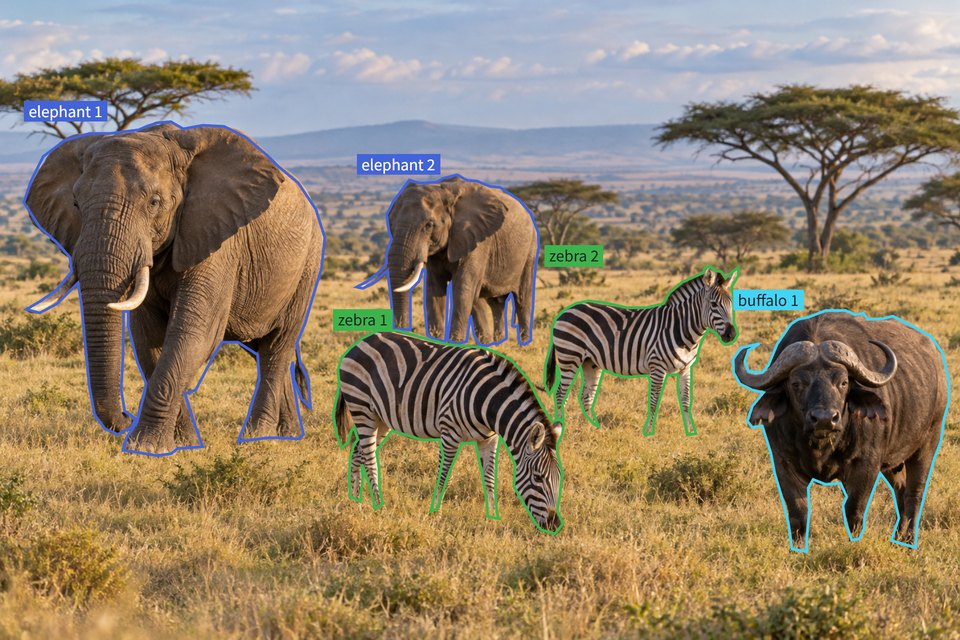
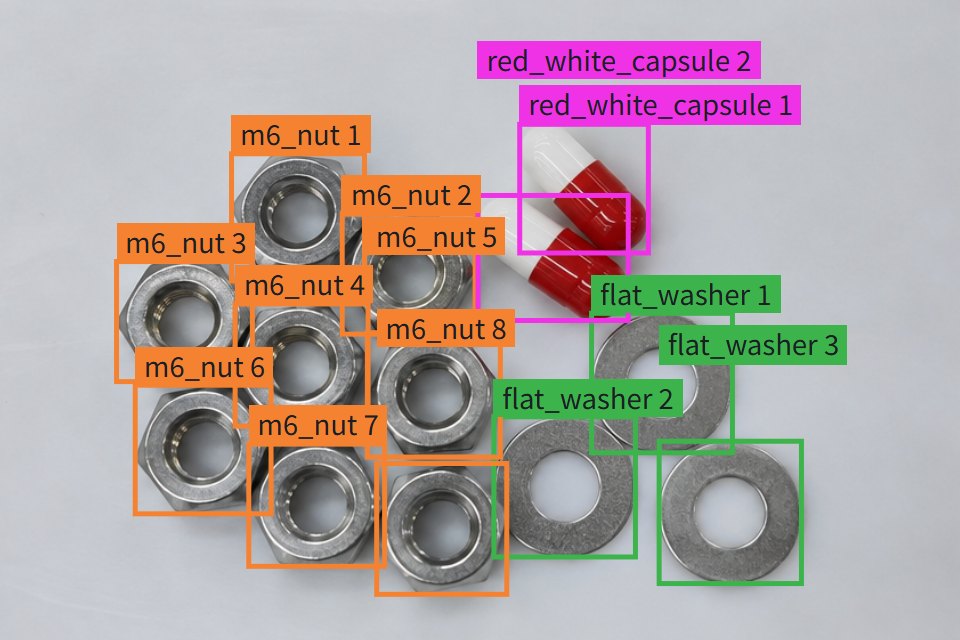
| Outlines (segmentation) | Boxes | Boxes inside boxes, with the text read |
|---|---|---|
 |
 |
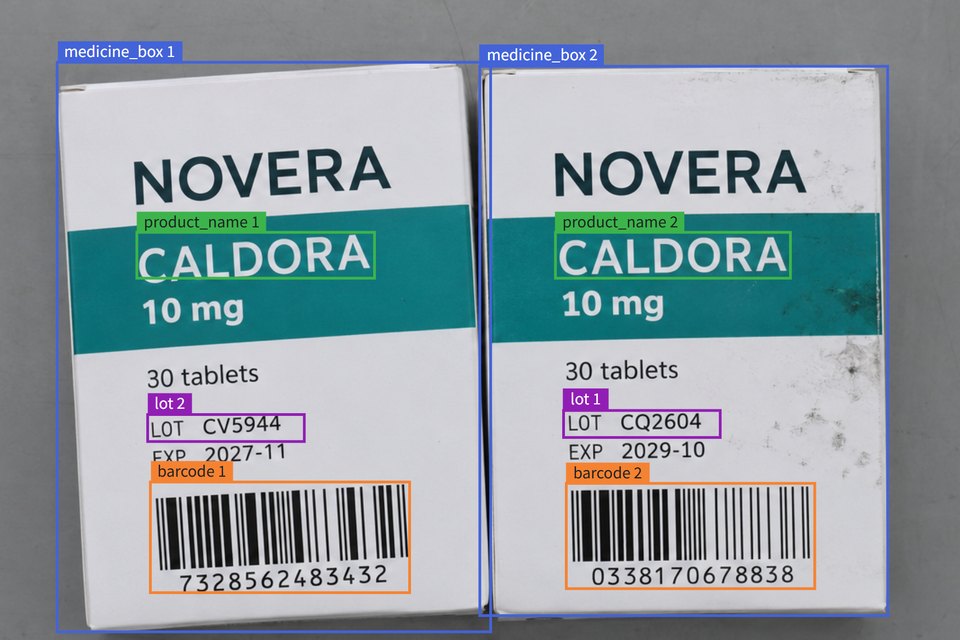 |
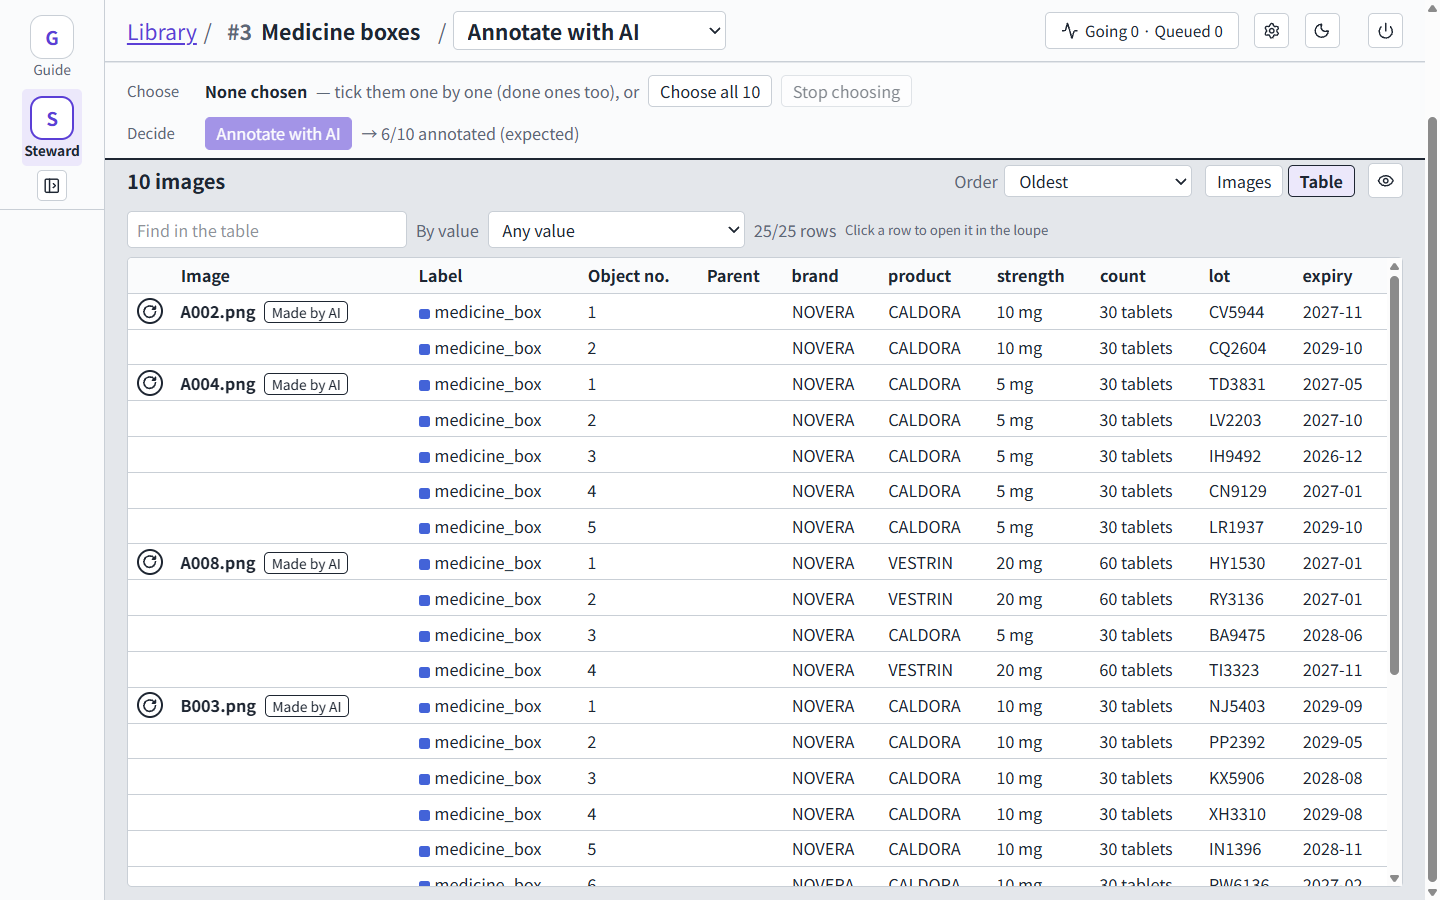
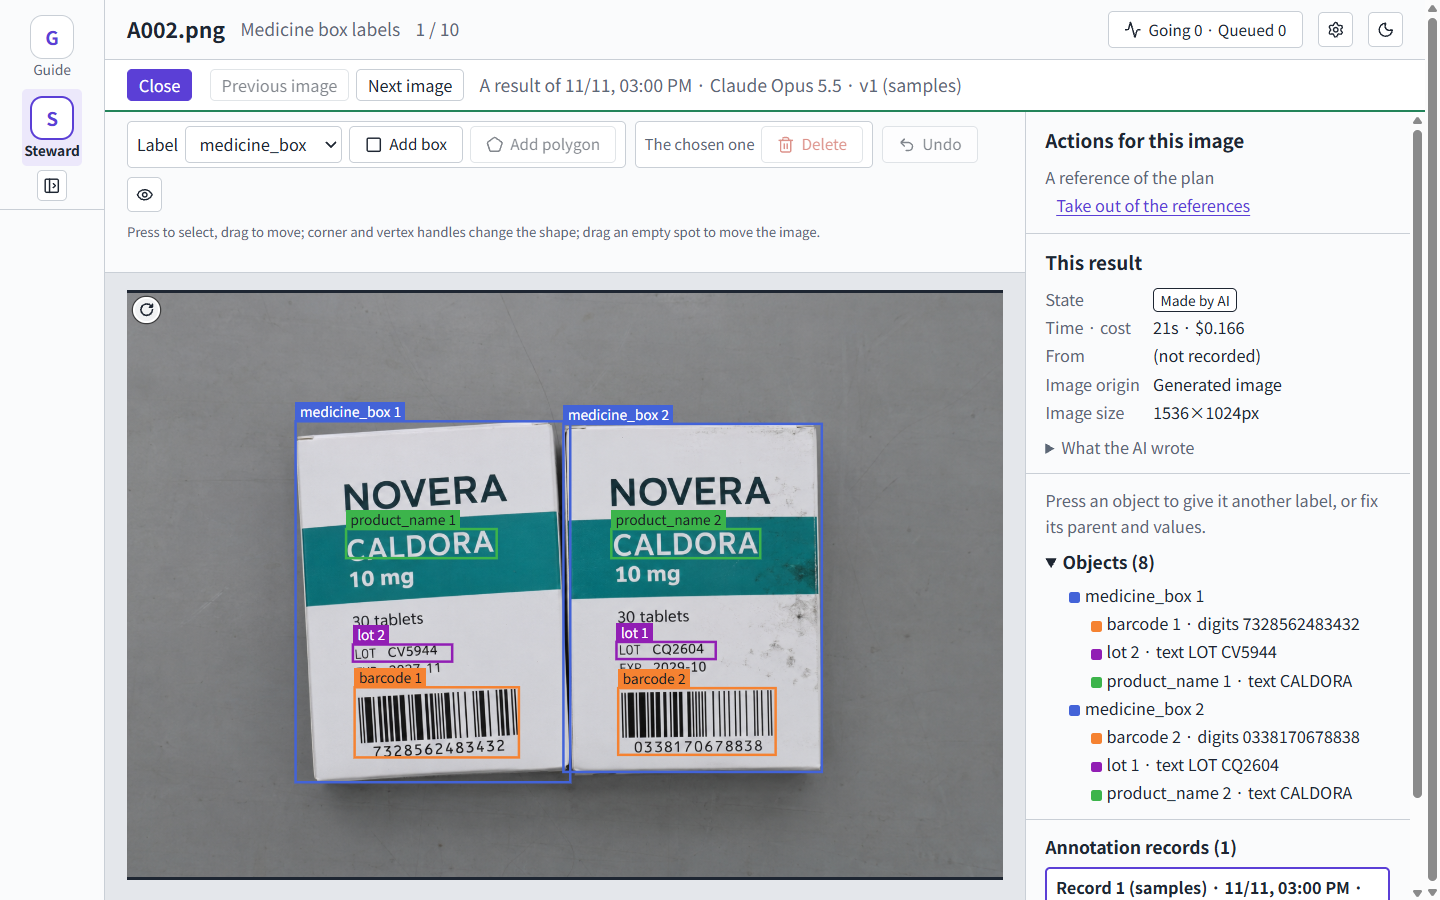
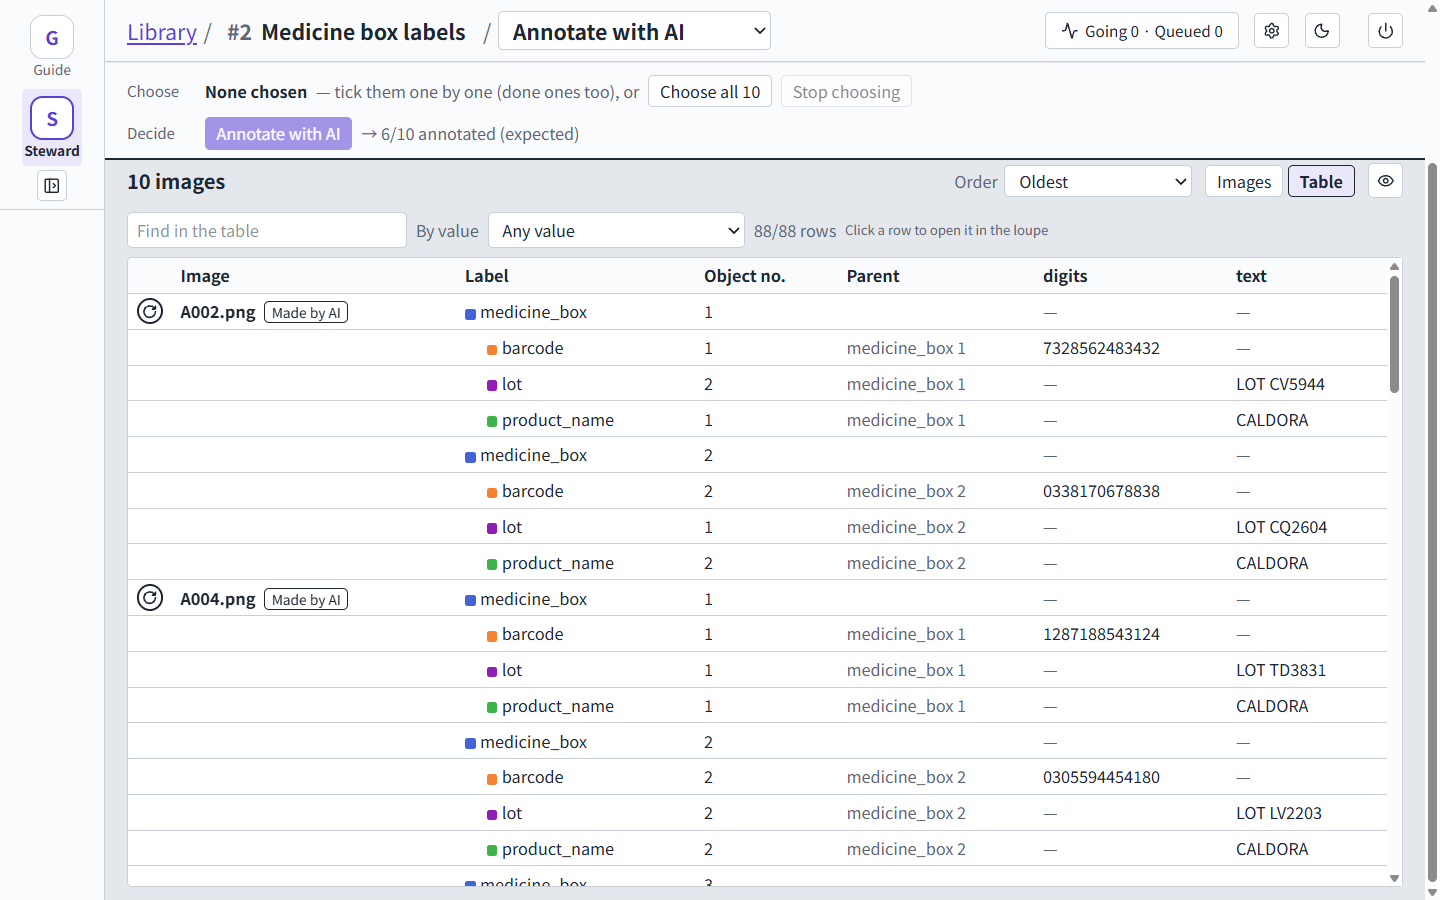
These are results of the sample datasets in samples/. The text read from the medicine boxes is shown under What it does.
The AI runs through your own Claude Code or Codex CLI, so annotation uses what that CLI is signed in with, usually your subscription's limits. Entering an API key in the app is not supported yet.
The app is in English and Japanese, both the screen and the agents. This page shows the English screen; the Japanese page shows the Japanese one.
The whole flow
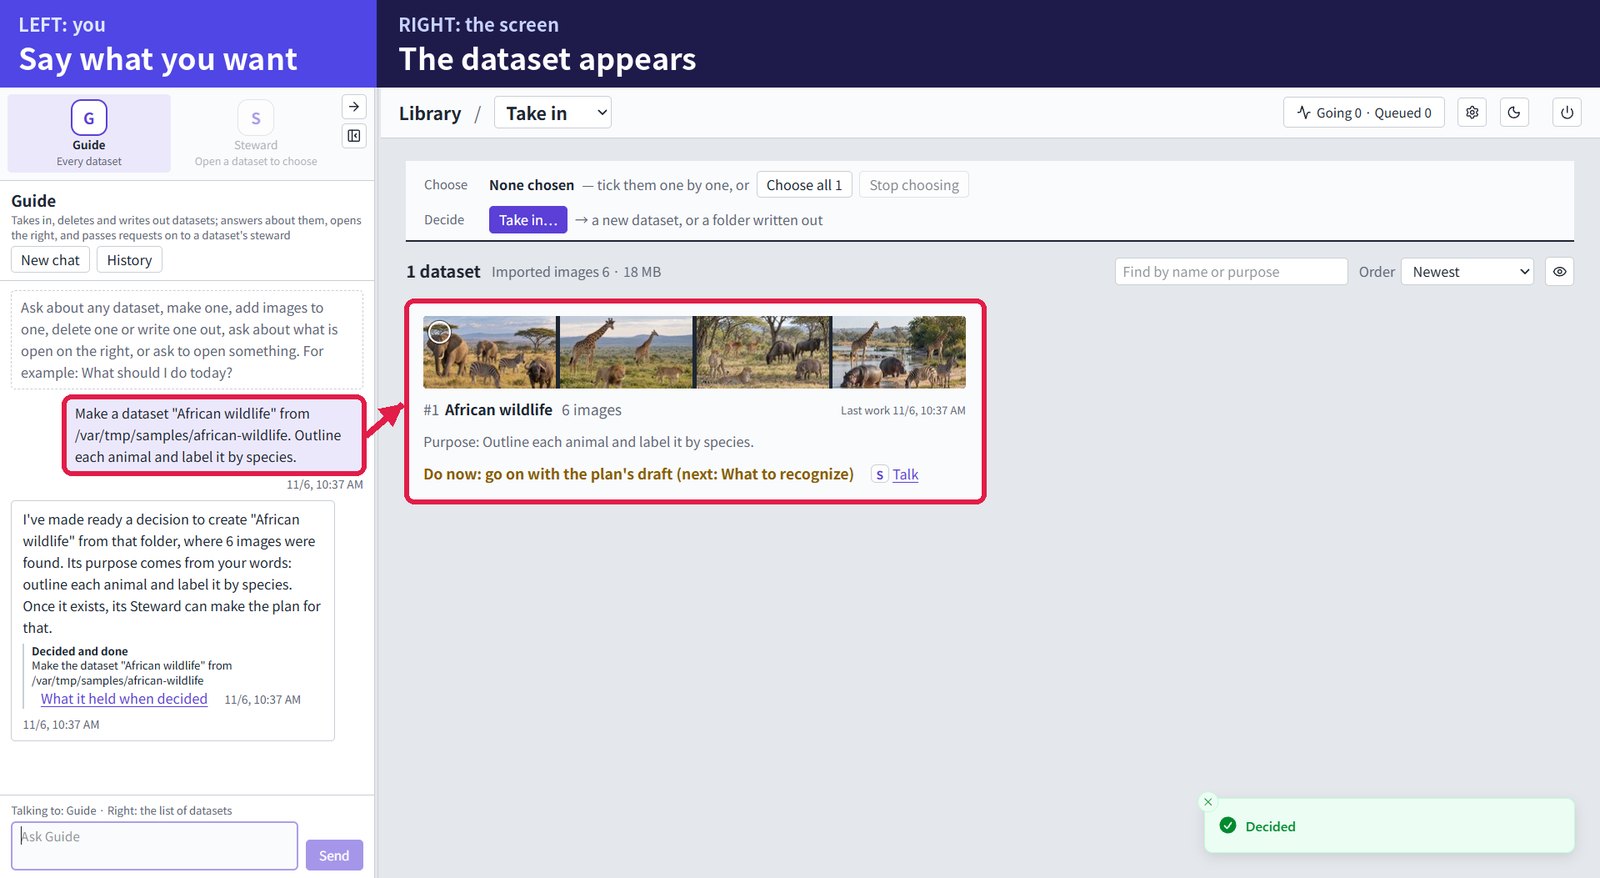
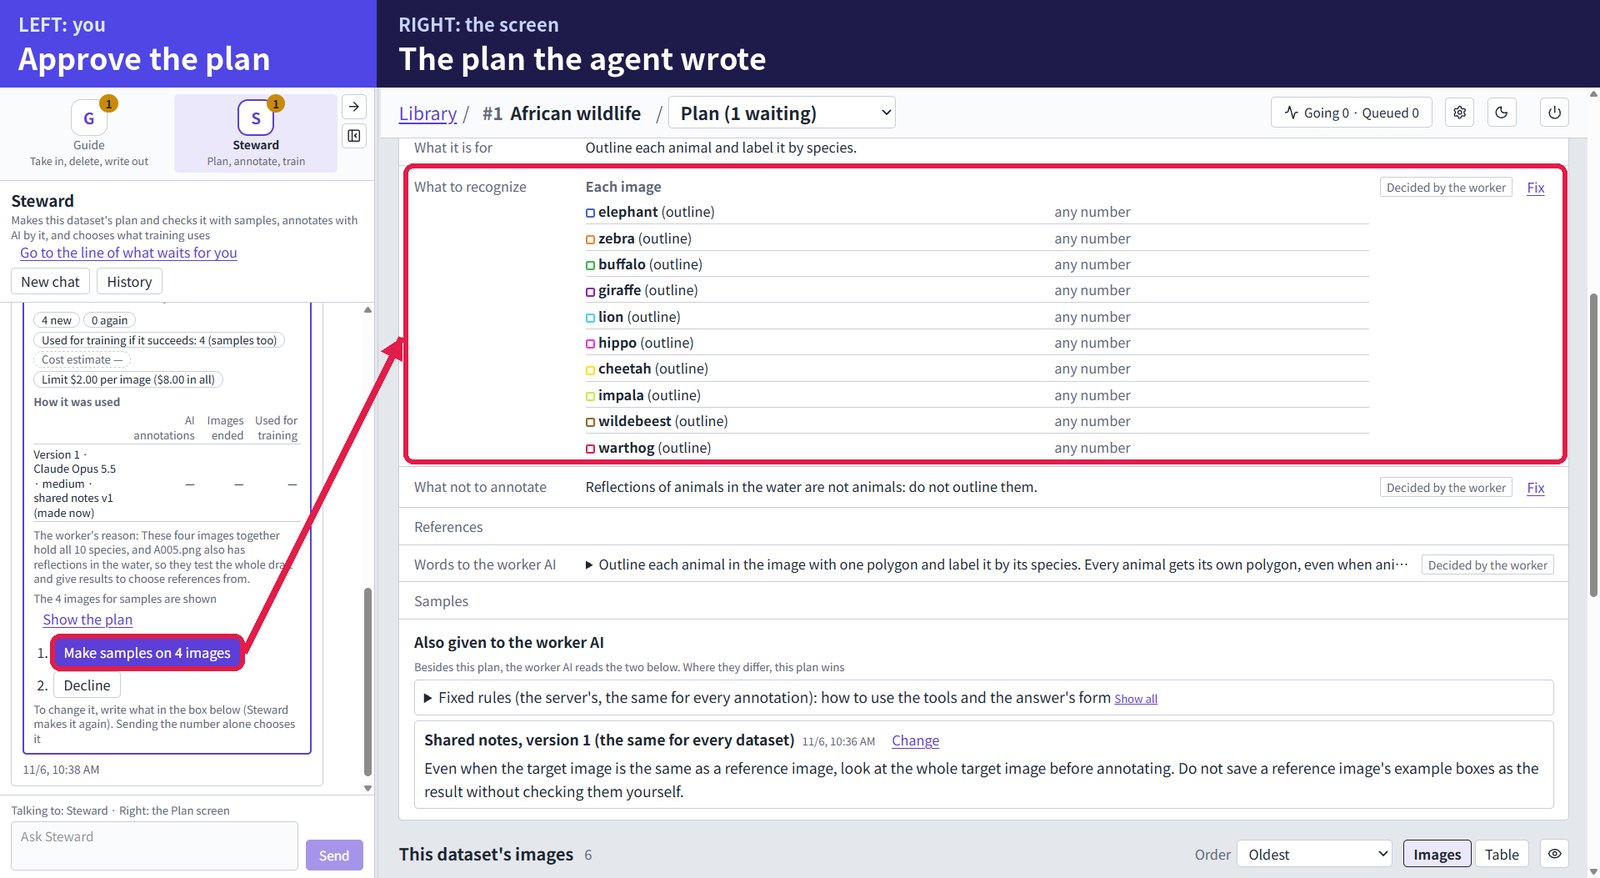
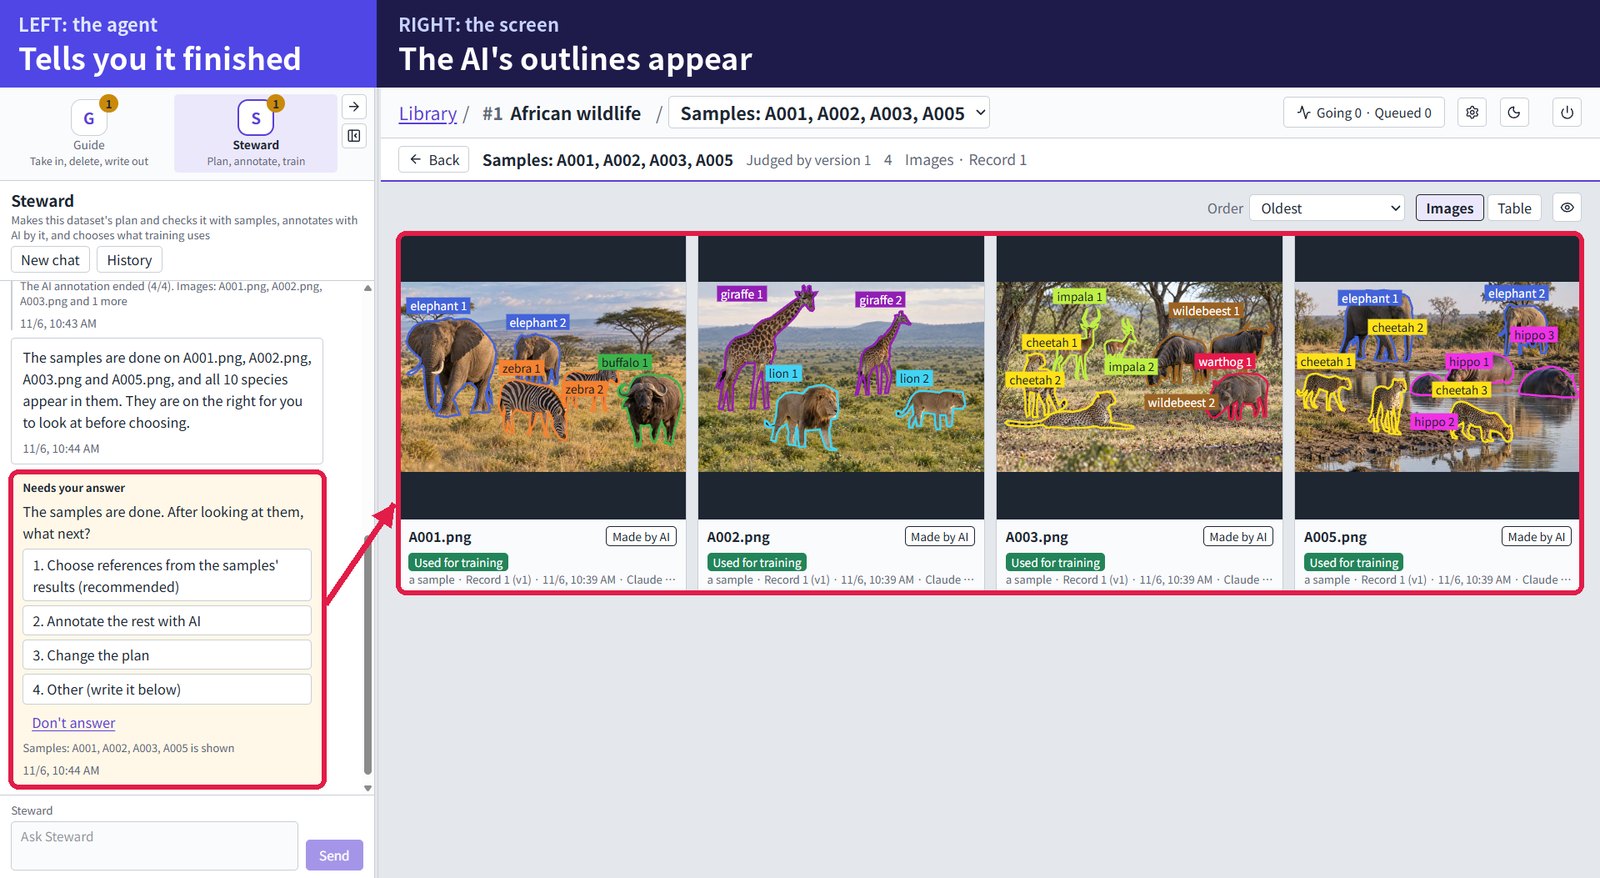
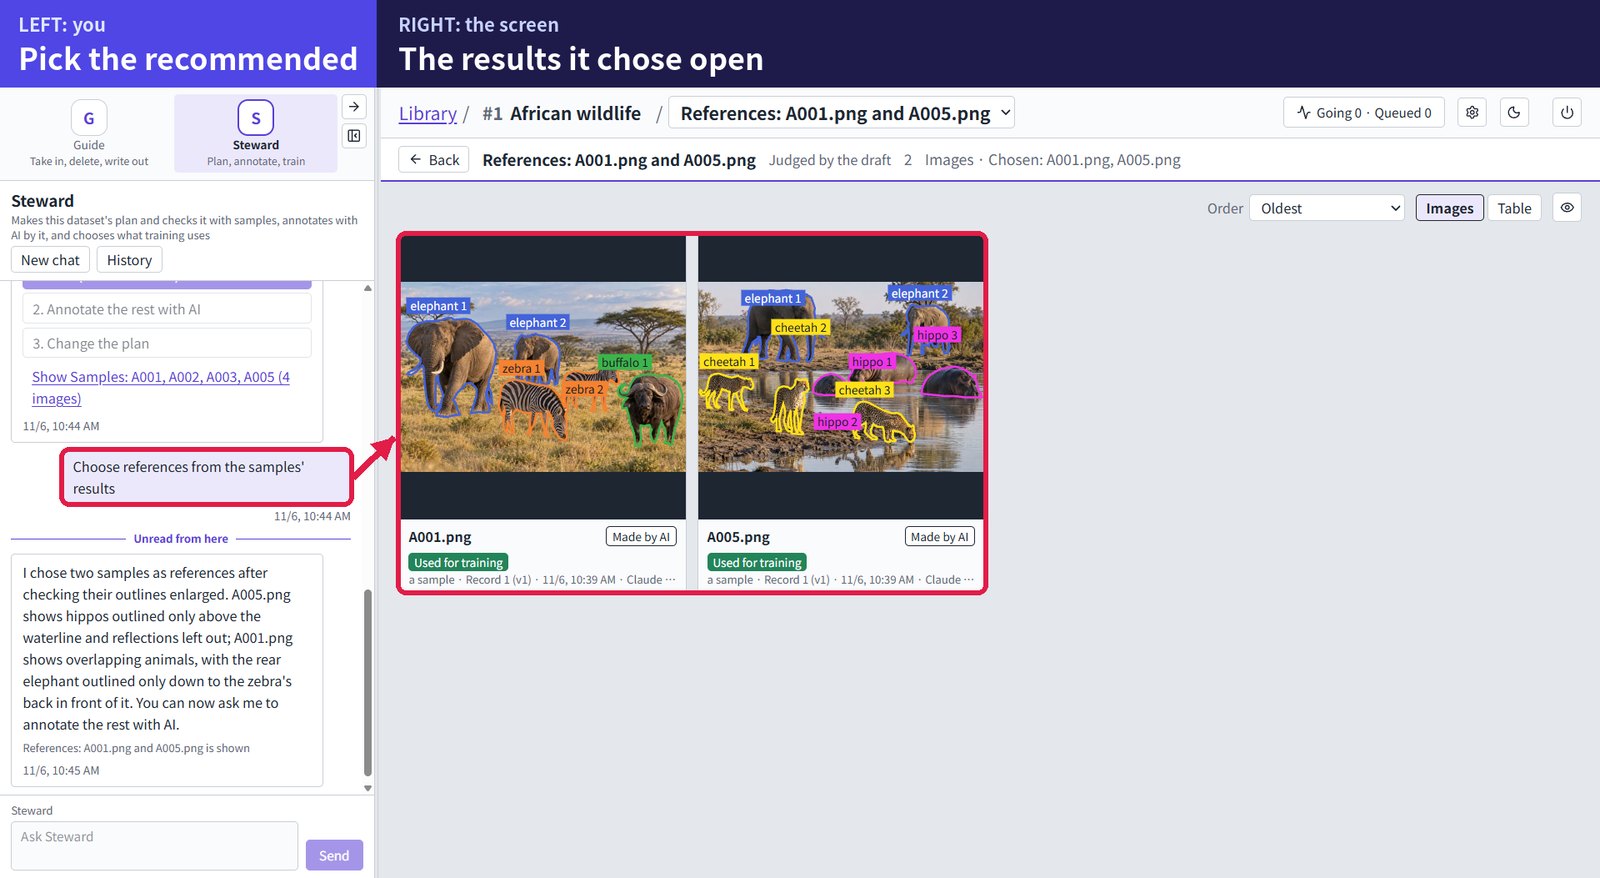
From one sentence to results used for training, on the real screen. This one outlines the animals by species; boxes and printed text go through the same steps. Waiting is sped up.
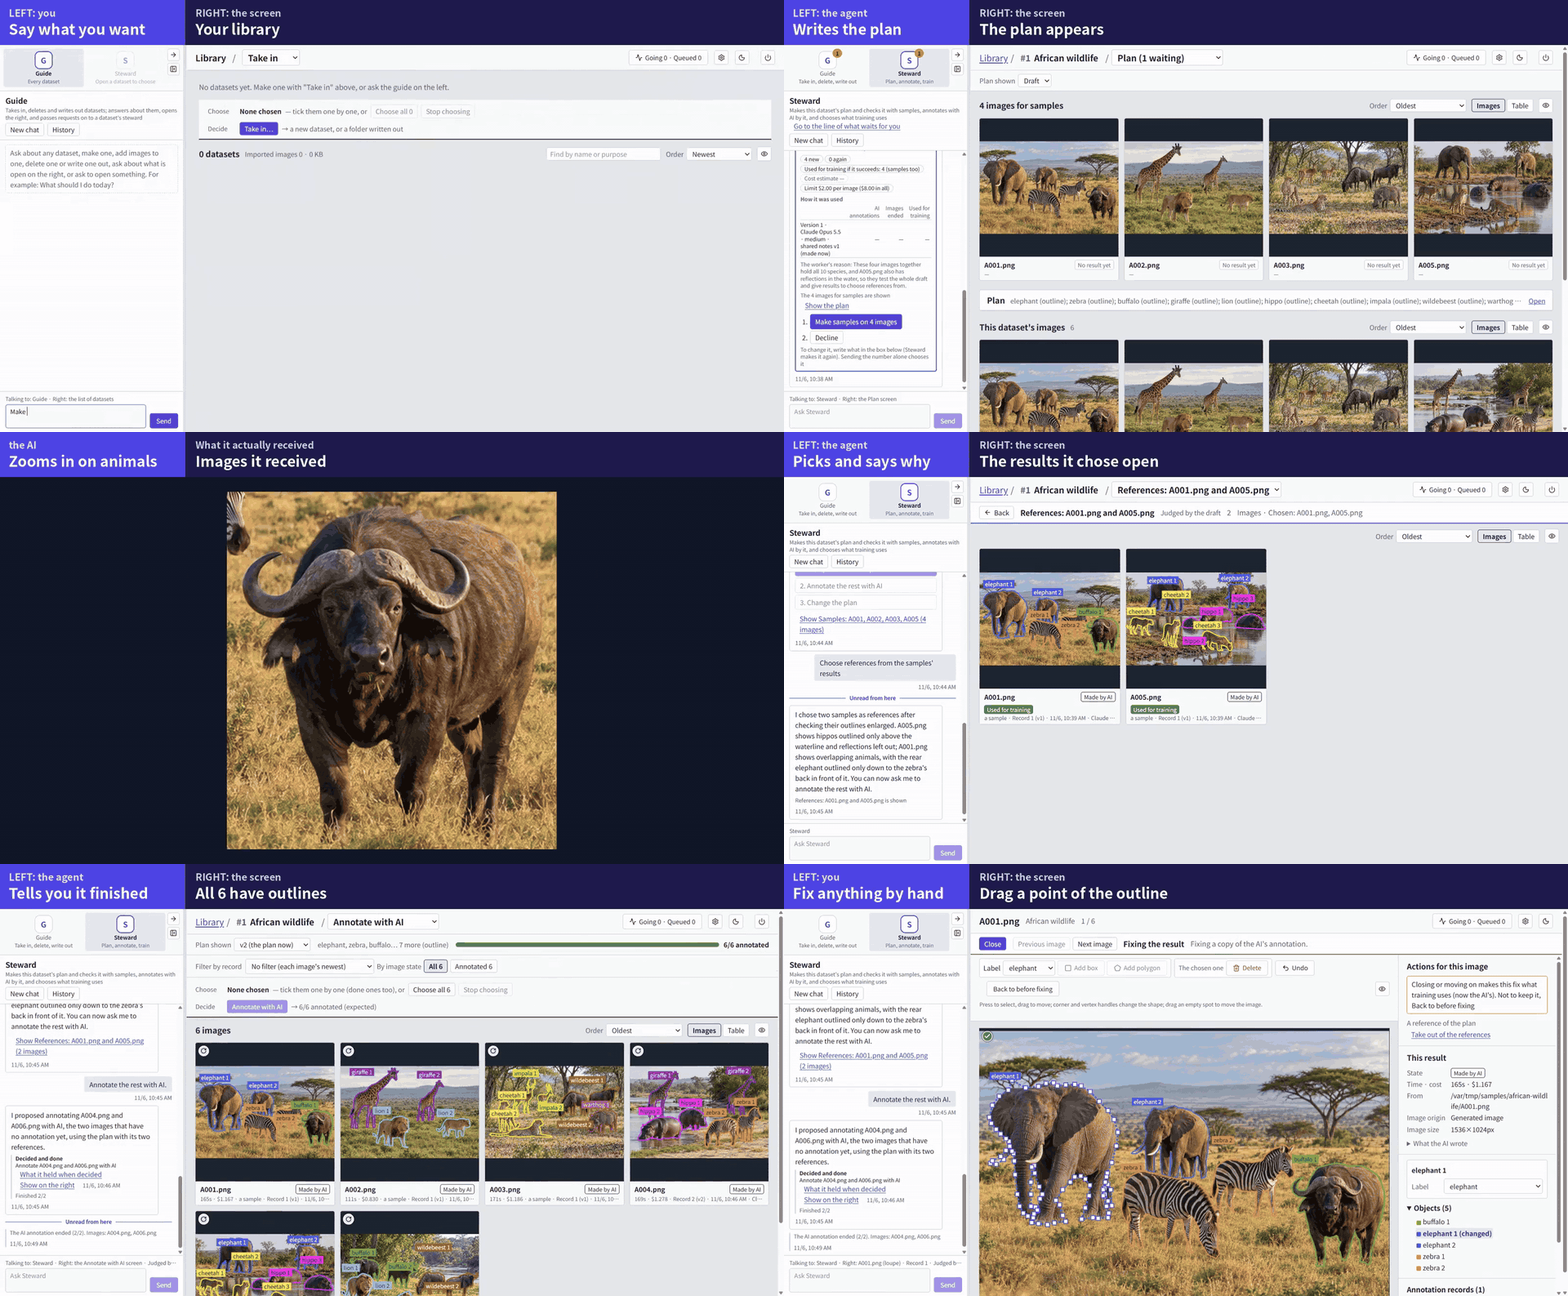
Talk on the left. The screen on the right follows.
The same animals, step by step.
1. Request. Say what you want in one sentence. You don't set up labels first.
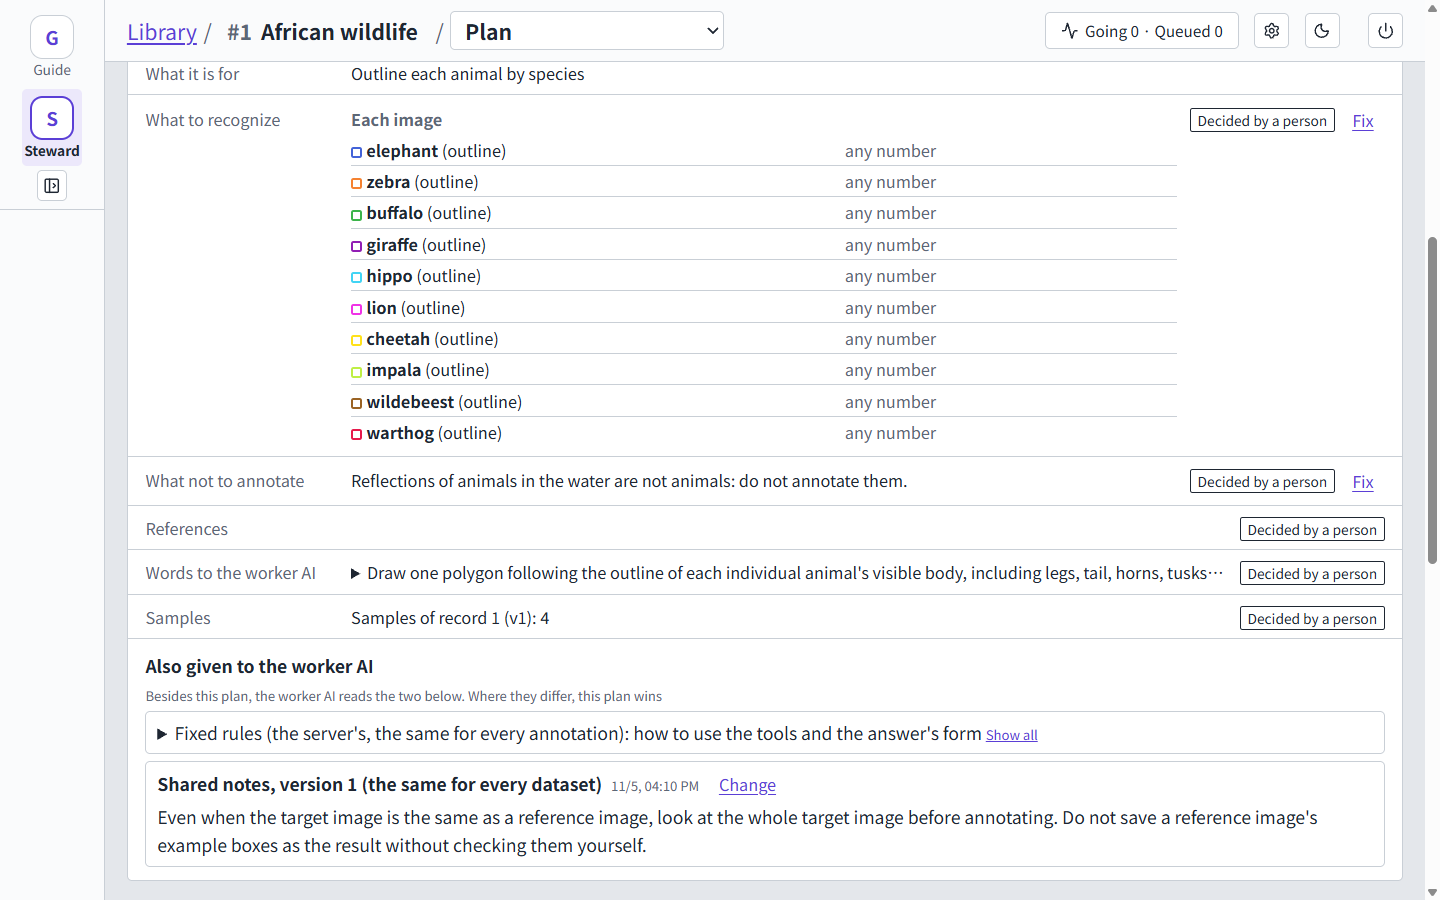
2. Plan. The agent looks through your images and writes the plan. Read it on the right. Nothing runs until you approve.
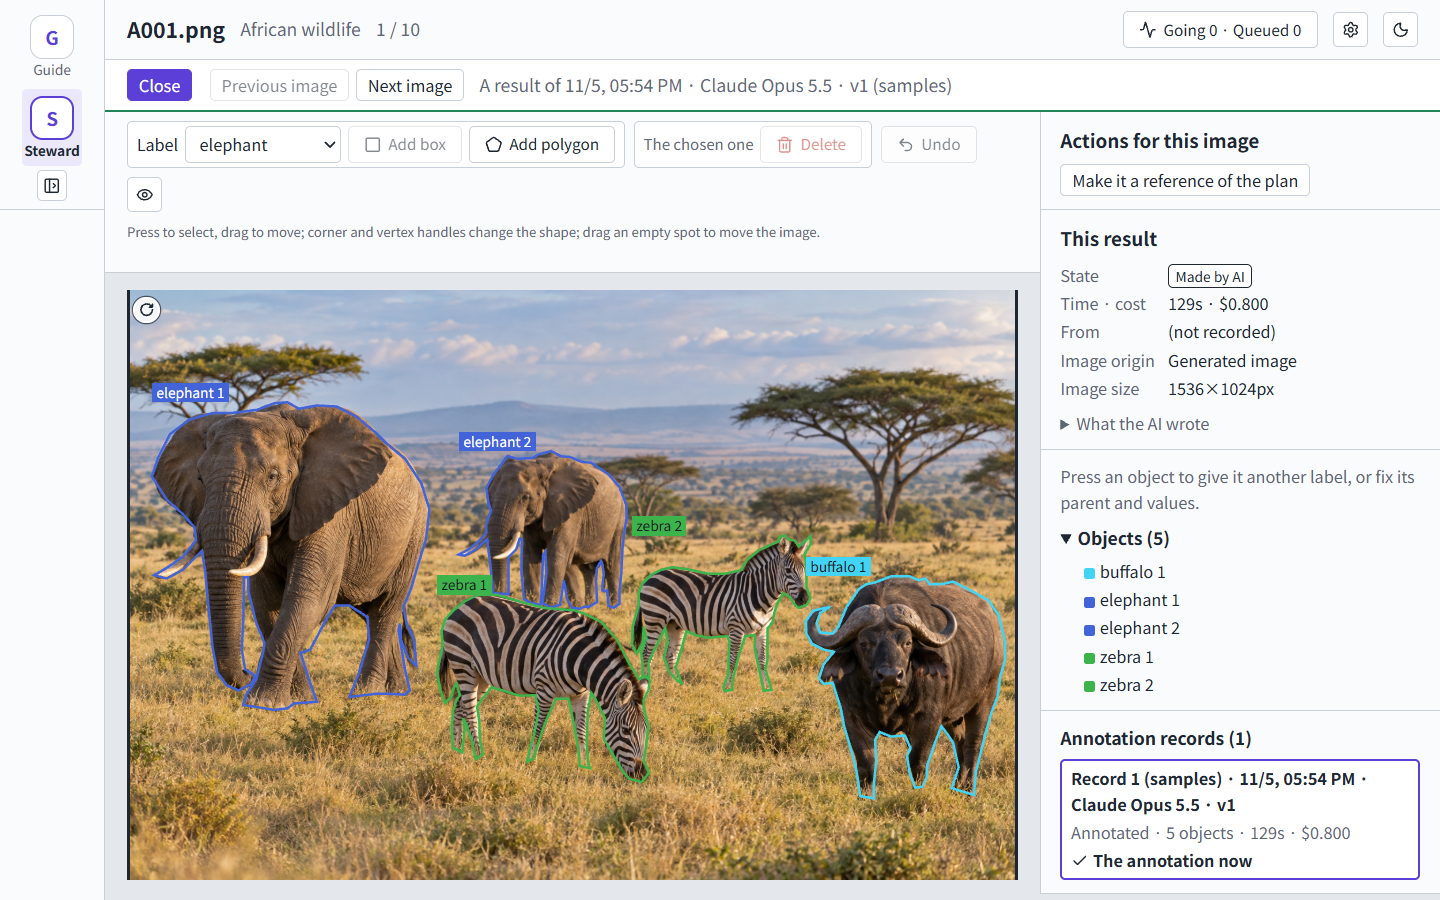
3. Annotate. The AI draws on a few samples first. When it finishes, the outlines appear on the right, and the agent asks what is next.
4. Check and use. Pick the recommended option, and the matching screen opens. Here the agent checks the results enlarged, chooses references and says why. Then you run the rest and choose what training uses.
How the AI draws
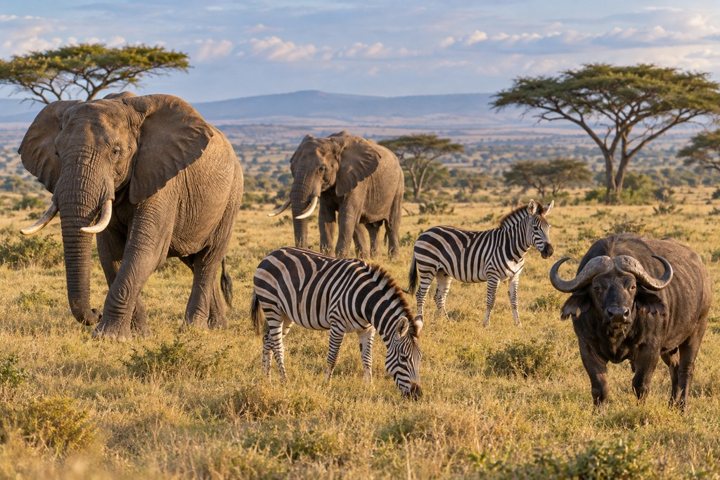
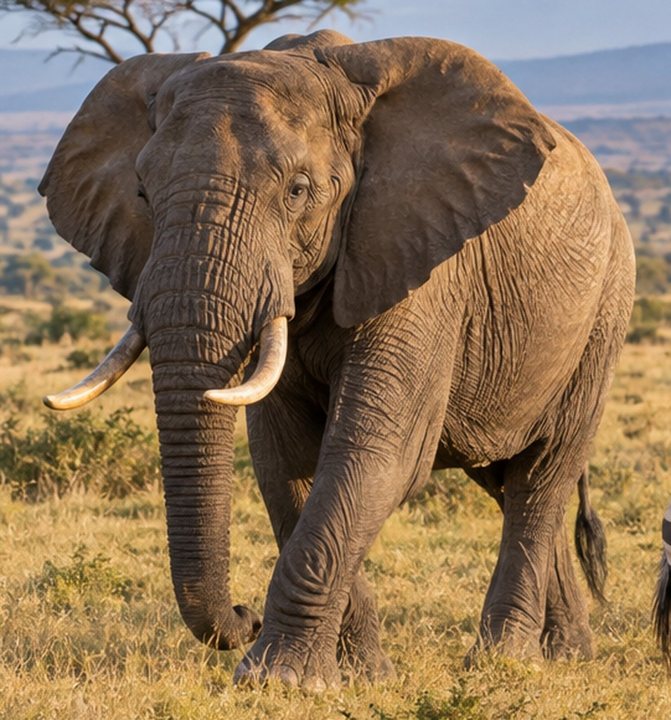
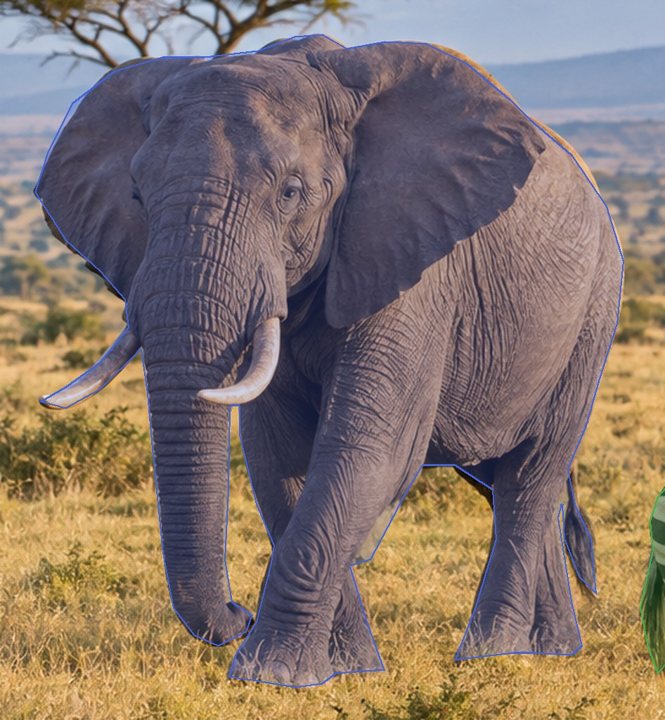
These are the actual images the AI received while annotating one image of the animals.
| It looks at the whole image | It zooms in on each animal | It draws an outline and checks it | It checks the finished image |
|---|---|---|---|
 |
 |
 |
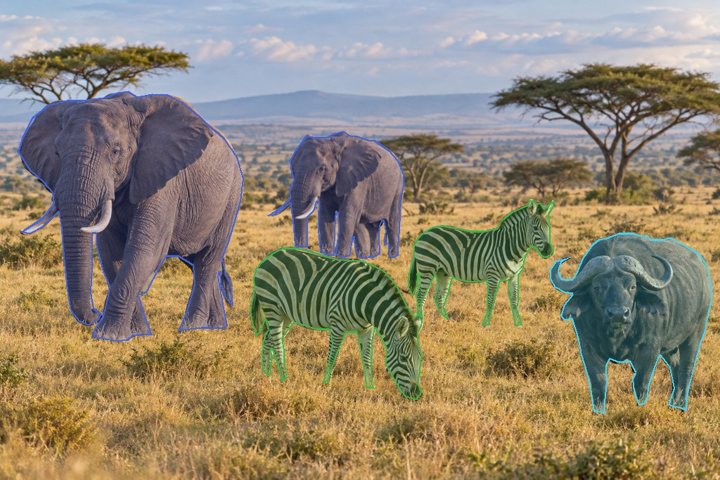 |
On this image it looked 19 times, 10 of them at crops. The AI decides how closely to look. These numbers are from runs on 2026-11-05 (Medicine box labels on 2026-11-11):
| Sample dataset | Views per image | Crops per image | Estimated cost per image |
|---|---|---|---|
| African wildlife (outlines) | 15–35 | 7–23 | about $1.09 |
| Medicine boxes (boxes and values) | 4–8 | 1–5 | about $0.19 |
| Medicine box labels (boxes inside boxes, barcodes and text) | 5–7 | 2–4 | about $0.24 |
| Tray parts (boxes) | 3–7 | 0–3 | about $0.23 |
Costs are at API prices with Claude Opus 5.5. On a subscription, usage counts toward your plan's limits.
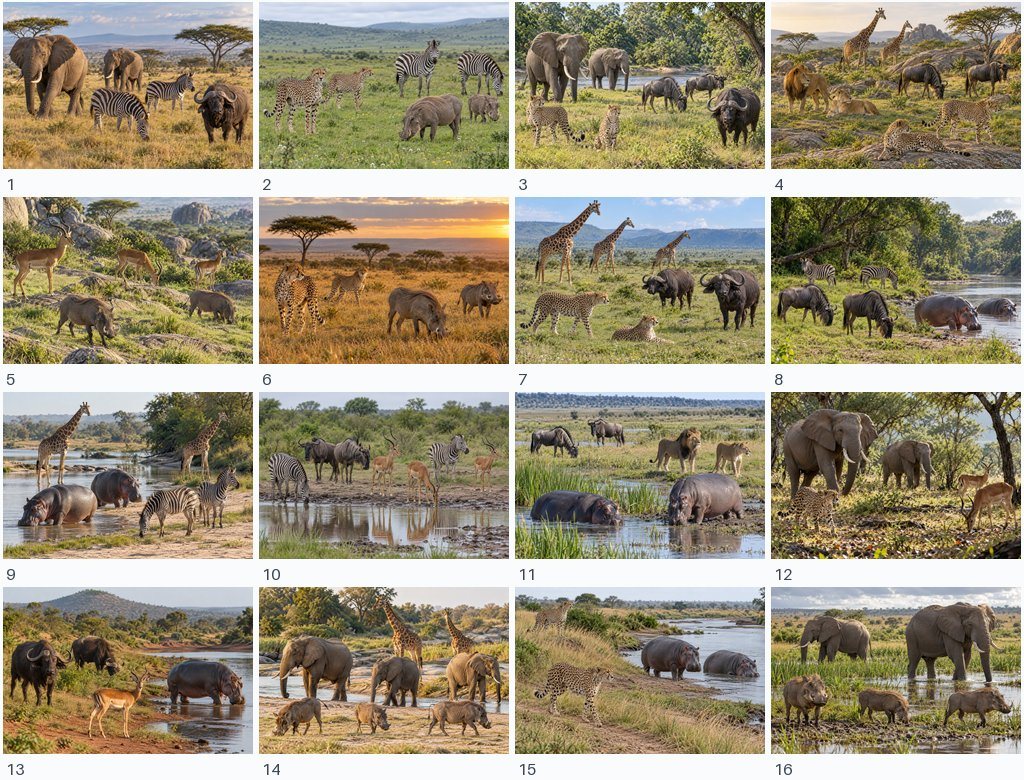
Before writing the plan, the agent takes in a dataset 16 images at a time:
What it does
- Boxes, outlines and values. It also answers questions about a whole image. COCO masks you import are kept and written out again.
- A plan with versions. Labels, what to leave out and reference images. Every result records the plan version, model, time and estimated cost that made it.
- Samples first. Try the plan on a few images before you run the rest.
- You decide. Agents can draft a plan, but anything that changes your data becomes a decision you accept or decline.
- Fix by hand. Add, move, reshape or delete objects, and correct labels and values.
- Choose what training uses, then write out COCO JSON. You can also take in folders of images or COCO JSON.
- English and Japanese, for the screen and the agents, with a dark mode.
| The plan | Fixing by hand |
|---|---|
 |
 |
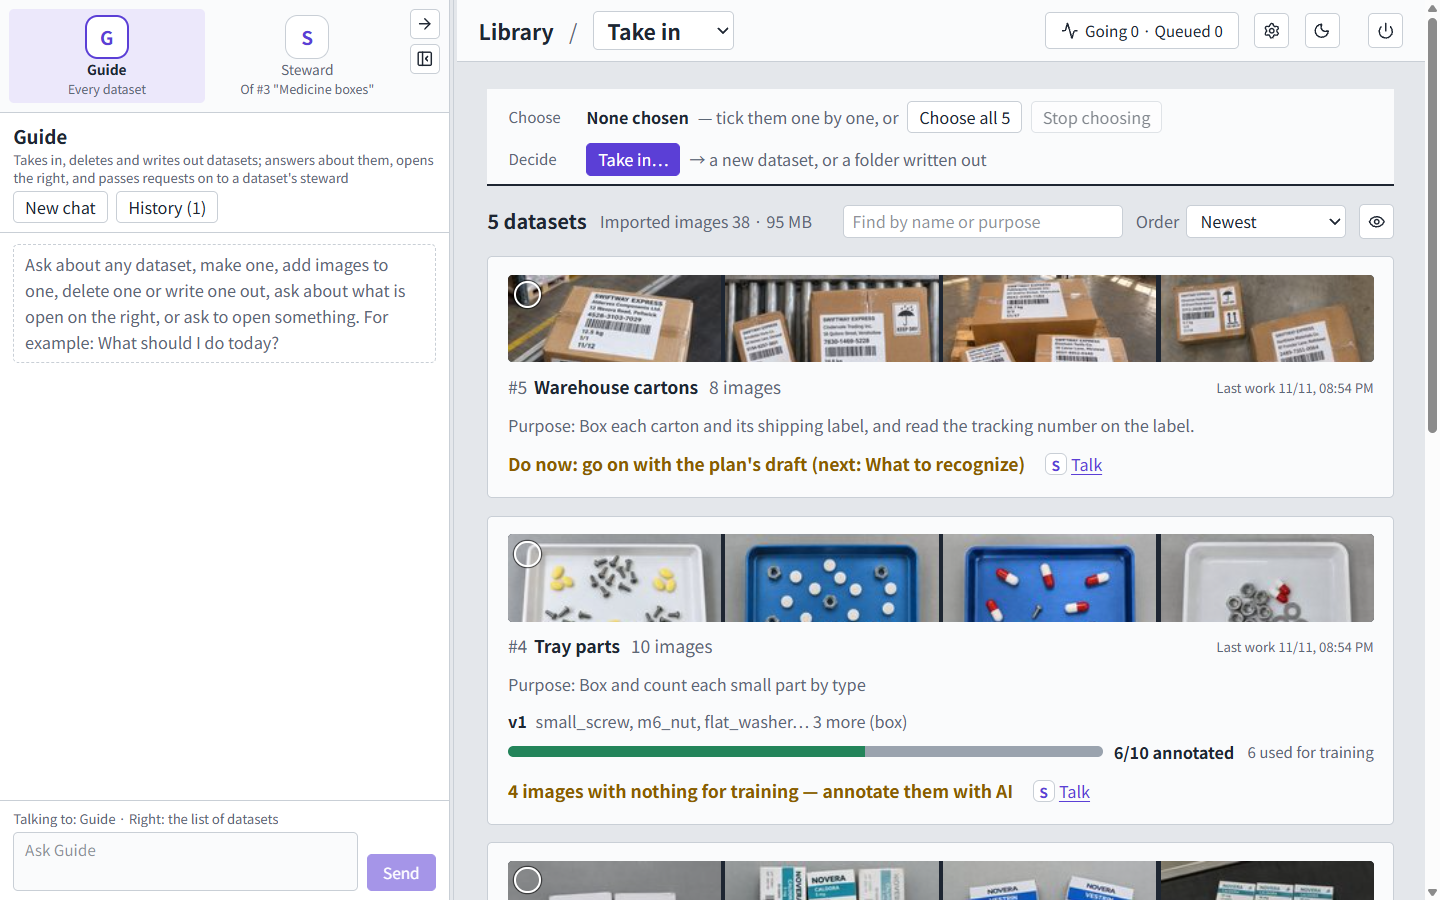
| Values read from images | The library |
|---|---|
 |
 |
| Barcodes, product names and lots | The text read from them |
|---|---|
 |
 |
Use it from your CLI
You don't have to use the screen. Connect Claude Code, or any other MCP client, to the app's /mcp endpoint and give it one prompt:
cat > mcp.json <<'EOF'
{"mcpServers":{"annotation":{"type":"http","url":"http://127.0.0.1:3900/mcp"}}}
EOF

claude -p --mcp-config mcp.json --strict-mcp-config \
  --allowedTools 'mcp__annotation__*' \
  "Make a dataset 'Tray parts' from /path/to/images. Box each small part by type. \
Annotate every image with AI and wait for it to finish. Then tell me the counts."
We tried this with one prompt for two sample datasets. Claude Code made both datasets, wrote their plans and annotated all 12 images in 2 minutes 16 seconds, without asking anything.
- The port is 3900, or the next free one. The app writes the number it uses to
agent_app/server.port. - On Windows, save the same JSON as
mcp.jsonin any editor, and put theclaudecommand on one line. - This endpoint has no approval step. A connected client can use every tool, including deleting datasets. It is meant for your own machine.
- The same operations are available over the HTTP API at
/v1.
How it's built
Browser (React) ── HTTP ──▶ FastAPI server ──▶ SQLite + image files
                                ▲    │ starts
                            MCP │    ▼
                    Claude Code or Codex CLI
                    (one per chat, one per image)

Your own CLI ── MCP ──▶ /mcp (the same server)
| Part | Technology |
|---|---|
| Server | Python 3.14, FastAPI, Uvicorn, Pillow |
| Storage | SQLite, with images and masks stored by their SHA-256 |
| Screen | React 19, TypeScript, Vite, Tailwind CSS, shadcn/ui, TanStack Query |
| AI | The Claude Code or Codex CLI you installed. No GPU and no model server |
| Agent tools | MCP (Python SDK), served by the app itself |
- Each image gets a fresh AI with only the plan and that image.
- The server keeps the queue and how many run at once.
- The AI measures on the image it sees, and the server converts that to original pixels.
- The app's agents have no shell. The server checks every tool call and turns data changes into decisions.
Install and run
It runs on Windows and Linux. macOS should work but has not been tested yet.
1. Install Claude Code or Codex
You need one of them, signed in. The app starts that CLI on your computer and never sees your credentials.
Claude Code needs a paid Claude plan or a Console account. Install it, open a new terminal, run claude once and sign in through your browser.
# Windows (PowerShell)
irm https://claude.ai/install.ps1 | iex
# Linux
curl -fsSL https://claude.ai/install.sh | bash
Codex: follow its install guide, then run codex once and sign in. The app starts with Claude Opus 5.5, so choose a GPT model in its settings (top right of the screen).
2. Get the app and start it
You need Git. Get the app:
git clone https://github.com/microtaro/llm-agents-for-image-annotation.git
The first start puts uv and Python into the llm-agents-for-image-annotation folder, which takes a few minutes and needs internet. Nothing else is installed.
Windows: in that folder, double-click start.cmd. The app opens in its own window (Chrome, or Edge if you don't have Chrome), and a shortcut named Annotation appears in the folder. From then on, double-click the shortcut. To quit, close the window.
Linux: in that folder, run sh start.sh. The app opens in your browser, and a small "Annotation" window stays open while it runs. If you close the browser tab, "Open in the browser" in that window brings it back. To quit, press "Quit" in the small window. Start it again with sh start.sh. With no display, open http://127.0.0.1:3900/ yourself and quit with the power icon at the top right of the screen.
The library starts with the sample datasets of the samples folder.
3. Use it
Open a sample dataset and tell the agent what you want: ask it to annotate the rest of the images, or start from nothing with Warehouse cartons. To use your own images, ask the Guide agent to make a dataset from a folder.
Good to know
- Language: the screen opens in your browser's language. Switch between English and Japanese in the settings at the top right. The agents answer in the language you write in.
- Port: 3900, or the next free one. The number is in
agent_app/server.port. - Log:
agent_app/server.log. Please include the end of it when you report a problem. - New versions: see the changelog. Run
git pullin the folder, then start withstart.cmdorsh start.sh, not the shortcut: they install what the new version needs. Your datasets and results stay. If a version changes how they are kept, the changelog says so. - Moved the folder: delete
agent_app/.venv, then start withstart.cmdorsh start.shonce. On Windows, this makes the shortcut again. - To remove the app, quit it and delete the folder.
Sample data
Five small datasets. All the images are synthetic. They are in samples/, and the library starts with them. Four have a plan and results on 6 of their 10 images, so you can annotate the rest. Warehouse cartons has nothing yet, to try the whole flow from the start.
| Dataset | Images (annotated) | What it shows |
|---|---|---|
| African wildlife | 10 (6) | Outline each animal, labeled by species |
| Medicine boxes | 10 (6) | Box each medicine box and read its printed values |
| Medicine box labels | 10 (6) | Box each medicine box, its barcode, product name and lot line, and read them |
| Tray parts | 10 (6) | Box and count small parts by type |
| Warehouse cartons | 8 (0) | Nothing yet: cartons with shipping labels, for a plan of your own |
Your data and safety
- The app runs on your computer and listens only on
127.0.0.1. It has no login and is for one person, so don't expose it to a network. It refuses requests from pages on other sites. - Your images are sent to the model provider through the CLI you use. The provider's terms apply.
- Your data stays in the app's folder (
agent_app/agent.dbandagent_app/agent-files/). The CLI keeps its own conversation logs outside that folder. - AI results can be wrong, and LLM coordinates are approximate. Check them before you rely on them. We have not published accuracy numbers yet.
- Whether you may train other models on AI outputs depends on your provider's terms. See Anthropic's article and OpenAI's Terms of Use.
How it differs
In this app, LLM agents carry the work from a conversation through the plan to annotation, and the LLM draws the shapes itself by looking at your images.
- It goes from talk to plan to annotation, and you decide little. Say what you want, and the agent looks through all the images 16 at a time and writes the plan, asking with options where it is unsure. It tries the plan on samples, checks the results, chooses references and runs the rest. The app keeps datasets, plans, results and decisions as types with states (an ontology), so what to decide next is known. The agent brings it to you as a decision with a recommended option, and most of the time you press the recommendation or approve.
- The AI looks for itself, with tools. It asks for zoomed crops and for its own outlines drawn over the image, checks them and fixes them. It decides how closely to look (19 times for the image above).
- Ask the dataset's records, and make new data from them. The agent answers by reading the app's database with conditions. Ask "Which images have values it couldn't read?" or "Which results did a person fix?", and the matching ones appear on the right. You can also ask in the chat to start from another dataset's plan, to carry results from an earlier version or another dataset over to the new plan, or to combine several datasets into a new one.
- The AI draws, and you can fix it by hand. Drag the points of an outline to fix its shape, add or delete objects, and correct labels and values. Then choose what training uses and export it as COCO JSON.
- Open source, and it runs on your computer. The AI runs through your own Claude Code or Codex, so you need no account or credits with another service.
It is not a good fit if you need pixel-exact segmentation, very large datasets at low cost, a shared workspace for a team, or video, 3D or keypoints.
Develop
npm test          # the screen's and the server's tests
npm run lint
npm run dev:ui    # while the app runs: the screen with hot reload, at http://127.0.0.1:5173
You need Node.js 24 or 26 and uv to work on the code: run npm ci first. The built screen in agent_app/ui/dist is kept in this repository, so that starting the app needs no Node.js; npm run build makes it again after you change the screen.
The app is in agent_app/: the server in agent_app/agent_app/, the screen in agent_app/ui/. Code comments cite design notes that are not in this repository, and agent_app/tools/ holds the project's own checks, some of which assume the author's setup.
Feedback
This is an early test version, and feedback is what we want most. Please open an issue.
Disclaimer
This software is provided "as is", without warranty of any kind (sections 7 and 8 of the Apache-2.0 license). The author is not liable for any loss or damage from using it, including wrong annotations, lost data, and the usage or costs of your Claude or Codex plan. Use it at your own risk: check the results before you rely on them, and keep copies of data that matters.
License
Developed by Jun Sato. Licensed under Apache-2.0. The libraries it uses keep their own licenses. Those built into the screen are listed in agent_app/ui/dist/third-party-licenses.md. This is an independent project, not affiliated with or endorsed by Anthropic or OpenAI.
Reviews (0)
Sign in to leave a review.
Leave a reviewNo results found