spring-boot-ai
Health Warn
- No license — Repository has no license file
- Description — Repository has a description
- Active repo — Last push 0 days ago
- Low visibility — Only 8 GitHub stars
Code Pass
- Code scan — Scanned 11 files during light audit, no dangerous patterns found
Permissions Pass
- Permissions — No dangerous permissions requested
No AI report is available for this listing yet.
🍀 🤖 Spring Boot AI - Evaluation Testing
![]()
![]()
Spring Boot AI
In this example, inspired by Building Agents with AWS: Complete Tutorial, we will build a simple AI agent application using Spring AI, highlighting key features like:
- Chat Client API and its Advisors
- Model Context Protocol (MCP)
- Retrieval Augmented Generation (RAG)
- Testing with AI Model Evaluation 🤩
This project is indexed and certified by MCP Review
The original example uses AWS Bedrock, but one of the great things about Spring AI is that with just a few config tweaks, the same code works with any other supported model. This project supports three profiles: Ollama (local), Google Gemini and AWS Bedrock.
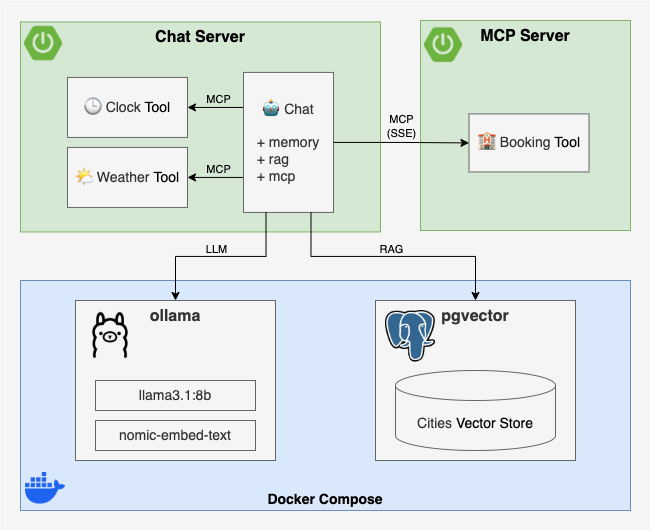
The application features an AI agent that helps users book accommodations in tourist destinations.
Through MCP, the agent can use the following tools:
- Weather Tool: Retrieves weather information for a specific city and date.
- Booking Tool: Books accommodations in a city for a specific date.
The Weather tool will be implemented locally using MCP, while the Booking tool will be provided by a remote MCP server. The current date is provided via the system prompt. Additional information about cities will be retrieved from a vector store using RAG.
Implementation
MCP Server
As is often the case with Spring Boot, implementing the MCP Server is pretty straightforward. Following the MCP Server Boot Starter guide, you just need to:
Add the
spring-ai-starter-mcp-server-webfluxorspring-ai-starter-mcp-server-webmvcdependencyCreate an instance and annotate it with
@Tooland@ToolParam:
@Service // or @Bean / @Component
class BookingTool(private val bookingService: BookingService) {
  @Tool(
    description = "make a reservation for accommodation for a given city and date",
  )
  fun book(
    @ToolParam(description = "the city to make the reservation for")
    city: String,
    @ToolParam(description = "the check-in date, when the reservation begins")
    checkinDate: LocalDate,
    @ToolParam(description = "the check-out date, when the reservation ends")
    checkoutDate: LocalDate
  ): String = bookingService.book(city, checkinDate, checkoutDate) // Delegate to a service
}
- Register it as a
MethodToolCallbackProvider:
@Configuration
class BookingToolConfiguration {
  @Bean
  fun bookingToolCallbackProvider(bookingTool: BookingTool) =
    MethodToolCallbackProvider.builder()
      .toolObjects(bookingTool)
      .build()
}
Chat Server
The Chat Server is a Spring Boot application built with the following dependencies:
spring-boot-starter-webor-webflux- to expose a REST API for the chat interfacespring-ai-starter-mcp-client- to use MCPspring-ai-starter-vector-store-pgvectorandspring-ai-advisors-vector-store- to enable RAG with PGVectorspring-ai-starter-model-ollama- to use Ollama modelsspring-ai-starter-model-google-genaiandspring-ai-starter-model-google-genai-embedding- to use Google Gemini modelsspring-ai-starter-model-bedrockandspring-ai-starter-model-bedrock-converse- to use AWS Bedrock models
Components
- MCP Tools
- Weather Tool - a local MCP tool that queries a WeatherService for the weather in a given city on a given date
- Booking Tool - a remote MCP tool that connects to the Booking MCP Server to reserve accommodations
- Chat
- Chat Client - a Spring AI ChatClient configured with:
- A system prompt to define the AI agent’s role and the current date
- The AI model autoconfigured by Spring Boot via the active profile
- The above MCP tools as part of the AI agent’s toolset
- Chat Service - wraps the Chat Client and adds three advisors:
- QuestionAnswerAdvisor - fetches context from a vector store and augments the user input (RAG)
- PromptChatMemoryAdvisor - adds conversation history to the user input (chat memory)
- SimpleLoggerAdvisor - logs the chat history to the console (for debugging)
- Chat Controller - exposes a simple REST POST endpoint that takes user input, calls the Chat Service, and returns the AI agent’s response
- Chat Client - a Spring AI ChatClient configured with:
- Vector Store Initializer - loads some sample data into the vector store at startup
Let's implement this step by step ...
Weather Tool
Here's how the Weather Tool is implemented:
- Create an instance and annotate it with
@Tooland@ToolParam:
@Service // or @Bean / @Component
class WeatherTool(private val weatherService: WeatherService) {
  @Tool(description = "get the weather for a given city and date")
  fun getWeather(
    @ToolParam(description = "the city to get the weather for")
    city: String,
    @ToolParam(description = "the date to get the weather for")
    date: LocalDate
  ): String = weatherService.getWeather(city, date) // Delegate to a service
}
- Register it as a
MethodToolCallbackProvider:
@Configuration
class WeatherToolConfiguration {
  @Bean
  fun weatherToolCallbackProvider(weatherTool: WeatherTool) =
    MethodToolCallbackProvider.builder()
      .toolObjects(weatherTool)
      .build()
}
Booking Tool
To set up the Booking Tool as a remote MCP tool, we just need to configure the MCP client SSE connection in application.properties:
spring.ai.mcp.client.toolcallback.enabled=true
spring.ai.mcp.client.sse.connections.booking-tool.url=http://localhost:8081
You can find all the alternative configurations in MCP Client Boot Starter documentation.
Chat Client
We create the Chat Client using Spring AI's ChatClient.Builder, which is already autoconfigured via spring.ai configuration properties (we'll talk at that later in Configuration), and initialize it with a custom system prompt and the available MCP tools:
@Configuration
class ChatClientConfiguration {
  @Bean
  fun chatClient(
    builder: ChatClient.Builder,
    toolCallbackProviders: List<ToolCallbackProvider>
  ): ChatClient {
    return chatClientBuilder(builder, toolCallbackProviders).build()
  }

  private fun chatClientBuilder(
    builder: ChatClient.Builder,
    toolCallbackProviders: List<ToolCallbackProvider>
  ): ChatClient.Builder {
    val system = """
      You are an AI powered assistant to help people book accommodation in touristic cities around the world.
      If there is no information, then return a polite response suggesting you don't know.
      If the response involves a timestamp, be sure to convert it to something human-readable.
      Do not include any indication of what you're thinking.
      Use the tools available to you to answer the questions.
      Just give the answer.
      When booking accommodation for a weekend, assume check-in on Saturday and check-out on Monday.
      Current date: {currentDate}
      """.trimIndent()
    return builder
      .defaultSystem(system)
      .defaultToolCallbacks(*toolCallbackProviders.toTypedArray())
  }
}
Chat Service
The Chat Service exposes a single chat method that takes a chat ID and a user question. It calls the Chat Client with the user question along with a set of advisors to enrich the interaction:
- QuestionAnswerAdvisor - retrieves relevant context from a vector store and injects it to the context (RAG)
- PromptChatMemoryAdvisor - retrieves or creates an
InMemoryChatMemoryRepositoryfor the given chat ID and adds it to the context - SimpleLoggerAdvisor - logs internal advisor traces to the console (if
logging.level.org.springframework.ai.chat.client.advisoris set toDEBUG)
Additionally, the question and answer are logged to the console.
Here’s the implementation:
@Service // or @Bean / @Component
class ChatService(
  vectorStore: VectorStore,
  private val clock: Clock,
  private val chatClient: ChatClient
) {
  private val logger = LoggerFactory.getLogger(ChatService::class.java)
  private val questionAnswerAdvisor = QuestionAnswerAdvisor.builder(vectorStore).build()
  private val simpleLoggerAdvisor = SimpleLoggerAdvisor()
  private val chatMemory = ConcurrentHashMap<String, PromptChatMemoryAdvisor>()

  fun chat(chatId: String, question: String): String {
    val chatMemoryAdvisor = chatMemory.computeIfAbsent(chatId) {
      PromptChatMemoryAdvisor.builder(
        MessageWindowChatMemory.builder()
          .chatMemoryRepository(InMemoryChatMemoryRepository())
          .build()
      ).build()
    }
    return chatClient
      .prompt()
      .system { it.param("currentDate", LocalDate.now(clock)) }
      .user(question)
      .advisors(questionAnswerAdvisor, chatMemoryAdvisor, simpleLoggerAdvisor)
      .call()
      .content().apply {
        logger.info("Chat #$chatId question: $question")
        logger.info("Chat #$chatId answer: $this")
      }!!
  }
}
Chat Controller
The Chat Controller exposes a simple REST POST endpoint that takes user input, calls the Chat Service, and returns the AI agent’s response:
@RestController
class ChatController(private val chatService: ChatService) {
  @PostMapping("/{chatId}/chat")
  fun chat(
    @PathVariable chatId: String,
    @RequestParam question: String
  ): String? {
    return chatService.chat(chatId, question)
  }
}
Vector Store Initializer
It's as simple as using Spring AI’s autoconfigured VectorStore and adding documents to it. This automatically invokes the embedding model to generate embeddings and store them in the vector store:
@Bean
fun vectorStoreInitializer(vectorStore: VectorStore) =
  ApplicationRunner {
    // TODO check if the vector store is empty ...
    // TODO load cities from a JSON file or any other source ...
    cities.forEach { city ->
      val document = Document(
        "name: ${city.name} " +
        "country: ${city.country} " +
        "description: ${city.description}"
      )
      vectorStore.add(listOf(document))
    }
  }
You can find the full version of vectorStoreInitializer in ChatServerApplication.kt.
Configuration
We use application.properties instead of application.yml because YAML cannot have both spring.ai.model.embedding (scalar, used by Bedrock and Ollama) and spring.ai.model.embedding.text (nested, used by Gemini) at the same time. Maybe some day this will be solved, but anyway this is a PoC that supports multiple models — in a production application you'd likely use only one, so this wouldn't be an issue.
In this file, we define global configuration values:
- Disable all model auto-configurations by default.
- Configure the datasource to connect to a PostgreSQL database with PGVector support.
- Set the server port to
8080. - Configure the URL of the remote Booking Tool MCP server.
- Set the logging level for chat advisor debug traces.
spring.application.name=chat-server

spring.datasource.url=jdbc:postgresql://localhost:5432/postgres
spring.datasource.username=postgres
spring.datasource.password=password
spring.datasource.driver-class-name=org.postgresql.Driver

spring.ai.model.chat=none
spring.ai.model.embedding=none
spring.ai.model.embedding.text=none

spring.ai.mcp.client.toolcallback.enabled=true
spring.ai.mcp.client.sse.connections.booking-tool.url=http://localhost:8081

server.port=8080

logging.level.org.springframework.ai.chat.client.advisor=INFO
The AI model is configured via Spring profiles. Each profile sets the chat model, embedding model, and vector store dimensions. The active profile must be specified at runtime using SPRING_PROFILES_ACTIVE.
Ollama profile
In application-ollama.yml, we configure Spring AI to use Ollama models:
- Set the base URL for the Ollama server to
http://localhost:11434. - Set the chat model to llama3.1:8b (must be a tools-enabled model).
- Set the embedding model to nomic-embed-text.
- Use
pull-model-strategy: when_missingto only pull models if they are not available locally. - Configure PGVector as the vector store with 768 dimensions (matching the embedding model size).
spring:
  ai:
    model:
      embedding: "ollama"
      chat: "ollama"
    ollama:
      base-url: "http://localhost:11434"
      init:
        pull-model-strategy: "when_missing"
      chat:
        options:
          model: "llama3.1:8b"
      embedding:
        options:
          model: "nomic-embed-text"
    vectorstore:
      pgvector:
        table-name: "vector_store_ollama"
        dimensions: 768
        initialize-schema: true
Gemini profile
In application-gemini.yml, we configure Spring AI to use Google Gemini models:
- Set the Google API key from the
GOOGLE_API_KEYenvironment variable. - Set the chat model to
gemini-2.5-flash. - Set the embedding model to
gemini-embedding-001with 768 dimensions. - Configure PGVector as the vector store with 768 dimensions.
spring:
  ai:
    model:
      chat: "google-genai"
      embedding:
        text: "google-genai"
    google:
      genai:
        api-key: "${GOOGLE_API_KEY}"
        chat:
          options:
            model: "gemini-2.5-flash"
            temperature: 0.7
        embedding:
          api-key: "${GOOGLE_API_KEY}"
          text:
            options:
              model: "gemini-embedding-001"
              dimensions: 768
    vectorstore:
      pgvector:
        table-name: "vector_store_gemini"
        dimensions: 768
        initialize-schema: true
Bedrock profile
In application-bedrock.yml, we configure Spring AI to use AWS Bedrock models:
- Set the AWS credentials and region from environment variables.
- Set the chat model using Bedrock Converse API.
- Set the embedding model using Bedrock Cohere.
- Configure PGVector as the vector store with 1024 dimensions (matching the Cohere embedding model size).
spring:
  ai:
    model:
      embedding: "bedrock-cohere"
      chat: "bedrock-converse"
    bedrock:
      aws:
        access-key: "${AWS_ACCESS_KEY_ID}"
        secret-key: "${AWS_SECRET_ACCESS_KEY}"
        region: "${AWS_REGION:eu-central-1}"
      converse:
        chat:
          options:
            model: "${AWS_BEDROCK_CHAT_MODEL}"
            max-tokens: 2048
      cohere:
        embedding:
          model: "${AWS_BEDROCK_EMBEDDING_MODEL}"
    vectorstore:
      pgvector:
        table-name: "vector_store_bedrock"
        dimensions: 1024
        initialize-schema: true
Test
Test MCP Server
To test the MCP Server, we will use a McpClient to call the book method of the Booking Tool, mocking the downstream BookingService:
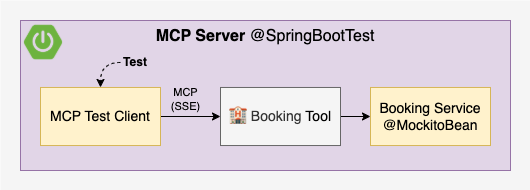
See the simplified test implementation below. For the complete implementation, including a test that verifies the list of available tools, refer to McpServerApplicationTest.kt.
@SpringBootTest(webEnvironment = RANDOM_PORT)
class McpServerApplicationTest {

  // 1. Inject the server port (it is random)
  @LocalServerPort
  val port: Int = 0

  // 2. Mock the BookingService instance
  @MockitoBean
  lateinit var bookingService: BookingService

  @Test
  fun `should book`() {
    // 3. Create a McpClient connected to the server
    val client = McpClient.sync(
      HttpClientSseClientTransport("http://localhost:$port")
    ).build()
    client.initialize()
    client.ping()

    // 4. Mock the bookingService using argument captors
    val bookResult = "Booking is done!"
    val cityCaptor = argumentCaptor<String>()
    val checkinDateCaptor = argumentCaptor<LocalDate>()
    val checkoutDateCaptor = argumentCaptor<LocalDate>()
    doReturn(bookResult)
      .whenever(bookingService)
      .book(
        cityCaptor.capture(),
        checkinDateCaptor.capture(),
        checkoutDateCaptor.capture()
      )

    // 5. Call the tool
    val city = "Barcelona"
    val checkinDate = LocalDate.parse("2025-04-15")
    val checkoutDate = LocalDate.parse("2025-04-18")
    val result = client.callTool(CallToolRequest(
      "book",
      mapOf(
        "city" to city,
        "checkinDate" to checkinDate.toEpochDay(),
        "checkoutDate" to checkoutDate.toEpochDay()
      )
    ))

    // 6. Verify the result
    assertThat(result.isError).isFalse()
    assertThat(result.content).singleElement()
      .isInstanceOfSatisfying(TextContent::class.java) {
        // TODO why is text double quoted?
        assertThat(it.text).isEqualTo("\"$bookResult\"")
      }

    // 7. Verify that the bookingService was called with
    // the correct parameters
    assertThat(cityCaptor.allValues).singleElement()
      .isEqualTo(city)
    assertThat(checkinDateCaptor.allValues).singleElement()
      .isEqualTo(checkinDate)
    assertThat(checkoutDateCaptor.allValues).singleElement()
      .isEqualTo(checkoutDate)

    // 8. Close the client
    client.close()
  }
}
To run the MCP Server tests:
cd mcp-server
./gradlew test
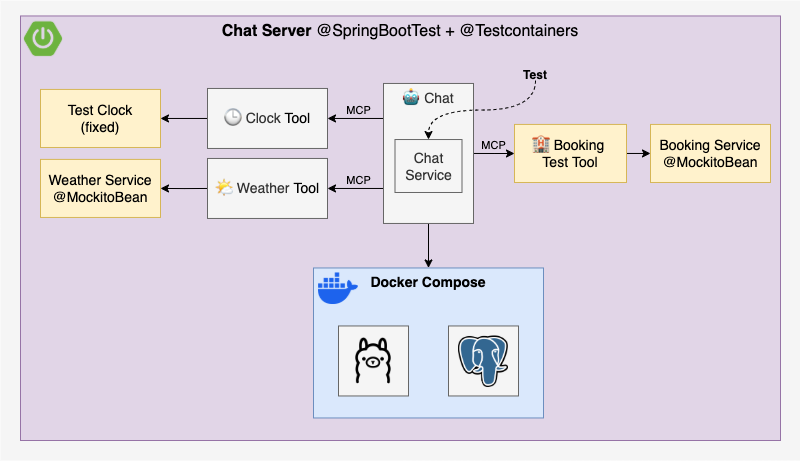
Test Chat Server
To test the Chat Server, we will:
- Override the default profile to
geminiand disable the MCP client in application-test.yml (overridable viaSPRING_PROFILES_ACTIVE). - Replace the remote Booking Tool by a local Booking Test Tool with the same signature.
- Create the local Book Testing Tool in BookingTestToolConfiguration.kt.
- Mock the downstream services Weather Service and Booking Service with
MockitoBean. - Create a fixed Clock to control the current date in ClockTestToolConfiguration.kt
- Declare it as
@Primary @Beanto override the defaultClockbean.
- Declare it as
- Start Docker Compose with PGVector using Testcontainers
You might’ve noticed that the test doesn’t actually check the MCP client’s SSE connection as it is disabled. I tried spinning up an McpServer using McpServerAutoConfiguration, and it almost worked. The problem? The client tries to connect before the server is up, which causes the whole application to fail on startup. Maybe is just an ordering issue, and hopefully something that can be fixed in the future 🤞
Now for the interesting part, how do we test the AI agent’s response? This is where Evaluation Testing comes in:
One method to evaluate the response is to use the AI model itself for evaluation. Select the best AI model for the evaluation, which may not be the same model used to generate the response.
This aligns with the evaluation techniques described in Martin Fowler’s Evals GenAI pattern:
- Self-evaluation: The LLM evaluates its own response, but this can reinforce its own mistakes or biases.
- LLM as a judge: Another model scores the output, reducing bias by introducing a second opinion.
- Human evaluation: People manually review responses to ensure the tone and intent feel right.
To keep things simple, we’ll go with self-evaluation 🤓
Each test will follow this structure:
@Test
fun `should do something`() {
  // 1. Mock downstream service(s)
  // Optionally use argument captors depending on how you plan
  // to verify parameters in step 5
  // Example for BookingService:
  doReturn("Your booking is done!")
    .whenever(bookingTestService).book(any(), any(), any())

  // 2. Call the chat service
  val chatId = UUID.randomUUID().toString()
  val chatResponse = chatService.chat(
    chatId,
    "Can you book accommodation for Barcelona from 2025-04-15 to 2025-04-18?"
  )

  // 3. Evaluate the response using the AI model
  val evaluationResult = TestEvaluator(chatClientBuilder) { evaluationRequest, userSpec ->
    userSpec.text(
      """
      Your task is to evaluate if the answer given by an AI agent to a human user matches the claim.
      Return YES if the answer matches the claim and NO if it does not.
      After returning YES or NO, explain why.
      Assume that today is ${LocalDate.now(clock)}.
      Answer: {answer}
      Claim: {claim}
      """.trimIndent()
    )
      .param("answer", evaluationRequest.responseContent)
      .param("claim", evaluationRequest.userText)
  }.evaluate(EvaluationRequest(
    "Accommodation has been booked Barcelona from 2025-04-15 to 2025-04-18",
    chatResponse
  ))

  // 4. Assert the evaluation result is successful, show feedback if not
  assertThat(evaluationResult.isPass).isTrue
    .withFailMessage { evaluationResult.feedback }

  // 5. If applicable, verify the parameters passed to the service
  // You can verify with argument captors or use the `verify` method as in the example below:
  verify(bookingTestService).book(
    eq("Barcelona"),
    eq(LocalDate.parse("2025-04-15")),
    eq(LocalDate.parse("2025-04-18"))
  )
}
See the full test implementation in ChatServerApplicationTest.kt.
Each evaluation uses a custom prompt tailored to the specific response being tested, and as you experiment, you'll notice some surprisingly quirky behavior. That’s why I ended up creating a custom TestEvaluator, based on Spring AI’s RelevancyEvaluator and FactCheckingEvaluator, which may not yet offer the level of customization you might want.
I had to adjust each prompt after running into odd results. For example, the evaluation model assuming it was still 2023 and refusing to believe the AI agent could predict weather for 2025. Or it mistaking "you" in the answer as referring to itself instead of the user. The weirdest? One evaluation just answered “NO” but the explanation said, “well, maybe I should have said YES” 🤣
For a production system, you'd definitely need a lot of prompt tuning and testing to get things right, for both the system and the evaluator, I suppose that’s part of the "fun" when working with GenAI.
By default, tests use the Gemini profile both locally and in CI (requires GOOGLE_API_KEY).
cd chat-server
./gradlew test
To test locally with Ollama (requires Ollama to be up, results may be flaky without adequate GPU hardware):
cd chat-server
SPRING_PROFILES_ACTIVE=ollama ./gradlew test
To test locally with Bedrock (requires AWS credentials):
cd chat-server
SPRING_PROFILES_ACTIVE=bedrock ./gradlew test
Run
You can configure the application using environment variables or a system.properties file in the root directory. This file is ignored by Git and is loaded by both ./gradlew bootRun and tests.
Example system.properties:
# AWS Bedrock
AWS_ACCESS_KEY_ID=...
AWS_SECRET_ACCESS_KEY=...
AWS_REGION=eu-central-1
AWS_BEDROCK_CHAT_MODEL=...
AWS_BEDROCK_EMBEDDING_MODEL=...

# Google Gemini
GOOGLE_API_KEY=...
Running the vector database
All profiles require PGVector for the RAG vector database:
cd chat-server
docker compose -f docker-compose-vectordb.yml up -d
To stop it:
cd chat-server
docker compose -f docker-compose-vectordb.yml down
To stop it and remove all volumes (removes all vector database data):
cd chat-server
docker compose -f docker-compose-vectordb.yml down -v
Running Ollama locally
If you want to use local LLMs, you can run Ollama either via Docker Compose or as a native application (more info at ollama.com).
cd chat-server
docker compose -f docker-compose-ollama.yml up -d
To stop it:
cd chat-server
docker compose -f docker-compose-ollama.yml down
Running the application
- Start MCP server
cd mcp-server
./gradlew bootRun
- Start Chat Server with one of the following profiles:
Ollama (requires Ollama and vector database):
cd chat-server
SPRING_PROFILES_ACTIVE=ollama ./gradlew bootRun
Gemini (requires vector database and GOOGLE_API_KEY):
cd chat-server
SPRING_PROFILES_ACTIVE=gemini ./gradlew bootRun
Bedrock (requires vector database and AWS credentials):
cd chat-server
SPRING_PROFILES_ACTIVE=bedrock ./gradlew bootRun
- Start chatting
A simple chat UI is available at http://localhost:8080/chat.html (disclaimer: this UI was entirely AI-generated as frontend is not the goal of this PoC).
You can also explore the API endpoints at http://localhost:8080/swagger-ui.html.
How to use other AI models
To use any of the other AI models supported by Spring AI, follow these steps:
- Add the required dependencies
- Configure the model in its own
application-<model>.ymlfile - Activate the profile using
SPRING_PROFILES_ACTIVE=<model>
Documentation
- Spring AI documentation
- Martin Fowler's GenAI patterns
- Inspired by sample project spring-ai-java-bedrock-mcp-rag
- Awesome Spring AI
Happy GenAI coding! 💙
Reviews (0)
Sign in to leave a review.
Leave a reviewNo results found