evo-mcp
Health Warn
- License — License: NOASSERTION
- Description — Repository has a description
- Active repo — Last push 0 days ago
- Low visibility — Only 5 GitHub stars
Code Pass
- Code scan — Scanned 12 files during light audit, no dangerous patterns found
Permissions Pass
- Permissions — No dangerous permissions requested
This self-hosted MCP server acts as a bridge between AI assistants (like VS Code or Claude) and the Seequent Evo platform. It enables AI tools to securely query and interact with your geoscience data, workspaces, and block models.
Security Assessment
Overall Risk: Low. The automated code scan of 12 files found no dangerous patterns, no hardcoded secrets, and no dangerous permission requests. Because the server acts as an interface to a specific external platform, it inherently makes network requests to access your geoscience data. The data accessed is highly sensitive (proprietary geological models and workspaces), so access should be strictly controlled. However, the tool itself does not appear to execute arbitrary shell commands or deploy malicious payloads.
Quality Assessment
The project appears to be well-structured and professionally documented by Seequent. It has very recent activity, with the last push occurring today. However, it is a very new or niche tool with only 5 GitHub stars, meaning it currently lacks broad community testing and visibility. The repository license is marked as "NOASSERTION" (though a license section exists in the README), which is a minor administrative concern for enterprise adoption.
Verdict
Use with caution—while the code is clean and the project is actively maintained, its extremely low community visibility means it has not yet been battle-tested by a wide audience.
The Seequent Evo MCP server is a self-hosted server that provides a secure interface between AI tools and the Evo platform, allowing you to access your geoscience data.
![]()
Seequent Developer Portal • Seequent Community • Seequent website
Evo MCP
Table of contents
- What is MCP?
- What is the Evo MCP server?
- Getting started
- Connect to Evo MCP
- Advanced
- Development
- Contributing
- Code of conduct
- License
- Disclaimer
- Acknowledgements
What is MCP?
The Model Context Protocol (MCP) is an open protocol that enables seamless integration between LLM applications and external data sources and tools. Whether you're building an AI-powered IDE, enhancing a chat interface, or creating custom AI workflows, MCP provides a standardized way to connect LLMs with the context they need.
An MCP Server is a lightweight program that provides specific features through the Model Context Protocol standard. Applications like chatbots, code editors, and AI tools run MCP clients that each establish a direct connection with an MCP server. Popular MCP clients include agentic code assistants (such as VS Code and Cursor) and conversational tools like Claude Desktop, with more expected in the future. MCP servers can connect to both local and remote data, supplying enriched information that enables AI models to generate more accurate and useful results.
MCP servers are consumable by any MCP client such as VS Code, Claude Desktop, or a Google ADK agent.
What is the Evo MCP server?
The Evo MCP server is a self-hosted server that provides a secure, standardised interface between your AI tools and the Evo platform. It acts as a bridge, exposing Evo SDK functionality - like access to your workspaces, geoscience objects, and block models - to any AI model or agent you choose.
The server comes packaged with many tools written by Seequent, but it is fully extensible and users are encouraged to add their own tools.
How teams use Evo MCP
- Workspace management: Create workspaces, summarize objects, snapshot and duplicate workspaces, copy objects between workspaces.
- Geoscience object creation: structured geoscience objects (pointsets, line segments, downhole collections, and downhole intervals) in Evo directly from raw CSV files, automating data validation and schema mapping.
[!WARNING]
The Evo MCP server is in early development and functionality is limited. Your feedback on future development is welcome!
Server architecture
flowchart LR
    Clients["🖥️ MCP Clients<br/>VS Code · Cursor<br/>Claude Desktop · ADK"]
    Clients -- stdio / streamable HTTP --> Server
    Server -- HTTPS --> APIs

    subgraph Server[Evo MCP Server]
        Tools[Tool Modules<br/>General · Admin<br/>Data · Filesystem]
        Filter[MCP_TOOL_FILTER]
        Context[EvoContext<br/>OAuth · Tokens]
        Tools --> Filter --> Context
    end

    subgraph APIs[Evo APIs]
        Discovery[Discovery]
        Workspace[Workspace]
        Object[Object]
    end
Key components
| Component | Description |
|---|---|
| MCP clients | Any MCP-compatible application connects to the server over STDIO or streamable HTTP. |
| FastMCP server | The core server runtime that handles MCP protocol, tool registration, and request routing. |
| Tool modules | Tools are grouped by category and conditionally registered based on the MCP_TOOL_FILTER setting. General tools are always loaded. |
| EvoContext | Manages OAuth authentication (with token caching), Evo SDK client initialization, and organization/hub selection. Initialization is lazy — it happens on the first tool call, triggering a browser-based login if needed. |
| Evo APIs | The Evo SDK packages (block model, geoscience object, workspace) communicate with Seequent Evo over HTTPS. |
Getting started
Prerequisites
- Python 3.10+
- Access to Seequent Evo (https://evo.seequent.com)
Installation
1. Clone this repository
git clone https://github.com/SeequentEvo/evo-mcp.git
2. Navigate to the root directory
cd <path-to-this-repository>
3. Create a Python environment
Option 1: Using uv (recommended)
The Python package manager uv makes it easy to set up your Python environment. Visit the uv website to learn more.
a. Install uv (if not already installed)
Windows
powershell -ExecutionPolicy ByPass -c "irm https://astral.sh/uv/install.ps1 | iex"
macOS and Linux
curl -LsSf https://astral.sh/uv/install.sh | sh
b. Create the Python environment including dependencies
uv sync
Option 2: Using pip and pyenv
If you prefer using pip and pyenv to manage your Python environment:
a. Install pyenv (if not already installed)
- Windows: Use pyenv-win
- macOS:
brew install pyenv - Linux: Follow pyenv installation guide
b. Install Python 3.10+
pyenv install 3.10
pyenv local 3.10
c. Create a virtual environment
python -m venv .venv
d. Activate the virtual environment
Windows
.venv\Scripts\activate
macOS and Linux
source .venv/bin/activate
e. Install dependencies
Install essential runtime dependencies:
pip install -e .
Install dev dependencies along with the essential runtime dependencies:
pip install -e '.[dev]'
4. Choose an MCP transport mode (optional)
The Evo MCP server supports two common transport modes for different use cases.
STDIO transport (default)
Recommended for: VS Code, Cursor, Claude Desktop, and other integrated MCP clients
STDIO (Standard Input/Output) is the default transport mode and is optimised for direct integration with MCP client applications. This transport communicates through standard input and output streams, making it perfect for command-line tools and desktop applications like VS Code and Cursor.
With STDIO transport, the client spawns a new server process for each session and manages its lifecycle. The server reads MCP messages from stdin and writes responses to stdout. This is why STDIO servers don’t stay running - they’re started on-demand by the client.
Advantages
- Simpler configuration - client handles connection automatically
- Better performance for local connections
- Directly integrated into VS Code and Cursor workflows
- No network overhead
Configure your client (VS Code, Cursor, etc.) to start the MCP server process. The client will handle all communication via STDIO.
Streamable HTTP transport
Recommended for: Testing, remote access, programmatic access via curl/scripts, and containerised deployments (Docker)
HTTP transport turns your MCP server into a web service accessible via a URL. This transport uses the Streamable HTTP protocol, which allows clients to connect over the network. Unlike STDIO where each client gets its own process, an HTTP server can handle multiple clients simultaneously.
The Streamable HTTP protocol provides full bidirectional communication between client and server, supporting all MCP operations including streaming responses. This makes it the recommended choice for network-based deployments.
Advantages
- Can be accessed via curl, programming languages, or HTTP clients
- Useful for testing and debugging
- Enables remote access to the server
- Simplifies integration with custom tools and scripts
- Ideal for containerised deployments (Docker, Kubernetes)
- Works well in cloud environments and microservices architectures
Limitations
- Requires separate server process management
- Slightly higher latency due to HTTP overhead
Common use cases
| Use case | Recommended mode |
|---|---|
| Using VS Code with Copilot | STDIO |
| Using Cursor with AI | STDIO |
| Using Claude Desktop | STDIO |
| Testing tools with curl | Streamable HTTP |
| Remote server access | Streamable HTTP |
| Custom script integration | Streamable HTTP |
5. Configure your environment
Make a copy of the file .env.example and rename it to .env. Fill in your app credentials as described below.
Evo app credentials
You first need to create a native app in the iTwin Developer Portal. This app will allow you to sign in with your Bentley account to access Seequent Evo. Visit the Evo Developer Portal to learn more.
Fill in your app credentials in the .env file:
EVO_CLIENT_ID=your-client-id
EVO_REDIRECT_URL=your-redirect-url
When you first use the server it will open your browser so you can sign in with your Bentley account. This gives the server access to any Evo instance and workspace your account has access to.
Alternative: Service authentication (for automation/CI)
If you need to run the server without interactive sign-in (e.g. automation, CI/CD, or background services), you can use a service app instead. Create a service app in the iTwin Developer Portal and set the following in your .env file:
AUTH_METHOD=client_credentials
EVO_CLIENT_ID=your-service-client-id
EVO_CLIENT_SECRET=your-service-client-secret
Note: The service app must be explicitly granted access to your Evo instance and workspaces.
MCP transport mode (optional)
The Evo MCP server supports two transport modes: STDIO and streamable HTTP. By default, the server runs in STDIO mode which is recommended for local development.
Set MCP_TRANSPORT environment variable in .env to choose the transport mode:
STDIO- Standard input/output (default)HTTP- Streamable HTTP
MCP_TRANSPORT=STDIO
If using HTTP mode, also configure the host and port:
MCP_TRANSPORT=HTTP
MCP_HTTP_HOST=localhost
MCP_HTTP_PORT=5000
When using HTTP mode, the MCP server must be running and reachable at the configured URL. The setup scripts can start it automatically for you, or you can run it manually.
MCP tool filtering (optional)
Set MCP_TOOL_FILTER environment variable in .env to filter available tools:
admin- Workspace/instance management and bulk data operationsdata- Object import, download and query operationsall- All tools (default)
MCP_TOOL_FILTER=all
Connect to Evo MCP
Apps like VS Code and Cursor make it easy to connect to MCP servers, whether they are running locally, are available over a local network, or over the internet. VS Code is free to download and use. Cursor requires a paid subscription.
NOTE: Installing any of the MCP client apps described in this section is entirely optional. If you have a favourite MCP client app that you think we should document here, please create a feature request ticket and let us know.
VS Code
Installation
VS Code comes in two versions - VS Code and VS Code Insiders. Install one of these apps before running Evo MCP.
NOTE: Both of these apps can be installed and used independently.
- Install the regular version of VS Code (recommended).
- Install VS Code Insiders for the most up-to-date experience. VS Code Insiders provides early access to the latest features and improvements for MCP integration.
Configuration
Run the supplied Python script to add the required settings. The script will ask you a series of questions in the console.
If you set up Python with uv:
uv run python scripts/setup_mcp.py
If you set up Python with pip:
python scripts/setup_mcp.py
Manual method
- Copy the settings found in
templates/vscode-stdio-config.json.
- For HTTP mode, use
templates/vscode-http-config.jsoninstead. - Update the template URL host and port to match
MCP_HTTP_HOSTandMCP_HTTP_PORTin your.env, and ensure the HTTP server is running.
- Open the Command Palette (press
Cmd+Shift+Pon macOS /Ctrl+Shift+Pon Windows/Linux). - Search for "mcp". Select MCP: Open User Configuration to update the user settings.

- Paste the settings you copied from the template, update the paths to match your local installation, and save the file. NOTE: The JSON template shows Windows file paths but the screenshot below shows macOS file paths. Follow the conventions that suit your operating system.
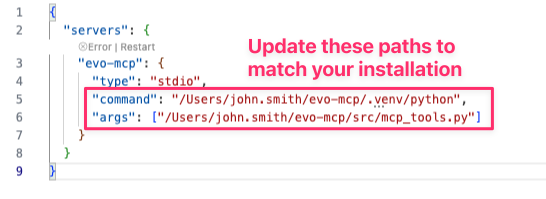
- The MCP server will start automatically when accessed by Copilot.
Verify the configuration
To verify that the Evo MCP server is correctly configured in VS Code:
Click the Extensions button in the Activity Bar (or press
Cmd+Shift+Xon macOS /Ctrl+Shift+Xon Windows/Linux).
Look for evo-mcp in the list of MCP Servers - Installed.
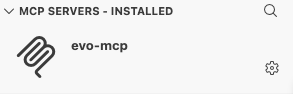
Ensure there are no warning icons or error messages displayed.
If you see evo-mcp listed without any warnings, the configuration is correct and the server is ready to use.
Cursor
Installation
Cursor is an AI-powered code editor with built-in support for MCP servers. To use the Evo MCP server in Cursor first download and install it.
NOTE: Cursor requires a paid subscription to use MCP features.
Configuration
Run the supplied Python script to add the required settings. The script will ask you a series of questions in the console.
If you set up Python with uv:
uv run python scripts/setup_mcp.py
If you set up Python with pip:
python scripts/setup_mcp.py
Manual method
- Copy the settings found in
templates/cursor-stdio-config.json.
- For HTTP mode, use
templates/cursor-http-config.jsoninstead. - Update the template URL host and port to match
MCP_HTTP_HOSTandMCP_HTTP_PORTin your.env, and ensure the HTTP server is running.
Open the Command Palette (press
Cmd+Shift+Pon macOS /Ctrl+Shift+Pon Windows/Linux).Search for "mcp". Select View: Open MCP Settings to update the user settings.

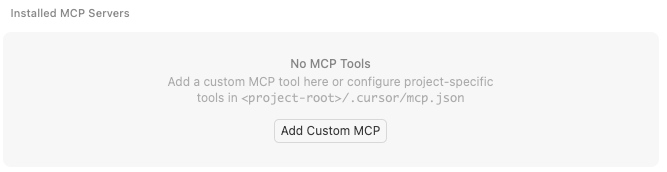
Click the Add Custom MCP button.
Paste the settings you copied from the template, update the paths to match your local installation, and save the file. NOTE: The JSON template shows Windows file paths but the screenshot below shows macOS file paths. Follow the conventions that suit your operating system.
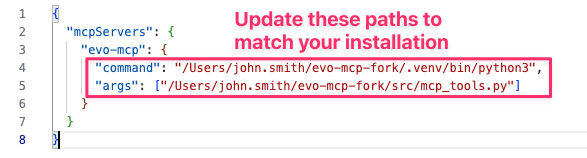
The MCP server will start automatically when accessed by Cursor AI.
Verifying the integration
To verify that the Evo MCP server is correctly configured in Cursor:
- Open Settings > Cursor Settings.
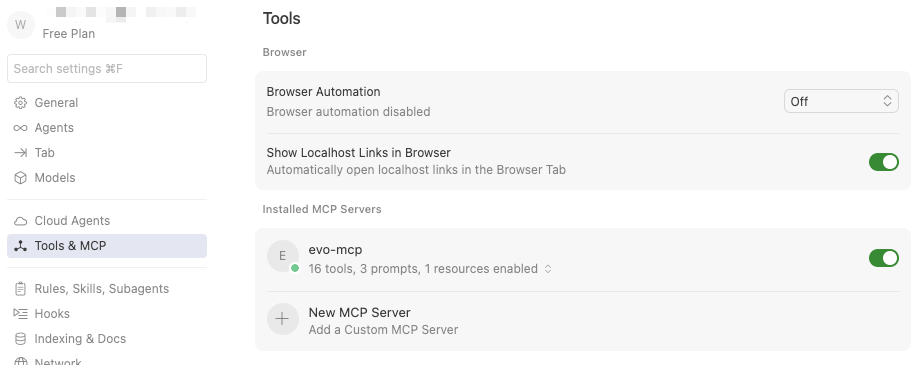
- In the search bar, type Tools & MCP.
- Look for evo-mcp in the Installed MCP Servers list. The MCP server should be enabled, display with a green light and list the properties of the server, eg. number of tools, etc.
Additional tips
- Use a separate workspace: Create a new workspace that is separate to your clone of this repository. If your copilot/agent has access to the source files in this repository, it may decide to ignore the MCP server.
- STDIO mode starts on demand: In
STDIOmode, VS Code/Cursor will launch the MCP server when needed. - HTTP mode needs a running server: If you select
HTTP, the server must already be running. The setup script can start it for you in the current terminal session so you can see live output. - Check your environment variables: Ensure
EVO_CLIENT_IDandEVO_REDIRECT_URLare set in your.envfile before connecting. - Reload after changes: If you edit settings or
.envvalues, reload the window so the client picks up the new config.
Advanced
Testing with curl
Running Evo MCP in streamable HTTP mode allows you to use curl to access the MCP tools.
Setup:
# In .env or environment
MCP_TRANSPORT=HTTP
MCP_HTTP_HOST=localhost
MCP_HTTP_PORT=5000
Start the server:
If you ran setup_mcp.py, selected HTTP, and chose to start now, the script starts the server in the current terminal so you can see live logs.
Otherwise, start it manually:
python src/mcp_tools.py
The server will start listening on http://localhost:5000/mcp.
Access tools using curl:
macOS/Linux (bash/zsh)
# 1) Initialize session and capture MCP session ID
SESSION_ID=$(curl -sS -D - -o /dev/null \
  -X POST http://localhost:5000/mcp \
  -H "Content-Type: application/json" \
  -H "Accept: application/json, text/event-stream" \
  -d '{"jsonrpc":"2.0","id":1,"method":"initialize","params":{"protocolVersion":"2025-06-18","capabilities":{},"clientInfo":{"name":"curl","version":"1.0"}}}' \
  | awk 'BEGIN{IGNORECASE=1}/^mcp-session-id:/{print $2}' | tr -d '\r')

# 2) List workspaces
curl -sS -X POST http://localhost:5000/mcp \
  -H "Content-Type: application/json" \
  -H "Accept: application/json, text/event-stream" \
  -H "Mcp-Session-Id: ${SESSION_ID}" \
  -d '{"jsonrpc":"2.0","id":2,"method":"tools/call","params":{"name":"list_workspaces","arguments":{"name":"","deleted":false,"limit":50}}}'

# 3) Create a workspace
curl -sS -X POST http://localhost:5000/mcp \
  -H "Content-Type: application/json" \
  -H "Accept: application/json, text/event-stream" \
  -H "Mcp-Session-Id: ${SESSION_ID}" \
  -d '{"jsonrpc":"2.0","id":3,"method":"tools/call","params":{"name":"create_workspace","arguments":{"name":"My New Workspace","description":"Test workspace"}}}'
Windows (PowerShell)
# 1) Initialize session and capture MCP session ID
$initHeaders = curl.exe -sS -D - -o NUL `
  -X POST http://localhost:5000/mcp `
  -H "Content-Type: application/json" `
  -H "Accept: application/json, text/event-stream" `
  -d '{"jsonrpc":"2.0","id":1,"method":"initialize","params":{"protocolVersion":"2025-06-18","capabilities":{},"clientInfo":{"name":"curl","version":"1.0"}}}'

$SESSION_ID = ($initHeaders | Select-String -Pattern '^mcp-session-id:\s*(.+)$' -CaseSensitive:$false).Matches[0].Groups[1].Value.Trim()

# 2) List workspaces
curl.exe -sS -X POST http://localhost:5000/mcp `
  -H "Content-Type: application/json" `
  -H "Accept: application/json, text/event-stream" `
  -H "Mcp-Session-Id: $SESSION_ID" `
  -d '{"jsonrpc":"2.0","id":2,"method":"tools/call","params":{"name":"list_workspaces","arguments":{"name":"","deleted":false,"limit":50}}}'

# 3) Create a workspace
curl.exe -sS -X POST http://localhost:5000/mcp `
  -H "Content-Type: application/json" `
  -H "Accept: application/json, text/event-stream" `
  -H "Mcp-Session-Id: $SESSION_ID" `
  -d '{"jsonrpc":"2.0","id":3,"method":"tools/call","params":{"name":"create_workspace","arguments":{"name":"My New Workspace","description":"Test workspace"}}}'
Note: Streamable HTTP requires clients to send
Accept: application/json, text/event-stream.
Testing with a Google ADK agent
An example Google ADK agent is provided for testing the MCP server:
Prerequisites
Google Cloud SDK (
gcloudCLI) installed and configuredgcloud auth application-default loginA GCP project with Vertex AI API enabled
Add to .env
GOOGLE_CLOUD_PROJECT=your-project-id
GOOGLE_CLOUD_LOCATION=your-region

# Passed through to the MCP server's `MCP_TOOL_FILTER` config.
MCP_TOOL_FILTER=all
Run
cd src\agents
adk web
Browse to http://localhost:8000 to interact with the agent.
Development
To add new MCP tools:
- Add tool function to appropriate module in
src/evo_mcp/tools/ - Decorate with
@mcp.tool()decorator - Tools are auto-registered based on their module (general/admin/data) on server startup
- Test using VS Code integration or the ADK agent
Linting
This repository uses Ruff for linting and formatting checks.
Linting also verifies that Python files include the required SPDX license header.
Run lint checks:
make lint
Auto-fix lint and formatting issues:
make lint-fix
Pre-commit
Install pre-commit hooks:
The local pre-commit hook will also auto-insert missing SPDX headers in Python files.
uv run --extra dev pre-commit install
Run hooks on all files:
uv run --extra dev pre-commit run --all-files
Contributing
Thank you for your interest in contributing to Seequent software. Please have a look over our contribution guide.
Code of conduct
We rely on an open, friendly, inclusive environment. To help us ensure this remains possible, please familiarise yourself with our code of conduct.
License
The Evo MCP server is open source and licensed under the Apache 2.0 license.
Copyright © 2026 Bentley Systems, Incorporated.
Licensed under the Apache License, Version 2.0 (the "License").
You may obtain a copy of the License at
http://www.apache.org/licenses/LICENSE-2.0
Unless required by applicable law or agreed to in writing, software
distributed under the License is distributed on an "AS IS" BASIS,
WITHOUT WARRANTIES OR CONDITIONS OF ANY KIND, either express or implied.
See the License for the specific language governing permissions and
limitations under the License.
Disclaimer
Before using an MCP Server, you should consider conducting your own independent assessment to ensure that your use would comply with your own specific security and quality control practices and standards, as well as the laws, rules, and regulations that govern you and your content.
Acknowledgements
Much of this document was inspired by the excellent guides written by FastMCP and AWS Labs.
Reviews (0)
Sign in to leave a review.
Leave a reviewNo results found