vaultr-notes
Health Pass
- License — License: Apache-2.0
- Description — Repository has a description
- Active repo — Last push 0 days ago
- Community trust — 14 GitHub stars
Code Fail
- exec() — Shell command execution in desktop-app/editor/src/frontmatter.js
Permissions Pass
- Permissions — No dangerous permissions requested
No AI report is available for this listing yet.
Vaultr: The Simplest Way to Build AI Workflows Around Your Notes.
Vaultr: The Simplest Way to Build AI Workflows Around Your Notes.
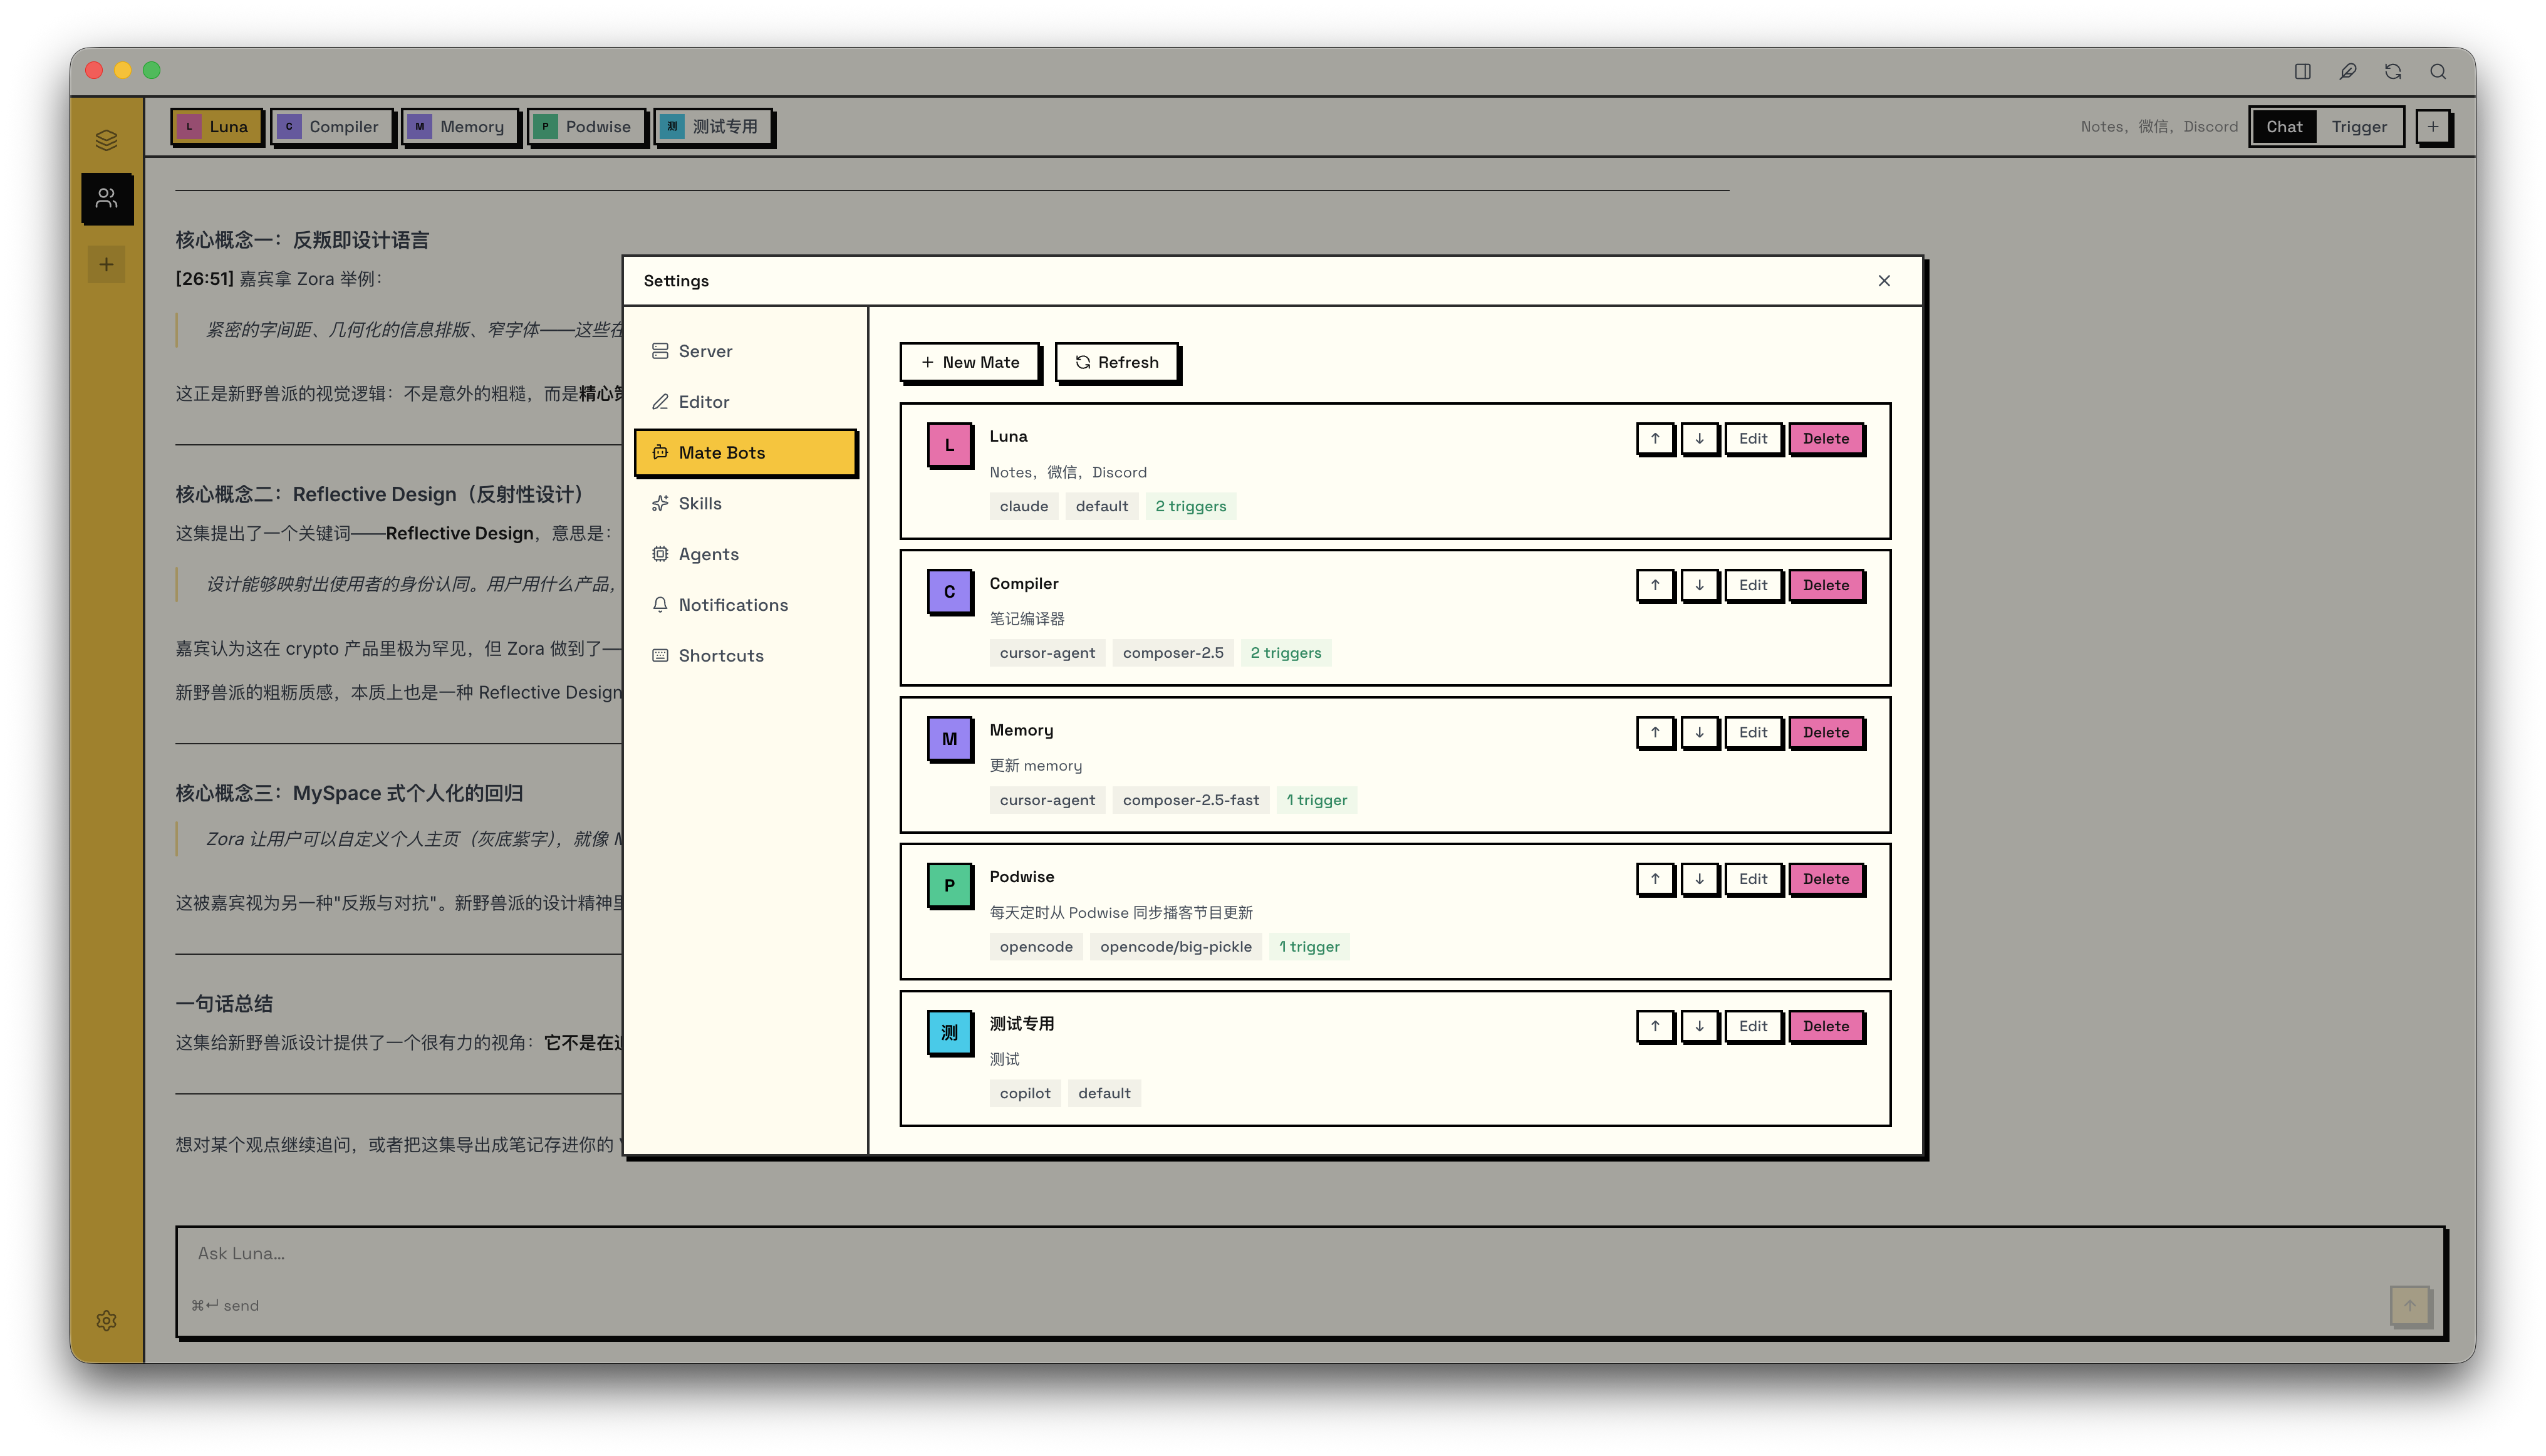
Table of Contents
- Highlight Features
- Design
- Architecture
- Installation
- Obsidian Compatibility
- Editor
- Shorts
- Mate Bots
- Discord
- Note AI Compiler
- Personal Memory
- Skills
- Customizing AI Behavior
- Shortcuts
Highlight Features
📝 Full-Featured Note System
- Built-in WYSIWYG editor: write in rich text or raw Markdown, switch anytime
- Wikilinks and wiki images: fully Obsidian-compatible
- Shorts: a daily capture stream for quick notes, accessible from anywhere
- Instant search inspired by Raycast: find anything as you type
- Clip browser extension: save any webpage as Markdown with one click
- Can also be self-hosted on a remote server
🤖 Event-Driven Multi-Agent System
- 15 agent CLIs supported out of the box
- Event-triggered automation: agents run tasks automatically when notes change, messages arrive, or schedules fire
- WeChat & Discord integration: chat with agents directly from WeChat or Discord DMs
🧠 Note AI Compiler
- Compiles your notes into structured knowledge points automatically
🪞 Personal Memory
- Automatically extracts personal memories from your notes (identity, preferences, goals, beliefs, people, and current state) into structured files that stay current
- Lets your AI agents truly know you: every conversation carries memory instead of starting cold
🔒 Local-First, Fully Offline
- All your data lives on your own machine: Markdown files, SQLite metadata, full-text index
- The desktop app bundles every dependency: no CDN, no cloud account, no internet required
🌐 Multiple Access Channels
- Available via CLI, desktop app, WeChat, and Discord
Design
Vaultr has one core idea: let AI organize your notes, not you.
Write freely, don't manage
Vaultr discourages spending energy on note maintenance: elaborate categorization, nested folder hierarchies, manual tagging, and archiving. These are low-value, repetitive chores. Taking notes should be effortless and spontaneous: just write.
Concretely, Vaultr strongly discourages nested directories. You can create simple buckets like /reading, /work, or /ideas, but nesting subdirectories inside them is not recommended, though it's technically possible. Keeping things flat frees you from the mental overhead of deciding where every note belongs.
AI compiles, you don't organize
What turns raw notes into useful knowledge? Vaultr's answer: hand it off to AI.
- You write short notes, journal entries, clip web pages. No curation needed.
- AI agents automatically compile these notes into structured knowledge units, stored in the knowledge base
- The knowledge base is further distilled into personal memory, giving every conversation context
The entire pipeline runs automatically. You don't need to be involved in any organizing work.
AI retrieves, you don't browse
Vaultr ships full-text search, but the more important capability is letting agents retrieve on your behalf. When you need something, ask an agent directly. It searches your notes and knowledge base and surfaces the answer.
⚠️ Things you must know before using Vaultr
- Avoid nested directories. Vaultr recommends a flat, single-level directory structure. You can technically create subdirectories inside category folders, but it is strongly discouraged.
- Keep filenames unique. Vaultr links notes using Wiki Link syntax
[[stem]], by filename rather than path. Duplicate filenames cause ambiguous references. - Underscore-prefixed directories are system-reserved. Directories like
_knowledge/,_shorts/, and_memory/are used internally by Vaultr. Do not use an underscore prefix for your own category directories. - Vaultr does not bundle an AI Agent. You need an agent CLI already installed on your machine (e.g. Claude Code, OpenCode, Codex). Vaultr discovers them automatically from your PATH with no extra configuration needed. See Backing Agents.
Architecture
┌──────────────┐  ┌──────────────┐  ┌──────────────┐  ┌──────────────┐
│              │  │              │  │              │  │              │
│  Desktop App │  │    WeChat    │  │     CLI      │  │  Clip (Ext)  │
│              │  │              │  │              │  │              │
└──────┬───────┘  └──────┬───────┘  └──────┬───────┘  └──────┬───────┘
       │                 │                 │                 │
       └─────────────────┴─────────────────┴─────────────────┘
                                  │
                                  ▼
┌────────────────────────────────────────────────────────────────────┐
│                           Vaultr Server                            │
└──────┬─────────────────┬─────────────────┬─────────────────┬───────┘
       │                 │                 │                 │
       ▼                 ▼                 ▼                 ▼
┌──────────────┐  ┌──────────────┐  ┌──────────────┐  ┌──────────────┐
│  Filesystem  │  │    SQLite    │  │    Bleve     │  │    Agents    │
│   (Markdown) │  │  (Metadata)  │  │  (FTS Index) │  │  (CLI/MCP)   │
└──────────────┘  └──────────────┘  └──────────────┘  └──────────────┘
Vaultr Server is a single, self-contained Go binary with no external dependencies. It embeds SQLite and Bleve directly, so the entire server is just one executable you drop anywhere and run.
Because it's a plain HTTP server, it deploys equally well on your local machine or a remote cloud instance. Run it on a home server or a container; all clients (desktop app, CLI, WeChat bridge) connect over the network the same way.
Installation
For most users: install the Desktop App and the Clip extension — that's it. The Desktop App detects the CLI on first launch and offers one-click installation if it is not found. A standalone Server & CLI installation is only needed if you want to deploy Vaultr on a remote or headless host.
💻 Desktop App
Download the latest
.dmgfile from the Latest Release pageOpen the dmg and drag Vaultr into your Applications folder
On first launch, macOS may block the app since it is signed but not notarized by Apple
Fix: Go to System Settings → Privacy & Security, scroll down to find the blocked app notice, and click Open Anyway
🧩 Browser Extension (Clip)
- Download the latest
vaultr-clip-*.zipfrom the Latest Release page - Unzip the file
- Open Chrome or Edge and go to
chrome://extensions/ - Enable Developer mode in the top-right corner
- Click Load unpacked and select the unzipped folder
- The extension is now installed and visible in your browser toolbar
⌨️ Server & CLI
Run the following command to install the Vaultr server and CLI:
curl -sL https://raw.githubusercontent.com/skoowoo/vaultr-notes/main/install-cli.sh | sh
Obsidian Compatibility
Vaultr is fully compatible with Obsidian. Both tools can work on the same vault at the same time, no migration required, no need to pick one over the other.
- Same vault, same files. Vaultr reads and writes plain Markdown in your existing directory structure. Keep using Obsidian as your primary editor if you prefer.
- Obsidian-native syntax. Wikilinks (
[[Note]]), aliases ([[Page|Alias]]), and wiki images (![[image.png]]) all work out of the box. - No format conversion. Everything Vaultr creates or modifies stays standard Markdown — open it in Obsidian and it looks exactly as you'd expect.
- Vaultr as your AI layer. Point Vaultr at your Obsidian vault and let it handle the AI side: note compilation, personal memory, event-driven agents, WeChat, and search. You write in Obsidian; Vaultr runs the automation on top.
Get started with an existing vault
Point vaultr init at your Obsidian vault directory:
# Initialize the current directory
vaultr init

# Or pass a path explicitly
vaultr init /path/to/your/obsidian-vault
This creates a .vaultr/ folder inside the directory, scans all Markdown files, registers them in the metadata database, and builds the full-text search index. If .vaultr/ already exists the command exits safely without changing anything. Your Obsidian vault is otherwise untouched.
After running vaultr init, open the Vaultr desktop app and complete the setup:
- Go to Settings → Server → Config
- Under Vault, click the path field and select your vault directory
- Save config
Your notes will now be available in Vaultr — while Obsidian continues to work on the same vault as before.
Editor
Vaultr includes a built-in WYSIWYG Markdown editor. Notes open in rich-text mode by default; toggle to raw Markdown at any time with the mode button in the toolbar.
✍️ Writing
The editor supports CommonMark and GFM: headings, bold, italic, strikethrough, inline code, code blocks, tables, and task lists. YAML frontmatter is preserved as-is.
🔗 Wikilinks and Wiki Images
Type [[ to insert a wikilink. Aliases follow Obsidian syntax: [[Page Name|Alias]]. Embed images with ![[filename.png]].
Find & Replace
Press ⌘F (Ctrl+F) to open the find & replace panel. If the editor is in WYSIWYG mode it switches to Source mode automatically, then opens the panel. Use the Aa button to toggle case-sensitive matching. Navigate matches with Enter / Shift+Enter, or replace one / all occurrences. Press Escape to close.
Selection Toolbar
Select any text in WYSIWYG mode and a floating toolbar appears above the selection:
- Inline format toggles: Bold, Italic, Strikethrough, Inline code
- Block format toggles: H1-H4, Blockquote, Bullet list, Ordered list (shown when the selection spans block-level content)
- Word count: displays the word count of the selection
- Copy as Markdown: copies the raw Markdown of the selection to the clipboard
- ⚡ Save as Short: appends the selection to today's Short Notes, with a
[[source]]backlink to the current note - Dismiss: collapses the selection and hides the toolbar
Shorts
Shorts is a lightweight daily capture stream, a rolling feed of timestamped quick notes stored under /_shorts/ in your vault, one Markdown file per day.
⚡ Capturing
| Method | How |
|---|---|
| Quick Note | Press ⌘. (Ctrl+.) to open a full-screen Zen editor; ⌘↵ to save, Esc to exit |
| From the editor | Select any passage → click ⚡ in the toolbar |
The Quick Note editor is distraction-free: no toolbar, no buttons, just you and the text. When saving from the editor, Vaultr automatically appends a [[source note]] backlink so you can always trace a Short back to its origin.
📅 Viewing
- Stream: a chronological feed grouped by date; today's entries appear at the top; scroll down to load older entries
- Calendar: a month grid marking which days have entries; click any date to jump to that day's notes
Mate Bots
Mate Bots are custom AI agents you define in Settings → Mate Bots. Each mate has a name, a system prompt, and a backing agent (any agent CLI detected on your PATH).
🔔 Event Triggers
Add one or more triggers to a mate and it runs automatically whenever a matching event fires. Vaultr ships with these built-in events:
| Event | When it fires |
|---|---|
note_created |
Any new note is created in the vault |
note_updated |
Any existing note is modified |
note_deleted |
Any note is deleted |
short_note_created |
A short-note entry is appended |
scheduled |
On a configured interval or daily time |
wechat_message |
A WeChat direct message is received |
discord_message |
A Discord DM is received |
compile_requested |
A note compilation is manually triggered |
Backing Agents
Vaultr automatically discovers available agent CLIs from your local
PATHwith no extra configuration needed. If you already use Claude Code, Codex, or Copilot in your terminal, Vaultr finds them at startup and makes them available as backing agents for your mates.
Vaultr integrates 15 agent CLIs out of the box:
- Claude Code
- OpenCode
- Codex CLI
- Cursor Agent
- Hermes
- GitHub Copilot CLI
- Pi
- DeepSeek TUI
- Kimi CLI
- Mistral Vibe CLI
- Devin for Terminal
- Qwen Code
- Qoder CLI
- Kiro CLI
- Kilo
Vaultr can receive WeChat direct messages and route them to a mate agent automatically. Setup has two steps.
Step 1: Connect WeChat in Server Config
- Open Settings → Server → Config → WeChat
- Click Scan QR to log in — a QR code appears
- Open WeChat on your phone and scan the code; confirm when prompted
- Once the status badge shows Connected, click Save all
The WeChat iLink bridge begins polling for new DMs.
Step 2: Create a Mate agent with a wechat_message trigger
Open Settings → Mate Bots and click New Mate
Fill in a name, pick an agent and model
Under Triggers, click + Add trigger
Set the Event to
wechat_messageWrite a prompt template:
Example prompt:
{{.Content}}Save the mate agent
From this point on, every WeChat DM fires the trigger and the mate agent replies automatically.
Discord
Same idea as WeChat, but Discord. The bot connects over the Gateway and replies to DMs.
Step 1: Configure Discord in Server Config
- Create a Bot at the Discord Developer Portal
- Under Bot → Privileged Gateway Intents, enable Message Content Intent
- Copy the Bot token
- Open Settings → Server → Config → Discord
- Paste the token into Bot token, fill in your Owner user ID (Developer Mode → right-click your avatar → Copy User ID), and set enabled to true
- Click Save all and restart the server. The Bot's status dot turns green once connected.
To send proactive DMs (e.g. from a scheduled trigger), the Bot must share at least one server with you.
If discord.com is not directly reachable, set Proxy URL to your local proxy (e.g. http://127.0.0.1:7890).
Step 2: Create a Mate agent with a discord_message trigger
- Open Settings → Mate Bots and click New Mate
- Fill in a name, pick an agent and model
- Under Triggers, click + Add trigger
- Set the Event to
discord_message - Write a prompt template. Available variables:
{Content},{DiscordChannelID},{DiscordUserID} - Save the mate agent
Done. Every incoming DM now triggers the mate agent and gets a reply.
Note AI Compiler
Compile notes into structured knowledge points automatically.
Step 1 — Enable the Compiler
Go to Settings → Server → Config → Compile and enable the compiler.
Step 2 — Create a Mate with a Compile Trigger
Create a mate in Settings → Mate Bots, add a trigger, and choose one of the two compile trigger modes:
- Auto-compile on note creation (
note_created+ Path Prefix)
Set the Event to note_created and add one or more Path Prefixes (e.g. /Web Clips/). The mate fires automatically whenever a new note is created inside a matching directory.
Example prompt:
Use the compile skill to compile note `{{.Path}}`, then use the index skill to update the knowledge index.
- Manual compile trigger (
compile_requested)
Set the Event to compile_requested. The mate fires when you manually trigger compilation from within the app (e.g. via the note action menu).
Example prompt:
Use the compile skill to compile note `{{.Path}}`, then use the index skill to update the knowledge index.
Personal Memory
Vaultr can automatically extract personal memories from your notes into six structured memory files (identity, preferences, goals, beliefs, people, and current state) stored under /_memory/.
Default scan scope: short notes (/_shorts) and knowledge units (/_knowledge). You can also specify additional directories directly in the prompt.
💬 Option 1 — Trigger manually in chat
Ask any agent directly in a conversation to update your personal memory. Example prompt:
Please update my personal memory. I'm [name], currently working on [project], … (brief self-introduction)
The agent invokes the vaultr-memory skill and completes the extraction automatically. The first run scans the last 90 days; subsequent incremental runs scan only the last 2 days.
⏰ Option 2 — Create a scheduled Mate Trigger (daily auto-run)
Create a Mate in Settings → Mate Bots with a scheduled trigger to update memory automatically every day.
Open Settings → Mate Bots and click New Mate
Give it a name (e.g.
Daily Memory), pick an agent and modelUnder Triggers, click + Add trigger
Set the Event to
scheduledand configure the time (e.g. daily at 08:00)Write a prompt:
Please update my personal memory. I'm [name], currently working on [project].To scan extra directories, append them in the prompt:
Please update my personal memory. I'm [name], currently working on [project]. Also scan /journal/.Save the mate agent
From this point on, memory updates run automatically once a day with no manual action required.
Skills
Vaultr ships with a set of built-in skills that agents can use when running tasks. You can add your own skills by placing them in ~/.vaultr/skills/.
Each skill is a directory containing a SKILL.md file:
~/.vaultr/skills/
└── your-skill/
    └── SKILL.md
Install external skills:
curl -sL https://raw.githubusercontent.com/skoowoo/vaultr-notes/main/install-skills.sh | sh
Install a custom skill:
cp -r your-skill ~/.vaultr/skills/
Vaultr picks up all skills in ~/.vaultr/skills/ automatically on startup.

Customizing AI Behavior
Every layer of AI output in Vaultr is customizable:
1. Global Agent System Prompt
Settings → Server → Config → Agent — set agent.system_prompt to replace the built-in default prompt that is prepended to every agent run. When left empty, Vaultr uses its built-in default which teaches agents about vault structure, wiki-link syntax, and personal memory files.
2. Per-Mate System Prompt & Trigger Prompt
In Settings → Mate Bots, each mate exposes two customization points:
- System Prompt — mate-specific instructions. Appended to the global system prompt (joined with
---). - Trigger Prompt template: the user message sent to the agent when a trigger fires. Supports variables:
{Path},{Name},{Content}for vault events;{Now},{Date},{Time}for scheduled triggers;{Content},{WechatUserID}for WeChat triggers;{Content},{DiscordChannelID},{DiscordUserID}for Discord triggers.
3. Rewrite the Compile Skill
The knowledge compilation behavior is defined in ~/.vaultr/skills/vaultr-compile-note/SKILL.md. Edit this file to change how raw notes are compiled into structured knowledge units.
4. Rewrite the Memory Extraction Skill
The personal memory extraction behavior is defined in ~/.vaultr/skills/vaultr-memory/SKILL.md. Edit this file to change what gets extracted and how memory files are structured.
5. Install or Build Custom Skills
Drop any skill directory into ~/.vaultr/skills/, then enable it in Settings → Skills. Skills are referenced by agents via their directory name.
Shortcuts
| Action | macOS | Windows / Linux |
|---|---|---|
| Dismiss | Esc |
Esc |
| Search | ⌘K |
Ctrl+K |
| New Note | ⌘N |
Ctrl+N |
| Quick Note | ⌘. |
Ctrl+. |
| Toggle Editor | ⌘E |
Ctrl+E |
| Close Editor Tab | ⌘W |
Ctrl+W |
| Find & Replace | ⌘F |
Ctrl+F |
| Expand / Shrink Editor | ⌘\ |
Ctrl+\ |
| Go to Notes | ⌘1 |
Ctrl+1 |
| Go to Agent Chat | ⌘2 |
Ctrl+2 |
| Refresh | ⌘R |
Ctrl+R |
| Settings | ⌘, |
Ctrl+, |
Reviews (0)
Sign in to leave a review.
Leave a reviewNo results found