ESP32-claude-usage-display
Health Uyari
- No license — Repository has no license file
- Description — Repository has a description
- Active repo — Last push 0 days ago
- Low visibility — Only 5 GitHub stars
Code Gecti
- Code scan — Scanned 2 files during light audit, no dangerous patterns found
Permissions Gecti
- Permissions — No dangerous permissions requested
Bu listing icin henuz AI raporu yok.
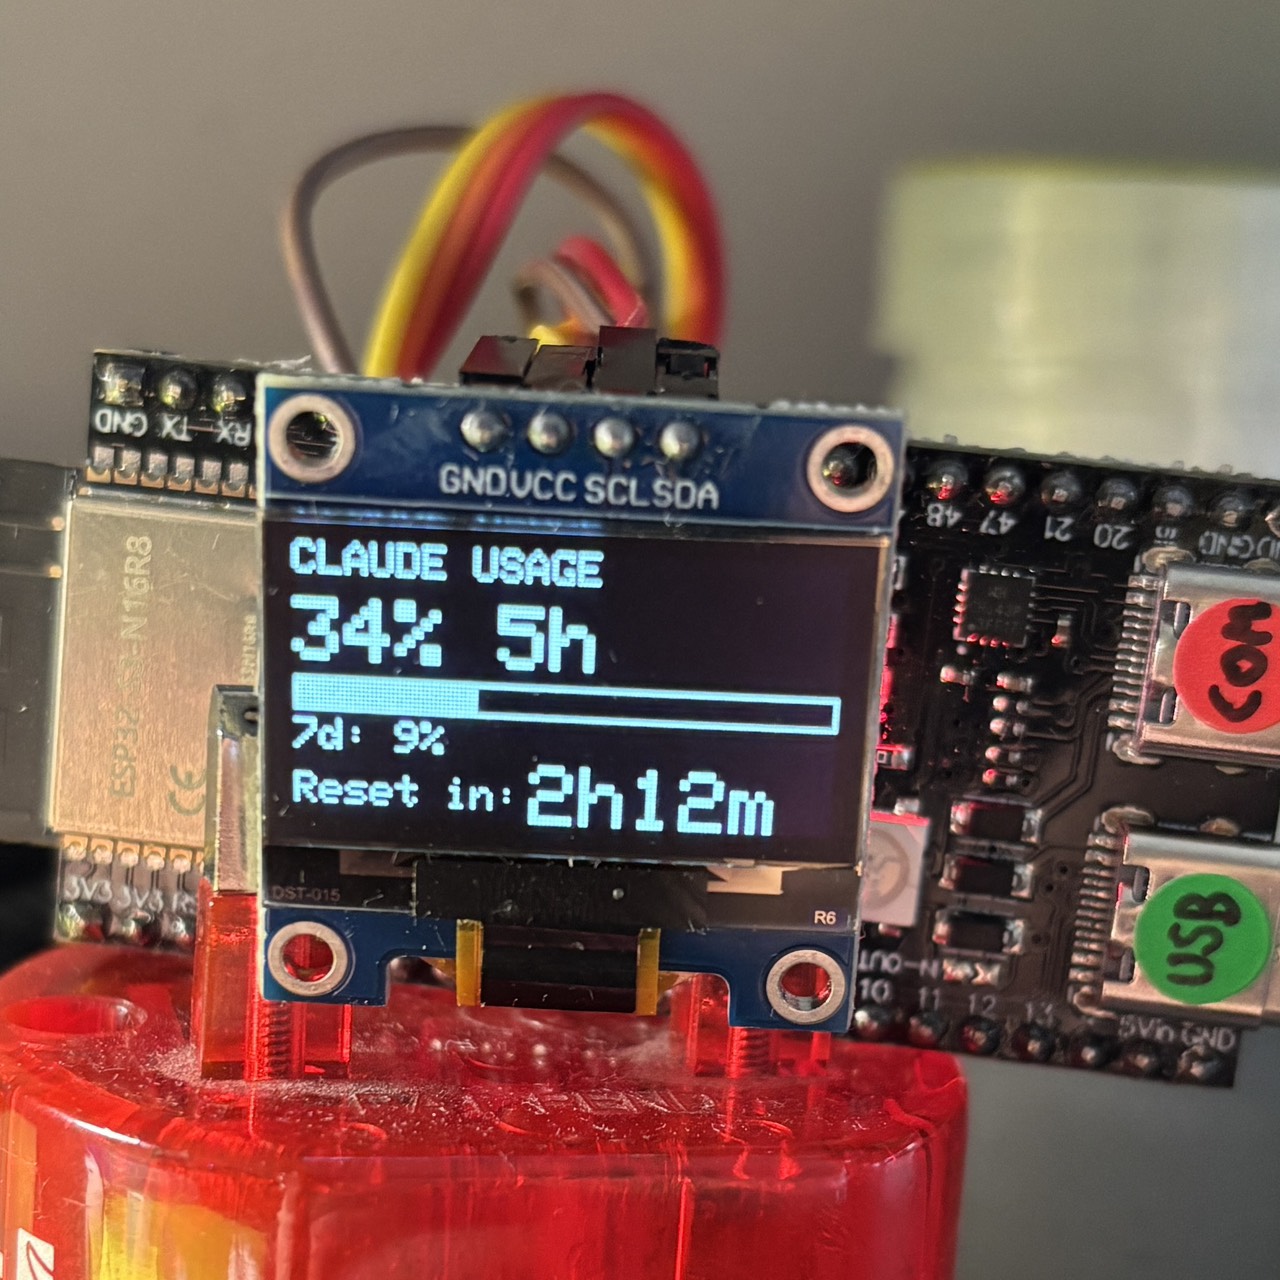
A physical dashboard that displays your Claude.ai usage limits on a 128×64 OLED screen. Shows the current 5-hour session usage, 7-day cap, and live countdown to reset — updated automatically. No API key required.
Claude Usage Dashboard — ESP32-S3
A physical dashboard that displays your Claude.ai usage limits on a 128×64 OLED screen. Shows the current 5-hour session usage, 7-day cap, and live countdown to reset — updated automatically. No API key required.
Hardware
| Component | Notes |
|---|---|
| ESP32-S3-N16R8 (or any ESP32-S3) | 16 MB flash, 8 MB PSRAM |
| SSD1306 OLED 128×64 I2C | 0.96" or 1.3" both work |
| USB-C cable | For flashing and power |
Wiring
OLED         ESP32-S3
────         ────────
VCC    →     3.3V
GND    →     GND
SDA    →     GPIO 8
SCL    →     GPIO 9
Note: GPIO 22 does not exist on ESP32-S3. Use GPIO 8/9 for I2C.
Using a Different Board
The project compiles for any ESP32-family board. Only two files need to change.
1. platformio.ini — change the board
Replace the board line and adjust build_flags to match your module:
| Board | board = value |
Remove from build_flags |
|---|---|---|
| ESP32 classic (Wemos D1 Mini32, NodeMCU-32S, etc.) | esp32dev |
-DBOARD_HAS_PSRAM -DARDUINO_USB_CDC_ON_BOOT=1 |
| ESP32-S3 (no PSRAM variant) | esp32-s3-devkitc-1 |
-DBOARD_HAS_PSRAM |
| ESP32-S2 | esp32-s2-saola-1 |
-DBOARD_HAS_PSRAM |
| ESP32-C3 | esp32-c3-devkitm-1 |
-DBOARD_HAS_PSRAM -DARDUINO_USB_CDC_ON_BOOT=1 |
| ESP32-C6 | esp32-c6-devkitc-1 |
-DBOARD_HAS_PSRAM -DARDUINO_USB_CDC_ON_BOOT=1 |
-DBOARD_HAS_PSRAM— only needed if your module physically has PSRAM (look for the R in the part number, e.g. N16R8)-DARDUINO_USB_CDC_ON_BOOT=1— only needed for boards using the native USB-CDC port for Serial (ESP32-S3 and S2 dev boards)
2. src/config/config.h — change the I2C pins
#define PIN_SDA  8   // ← change to match your wiring
#define PIN_SCL  9   // ← change to match your wiring
Common I2C defaults by board family:
| Board family | Default SDA | Default SCL |
|---|---|---|
| ESP32 classic | GPIO 21 | GPIO 22 |
| ESP32-S3 / S2 | GPIO 8 | GPIO 9 |
| ESP32-C3 | GPIO 8 | GPIO 9 |
| ESP32-C6 | GPIO 6 | GPIO 7 |
Any free GPIO works for I2C. The table above lists common defaults, but you can wire SDA/SCL to any available pin — just update
config.hto match your physical wiring.
Can I use an ESP8266?
Not without significant rewriting. The codebase depends on three ESP32-specific libraries with no drop-in equivalent on ESP8266:
WiFiClientSecure— the ESP8266 version has a different API and limited TLS cipher support that often fails against CloudflarePreferences— uses ESP32 NVS (non-volatile storage); ESP8266 has no equivalent and would need LittleFS or EEPROM- Simultaneous AP+STA mode —
WIFI_AP_STAbehaves differently on ESP8266
Can I use a non-ESP microcontroller (Arduino Uno, STM32, etc.)?
This project requires:
- WiFi with HTTPS / TLS — to call
claude.aidirectly from the device - ~50 KB free RAM — for the TLS stack, JSON parser, and HTTP response buffers
- Arduino framework — PlatformIO + the libraries used here
Standard Arduinos (Uno, Nano, Mega) have no WiFi and cannot run this project. Boards like the Arduino Uno R4 WiFi or RP2040 W are possible in principle, but would require porting WiFiClientSecure, Preferences, and the WiFi AP logic to their platform equivalents — a non-trivial effort.
The easiest swap is any other ESP32-family board — the change is two lines in two files.
Software Requirements
- VS Code with the PlatformIO extension
- PlatformIO downloads all library dependencies automatically on first build
Build & Flash
- Clone or download this repository
- Open the folder in VS Code
- PlatformIO will detect
platformio.iniautomatically - Click Build (checkmark icon) — first build downloads the toolchain (~5 min)
- Connect the ESP32-S3 via USB
- Click Upload (arrow icon)
First-Time Setup
After flashing, the device starts a WiFi access point named ESP32-Claude-Dashboard.
Step 1 — Get your Claude session cookie
Do this before connecting to the device AP, while on your normal WiFi:
- Open claude.ai in Chrome and make sure you are logged in
- Open DevTools:
F12(orCtrl+Shift+I) - Go to the Network tab
- Refresh the page or click anything to generate a request
- Click any request to
claude.aiin the list - In the right panel, find Request Headers → Cookie
- Copy the entire value of the Cookie header
DevTools → Network → any claude.ai request → Request Headers

Cookie: sessionKey=sk-ant-...; __cf_bm=...; other=...
        ^^^^^ copy this entire value
Why this approach? The ESP32 impersonates a logged-in browser session. The cookie is valid as long as you stay logged in to claude.ai. If you log out or the session expires, repeat this step.
Step 2 — Configure the device
- Connect to WiFi ESP32-Claude-Dashboard (password:
dashboard1) - Open a browser and go to
http://192.168.4.1 - Under Connection Settings, fill in:
- Home WiFi SSID — your home router network name
- Home WiFi Password — your home router password
- Claude Cookie Header — paste the full cookie value from Step 1
- Click Save Settings
The device connects to your home WiFi and fetches live data within ~10 seconds. The OLED updates automatically.
After saving, the AP stays running. You can return to your home WiFi and still reach the portal at
http://192.168.4.1while connected to the ESP32-Claude-Dashboard AP.
What It Displays
| Field | Description |
|---|---|
| Primary % | 5-hour session usage (or 7-day if no 5h limit on your plan) |
| Progress bar | Visual fill for the primary metric |
| 7-day % | Weekly usage cap |
| 7-day Opus % | Weekly Opus model usage (Pro plan only) |
| Reset in: 2h15m | Live countdown to next usage reset (NTP-synced) |
All rows are individually toggleable in the web portal under Display Settings.
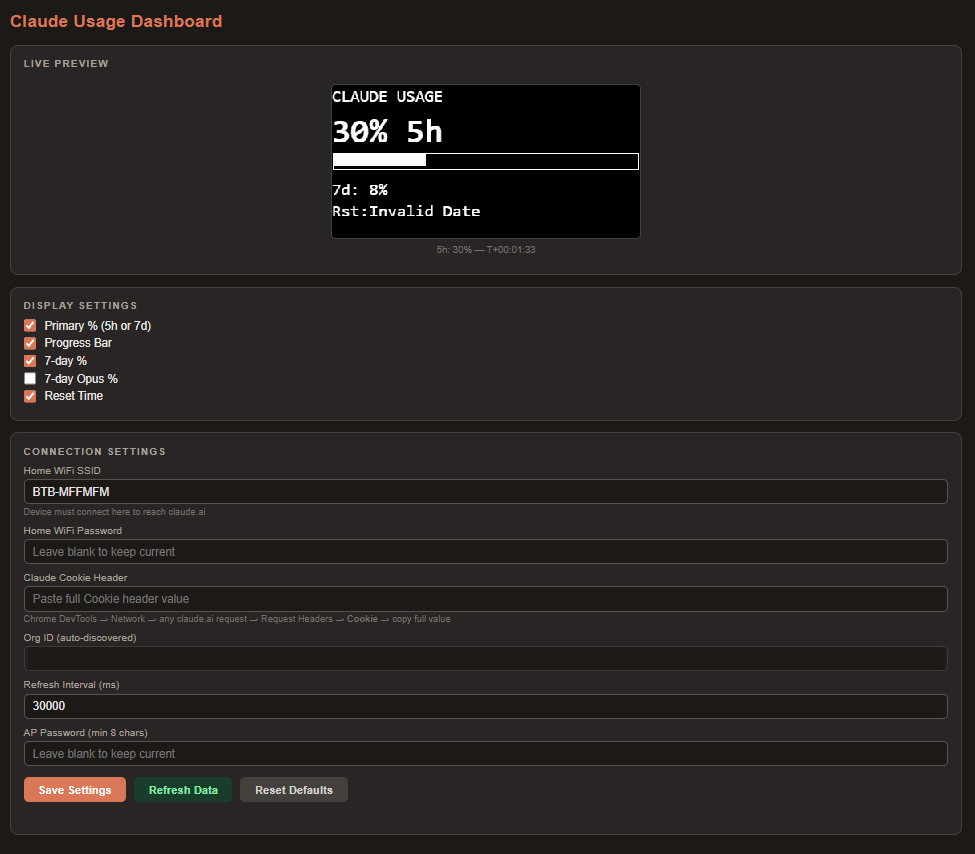
Web Portal
Connect to the ESP32-Claude-Dashboard AP and open http://192.168.4.1.
| Section | Description |
|---|---|
| Live Preview | Canvas rendering of the current OLED layout, updates every 30 s |
| Display Settings | Toggle each row on/off |
| Connection Settings | WiFi credentials, session cookie, refresh interval, AP password |
| Refresh Data | Force an immediate fetch |
| Reset Defaults | Wipe all settings back to factory defaults |
Settings Reference
| Setting | Default | Description |
|---|---|---|
| Refresh interval | 30 000 ms | How often to poll claude.ai |
| AP password | dashboard1 |
Password for the device WiFi AP |
| Session cookie | (empty) | Full Cookie header from claude.ai DevTools |
| Home WiFi SSID | (empty) | Your home router — required for internet access |
Troubleshooting
OLED shows nothing
- Check wiring: SDA → GPIO 8, SCL → GPIO 9, VCC → 3.3V (not 5V)
- Verify the I2C address is
0x3C; some modules use0x3D— editconfig.hif needed
Build fails with cc1plus.exe: CreateProcess: No such file or directory
- The toolchain download was corrupted. Run in PowerShell:
Then rebuild — PlatformIO re-downloads it automatically.Remove-Item -Recurse -Force "$env:USERPROFILE\.platformio\packages\toolchain-xtensa-esp-elf"
OLED shows Set WiFi SSID
- Open the portal at
http://192.168.4.1and enter your home WiFi credentials
OLED shows Set session key
- Follow Step 1 above and paste the cookie into the portal
OLED shows API Error
- Click Refresh Data in the portal and check the Org ID field populates
- The session cookie may have expired — repeat Step 1
- Open the Serial Monitor (115200 baud) in PlatformIO for detailed HTTP error codes
OLED shows WiFi connecting
- Wait 15–20 seconds after powering on; the device retries automatically
- Verify SSID and password in the portal
Reset countdown shows HH:MM instead of Xh Ym
- NTP sync not yet complete — resolves within ~30 seconds of WiFi connecting
Architecture
claude.ai  ──HTTPS──>  ESP32-S3  ──I2C──>  OLED
             (session cookie)
                  |
                  └──WiFi AP──>  Browser (192.168.4.1)
The ESP32 calls claude.ai/api/organizations/{org}/usage directly using your browser session cookie. No backend server, no API key, no cloud service required. The org UUID is auto-discovered on first fetch and cached in flash storage.
Security Notes
Change the default AP password. The device ships with AP password dashboard1. Anyone within WiFi range who knows the password can open the settings portal and replace your session cookie or WiFi credentials. Change it to something strong in the web portal under Connection Settings → AP Password.
No TLS certificate verification. The ESP32 connects to claude.ai with setInsecure() because loading a full CA certificate bundle requires significant flash space. In practice this means a machine-in-the-middle on your local network could intercept the session cookie in transit. On a trusted home/office network this risk is very low.
Your credentials live on the device, never in code. The session cookie, WiFi password, and AP password are stored only in the ESP32's NVS (encrypted flash partition) — they are never written to any source file, config file, or anywhere that would appear in this repository.
The settings portal is HTTP, not HTTPS. Traffic between your browser and 192.168.4.1 is unencrypted. Use the portal only while connected to the device's own AP, not over a shared network.
License
MIT
Screenshots
OLED Display
Web Portal
Yorumlar (0)
Yorum birakmak icin giris yap.
Yorum birakSonuc bulunamadi