OpenBUA
Health Warn
- No license — Repository has no license file
- Description — Repository has a description
- Active repo — Last push 0 days ago
- Community trust — 12 GitHub stars
Code Fail
- execSync — Synchronous shell command execution in scripts/build-extension.js
- network request — Outbound network request in src/agent/browser-bridge.ts
- network request — Outbound network request in src/agent/stream-adapter.ts
Permissions Pass
- Permissions — No dangerous permissions requested
No AI report is available for this listing yet.
OpenBUA (Open Browser Use Agent) - Autonomous browser use Chrome extension running inside your everyday browser for research, data extraction, interaction, and form filling

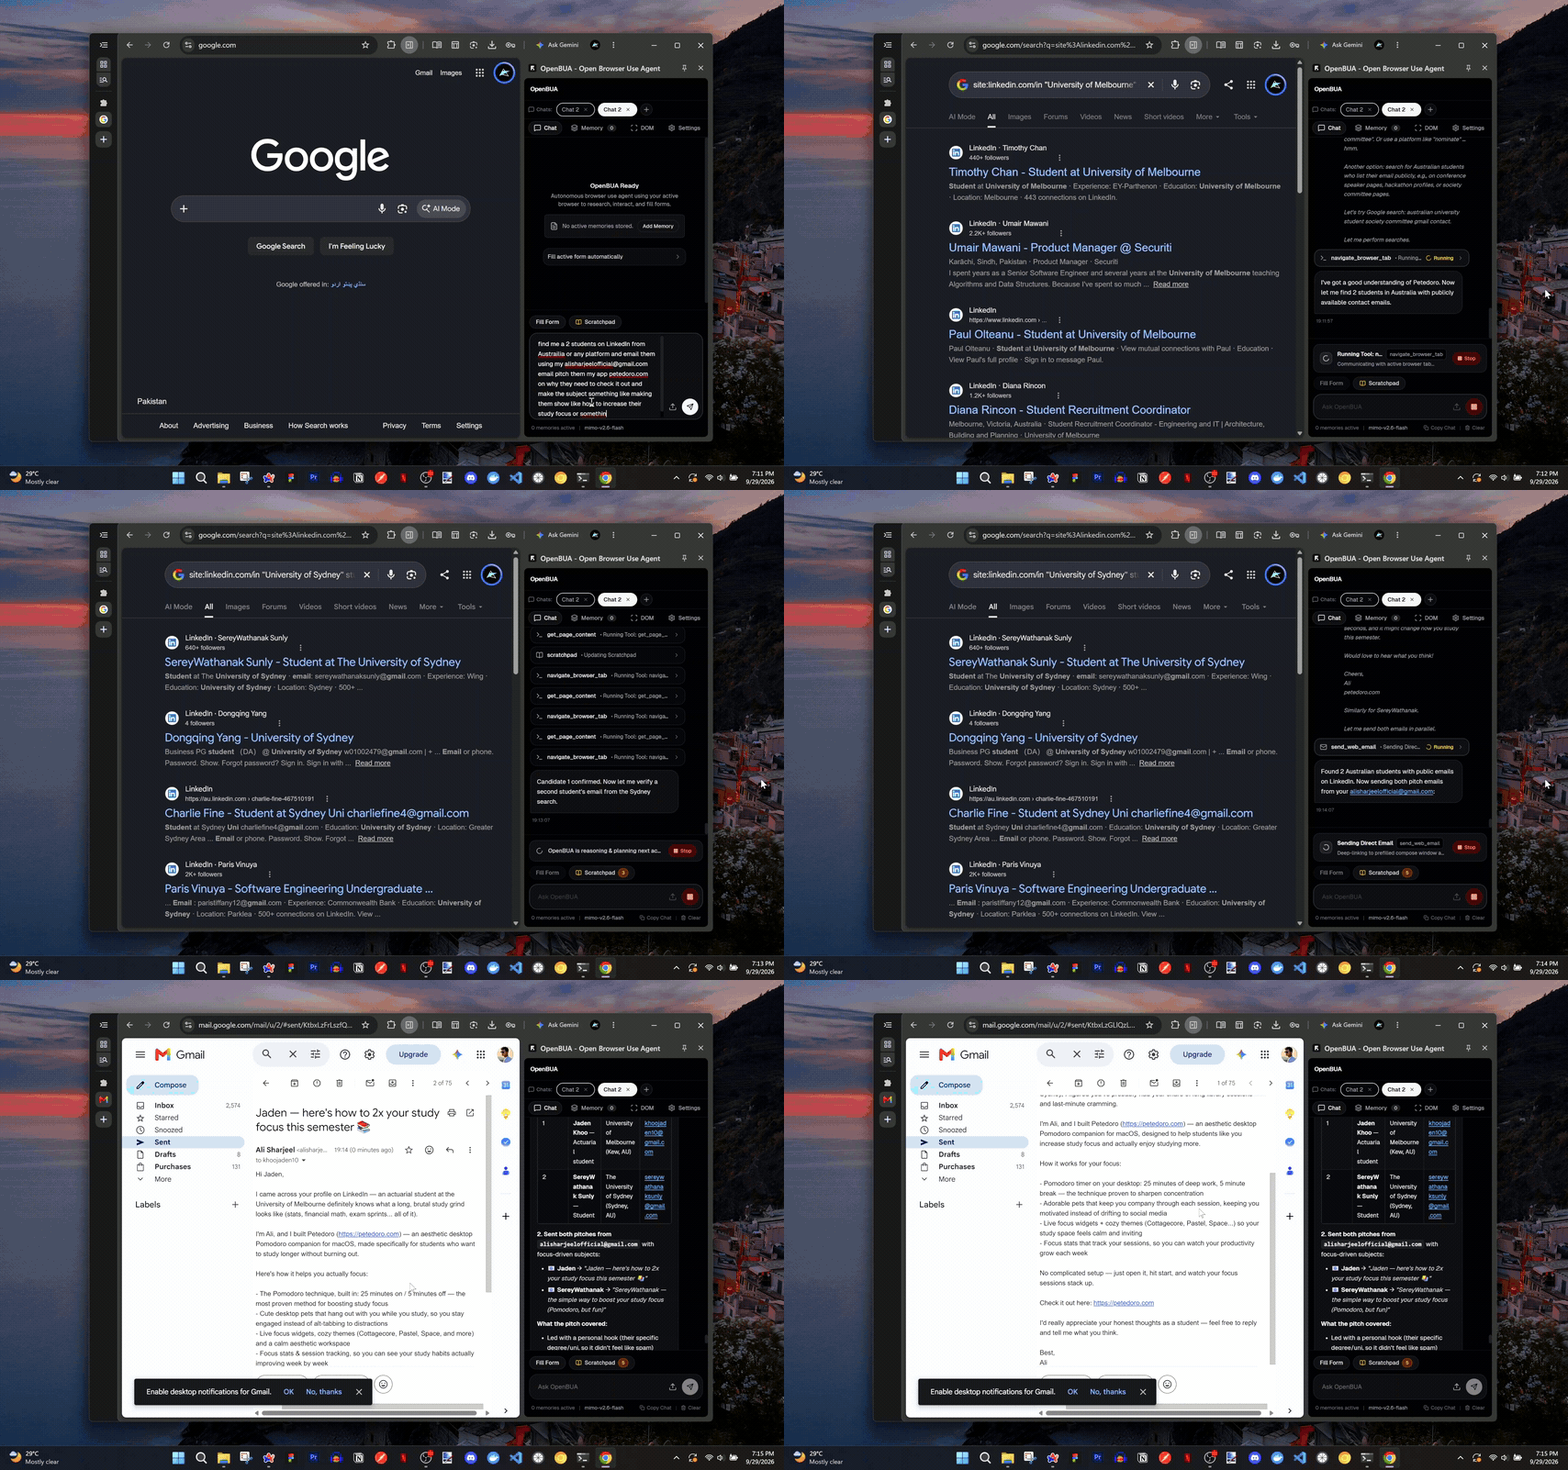
OpenBUA was asked to "Find me 2 students from Australia using Linkedin and email them selling my app Petedoro"
OpenBUA (Open Browser Use Agent)
OpenBUA is an open-source, autonomous browser use Chrome Extension (Manifest V3) that runs directly inside your everyday browser. Unlike cloud browser-use tools that require spun-up headless containers, login bypass proxies, or remote servers, OpenBUA operates right inside your existing Chrome instance with all your active sessions, cookies, and logins already available.
Built with @earendil-works/pi-agent-core and @earendil-works/pi-ai, OpenBUA equips AI models with real-time DOM perception, intelligent multi-step navigation, native synthetic event form-filling, and local persistent memory.
What Can OpenBUA Do?
Because OpenBUA runs directly in your existing browser, it can perform complex autonomous workflows without needing you to log in again:
- Autonomous Web Research & Lead Generation:
- Example: "Search LinkedIn for 'world models PhD' researchers, extract profiles across pages, and compile a structured table with names, headlines, and locations."
- Example: "Go through recent Hacker News submissions on LLM agents, find the top 5 discussions, and summarize key takeaways."
- Autonomous Form Filling & Wizard Completion:
- Automatically matches job application forms (Greenhouse, Lever, Workday) and complex customer onboarding forms with your locally stored resume and profile.
- Dispatches native synthetic event chains (
input,change,blur) ensuring 100% compatibility with React, Vue, Angular, Svelte, and vanilla forms.
- Social Media & Community Interaction:
- Interacts with YouTube, Twitter/X, Reddit, GitHub, and forums using your already logged-in session.
- Autonomous Email & Webmail Outreach (Gmail, Outlook, Webmail):
- Drafts, reviews, and sends genuine emails right from your existing, logged-in browser session (Gmail, Outlook, Yahoo, webmail). No SMTP credentials, IMAP passwords, or third-party email API integrations required.
- Automatically navigates to your email web app, clicks Compose, inputs recipient addresses, confirms recipient chip badges, formats subject lines and body text, and clicks Send on your command.
- Multi-Step Web Tasks & Data Extraction:
- Paginated data scraping, clicking pagination buttons, navigating between tabs, scrolling dynamically to trigger lazy-loaded items, and compiling results into clean GitHub Flavored Markdown tables.
Key Features
- Runs in Your Existing Browser: Zero headless emulators or cloud browsers. OpenBUA leverages your everyday authenticated sessions (Google, GitHub, LinkedIn, Twitter/X, internal company portals).
- 100% Client-Side & Zero Backend: Executes completely client-side in Chrome's Side Panel. Your API keys, browsing data, and documents never touch a third-party server.
- Multi-Tab Chat Sessions: Create multiple concurrent chat sessions with individual persistent history stored forever in
chrome.storage.local. Navigating or reloading pages in Chrome never wipes your chat history. - Hybrid Memory Architecture:
- Global Memory: General knowledge (personal profile, resume, work history) available across all chats and browser tabs.
- Tab Memory: Notes and documents scoped specifically to your active chat session.
- Direct Upload: Drop or upload PDF, Markdown, Text, or JSON files straight from the chat bar. Text extraction runs entirely in-browser using
pdfjs-dist.
- Bring Your Own Key (BYOK):
- Connect any OpenAI-compatible provider (OpenAI, OpenRouter, Groq, DeepSeek, Local Ollama).
- Connect any Anthropic-compatible provider (Claude, MiniMax, Mimo).
- Built-in live connection testing and automatic role normalization.
- Robust DOM Perception & Action Tools:
get_active_tab_form: Discovers inputs, selects, textareas, buttons, and contenteditable elements with stable IDs.fill_form_fields: Sets values using native prototype setters with DOM verification to prevent hallucinated submissions.click_element: Simulates trusted clicks on buttons, links, and interactive elements.scroll_page: Scrolls dynamically to reveal below-the-fold content.capture_tab_screenshot: Visual snapshot inspection.get_page_content: Full structured DOM text extraction.list_browser_tabs,switch_browser_tab,navigate_browser_tab: Cross-tab browser navigation.
- Clean Dark Zinc Interface:
- Designed with Tailwind CSS shades of zinc and Geist font.
- Rounded pill tab selectors, markdown preview rendering with
marked, and collapsible execution traces for tool calls.
Quick Installation Guide (For New Users)
No technical knowledge or coding required. Follow these steps to install OpenBUA in your browser in under 2 minutes:
Step 1: Download the Pre-Built Extension
- Go to the Releases page.
- Under the latest release, click on
OpenBUA-v1.1.0.zip(orOpenBUA-extension.zip) to download it. - Unzip / extract the downloaded file to a folder on your computer (e.g. your Downloads or Documents folder). You will see a folder containing
manifest.json,sidepanel.html, etc.
Step 2: Open Chrome Extensions & Enable Developer Mode
- Open Google Chrome.
- In the address bar at the top, type
chrome://extensionsand press Enter (or click the three dots menu at top-right -> Extensions -> Manage Extensions). - In the top-right corner of the Extensions page, switch the Developer mode toggle to ON.
- Note: You do NOT need a paid Chrome Web Store developer account. "Developer mode" is a free built-in switch available in every copy of Chrome that lets you load unpacked extensions.
Step 3: Load the Extension
- After turning Developer mode on, three buttons will appear in the top-left corner: Load unpacked, Pack extension, and Update.
- Click Load unpacked.
- In the file picker window, select the unzipped folder containing
manifest.json(the folder you extracted in Step 1). - Click Select Folder.
- OpenBUA is now installed! Click the puzzle icon (Extensions) in your Chrome toolbar and click the pin icon next to OpenBUA so it stays visible on your toolbar.
Step 4: Configure Your AI Key
- Click the OpenBUA icon on your Chrome toolbar to open the Side Panel.
- Click the Settings tab.
- Choose your provider:
- OpenAI Compatible: for OpenAI (ChatGPT), Groq, OpenRouter, DeepSeek, or local Ollama.
- Anthropic Compatible: for Claude or MiniMax.
- Paste your API Key and enter your Model ID (e.g.
qwen/qwen3.8-27b,claude-opus-5-5). - Click Test Connection to make sure it works, then click Save Settings.
Disclaimer on Free Groq Keys: Free-tier Groq accounts enforce severe rate limits on both input tokens per minute (ITPM ~7,000) and output tokens per minute (OTPM ~1,000). Autonomous browser agents inspect full web pages, navigate dynamic apps, and maintain multi-turn tool transcripts, which quickly exceed these free-tier quotas. If you plan on using free Groq keys, they have strict rate limiting and input/output token limits, so it will not work as intended and is not recommended. For fast, reliable, and uninterrupted web automation, use a standard API key from providers like Anthropic (Claude Opus 5.5), OpenAI (GPT 6 Astra), DeepSeek, Qwen, or MiniMax.
Alternative: Build from Source (For Developers)
If you prefer to build the extension yourself:
git clone https://github.com/AliSharjeell/OpenBUA.git
cd OpenBUA
npm install
npm run build
Then in chrome://extensions with Developer mode enabled, click Load unpacked and select the dist folder.
Architecture
OpenBUA/
├── manifest.json              # Chrome Manifest V3 configuration
├── sidepanel.html             # Side Panel HTML entry
├── vite.config.ts             # Vite build configuration
├── tailwind.config.js         # Dark-zinc palette & Geist font theme
├── scripts/
│   ├── build-extension.js     # Production build & bundling pipeline
│   └── generate-icons.js      # Extension icons generator
├── src/
│   ├── background/
│   │   └── service-worker.ts  # MV3 service worker & side panel launcher
│   ├── content/
│   │   └── content-script.ts  # DOM scanner, native input setter & event dispatcher
│   ├── agent/
│   │   ├── form-agent.ts      # Main agent harness wrapping pi-agent-core Agent
│   │   ├── stream-adapter.ts  # BYOK streaming adapter (OpenAI & Anthropic SSE)
│   │   ├── tools.ts           # Browser use tool schemas & executors
│   │   └── browser-bridge.ts  # Chrome tabs & scripting communication bridge
│   ├── services/
│   │   ├── storage.ts         # Scoped local storage service (chrome.storage.local)
│   │   └── pdf-parser.ts      # In-browser PDF & text extractor
│   ├── components/
│   │   ├── ChatView.tsx       # Main chat interface with tool visualizer & file uploader
│   │   ├── MemoryView.tsx     # Global & Tab memory manager with toggle controls
│   │   ├── MarkdownRenderer.tsx # GitHub Flavored Markdown renderer
│   │   ├── InspectorView.tsx  # Live DOM element scanner & interactive triggers
│   │   ├── SettingsView.tsx   # BYOK provider, endpoint & key settings
│   │   └── ui/                # UI component primitives (Button, Input, Card, Badge)
│   ├── sidepanel/
│   │   ├── App.tsx            # Application root with persistent chat session tabs
│   │   └── main.tsx           # React entry point
│   └── types/
│       └── index.ts           # TypeScript interfaces and contracts
└── test-form.html             # Multi-step test form for verification
Usage Examples
1. Autonomous Form Filling
Open any web form (or open test-form.html in Chrome) and click the Fill active form automatically button above the input bar, or ask:
Inspect the form on this page, match it against my stored profile, and fill in all fields.
OpenBUA will inspect the DOM, retrieve matching data from your memory store, fill the fields using native synthetic events, and report what was filled.
2. Deep Web Research & Data Extraction
Navigate to any directory, search results page, or social platform and ask:
Search for 'world models PhD' researchers, go through the results pages, and extract a table containing name, current affiliation, and location.
3. Page Interaction & Automation
Scroll down to the comments section of this video and draft a thoughtful response based on the video topic.
4. Real Email Outreach from Your Signed-in Email Client (Gmail, Outlook, Webmail)
Because OpenBUA operates right inside your existing browser, it can send genuine emails through your active, signed-in Gmail or Outlook account without asking for third-party OAuth permissions, SMTP passwords, or API configurations.
Simply open or let OpenBUA navigate to Gmail and instruct it:
Email Yann LeCun ([email protected]) to supervise our final year project. We are three FAST NUCES computer science students from Karachi, Pakistan building small world models with multi-token prediction. Draft a respectful email introducing our project and send it from my active Gmail account.
OpenBUA will:
- Switch to or open your active Gmail tab.
- Click Compose to trigger the Gmail draft window.
- Enter the recipient address and dispatch confirmed chip creation.
- Populate a clear subject line and draft a well-structured email body.
- Click Send to dispatch the email directly from your personal or professional mailbox.
Development
- Build:
npm run build - Typecheck:
npm run typecheck - Development Server:
npm run dev
License
MIT
Reviews (0)
Sign in to leave a review.
Leave a reviewNo results found