databricks-template
Health Warn
- No license — Repository has no license file
- Description — Repository has a description
- Active repo — Last push 0 days ago
- Community trust — 65 GitHub stars
Code Pass
- Code scan — Scanned 12 files during light audit, no dangerous patterns found
Permissions Pass
- Permissions — No dangerous permissions requested
No AI report is available for this listing yet.
A production-ready PySpark project template with medallion architecture, Python packaging, unit tests, integration tests, CI/CD automation, Databricks Asset Bundles, and DQX data quality framework.
databricks-template
A production-ready PySpark project template with medallion architecture, Python packaging, unit tests, integration tests, coverage tests, CI/CD automation, Declarative Automation Bundles, and DQX data quality framework.


🚀 Overview
This project template is designed to boost productivity and promote maintainability when developing ETL pipelines on Databricks. It aims to bring software engineering best practices—such as modular architecture, automated unit and integration testing, and CI/CD—into the world of data engineering. By combining a clean project structure with robust development and deployment jobs, this template helps teams move faster with confidence.
You’re encouraged to adapt the structure and tooling to suit your project’s specific needs and environment.
Interested in bringing these principles in your own project? Let’s connect on Linkedin.
🧪 Technologies
- Databricks Free Edition (Serverless)
- Databricks Runtime 18.0 LTS
- Databricks Unity Catalog
- Databricks Declarative Automation Bundles (former Databricks Asset Bundles)
- Databricks CLI
- Databricks Python SDK
- Databricks DQX
- Databricks AI Dev Kit
- Claude Code
- PySpark 4.1
- Python 3.12+
- GitHub Actions
- Pytest
📦 Features
This project template demonstrates how to:
- use agentic development (with Databricks AI Dev Kit and Claude Code) in data projects.
- structure PySpark code inside classes/packages, instead of notebooks.
- package and deploy code to different environments (dev, staging, prod).
- use a CI/CD pipeline with Github Actions.
- run unit tests on transformations with pytest package. Set up VSCode to run unit tests on your local machine.
- run integration tests setting the input data and validating the output data.
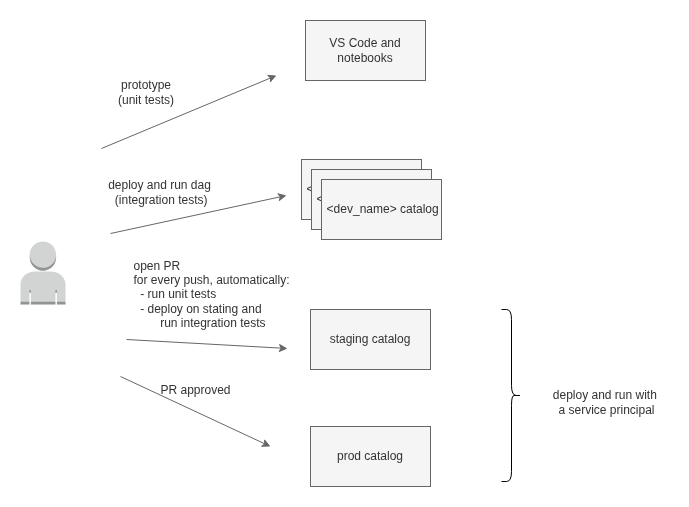
- isolate "dev" environments / catalogs to avoid concurrency issues between developer tests.
- show developer name and branch as job tags to track issues.
- utilize coverage package to generate test coverage reports.
- utilize uv as a project/package manager.
- configure job to run tasks selectively.
- use medallion architecture pattern.
- lint and format code with ruff and pre-commit.
- use a Make file to automate repetitive tasks.
- utilize argparse package to build a flexible command line interface to start the jobs.
- utilize Databricks Declarative Automation Bundles to package/deploy/run a Python wheel package on Databricks.
- configure jobs to run across multiple environments by generating environment-specific job definitions using the Databricks SDK.
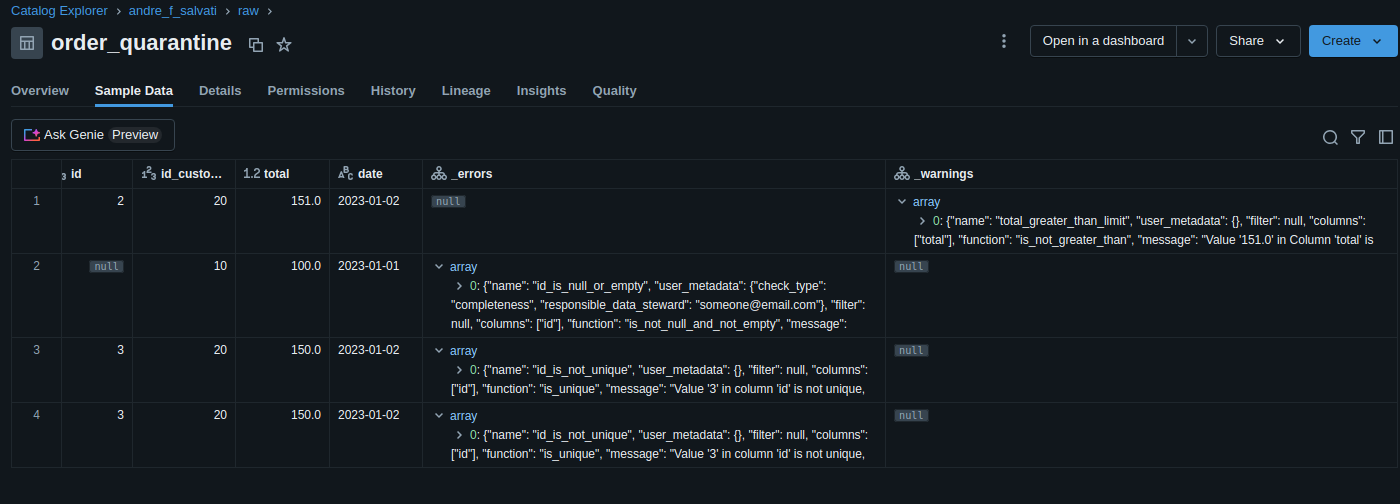
- utilize Databricks DQX to define and enforce data quality rules, such as null checks, uniqueness, thresholds, and schema validation, and filter bad data on quarantine tables.
- utilize service principals to run production code
- utilize Databricks SDK for Python to manage workspaces and accounts and analyse costs. Refer to 'scripts' folder for some examples.
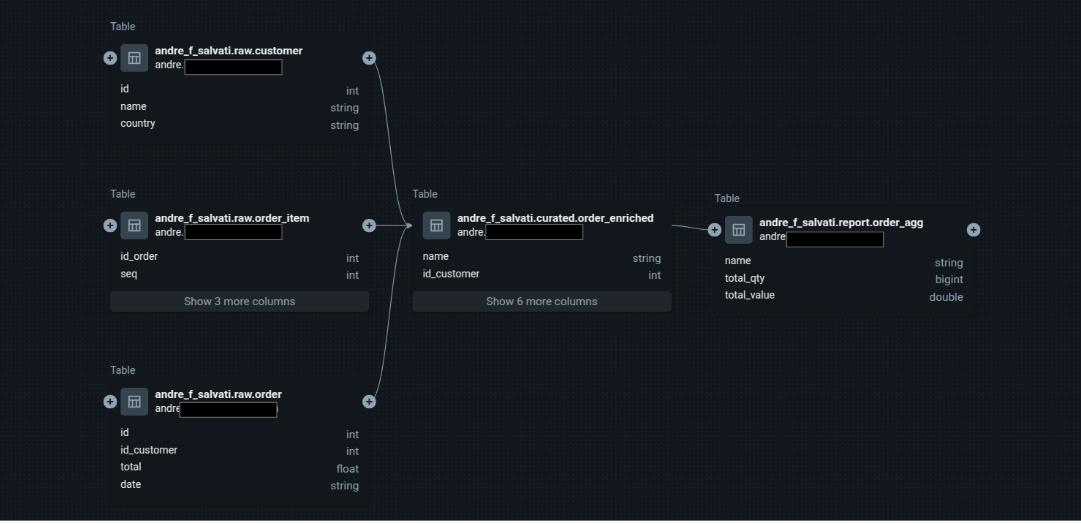
- utilize Databricks Unity Catalog and get data lineage for your tables and columns.
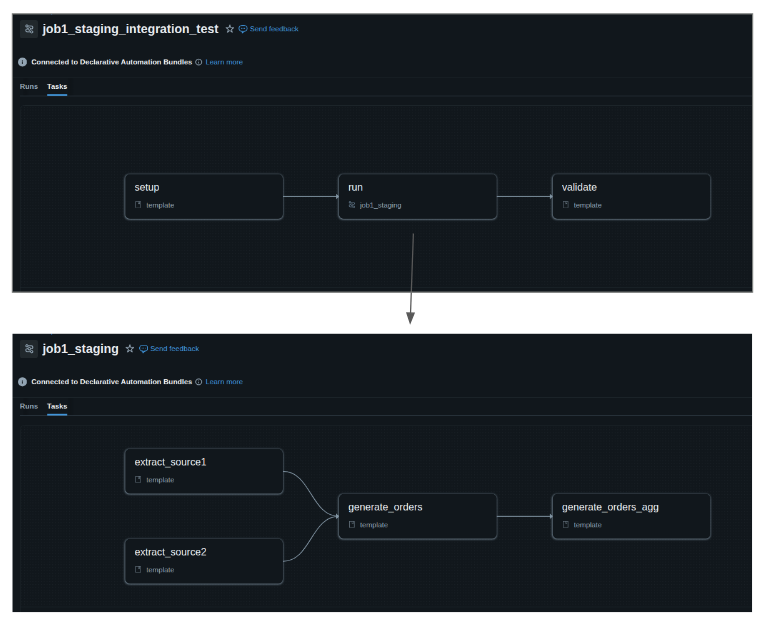
- utilize Databricks Lakeflow Jobs to execute a DAG and task parameters to share context information between tasks (see Task Parameters section). Yes, you don't need Airflow to manage your DAGs here!!!
- utilize serverless job clusters on Databricks Free Edition to deploy your pipelines.
🧠 Resources
Agentic development:
- Claude Code: 5 Essentials for Data Engineering
- Mastering Claude Code in 30 minutes
- Introducing Databricks AI Dev Kit - Skills, MCP server, Builder App
Debates on the use of notebooks vs. Python packaging:
- The Rise of The Notebook Engineer
- Please don’t make me use Databricks notebooks
- this Linkedin thread by Daniel Beach
- this Linkedin thread by Ryan Chynoweth
- this Linkedin thread by Jaco van Gelder
Sessions on Databricks Declarative Automation Bundles, CI/CD, and Software Development Life Cycle at Data + AI Summit 2025:
- CI/CD for Databricks: Advanced Asset Bundles and GitHub Actions
- Deploying Databricks Asset Bundles (DABs) at Scale
- A Prescription for Success: Leveraging DABs for Faster Deployment and Better Patient Outcomes
Other resources:
- Goodbye Pip and Poetry. Why UV Might Be All You Need
- The Spark Revolution You Didn’t See Coming: How Apache Spark 4.0 in Databricks Just Changed Everything
📁 Folder Structure
databricks-template/
│
├── .github/                       # CI/CD automation
│   └── workflows/
│       └── onpush.yml             # GitHub Actions pipeline
│
├── src/                           # Main source code
│   └── template/                  # Python package
│       ├── main.py                # Entry point with CLI (argparse)
│       ├── config.py              # Configuration management
│       ├── baseTask.py            # Base class for all tasks
│       ├── commonSchemas.py       # Shared PySpark schemas
│       ├── job1/                  # Job-specific tasks
│       │   ├── extract_source1.py
│       │   ├── extract_source2.py
│       │   ├── generate_orders.py
│       │   ├── generate_orders_agg.py
│       │   ├── integration_setup.py
│       │   └── integration_validate.py
│       └── job2/                  # Additional job tasks
│
├── tests/                          # Unit tests
│   ├── job1/
│   │   └── unit_test.py            # Pytest unit tests
│   └── job2/
│
├── resources/                      # Databricks workflow templates
│   └── jobs.yml                    # Generated job definition (auto-created)
│
├── scripts/                              # Helper scripts
│   ├── sdk_generate_template_job.py      # Job definition generator (Databricks SDK)
│   ├── sdk_init.py                       # Workspace initialization
│   ├── sdk_analyze_job_costs.py          # Cost analysis script
│   └── sdk_workspace_and_account.py      # Workspace and account management
│
├── docs/                           # Documentation assets
│   ├── dag.png
│   ├── task_output.png
│   ├── data_lineage.png
│   ├── data_quality.png
│   └── ci_cd.png
│
├── dist/                        # Build artifacts (Python wheel)
├── coverage_reports/            # Test coverage reports
│
├── databricks.yml               # Declarative Automation Bundle config
├── pyproject.toml               # Python project configuration (uv)
├── Makefile                     # Build automation
├── .pre-commit-config.yaml      # Pre-commit hooks (ruff)
└── README.md                    # This file
CI/CD pipeline
Jobs
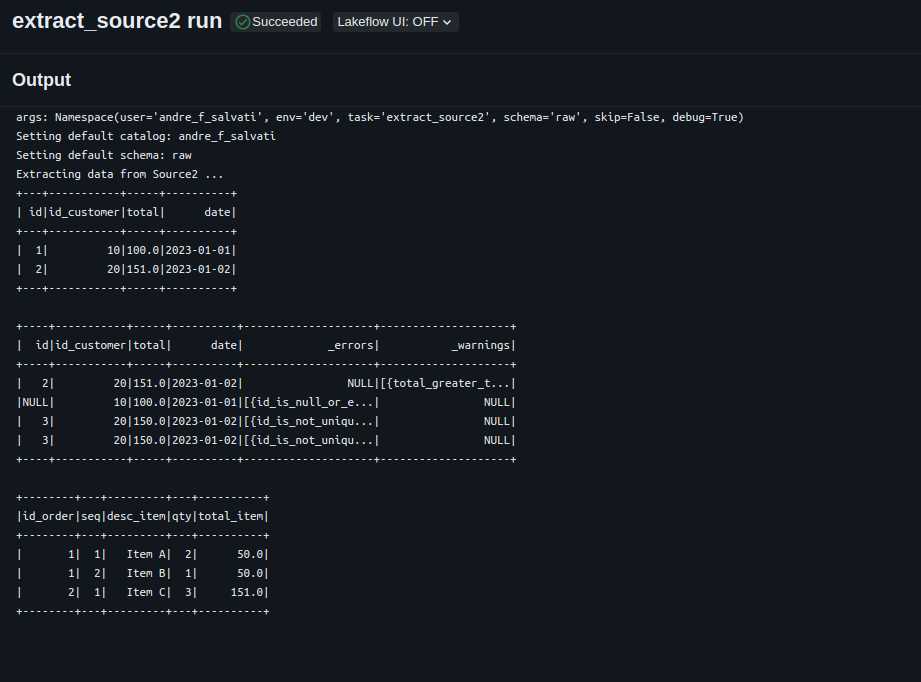
Task Output
Data Lineage
Data Quality (generated by Databricks DQX)
Instructions
(Optional) Install Databricks AI Dev Kit and Claude Code.
Create a workspace. Use a Databricks Free Edition workspace.
Install and configure Databricks CLI on your local machine. Check the current version on databricks.yaml. Follow instructions here.
Build Python env and execute unit tests on your local machine.
make sync & make testCreate an external location in Databricks and update the "storage-root" parameter in the Makefile. This step will create the catalogs, schemas, service principal, and the required grants. For more details, see Overview of external locations. Then run:
make initGenerate a secret for the service principal. In Databricks, go to: Workspace -> Settings -> Identity and access -> Service principals -> Secrets. Generate a new secret for your service principal and update the corresponding profiles in your .databrickscfg file. Your configuration should look similar to this:
 [dev]
 host             = https://xxxx.cloud.databricks.com/
 token            = bbbbbbbbbbbbbbbbbbbbbbbbbbbbbbbbbbbb

 [staging]
 host          = https://xxxx.cloud.databricks.com/
 client_id     = yyyyyyyy-yyyy-yyyy-yyyy-yyyyyyyyyyyy
 client_secret = aaaaaaaaaaaaaaaaaaaaaaaaaaaaaaaaaaaa

 [prod]
 host          = https://xxxx.cloud.databricks.com/
 client_id     = yyyyyyyy-yyyy-yyyy-yyyy-yyyyyyyyyyyy
 client_secret = aaaaaaaaaaaaaaaaaaaaaaaaaaaaaaaaaaaa
Deploy and execute on the dev workspace.
make deploy env=devConfigure CI/CD automation with the service principal ID and Secret. Configure Github Actions repository secrets (DATABRICKS_HOST, DATABRICKS_PRINCIPAL_ID, DATABRICKS_SECRET).
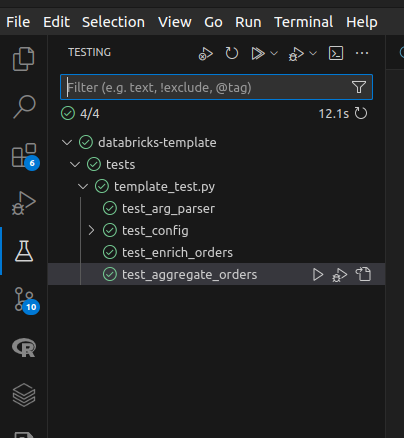
(Optional) You can also execute unit tests from your preferred IDE. Here's a screenshot from VS Code with Microsoft's Python extension installed.
Task parameters
- task (required) - determines the current task to be executed.
- env (required) - determines the AWS account where the job is running. This parameter also defines the default catalog for the task.
- user (required) - determines the name of the catalog when env is "dev".
- schema (optional) - determines the default schema to read/store tables.
- skip (optional) - determines if the current task should be skipped.
- debug (optional) - determines if the current task should go through debug conditional.
Star History
Reviews (0)
Sign in to leave a review.
Leave a reviewNo results found