Agent4API
Health Uyari
- License — License: Apache-2.0
- Description — Repository has a description
- Active repo — Last push 0 days ago
- Low visibility — Only 5 GitHub stars
Code Gecti
- Code scan — Scanned 12 files during light audit, no dangerous patterns found
Permissions Gecti
- Permissions — No dangerous permissions requested
Bu listing icin henuz AI raporu yok.
Turn existing APIs into AI Agents — in minutes. APIs In. AI Agents Out.

Agent4API
English | 简体中文
Turn OpenAPI operations into Agents—fast.
DEMO: https://agent4api.ecrfs.com/admin
Username:demo
Password:demo123
Introduction
Agent4API was created to help you quickly orchestrate OpenAPI operations into Agents, with seamless integration into standalone Chat and Embed Chat.
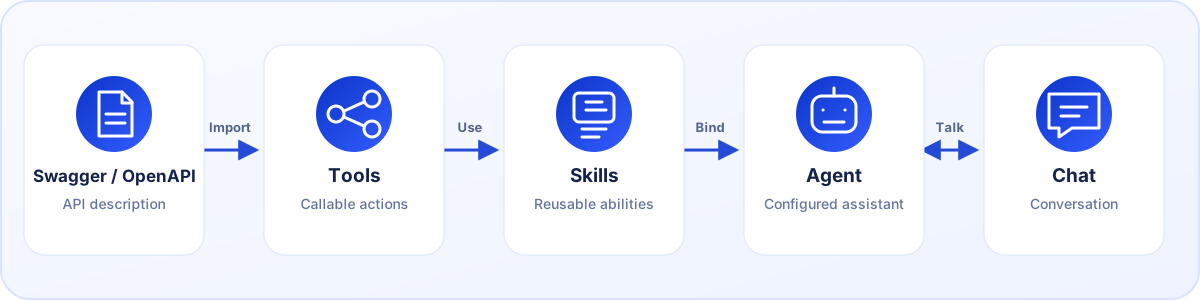
We support one-click import of Swagger 2.0 and OpenAPI 3.x definitions. Agent4API understands the business capabilities behind the operations and automatically generates and orchestrates the Tools, Skills, and Agents. There is no need to organize every operation, write each Skill, or configure every Agent by hand: start chatting as soon as the import is complete, or integrate the result into an existing application through MCP and OpenAI/Anthropic-compatible APIs.
Agent4API supports LLM providers that expose OpenAI-compatible or Anthropic-compatible APIs, including DeepSeeker, GPT, Claude, and others.
Agent4API follows a simple one input, three service types model:
- One input — Swagger/OpenAPI: import from a URL or JSON/YAML file, or generate again from an existing API Source.
- Three service types:
- Tools MCP — expose imported Tools through the Model Context Protocol.
- Agent API — serve configured Agents through OpenAI-compatible and Anthropic-compatible APIs.
- Chat and Embed Chat — use Agents in the built-in browser Chat or embed a fixed Agent into an existing website.
It is a single FastAPI/Vue application backed by SQLite, with an English and Simplified Chinese administration interface. See the GitHub Wiki for complete documentation.
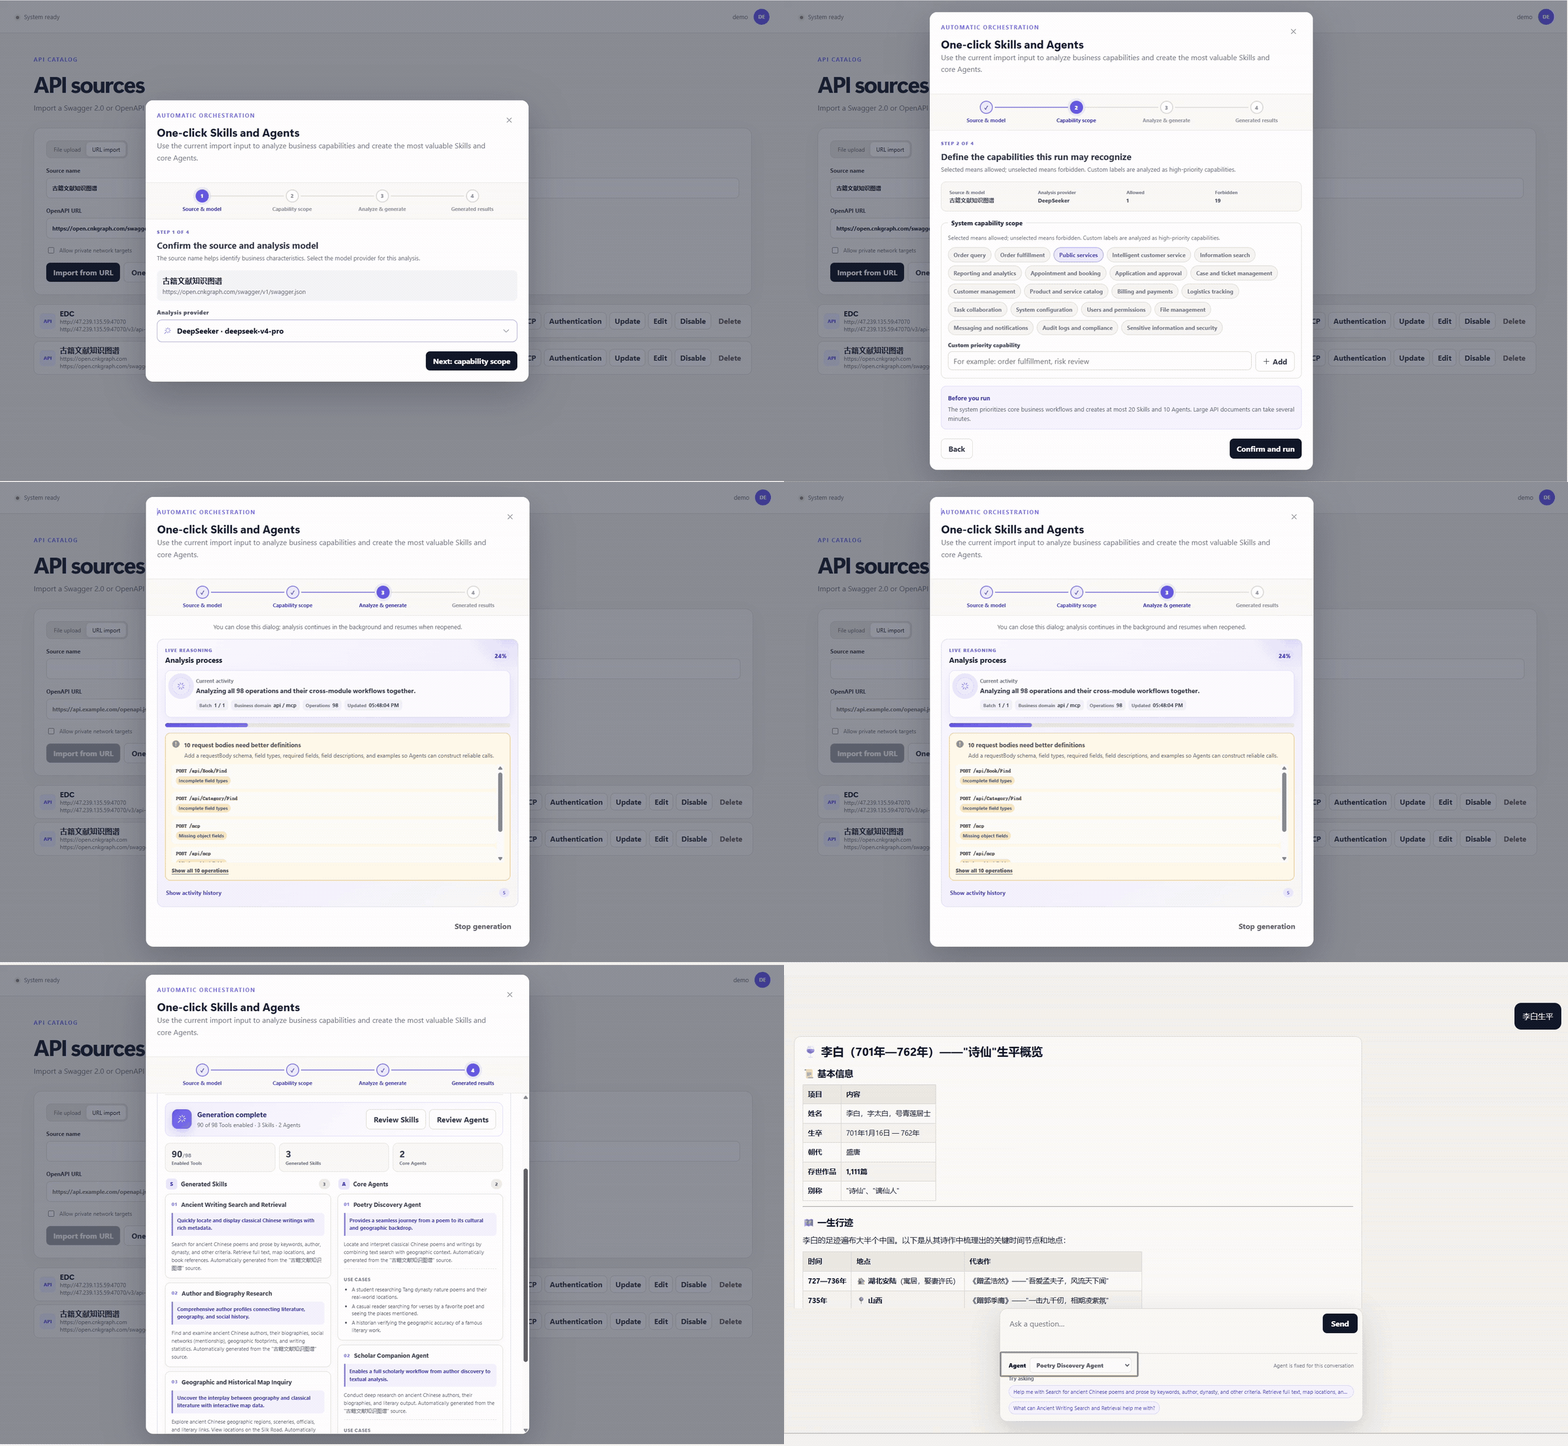
Core capability: generate an API Agent in one click
After configuring and enabling an LLM provider, open API Sources:
- Enter a Source name and provide a Swagger/OpenAPI URL or JSON/YAML file.
- Choose One-click generate and select the LLM provider for analysis.
- Select the system capabilities that may be recognized and optionally add
custom business capabilities to prioritize. - Start generation and watch the analysis and results in real time.
For an API Source that has already been imported, choose One-click generate
on its Source card—there is no need to upload the definition again.
A single generation run completes the entire orchestration pipeline:
- parses operations and creates governed Tools;
- understands relationships across the whole API or by business domain, then
identifies, merges, and deduplicates real business capabilities; - generates up to 20 focused Skills and 10 core Agents;
- enables only the Tools used by generated Skills and starts those Skills;
- enables generated Agents and binds them to the selected provider and model;
- assigns human-in-loop mode to workflows containing write or high-impact actions;
- shows operation counts, capabilities, workflows, business value, Skill/Agent
counts, and generation progress; - flags incomplete request-body schemas, field types, and descriptions so the
OpenAPI definition can be improved.
These counts are limits, not targets. The system favors a small, coherent set
that captures the API's core value instead of mechanically creating one Skill
per operation. Model output is structurally validated and reference-checked,
with automatic correction or a safe fallback when needed.
Generation runs in the background: closing the wizard does not stop the job,
reopening it restores progress, and an active run can be stopped explicitly.
The Source, Tools, Skills, and Agents are persisted atomically, so failures do
not leave a partial configuration and the capability scope can be adjusted
before a safe retry.
Quick start
Docker
The published image is apoet2003/agent4api:latest. To use another Docker Hub account, image tag, or published port, copy .env.example to .env and edit the corresponding values first.
Pull the published image from Docker Hub and start:
docker compose pull
docker compose up -d
The container exposes one port for the frontend, API, MCP, and embed assets, all accessed through the same origin and relative paths. The administration page defaults to http://127.0.0.1:8000. SQLite data and the encryption key are persisted in the agent4api-data volume.
Run from source
1. Install the required runtimes
- Python
3.12 - Node.js
20.19.4, managed with nvm or nvm-windows - Optional: Conda with the
libmambasolver
Choose one of the following Python environment options.
Windows Command Prompt with venv and pip:
py -3.12 -m venv .venv
call .venv\Scripts\activate.bat
python -m pip install --upgrade pip
python -m pip install -e ./backend
Linux or macOS shell with venv and pip:
python3.12 -m venv .venv
. .venv/bin/activate
python -m pip install --upgrade pip
python -m pip install -e ./backend
Conda:
conda env create --solver libmamba -f environment.yml
conda activate agent4api
2. Install the frontend and create the configuration
nvm use 20.19.4
cd frontend
npm install
cd ..
Windows Command Prompt:
copy .env.example .env
Linux or macOS shell:
cp .env.example .env
Review .env before starting the application.
3. Start the application
With the Conda environment, use the convenience script:
run.bat
./run.sh
For a manually created Python environment, activate it and start the backend:
python -m alembic -c backend/alembic.ini upgrade head
python -m uvicorn chat4openapi.main:app --app-dir backend/src --host 127.0.0.1 --port 8000
Then start the frontend in a second terminal:
nvm use 20.19.4
cd frontend
npm run dev -- --host 127.0.0.1 --port 5173 --strictPort
4. Open the administration page
Open http://127.0.0.1:5173. The first-run wizard will guide you through creating the administrator account.
Administrator password recovery
From the login page, choose Request password reset. Agent4API creates a
15-minute, one-time key in the server-only filedata/password-reset/admin-password-reset.key (inside the /app/data volume
when using Docker). Open that file on the server, then enter its key and the
new password on the reset page. The key is never returned by the API and is
deleted after use or expiry. Configure the directory and lifetime withCHAT4OPENAPI_ADMIN_PASSWORD_RESET_DIR andCHAT4OPENAPI_ADMIN_PASSWORD_RESET_MINUTES.
Yorumlar (0)
Yorum birakmak icin giris yap.
Yorum birakSonuc bulunamadi