spel
Health Gecti
- License — License: Apache-2.0
- Description — Repository has a description
- Active repo — Last push 0 days ago
- Community trust — 17 GitHub stars
Code Basarisiz
- rm -rf — Recursive force deletion command in .github/workflows/allure.yml
- rm -rf — Recursive force deletion command in .github/workflows/ci.yml
- rm -rf — Recursive force deletion command in .github/workflows/pr-cleanup.yml
Permissions Gecti
- Permissions — No dangerous permissions requested
Bu listing icin henuz AI raporu yok.
Idiomatic Clojure wrapper for Playwright. Browser automation, API testing, Allure reporting, and native CLI - for Chromium, Firefox, and WebKit
![]()
Open pages · click buttons · fill forms · take screenshots · scrape content · run E2E tests · generate reports — all from simple shell commands.

| Page Snapshots | Inline Scripting | Visual Annotations | AI Agent Prompts |
 |
 |
 |
 |
What is spel?
spel is a command-line tool that controls a real browser. You type commands in your terminal, and spel opens pages, clicks buttons, fills forms, takes screenshots, reads page content, and more. Think of it as a remote control for Chrome/Firefox/WebKit that works from the shell.
Concrete example — scrape a page and get its content as Markdown:
spel open https://news.ycombinator.com
spel markdownify                          # page content as clean Markdown
spel screenshot front-page.png            # take a screenshot
spel close
Why not just use Puppeteer / Playwright directly?
- No Node.js, no
node_modules, no 100 MB binary downloads. spel is a single self-contained binary (~71 MB). It uses Playwright Java under the hood, but you don't need to set up a Node project, manage npm dependencies, or deal with binary downloads on everynpm install. - Persistent browser session. spel runs a background daemon — your browser stays open between commands. This makes it fast for interactive use and for AI agents that need to issue many commands in sequence.
- Works as a CLI, not just a library. You don't need to write a script to automate a browser. Just type
spel open,spel click,spel fillin your terminal (or let your AI agent do it).
Why not just use Claude Code's --chrome / browser MCP tools?
You can! If Claude Code's built-in browser works for you, keep using it. spel offers more when you need:
- Persistent sessions across multiple agent commands (the browser stays open)
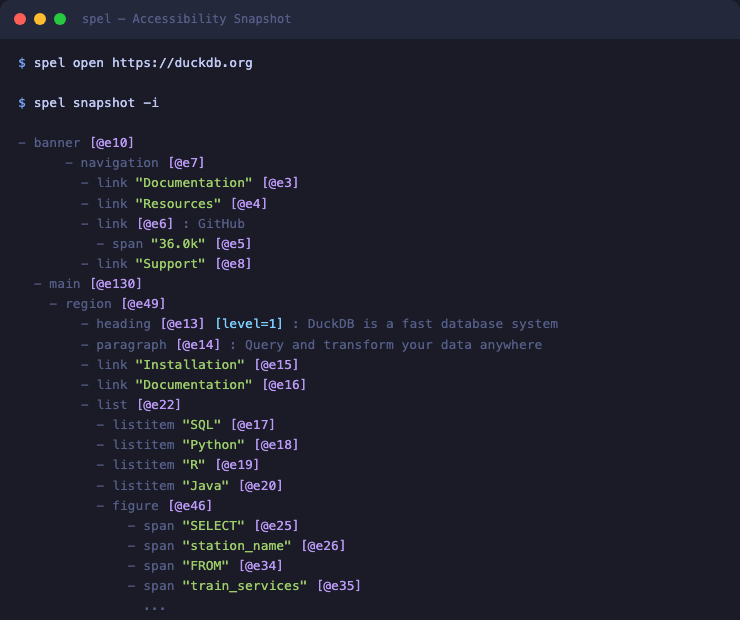
- Accessibility snapshots — a structured, numbered view of the page that's better than raw HTML for AI agents
- E2E test generation — record a browser session and turn it into a test
- Allure reports — detailed test reports with traces, screenshots, and network inspection
- CI integration — run the same tests headlessly in CI with proper reporting
- Three browser engines — Chromium, Firefox, and WebKit
Who is this for?
| You want to... | spel gives you... |
|---|---|
| Automate a browser from the terminal | spel open, spel click, spel fill, spel screenshot |
| Scrape page content | spel markdownify, spel snapshot, spel get text |
| Write E2E tests | Clojure test framework with Allure reports, or record-and-generate |
| Let an AI agent control a browser | CLI commands + accessibility snapshots that agents can reason about |
| Run browser tests in CI | Headless mode + Allure reporting + video recording |
Rationale
spel wraps Playwright Java with idiomatic Clojure: maps for options, anomaly maps for errors, with-* macros for lifecycle, and a native CLI binary for instant browser automation.
- Single binary, no ecosystem baggage: One download, no
node_modules, no npm, no transitive dependency surprises. Install the binary, install browsers, done. - Persistent daemon: First command auto-starts a background browser. Subsequent commands reuse it. No cold-start on every invocation — fast enough for interactive loops and AI agents.
- Accessibility snapshots: Pages are represented as structured, numbered documents (not raw HTML). AI agents can read them like text and reference elements by number — no brittle CSS selectors.
- Record, then generate: Capture any browser session to JSONL and auto-generate idiomatic Clojure tests or reusable scripts.
- Allure reports with network inspection: Full Allure reporting with Playwright traces, network visualization (method, status, headers, body), and visual diffs.
- API testing built in: Intercept, assert, and inspect HTTP traffic in the same tool as your browser tests.
- Three browser engines: Chromium, Firefox, and WebKit — full Playwright API coverage.
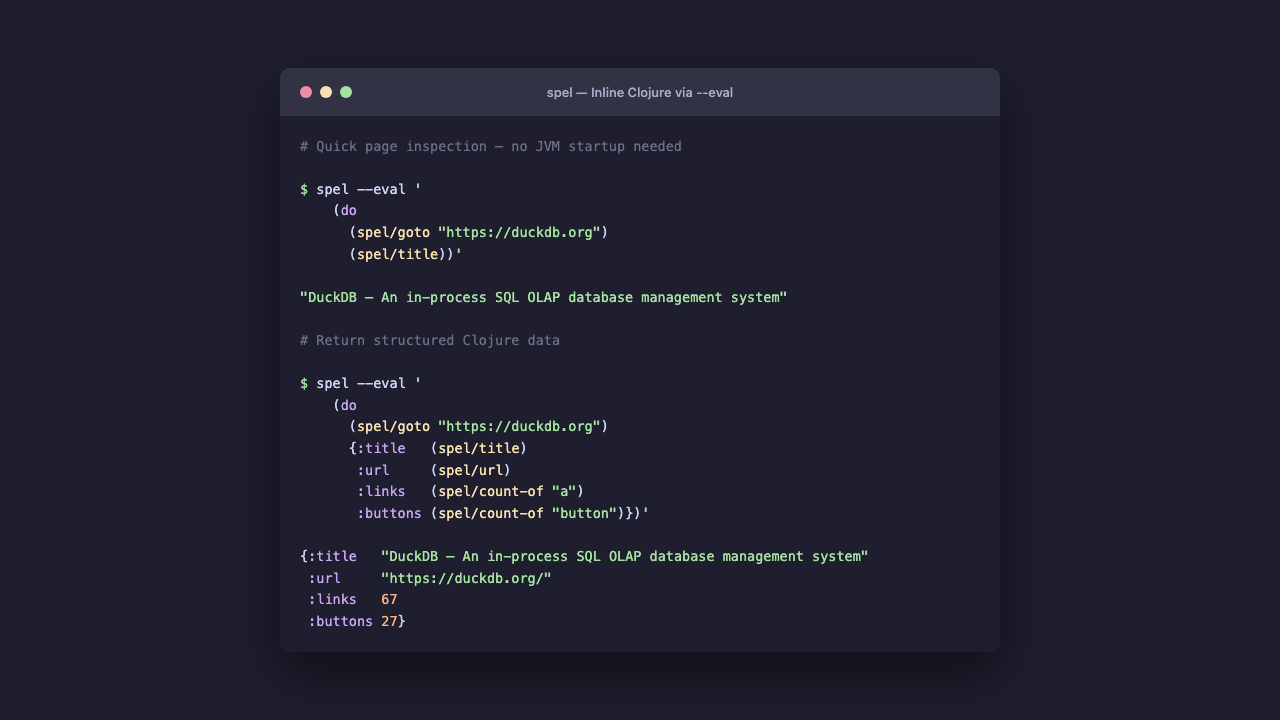
- Inline Clojure scripting: Run arbitrary Clojure expressions mid-session via
eval-sci— not just shell commands, but real code.
Quick Start
Install
Clojure library:
;; deps.edn
{:deps {com.blockether/spel {:mvn/version "0.7.9"}}}
Native CLI (download from GitHub releases):
# macOS (Apple Silicon)
curl -LO https://github.com/Blockether/spel/releases/latest/download/spel-macos-arm64
chmod +x spel-macos-arm64 && mv spel-macos-arm64 ~/.local/bin/spel

# Linux (amd64)
curl -LO https://github.com/Blockether/spel/releases/latest/download/spel-linux-amd64
chmod +x spel-linux-amd64 && mv spel-linux-amd64 ~/.local/bin/spel

# Linux (arm64)
curl -LO https://github.com/Blockether/spel/releases/latest/download/spel-linux-arm64
chmod +x spel-linux-arm64 && mv spel-linux-arm64 ~/.local/bin/spel

# Windows (PowerShell)
Invoke-WebRequest -Uri https://github.com/Blockether/spel/releases/latest/download/spel-windows-amd64.exe -OutFile spel.exe
Move-Item spel.exe "$env:LOCALAPPDATA\Microsoft\WindowsApps\spel.exe"
Add ~/.local/bin to your PATH:
export PATH="$HOME/.local/bin:$PATH" # add to ~/.bashrc or ~/.zshrc
macOS Gatekeeper (binaries are not Apple-signed):
xattr -d com.apple.quarantine ~/.local/bin/spel
Post-install:
spel install   # install browsers
spel version   # verify installation
Guided Installation (for LLM agents)
Step-by-step agent-driven install guideIf you're an LLM agent installing spel for a user, follow these steps. Ask questions where indicated — adapt to the user's answers.
Step 1: Detect platform and install binary
Detect the user's OS and architecture, then download the correct binary:
| Platform | Binary name |
|---|---|
| macOS Apple Silicon | spel-macos-arm64 |
| Linux x86_64 | spel-linux-amd64 |
| Linux ARM64 | spel-linux-arm64 |
| Windows x86_64 | spel-windows-amd64.exe |
Agent:
- Run
uname -s+uname -m(Unix) or check$env:PROCESSOR_ARCHITECTURE(Windows) - Download from
https://github.com/Blockether/spel/releases/latest/download/<binary> - Place in
~/.local/bin/(Unix) or%LOCALAPPDATA%\spel\(Windows) - Make executable:
chmod +x(Unix only) - On macOS: remove quarantine with
xattr -d com.apple.quarantine - Ensure the install directory is in PATH — detect shell and add to the correct config file
Step 2: Ask — Which browser?
"Which browser do you primarily use? Chrome, Edge, or Brave?"
Based on the answer, set the default channel:
| Answer | Channel |
|---|---|
| Chrome (default) | chrome (no flag needed) |
| Edge | msedge |
| Brave | brave |
Set SPEL_CHANNEL environment variable to the chosen channel (e.g. msedge, brave). Skip for Chrome — it's the default.
Step 3: Ask — Use your real browser profile?
"Do you want spel to use your real browser profile? This gives you all your extensions, saved passwords, bookmarks, and preferences inside spel."
If yes, detect the profile path:
| OS | Chrome | Edge |
|---|---|---|
| macOS | ~/Library/Application Support/Google/Chrome/Default |
~/Library/Application Support/Microsoft Edge/Default |
| Linux | ~/.config/google-chrome/Default |
~/.config/microsoft-edge/Default |
| Windows | %LOCALAPPDATA%\Google\Chrome\User Data\Default |
%LOCALAPPDATA%\Microsoft\Edge\User Data\Default |
Verify the profile exists, then set:
Set SPEL_PROFILE environment variable to the detected path.
If no, skip — spel will use a fresh browser context each time.
Step 4: Ask — Corporate proxy?
"Are you behind a corporate proxy (Zscaler, Netskope, etc.)? If unsure, try
spel installfirst — if it fails with 'PKIX path building failed', you need this."
If yes:
Set both SPEL_CA_BUNDLE and NODE_EXTRA_CA_CERTS environment variables to the path of the corporate CA bundle (PEM format). Ask the user where the cert file is, or help them find it.
See the Corporate Proxy section below for details.
Step 5: Install browsers
Run spel install to download Chromium. If the user chose Edge, also run spel install msedge.
Step 6: Ask — Automation or testing?
"Will you use spel for automation only (scripting, scraping, agents) or also for writing tests (with assertions and Allure reports)?"
Scaffold agent skills (all 8 agents by default, use --only to scaffold a subset, or --no-tests to skip the seed test file):
# Full scaffolding with all 8 agents (default)
spel init-agents

# All agents, no seed test or specs directory
spel init-agents --no-tests

# Scaffold only specific groups
spel init-agents --only=test          # test agents only
spel init-agents --only=automation    # browser automation agents only
spel init-agents --only=visual        # visual QA agents only
spel init-agents --only=bugfind      # adversarial bug-finding agents only
spel init-agents --only=orchestrator # orchestrator agent only
spel init-agents --only=discovery    # product discovery agents only
Choose the right loop for your coding agent:
spel init-agents --loop=opencode   # OpenCode (default)
spel init-agents --loop=claude     # Claude Code
Step 7: Verify
Run spel version to confirm installation. Then test with spel open https://example.com — it should open and return JSON. Run spel close after.
If the user chose to use a profile, test with their profile path to verify it works.
Step 8: Persist configuration
Save the user's choices so they don't need to pass flags every time. Detect their shell and OS, then write to the correct config file:
| OS | Shell | Config file |
|---|---|---|
| macOS/Linux | zsh | ~/.zshrc |
| macOS/Linux | bash | ~/.bashrc |
| macOS/Linux | fish | ~/.config/fish/config.fish (use set -Ux VAR value) |
| Windows | PowerShell | $PROFILE (use [Environment]::SetEnvironmentVariable("VAR", "value", "User")) |
| Windows | cmd | setx VAR value |
Agent: detect the shell (echo $SHELL on Unix, $PSVersionTable on Windows) and write the env vars to the correct file using the correct syntax. Do not assume bash.
If you're behind a corporate SSL-inspecting proxy (Zscaler, Netskope, etc.), spel install may fail with "PKIX path building failed". Set these env vars before running spel install:
| Env Var | Format | On missing file | Description |
|---|---|---|---|
SPEL_CA_BUNDLE |
PEM file | Error | Extra CA certs (merged with defaults) |
NODE_EXTRA_CA_CERTS |
PEM file | Warning, skips | Shared with Node.js subprocess |
SPEL_TRUSTSTORE |
JKS/PKCS12 | Error | Truststore (merged with defaults) |
SPEL_TRUSTSTORE_TYPE |
String | — | Default: JKS |
SPEL_TRUSTSTORE_PASSWORD |
String | — | Default: empty |
export SPEL_CA_BUNDLE=/path/to/corporate-ca.pem
export NODE_EXTRA_CA_CERTS=/path/to/corporate-ca.pem
spel install --with-deps
All options merge with built-in defaults — public CDN certs continue to work.
Environment VariablesAll env vars are optional. CLI flags always take priority over env vars.
Browser
| Env Var | CLI equivalent | Description |
|---|---|---|
SPEL_BROWSER |
--browser |
Browser engine: chromium (default), firefox, webkit |
SPEL_CHANNEL |
--channel |
Chromium channel: chrome, msedge, chrome-beta, etc. |
SPEL_PROFILE |
--profile |
Chrome/Edge user data directory (full profile: extensions, passwords, bookmarks) |
SPEL_LOAD_STATE |
--load-state |
Playwright storage state JSON path (alias: SPEL_STORAGE_STATE) |
SPEL_EXECUTABLE_PATH |
--executable-path |
Custom browser binary path |
SPEL_USER_AGENT |
--user-agent |
Custom user agent string |
SPEL_STEALTH |
--no-stealth |
Set to false to disable stealth mode (ON by default) |
Session
| Env Var | CLI equivalent | Description |
|---|---|---|
SPEL_SESSION |
--session |
Session name (default: default) |
SPEL_JSON |
--json |
Set to true for JSON output |
SPEL_TIMEOUT |
--timeout |
Command timeout in milliseconds |
Network
| Env Var | CLI equivalent | Description |
|---|---|---|
SPEL_PROXY |
--proxy |
Proxy server URL |
SPEL_PROXY_BYPASS |
--proxy-bypass |
Proxy bypass patterns |
SPEL_HEADERS |
--headers |
Default HTTP headers (JSON string) |
SPEL_IGNORE_HTTPS_ERRORS |
--ignore-https-errors |
Set to true to ignore HTTPS errors |
SSL/TLS
| Env Var | CLI equivalent | Description |
|---|---|---|
SPEL_CA_BUNDLE |
— | PEM file with extra CA certs (merged with defaults) |
NODE_EXTRA_CA_CERTS |
— | PEM file, also respected by Node.js subprocess |
SPEL_TRUSTSTORE |
— | JKS/PKCS12 truststore path |
SPEL_TRUSTSTORE_TYPE |
— | Truststore type (default: JKS) |
SPEL_TRUSTSTORE_PASSWORD |
— | Truststore password |
Testing
| Env Var | CLI equivalent | Description |
|---|---|---|
SPEL_INTERACTIVE |
— | Set to true for headed mode in test fixtures |
SPEL_SLOW_MO |
— | Slow motion delay in ms for test fixtures |
SPEL_ALLURE_CWD |
— | Working directory for Allure CLI process (set to /tmp on read-only filesystems like AWS Lambda) |
Daemon Lifecycle
| Env Var | CLI equivalent | Description |
|---|---|---|
SPEL_SESSION_IDLE_TIMEOUT |
— | Auto-shutdown daemon after this many ms of inactivity (default: 1800000 = 30 min, 0 disables) |
SPEL_CDP_IDLE_TIMEOUT |
— | Auto-shutdown after CDP disconnect if no reconnect (ms, default: 1800000, 0 disables) |
SPEL_CDP_LOCK_WAIT |
— | Max seconds to wait for CDP route lock release (default: 120, 0 = fail immediately) |
SPEL_CDP_LOCK_POLL_INTERVAL |
— | Poll interval in seconds when waiting for CDP route lock (default: 2) |
Advanced
| Env Var | CLI equivalent | Description |
|---|---|---|
SPEL_AUTO_CONNECT |
--auto-connect |
Set to any value to auto-discover Chrome CDP |
SPEL_AUTO_LAUNCH |
--auto-launch |
Set to any value to auto-launch browser with debug port (per-session isolation) |
SPEL_CDP |
--cdp |
Connect via Chrome DevTools Protocol URL |
SPEL_ARGS |
--args |
Extra Chromium launch args (comma-separated) |
SPEL_DRIVER_DIR |
— | Override Playwright browser driver directory |
SPEL_DEBUG |
--debug |
Set to true for debug logging |
CLI Examples
The CLI is the primary way to use spel. The first command auto-starts a background browser daemon; subsequent commands reuse the same browser session.
Navigate and interact:
spel open https://example.org             # open a page
spel click "text=More information"        # click a link by text
spel fill "#search" "browser automation"  # fill an input field
spel press Enter                          # press a key
spel screenshot result.png                # take a screenshot
spel close                                # close the session
Read page content:
spel get title                            # page title
spel get text                             # all visible text
spel get html                             # full HTML
spel markdownify                          # page as clean Markdown
spel snapshot -i                          # accessibility snapshot with numbered refs
Multiple sessions in parallel:
spel --session shop open https://shop.example.com
spel --session docs open https://docs.example.com
spel --session shop screenshot shop.png
spel --session docs screenshot docs.png
Use your real Chrome profile (with extensions, saved passwords, etc.):
export SPEL_CHANNEL=chrome
export SPEL_PROFILE="$HOME/.config/google-chrome/Default"
spel open https://github.com    # opens with your logged-in session
Run spel --help for the full command list (~150 commands covering navigation, interaction, content extraction, network interception, cookies, tabs, frames, debugging, and more).
Clojure Library
spel is also a Clojure library for writing browser automation and tests programmatically:
(require '[com.blockether.spel.core :as core]
         '[com.blockether.spel.page :as page])

(core/with-testing-page [pg]
  (page/navigate pg "https://example.org")
  (page/title pg))
;; => "Example Domain"
Device emulation:
(core/with-testing-page {:device :iphone-14 :locale "fr-FR"} [pg]
  (page/navigate pg "https://example.org"))
Combined browser + API testing (shared Playwright trace):
(core/with-testing-page [pg]
  (page/navigate pg "https://example.org/login")
  (core/api-get (core/page-api pg) "/api/me"))
API Testing & Playwright-Style Tests
Write browser and API tests side-by-side:
spel lets you write browser tests (open pages, click buttons, verify DOM) and API tests (call endpoints, check responses) using the same framework. You get full Playwright traces for both.
API testing on its own:
(core/with-testing-api {:base-url "https://api.example.org"} [ctx]
  (core/api-get ctx "/users"))
Combine browser + API for a single trace:
You can link UI and API actions within the same test, ensuring one trace covers front-end and back-end steps:
(core/with-testing-page [pg]
  (page/navigate pg "https://example.org/login")
  (core/api-get (core/page-api pg) "/api/me"))

(core/with-testing-page [pg]
  (page/navigate pg "https://example.org/login")
  (core/with-page-api pg {:base-url "https://api.example.org"} [ctx]
    (core/api-get ctx "/me")))
Retry/polling logic built in:
To handle flaky endpoints or wait for backend jobs:
(core/with-retry {}
  (core/api-get ctx "/flaky-endpoint"))

(core/with-retry {:max-attempts 10 :delay-ms 1000 :backoff :fixed
                  :retry-when (core/retry-guard #(= "ready" (:status %)))}
  (core/api-get ctx "/job/123"))
Important: Do not nest
with-testing-pageinsidewith-testing-api(or vice versa). Each creates its own Playwright instance, browser, and context, so you end up with separate traces. Usepage-apiorwith-page-apiwhen you want UI and API steps in one trace.
Allure reporting:
Browser and API tests can feed the same Allure report with traces, screenshots, steps, and network inspection, so one run tells the whole story.
See the full API reference, browser options, Allure reporting, and API testing.
Ready-made Prompts for AI Coding Agents
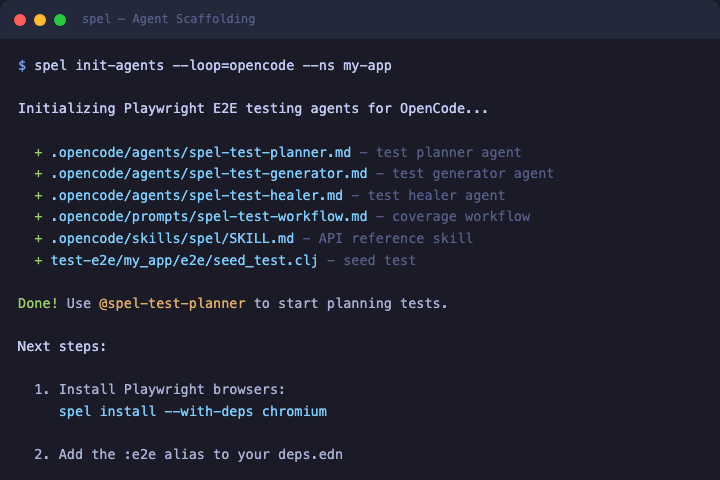
What this does: spel init-agents generates pre-written prompt files that teach your AI coding agent (Claude Code, OpenCode, etc.) how to use spel. After running this command, your agent knows all spel commands, best practices, and can write E2E tests, automate browsers, or find bugs — without you having to explain spel's API yourself.
Think of it like this: instead of copy-pasting documentation into your AI agent's context, init-agents drops the right instruction files into your project so the agent picks them up automatically.
# Generate prompt files for Claude Code:
spel init-agents --loop=claude

# Generate prompt files for OpenCode (default):
spel init-agents
What gets created:
| What | Where | Purpose |
|---|---|---|
| Agent prompt files | .claude/agents/ or .opencode/agents/ |
Teach the AI agent how to use spel's commands |
| API reference | .claude/skills/spel/ |
Complete command reference the agent can look up |
| Seed test file | test-e2e/ |
A starter test file for the agent to build on |
| Workflow prompts | .claude/prompts/ |
Step-by-step workflows the agent can follow |
After setup, you can ask your AI agent things like:
- "Test the login page" — the agent opens the browser, navigates, interacts, and writes assertions
- "Find bugs on the checkout flow" — the agent explores the UI systematically, looking for issues
- "Scrape product data from this page" — the agent uses spel commands to extract content
spel init-agents                              # all 8 prompt sets (default)
spel init-agents --loop=claude                # Claude Code format
spel init-agents --only=test                  # only test-writing prompts
spel init-agents --only=automation            # only browser automation prompts
spel init-agents --only=visual                # only visual QA prompts
spel init-agents --only=bugfind              # only bug-finding prompts
spel init-agents --only=orchestrator          # only the orchestrator prompt
spel init-agents --only=test,visual           # combine groups
spel init-agents --only=discovery             # only product discovery prompts
spel init-agents --only=core                  # simplified 6-prompt core setup
spel init-agents --simplified                 # same as --only=core
spel init-agents --flavour=clojure-test       # clojure.test instead of Lazytest
spel init-agents --no-tests                   # skip seed test and specs directory
| Flag | Default | Purpose |
|---|---|---|
--loop TARGET |
opencode |
Which AI coding agent: opencode or claude |
--only GROUPS |
— | Only generate specific prompt groups (comma-separated) |
--simplified |
— | Simplified 6-prompt setup (alias for --only=core) |
--ns NS |
dir name | Base namespace for generated tests |
--flavour FLAVOUR |
lazytest |
Test framework: lazytest or clojure-test |
--no-tests |
— | Skip seed test and specs directory |
--learnings |
— | Agents will maintain a LEARNINGS.md file where they record gotchas and patterns they discover while working (useful for building up project-specific knowledge over time) |
--dry-run |
— | Preview what files would be created without writing them |
--force |
— | Overwrite existing files |
--test-dir DIR |
test-e2e |
Where to put E2E test files |
--specs-dir DIR |
test-e2e/specs |
Where to put test plan files |
| Group | What the agent can do | Included prompts |
|---|---|---|
test |
Plan and write E2E tests | test-planner, test-writer |
automation |
Explore UIs and automate browser flows | explorer, automator |
visual |
Generate visual content and slides | presenter |
bugfind |
Systematically find bugs and visual regressions | bug-hunter |
orchestrator |
Smart routing — analyzes your request and picks the right workflow | orchestrator |
discovery |
Inventory product features and audit UX coherence | product-analyst |
The orchestrator is a good default entry point — tell it what you want and it delegates to the right specialist. In Claude Code: @spel-orchestrator test the login page.
Video Recording
Record browser sessions as WebM files for debugging and CI artifacts.
(def ctx (core/new-context browser {:record-video-dir "videos"}))
See PDF, stitch, and video options.
Test Generation (Codegen)
Record browser sessions and transform them to idiomatic Clojure code.
spel codegen record -o recording.jsonl https://example.org
spel codegen recording.jsonl > my_test.clj
See codegen CLI reference for full actions and output formats.
Building from Source
# Install browsers (via Playwright Java CLI)
clojure -M -e "(com.microsoft.playwright.CLI/main (into-array String [\"install\" \"--with-deps\"]))"

# Build JAR
clojure -T:build jar

# Build native image (requires GraalVM)
clojure -T:build native-image

# Run tests
make test
make test-allure

# Start REPL
make repl
Changelog
See CHANGELOG.md.
License
Apache License 2.0 — see LICENSE.
Yorumlar (0)
Yorum birakmak icin giris yap.
Yorum birakSonuc bulunamadi