esp-agentic-dev
Health Uyari
- License — License: MIT
- Description — Repository has a description
- Active repo — Last push 0 days ago
- Low visibility — Only 5 GitHub stars
Code Gecti
- Code scan — Scanned 10 files during light audit, no dangerous patterns found
Permissions Gecti
- Permissions — No dangerous permissions requested
Bu listing icin henuz AI raporu yok.
A development framework for ESP32 designed for agentic coding assistants.
esp-agentic-dev
A pure-JTAG development framework for ESP32, designed for agentic coding assistants.
Designed to give LLM coding agents like Claude Code full autonomous control over the develop → flash → inspect → edit loop. Build, flash, inspect, and debug ESP32 firmware entirely over JTAG. For ESP32 devices with built-in JTAG support (e.g., ESP32-C3), no additional debug hardware is required.
Design
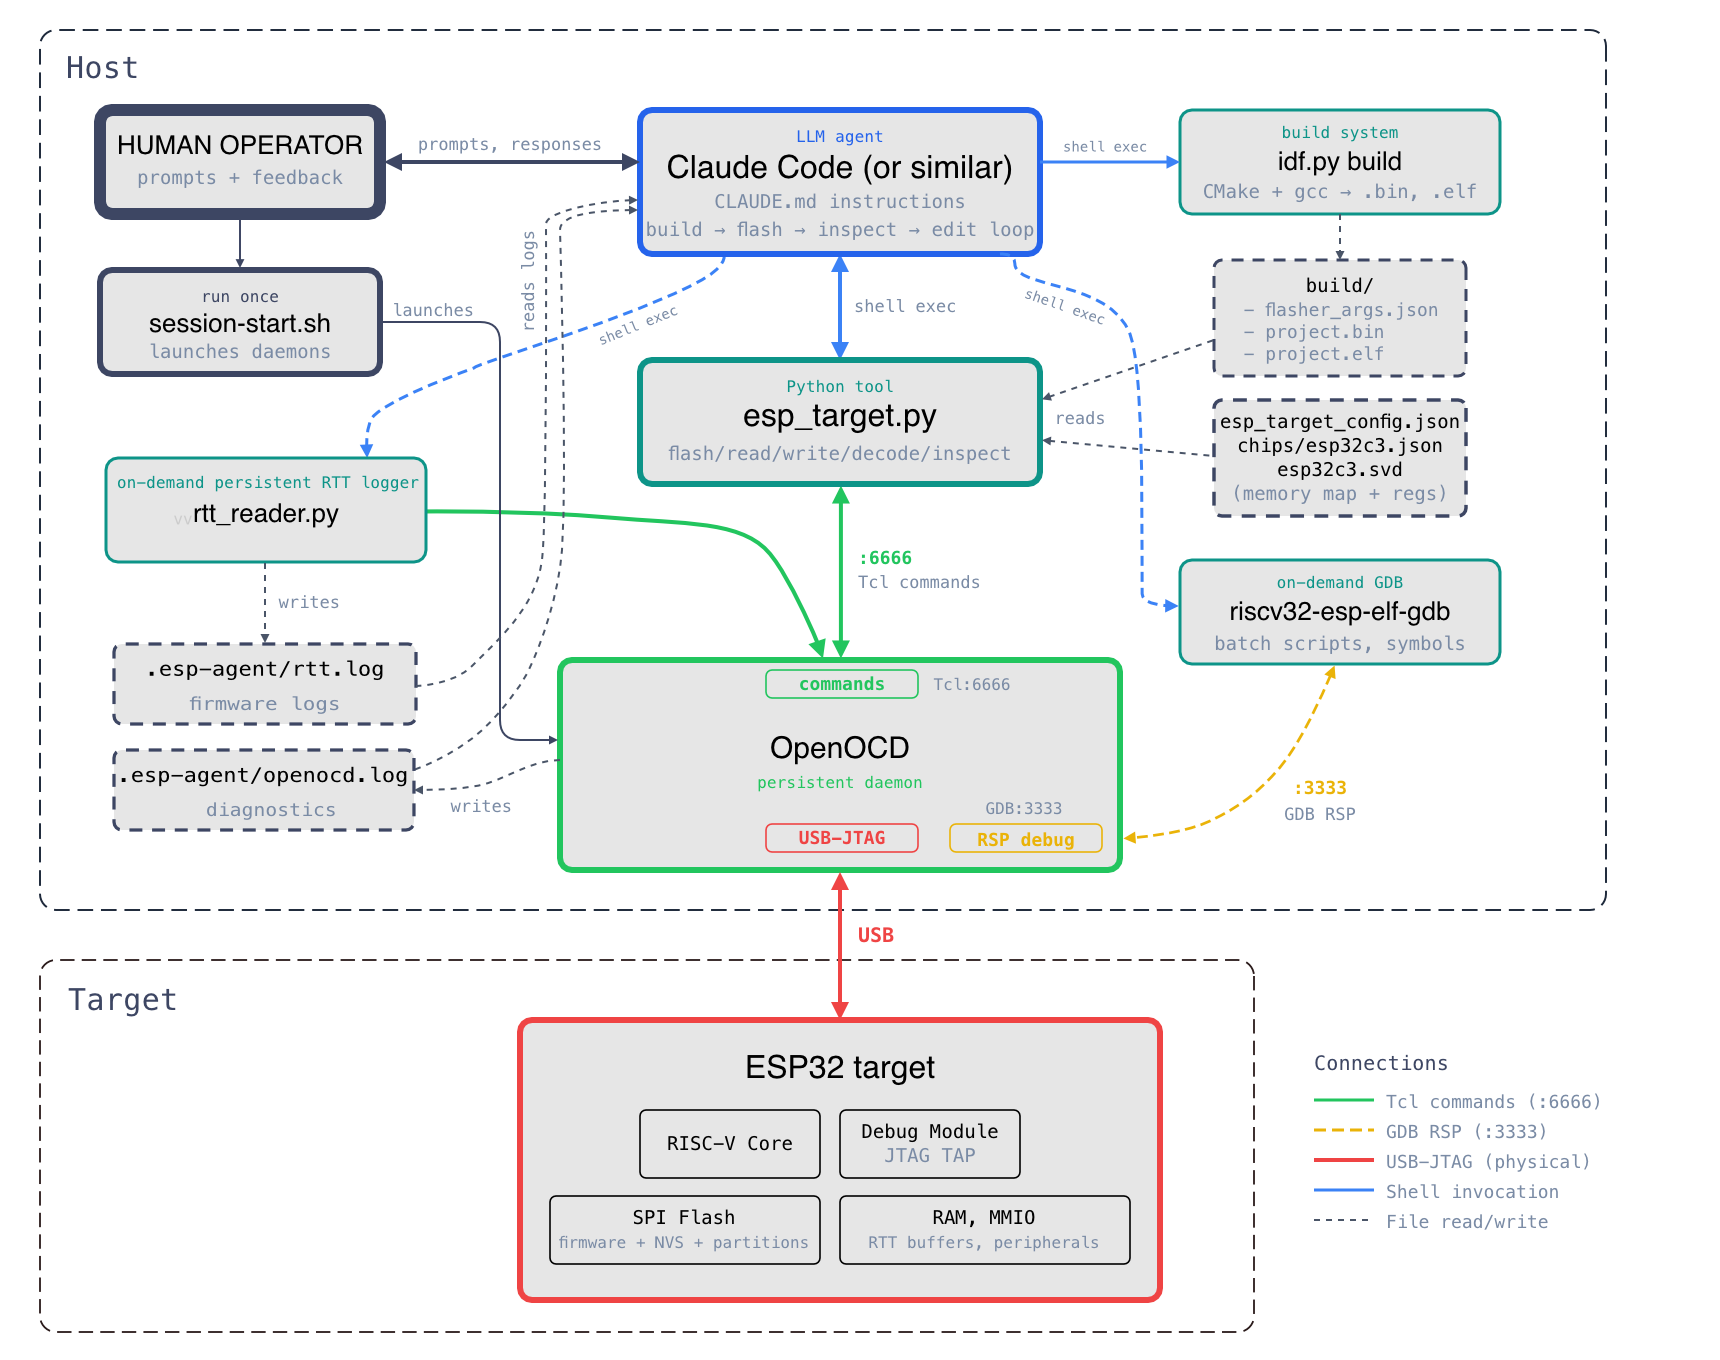
Everything routes through a single interface: OpenOCD over JTAG.
- Target control is a single Python tool (
esp_target.py) for erasing, flashing, resetting, halting, resuming, and inspecting the target - Flashing goes through OpenOCD’s JTAG flash programmer (
program_esp) - Register inspection uses SVD-aware named peripheral access with bitfield decode
- Debugging uses GDB over OpenOCD’s RSP port
- Logging uses SEGGER RTT — a shared-memory ring buffer read via JTAG debug access, no UART involvement
With a single stable control point, the agent can concurrently:
- Flash new firmware without switching interfaces
- Stream plain-text firmware logs while inspecting peripheral registers
- Read memory non-intrusively while the CPU runs
- Halt, inspect CPU state, and resume without disrupting the log stream
- Launch GDB for symbol-aware debugging alongside all of the above
This level of observability — seeing both application output and hardware
state at the same time, through the same transport — is what makes
autonomous firmware development practical. The agent doesn’t need to
guess what went wrong; it can look.
Everything is controlled by command-line tools that an LLM agent can
invoke directly. No IDE, no GUI, no interactive prompts. For detailed
implementation decisions see
docs/design-decisions.md.
Architecture
Claude Code (or any agent)
  ├── idf.py build                    → compile firmware
  ├── esp_target.py (shell exec)      → flash, reset, inspect registers
  ├── GDB batch scripts (on-demand)   → symbol-aware debugging
  ├── reads .esp-agent/rtt.log        → firmware log output
  └── reads .esp-agent/openocd.log    → infrastructure diagnostics

OpenOCD (persistent daemon)
  ├── Tcl :6666    — commands from tools
  ├── GDB :3333    — on-demand debugging
  └── USB-JTAG     → ESP32 target

esp_target.py
  └── OpenOCD Tcl port (:6666)        → mww/mdw, program_esp, halt/resume

rtt_reader.py (background daemon)
  └── OpenOCD Tcl port (:6666)        → polls RTT ring buffer via mdw/mww
Quick start
1. Clone
git clone https://github.com/ccattuto/esp-agentic-dev.git
2. Set up your ESP-IDF project
Copy the tools and config into your project:
cd your-esp-idf-project

# Copy tools
cp esp-agentic-dev/tools/esp_target.py .
cp esp-agentic-dev/tools/svd_parser.py .
cp esp-agentic-dev/tools/rtt_reader.py .

# Copy templates
cp esp-agentic-dev/templates/CLAUDE.md .
# cp esp-agentic-dev/templates/CLAUDE.md AGENTS.md  (for other agents such as Codex CLI)
cp esp-agentic-dev/templates/esp_target_config.json .
cp esp-agentic-dev/templates/esp-session-start.sh .
cp esp-agentic-dev/templates/esp-session-stop.sh .
chmod +x esp-session-start.sh esp-session-stop.sh

# Copy chip config
mkdir -p chips
cp esp-agentic-dev/chips/esp32c3.json chips/

# Provide board configuration, or copy it from boards/
cp esp-agentic-dev/boards/codecellc3.md board.md
3. Get the SVD file
Download the CMSIS SVD for your chip from Espressif's SVD repo:
curl -L -o chips/esp32c3.svd \
    https://raw.githubusercontent.com/espressif/svd/main/svd/esp32c3.svd
4. Edit the config
Edit esp_target_config.json to match your setup. The defaults work for
ESP32-C3 with built-in USB-JTAG:
{
  "chip": "chips/esp32c3.json",
  "openocd": {
    "board_cfg": "board/esp32c3-builtin.cfg",
    "flash_command": "program_esp",
    "tcl_port": 6666,
    "gdb_port": 3333,
    "telnet_port": 4444
  },
  "gdb": {
    "executable": "riscv32-esp-elf-gdb-no-python"
  },
  "logging": {
    "method": "rtt"
  }
}
Edit board.md to describe your specific development board
— pin assignments, LEDs, buttons, I2C/SPI buses, and any hardware constraints.
This gives the agent the context it needs to write correct pin
configurations and peripheral initialization code. See boards/ for examples.
5. Start a session
You (human) — activate the ESP-IDF environment and start the infrastructure::
. $IDF_PATH/export.sh   # if not already active in this shell

./esp-session-start.sh

python3 esp_target.py health
# → {"ok": true, "state": "running", "chip": "ESP32-C3", ...}
You (human) — launch the agent:
claude # or your preferred agentic coding tool
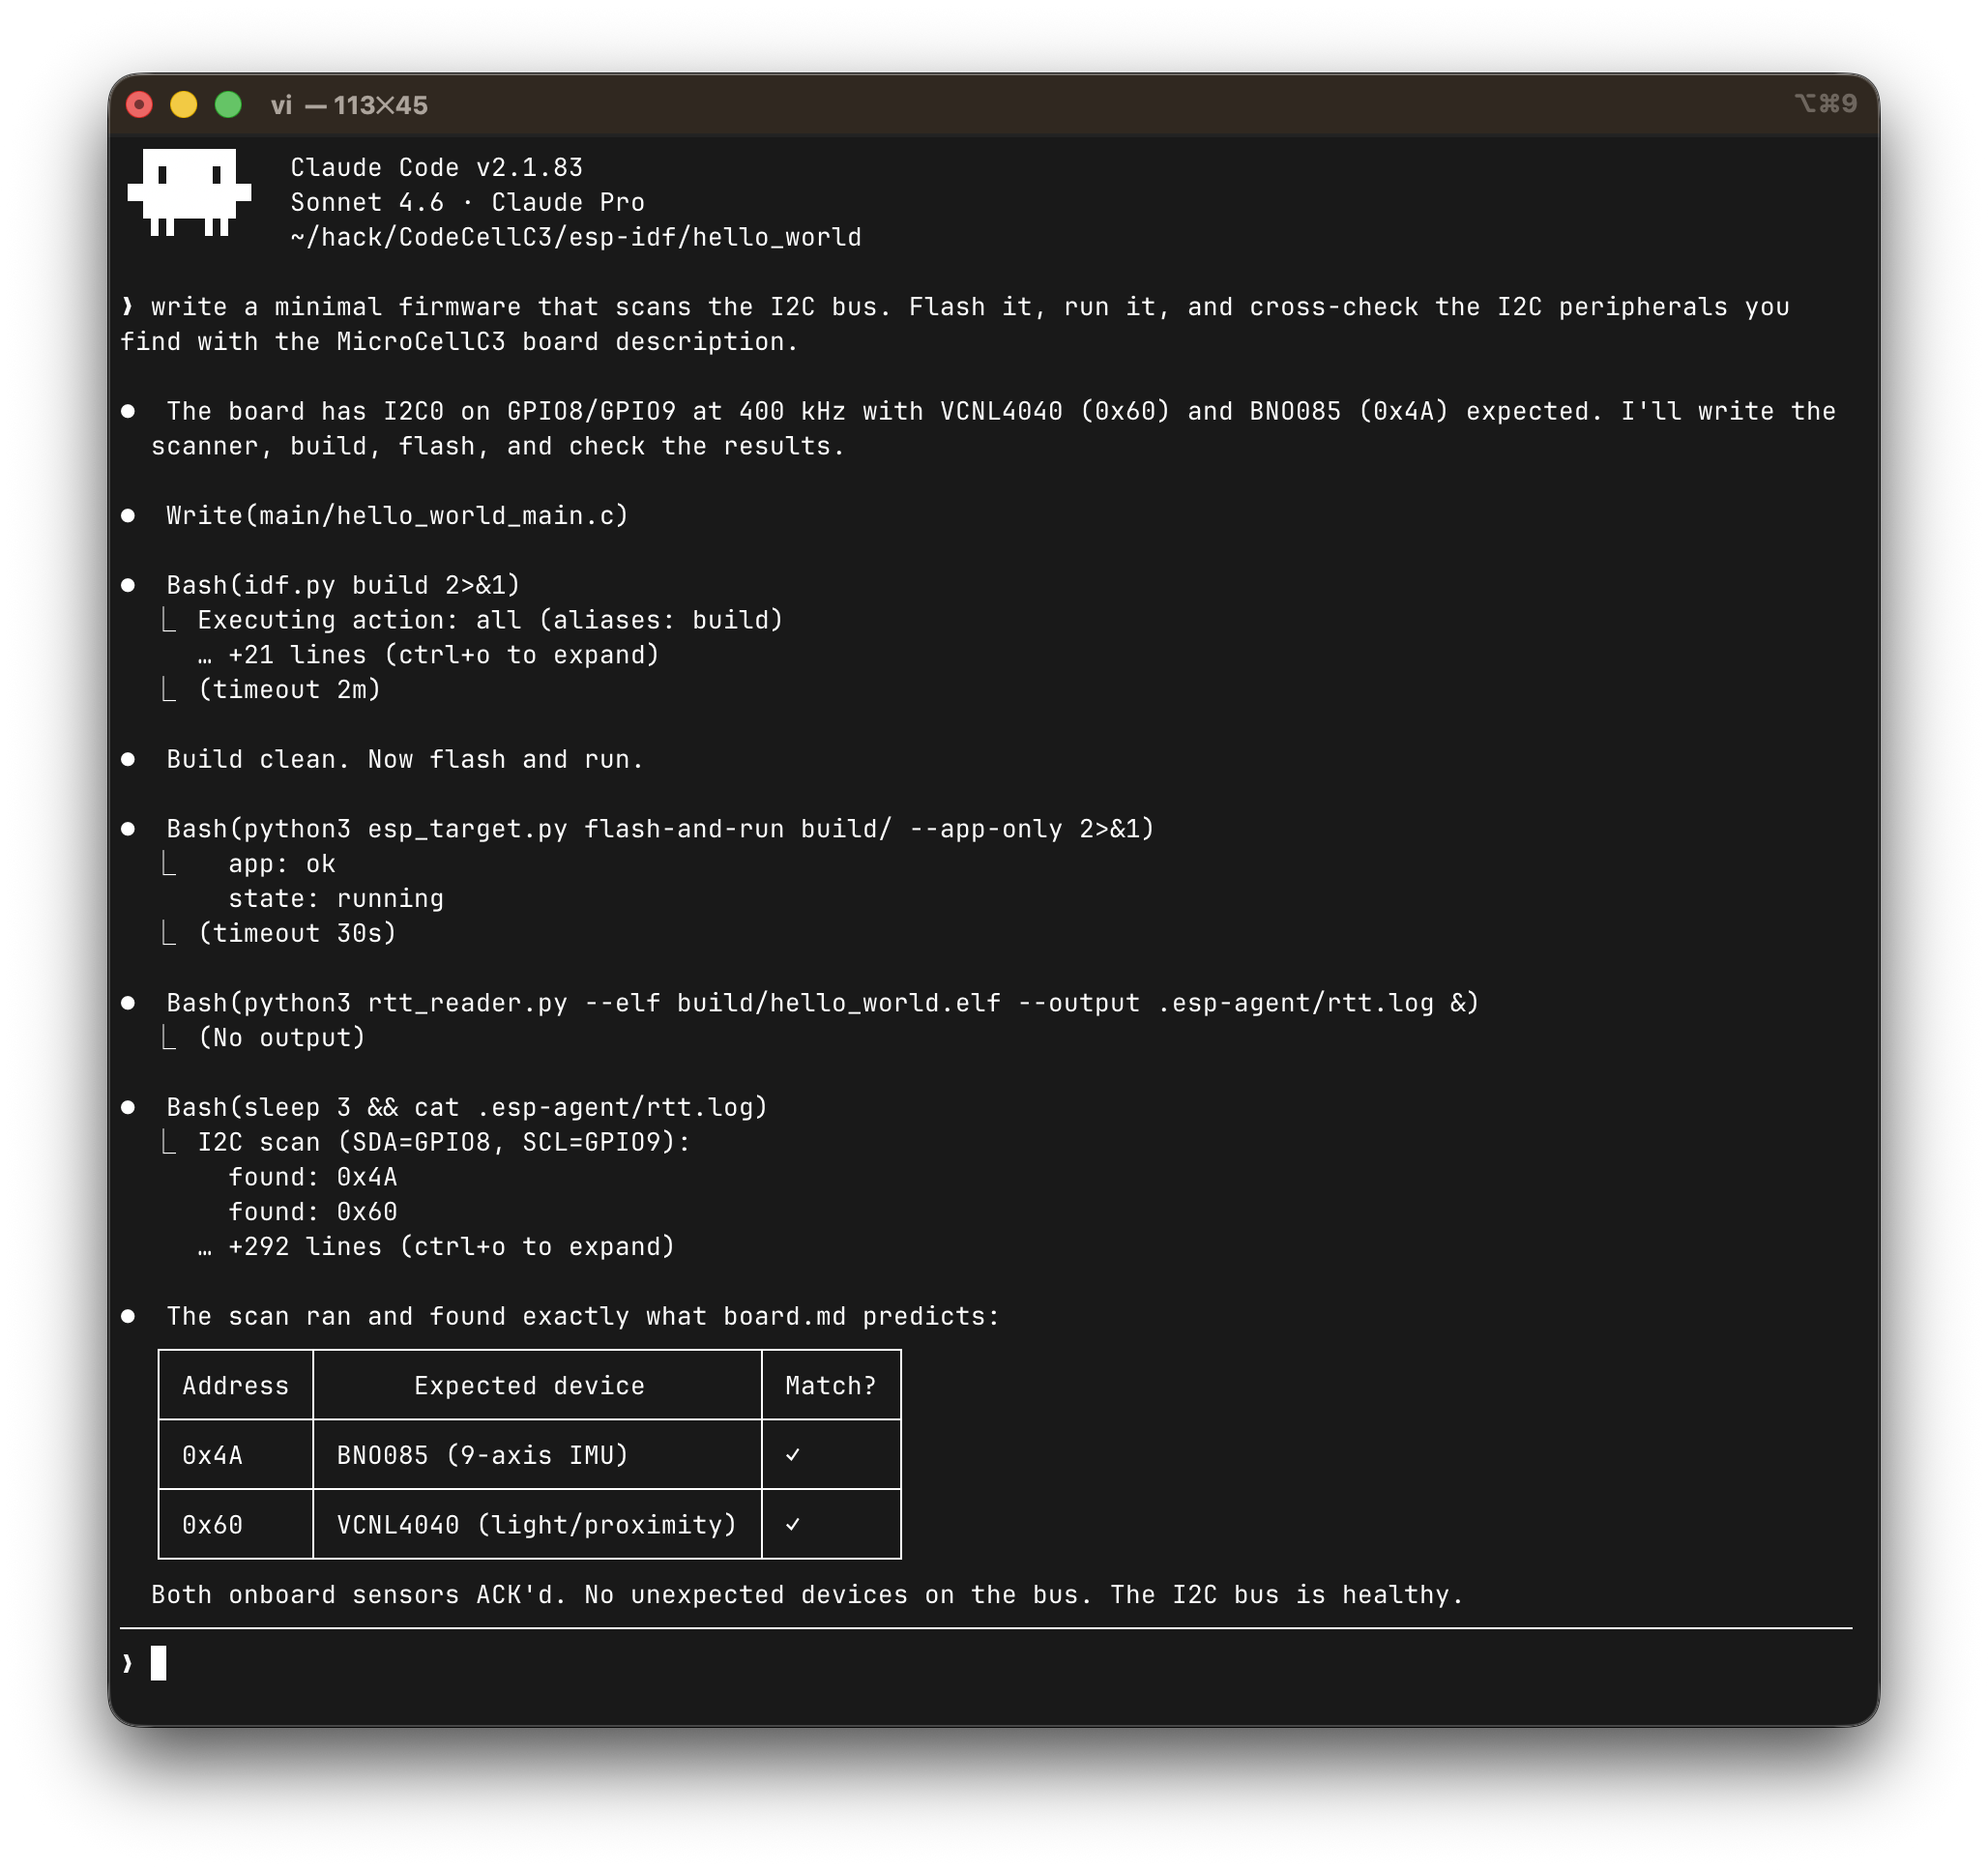
The agent takes it from here — building, flashing, reading logs,
inspecting registers, editing code. Typical actions taken by the agent look like:
# Agent builds
idf.py build

# Agent flashes
python3 esp_target.py flash-and-run build/

# Agent starts log capture (if firmware has RTT)
python3 rtt_reader.py --elf build/project.elf --output .esp-agent/rtt.log &

# Agent reads firmware output
cat .esp-agent/rtt.log

# Agent inspects hardware state
python3 esp_target.py decode GPIO.OUT

# Agent edits code, repeats
You (human) — when done:
./esp-session-stop.sh
Adding RTT to your firmware
1. Get SEGGER RTT sources
Download SEGGER_RTT.c, SEGGER_RTT.h, and SEGGER_RTT_printf.c from
SEGGER's website.
Copy them into your main/ component directory.
2. Use the patched config header
Copy the SEGGER_RTT_Conf.h from this repository's rtt/ directory. It adds
RISC-V interrupt lock macros (csrrci/csrw on mstatus MIE bit), guarded
by #if defined(__riscv). ARM targets use the stock PRIMASK/BASEPRI macros
unchanged.
3. Update CMakeLists.txt
idf_component_register(
    SRCS "SEGGER_RTT.c" "SEGGER_RTT_printf.c" "your_main.c"
    PRIV_REQUIRES spi_flash
    INCLUDE_DIRS "."
)
4. Write to RTT in your code
#include "SEGGER_RTT.h"

void app_main(void) {
    SEGGER_RTT_WriteString(0, "Boot complete\n");
    while (1) {
        SEGGER_RTT_printf(0, "tick %d\n", counter++);
        vTaskDelay(pdMS_TO_TICKS(1000));
    }
}
Tools
esp_target.py
Target control over OpenOCD's Tcl interface. Reads esp_target_config.json
automatically.
# Target state
esp_target.py health              # check connectivity
esp_target.py state               # running / halted
esp_target.py halt                # halt CPU
esp_target.py wait-halt           # block until CPU halts
esp_target.py resume              # resume CPU
esp_target.py reset run           # reset and run

# Flash
esp_target.py flash build/            # full flash (bootloader + partition table + app)
esp_target.py flash build/ --app-only # app only (faster)
esp_target.py flash-and-run build/ --app-only

# Memory
esp_target.py read 0x3FC80000 4           # read 4 words
esp_target.py read 0x3FC80000 16 --width 8 # read 16 bytes
esp_target.py write 0x3FC80000 0xDEADBEEF

# CPU registers (target must be halted)
esp_target.py cpu-regs            # all core registers + key CSRs
esp_target.py cpu-reg pc          # single register
esp_target.py cpu-reg mcause
esp_target.py cpu-reg-write a0 1  # explicit CPU register write

# SVD-aware peripheral access
esp_target.py list-periph                 # all peripherals
esp_target.py list-regs GPIO              # registers in a peripheral
esp_target.py read-reg GPIO.OUT           # read by name
esp_target.py decode GPIO.OUT             # decode into named bitfields
esp_target.py inspect UART0               # dump all registers of a peripheral
esp_target.py write-reg GPIO.OUT_W1TS 0x400

# Info
esp_target.py memmap              # chip memory map
esp_target.py info                # resolved configuration
esp_target.py raw "targets"       # raw OpenOCD command passthrough
rtt_reader.py
Reads SEGGER RTT ring buffers directly via OpenOCD memory access. Runs as
a background process, streams firmware log output to a file or stdout.
When --output points to an existing file, the previous file is rotated
to a timestamped sibling before streaming starts.
# Recommended: use ELF to locate control block (instant, always correct for current build)
rtt_reader.py --elf build/project.elf --output .esp-agent/rtt.log &

# Using known address (instant, if address is already known)
rtt_reader.py --address 0x3fc8d824 --output .esp-agent/rtt.log &

# Scan SRAM for control block (fallback only — slow, use when no ELF is available)
rtt_reader.py --output .esp-agent/rtt.log &

# Just find the control block and print info
rtt_reader.py --elf build/project.elf --scan-only
svd_parser.py
Standalone CMSIS SVD parser using only Python stdlib. Used internally byesp_target.py. Supports the full SVD schema: peripherals, registers,
clusters, fields, derived peripherals. Caches parsed results as JSON for
fast subsequent loads.
Using with coding agents
Copy the agent instructions into your project root:
- Claude Code reads
CLAUDE.md— copy fromtemplates/CLAUDE.md - Other agents (Codex CLI, Cursor, etc.) read
AGENTS.md— copyCLAUDE.mdtoAGENTS.md
The file contains complete instructions for the agentic workflow:
how to build, flash, read logs, inspect registers, debug crashes.
Recommended .claude/settings.json for permissions:
{
  "allowedTools": [
    "Read",
    "Edit",
    "Write",
    "Bash(python3 esp_target.py:*)",
    "Bash(python3 rtt_reader.py:*)",
    "Bash(idf.py:*)",
    "Bash(riscv32-esp-elf-gdb:*)",
    "Bash(riscv32-esp-elf-gdb-no-python:*)",
    "Bash(riscv32-esp-elf-nm:*)",
    "Bash(riscv32-esp-elf-objdump:*)",
    "Bash(riscv32-esp-elf-addr2line:*)",
    "Bash(cat:*)",
    "Bash(head:*)",
    "Bash(tail:*)",
    "Bash(grep:*)",
    "Bash(ls:*)",
    "Bash(echo:*)",
    "Bash(find:*)",
    "Bash(file:*)",
    "Bash(awk:*)",
    "Bash(sed:*)",
    "Bash(diff:*)"
  ]
}
The typical agentic development cycle:
- Agent edits source code
idf.py build— agent parses compiler errors, fixes themesp_target.py flash-and-run build/- Agent reads
.esp-agent/rtt.logfor firmware output - Agent inspects hardware state via
esp_target.py decode,inspect,cpu-regs - Agent diagnoses the issue, edits code, repeats
Supported chips
Any ESP32 chip with a USB-JTAG controller should work.
This repository provides configuration files for the following chips:
| Chip | Config | Tested | Notes |
|---|---|---|---|
| ESP32-C3 | chips/esp32c3.json |
Yes | Built-in USB-JTAG |
| ESP32-S3 | chips/esp32s3.json |
No | Built-in USB-JTAG |
Adding a new chip requires:
- A chip JSON file with the memory map (see
chips/esp32c3.jsonas reference) - An SVD file from Espressif's SVD repo
- Updated
esp_target_config.jsonwith the correct board config, flash command, and GDB executable
The tools are chip-agnostic — only the config files change. Contributions
of new chip configs are welcome.
ESP-IDF apptrace (alternative logging)
For capturing all ESP-IDF internal logging (WiFi, BLE, RTOS, driver
output), the ESP-IDF apptrace mechanism can redirect ESP_LOGx output
over JTAG. See the CLAUDE.md template for setup
instructions.
Key tradeoff: apptrace captures everything automatically but blocks
OpenOCD during capture and produces binary output requiring a decode
step. RTT is better for the continuous agentic loop; apptrace is better
for deep diagnostic sessions.
Requirements
- Python 3.8+
- ESP-IDF (for building firmware)
- OpenOCD with Espressif support (installed with ESP-IDF)
- An ESP32 board with JTAG access (built-in USB-JTAG or external probe)
No additional Python packages are needed — all tools use stdlib only.
The ESP-IDF environment must be active in your shell before starting a session.
If idf.py and openocd are not on your PATH:
. $IDF_PATH/export.sh
This must be done in the same shell where you run esp-session-start.sh and claude (or any agent).
The session script and the agent inherit the shell environment — if the toolchain isn't on PATH, nothing works.
License
Contributing
Contributions welcome. This has been tested with Claude Code and Codex CLI on macOS.
The most useful additions are:
- Chip configs (in
chips/) for other ESP32 variants with native JTAG support (C5, C6, H2, P4) - Board information (in
boards/) for popular boards with supported ESP32 chips - Testing on different host platforms (Linux, Windows WSL)
Yorumlar (0)
Yorum birakmak icin giris yap.
Yorum birakSonuc bulunamadi