storescreens-cli
Health Uyari
- License — License: MIT
- Description — Repository has a description
- Active repo — Last push 0 days ago
- Low visibility — Only 6 GitHub stars
Code Basarisiz
- rm -rf — Recursive force deletion command in install.sh
- rm -rf — Recursive force deletion command in scripts/test-mcp.sh
Permissions Gecti
- Permissions — No dangerous permissions requested
Bu listing icin henuz AI raporu yok.
Capture App Store screenshots for iOS and macOS apps across every required device size in one command. Supports iPhone, iPad, Apple Watch, and Mac.
StoreScreens
Capture App Store screenshots across every required device size in one command. Runs your UI tests on multiple simulators in parallel (or natively on macOS), organizes the output by device and locale, and auto-detects which App Store size each simulator maps to. Supports iPhone, iPad, Apple Watch, and Mac App Store screenshots.
Three pieces, one workflow
StoreScreens ships as three complementary pieces. Most users only need the CLI; the other two exist to make AI coding assistants first-class operators.
| Piece | What it is | When you want it |
|---|---|---|
storescreens (CLI) |
The core binary. Runs UI tests across simulators, captures screenshots, builds the HTML preview gallery. | Always - this is the engine. Use it from your terminal, CI, or scripts. |
storescreens-mcp (MCP server) |
A structured wrapper that exposes the CLI's operations as Model Context Protocol tools with inline progress streaming. | When your AI coding assistant (Claude Code, Cursor, etc.) should drive captures directly instead of parsing CLI output from a Bash call. |
| storescreens-skill | An agent skill - instructions and templates that teach an assistant how to detect your Xcode project, generate config, scaffold UI tests, and run a capture. | When you want an assistant to do the full setup for you, from zero to first screenshots, with no manual steps. Works with any assistant that supports skills. |
Both the CLI and MCP server are installed by brew install storescreens.
How this compares to other Xcode MCP servers
StoreScreens is purpose-built for one job: generating the complete set of App Store Connect screenshots. It is not a general Xcode control surface, and it is not competing with the general-purpose Xcode MCP servers, it complements them.
| Tool | Scope | Best for | App Store screenshot output |
|---|---|---|---|
storescreens |
Narrow. App Store screenshot capture, device-size routing, locale and appearance matrix, HTML preview gallery. | Producing the final screenshot set for App Store Connect in one command. | Yes. Named, organized by device and locale, ready to upload. |
| Apple Xcode MCP (built into Xcode 26.3+) | Xcode-resident tools. Most notably RenderPreview for a single SwiftUI #Preview. |
Checking one view's layout without spinning up a simulator. | No. |
| XcodeBuildMCP | General iOS/macOS build, test, and device interaction driven by xcodebuild. |
Letting an agent compile, test, and debug iOS/macOS projects through a unified MCP interface. | No. |
| xc-mcp | 29 tools covering build, simulator lifecycle, and accessibility-first UI automation. Optimized for low-context agent interactions. | Agents that need to drive the simulator via semantic accessibility queries (fast, token-cheap) instead of parsing screenshots. | No, its screenshot tool is for a single capture, not a full App Store matrix. |
If you are shipping an app, you will likely use StoreScreens alongside one of the general servers: the general server handles build and run, StoreScreens handles the screenshot matrix at the end.
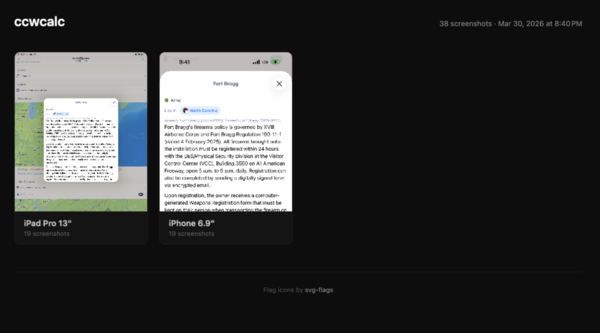
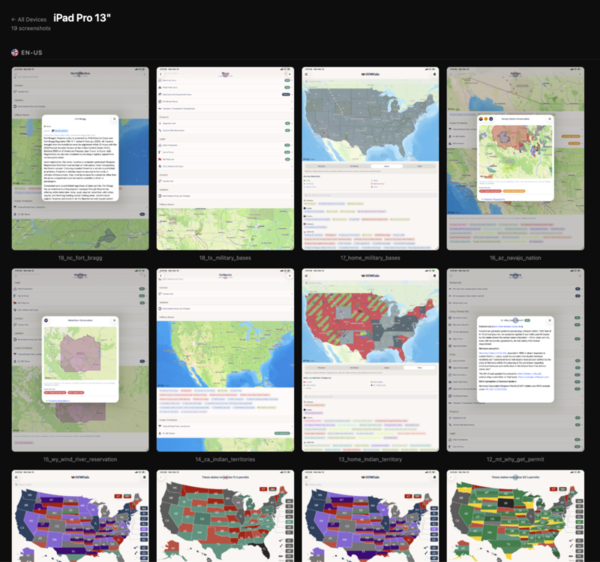
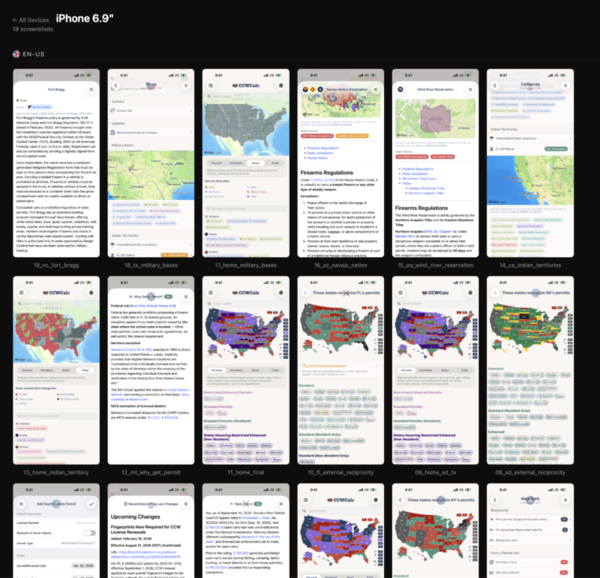
Each run produces a browsable HTML preview with per-device galleries:
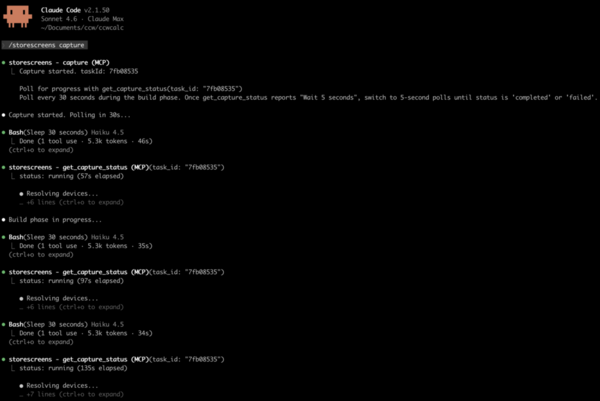
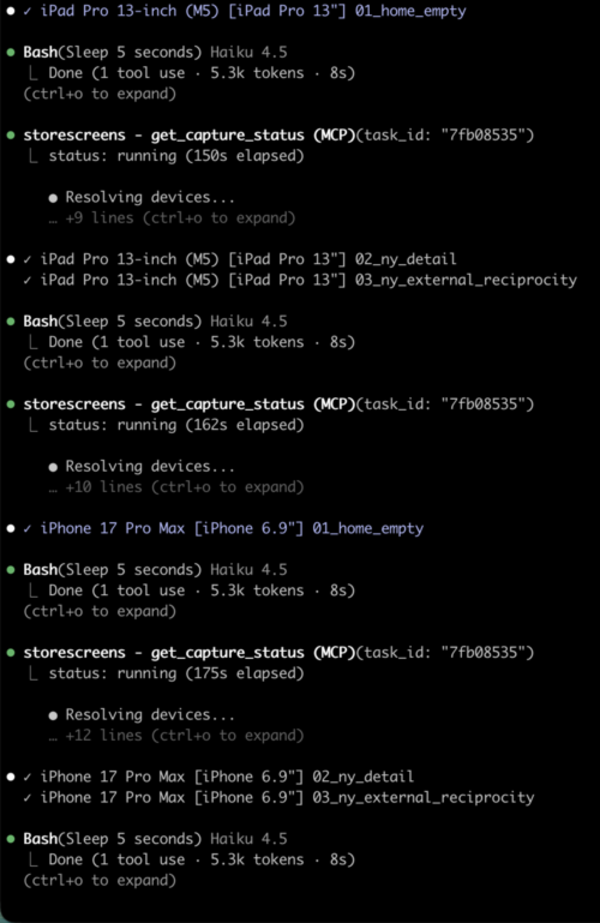
When the MCP server is configured, the agent streams per-screenshot progress inline as each device captures:
Install
Requires macOS 14+ (Sonoma or later) on Apple Silicon (arm64). Intel Macs are not supported in the prebuilt binaries; Intel users can build from source.
Homebrew
brew tap ciscoriordan/tap
brew install storescreens
Script
curl -fsSL https://raw.githubusercontent.com/ciscoriordan/storescreens-cli/main/install.sh | sh
From source
Requires Xcode 16+.
git clone https://github.com/ciscoriordan/storescreens-cli.git
cd storescreens-cli
swift build -c release
sudo cp .build/release/storescreens-cli /usr/local/bin/storescreens
Verify the install worked:
storescreens --help
Quick Start
cd /path/to/your/xcode-project

# 1. Generate a config file
storescreens init

# 2. Generate screenshot UI tests
storescreens setup

# 3. Open the generated test file and add your app navigation (see below)
open MyAppUITests/ScreenshotTests.swift

# 4. Capture screenshots on all devices (--verbose for live output)
storescreens capture --verbose
How it works
The CLI uses XCUITest - Apple's built-in UI testing framework - to drive your app and capture screenshots. A UI test launches your app in a simulator, taps through screens programmatically, and saves screenshots at each step. The CLI then runs that test across every device size in your config.
Do I need a UI test target?
Yes. If your project doesn't have one yet, add it in Xcode:
- File > New > Target
- Select UI Testing Bundle
- Name it something like
MyAppUITests - Make sure it's targeting your app
storescreens setup will detect the target automatically. If none exists, it prints these steps for you.
Using a manually written test file
If you wrote your ScreenshotTests.swift by hand (rather than generating it with storescreens setup), the target setup requires one extra step because Xcode auto-creates a placeholder test file when you add the target:
- File → New → Target → UI Testing Bundle
- Name it to match your
test_targetinstorescreens.yml(e.g.ExampleUITests) - Set Target to be Tested to your app
- Click Finish - Xcode creates the target with a default
ExampleUITestsLaunchTests.swiftplaceholder - Delete the placeholder file Xcode generated (move to Trash)
- Right-click your UI test group in the Project Navigator → Add Files to "[project]"
- Select your
ScreenshotTests.swiftand confirm it is added to theExampleUITeststarget - In
storescreens.yml, settest_targetandtest_classto match:
test_target: ExampleUITests
test_class: ScreenshotTests
Then verify everything builds before running the full capture. Pipe the output to a log file so you can inspect errors:
# Confirm the test target builds and the test is discoverable
xcodebuild build-for-testing \
  -workspace Example.xcworkspace \
  -scheme Example \
  -destination 'platform=iOS Simulator,name=iPhone 17 Pro' \
  2>&1 | tee build.log

# Then capture (--verbose for live terminal output; logs are always saved)
storescreens capture --verbose
The generated test file
storescreens setup asks you to name the screens you want to capture, then generates a test file:
// MyAppUITests/ScreenshotTests.swift

import XCTest

class ScreenshotTests: XCTestCase {
    func testScreenshots() {
        let app = XCUIApplication()
        app.launch()

        takeScreenshot(named: "01_Home")

        // TODO: Navigate to Search Results
        takeScreenshot(named: "02_SearchResults")

        // TODO: Navigate to Detail
        takeScreenshot(named: "03_Detail")

        // TODO: Navigate to Settings
        takeScreenshot(named: "04_Settings")
    }

    func takeScreenshot(named name: String) {
        let screenshot = XCUIScreen.main.screenshot()
        let attachment = XCTAttachment(screenshot: screenshot)
        attachment.name = name
        attachment.lifetime = .keepAlways
        add(attachment)
    }
}
The first screenshot captures whatever's on screen right after launch. Each // TODO is where you add code to navigate to the next screen.
Adding navigation
Replace each TODO with XCUITest calls that interact with your app's UI. Common patterns:
// Tap a tab bar button
app.tabBars.buttons["Search"].tap()

// Tap a navigation link or button
app.buttons["Settings"].tap()

// Tap a list row
app.cells["My Profile"].tap()

// Type into a search field
app.searchFields.firstMatch.tap()
app.typeText("recipes")

// Scroll down
app.swipeUp()

// Wait for content to load
let element = app.staticTexts["Welcome"]
_ = element.waitForExistence(timeout: 5)
A complete example:
func testScreenshots() {
    let app = XCUIApplication()
    app.launch()

    // Home screen - shown right after launch
    takeScreenshot(named: "01_Home")

    // Search - tap the search tab, enter a query
    app.tabBars.buttons["Search"].tap()
    app.searchFields.firstMatch.tap()
    app.typeText("recipes")
    takeScreenshot(named: "02_Search")

    // Detail - tap a result
    app.cells.firstMatch.tap()
    takeScreenshot(named: "03_Detail")

    // Settings - go back, open settings
    app.navigationBars.buttons.firstMatch.tap()
    app.tabBars.buttons["Settings"].tap()
    takeScreenshot(named: "04_Settings")
}
You can test your navigation works before running the full capture - just run the test in Xcode with Cmd+U or click the diamond next to the test function.
Accessibility identifiers
UI tests find elements by accessibility identifier, text label, or type. Always prefer .accessibilityIdentifier() over matching by text - text labels can appear in multiple places (e.g. your app name on both the launch screen and the main toolbar), causing tests to match the wrong element or pass prematurely.
Add identifiers to your SwiftUI views:
// Buttons and interactive elements
Button("Save") { ... }
  .accessibilityIdentifier("saveButton")

// Loading indicators - so tests can wait for loading to finish
ProgressView()
  .accessibilityIdentifier("loadingIndicator")

// Content containers - so tests can wait for content to appear
ScrollView { ... }
  .accessibilityIdentifier("mainContent")

// Toolbar items
ToolbarItem(placement: .topBarLeading) {
  Button { ... } label: { Image(systemName: "gear") }
    .accessibilityIdentifier("settingsButton")
}

// Search fields
TextField("Search", text: $query)
  .accessibilityIdentifier("searchField")
Then in your test, wait for elements by identifier instead of using sleep():
// Bad: fragile timing, screenshots may capture loading spinners
sleep(5)
takeScreenshot(named: "01_Home")

// Good: waits for actual content to load
waitForElement(id: "mainContent", timeout: 15)
takeScreenshot(named: "01_Home")
The generated waitForElement() helper searches all element types by accessibility identifier, so it works for buttons, text, scroll views, or any other element.
Common pitfall: If your app name (e.g. "MyApp") appears as Text("MyApp") in both LaunchScreen.swift and your main view's toolbar, a test like app.staticTexts["MyApp"].waitForExistence(timeout: 10) will match the launch screen text and proceed before your main content loads. Use a unique identifier instead:
// In your main view:
Text("MyApp")
  .accessibilityIdentifier("mainTitle")

// In your test:
app.staticTexts["mainTitle"].waitForExistence(timeout: 10)
How screenshots are saved
By default, screenshots are collected from the filesystem. Your test code writes PNGs directly to a cache directory, and the CLI copies them to the output folder after the test finishes.
The generated takeScreenshot() helper does two things:
- Creates an
XCTAttachment(stored in the.xcresultbundle as a backup) - Writes a PNG file to the StoreScreens cache directory on the host filesystem
The CLI reads the cache directory from a breadcrumb file at ~/.storescreens-cache-dir, which it writes before each capture run. Your test code discovers this path using SIMULATOR_HOST_HOME:
let hostHome = ProcessInfo.processInfo.environment["SIMULATOR_HOST_HOME"]
    ?? ProcessInfo.processInfo.environment["HOME"]
    ?? NSHomeDirectory()
let breadcrumb = (hostHome as NSString).appendingPathComponent(".storescreens-cache-dir")
let cacheDir = try? String(contentsOfFile: breadcrumb, encoding: .utf8)
    .trimmingCharacters(in: .whitespacesAndNewlines)
Intermediate screenshots and named pipes for real-time logging are stored in .storescreens-cache/ in your project directory. Add it to .gitignore:
.storescreens-cache
Why filesystem over xcresult?
Filesystem capture is the primary path because it gives you things xcresult export can't:
- Streaming progress - PNGs land one-by-one as the test runs, so the MCP server streams per-screenshot updates to your AI assistant.
xcresulttool exportonly runs after the entire test finishes, so progress is all-or-nothing. - Incremental safety - if the test crashes partway through, you still get every screenshot captured before the crash.
- Deterministic filenames - you pick the name.
xcresulttoolappends_N_UUID.pngto every attachment, which has to be regex-stripped back to the original name. - No silent skip rules -
xcresulttoolsilently drops attachments whose names start withScreenshot,UI Snapshot,Synthesized Event,Screen Recording, and several others. Filesystem writes are always kept, no matter what you name them. - Faster - no post-processing step after the test finishes.
The tradeoff: filesystem capture only works on simulators, because it relies on SIMULATOR_HOST_HOME to cross the sandbox boundary back to your Mac. App Store screenshots are simulator-only anyway, so this rarely matters.
If you need to capture on real devices, or you want attachments visible in Xcode's built-in test report UI, pass --xcresult instead:
storescreens capture --xcresult
Screenshot mode in your app
Your app can detect when it's being run by StoreScreens and adjust its behavior accordingly. The generated test file launches your app with --screenshotMode as a launch argument:
app.launchArguments = ["--screenshotMode"]
Check for this in your app to set up the ideal state for screenshots:
// In your root view or app entry point
.task {
    if ProcessInfo.processInfo.arguments.contains("--screenshotMode") {
        // Grant pro/premium access so screenshots show full features
        settings.isProUser = true

        // Disable animations for faster, deterministic screenshots
        UIView.setAnimationsEnabled(false)

        // Reset any persisted UI state (e.g., expansion toggles, onboarding)
        UserDefaults.standard.set("", forKey: "expandedSections")
    }
}
Common things to configure in screenshot mode:
- Simulate pro/premium access - show the full app without paywalls. Make sure your entitlement checks don't override this (skip StoreKit verification in screenshot mode).
- Disable animations - makes UI interactions instant and screenshots deterministic.
- Reset UI state - clear persisted toggles, expansion states, or onboarding flags so tests always start from a known state.
- Seed sample data - pre-populate the app with good-looking content if it would otherwise be empty on first launch.
Simple mode (no tests needed)
If you don't want to write UI tests, use simple mode instead:
storescreens capture --mode simple
This boots each simulator, installs and launches your app, and takes a single screenshot of whatever's on screen. Good for capturing your launch screen or a static state.
Commands
| Command | Description |
|---|---|
storescreens init |
Generate a storescreens.yml config file |
storescreens setup |
Set up screenshot UI tests (interactive wizard) |
storescreens capture |
Capture screenshots on all configured devices |
storescreens check |
Scan source for iPad-unsafe patterns and device assumptions |
storescreens list |
Show available simulators and App Store size mappings |
storescreens screenshot |
Take a quick screenshot of a running simulator |
storescreens --help |
Show help and available commands |
storescreens init
Generates a storescreens.yml config file by auto-detecting your project:
- Finds your
.xcodeprojor.xcworkspace - Detects your scheme and deployment target
- Picks simulators that match required App Store sizes and are compatible with your deployment target
- Warns if any required sizes are missing
storescreens init              # generate config
storescreens init --force      # overwrite existing config
storescreens setup
Interactive wizard that generates a screenshot test file and wires it into your config. It scans your Swift source to auto-discover screens from TabView, NavigationLink, .sheet, .fullScreenCover, and Navigator route patterns.
$ storescreens setup

Project Detection
  ✓ Found project: MyApp.xcodeproj
  ✓ Detected scheme: MyApp

UI Test Target
  ✓ Found UI test target: MyAppUITests

Screenshot Screens
  Found 4 screens in your source code:
    1. Home (TabView)
    2. Search (TabView)
    3. Settings (NavigationLink)
    4. Profile (sheet)

  Press Enter to use these, or type your own (comma-separated)
  >
  ✓ Using discovered screens.

  ✓ Wrote MyAppUITests/ScreenshotTests.swift (4 screenshots)
  ✓ Updated storescreens.yml
If no screens are found in your source, it falls back to asking you to type them manually. If no UI test target exists, it prints step-by-step instructions to create one in Xcode.
Use --non-interactive to skip prompts and use auto-discovered screens (or defaults if none found).
storescreens capture
Captures screenshots using one of two modes.
XCTest mode (default) - runs your UI tests, collects screenshots written to the filesystem by your test code. Use --verbose to see full xcodebuild output in the terminal (logs are always saved to the output directory either way):
storescreens capture --verbose
How it works:
- Runs
xcodebuild teston each target simulator - Your test code writes screenshots as PNGs to a shared cache directory
- The CLI collects PNGs from the cache and organizes them into folders by device size
Simple mode - boots each simulator, installs your app, and takes a raw screenshot of whatever's on screen:
storescreens capture --mode simple
Useful if you don't have UI tests and just want a quick capture of your launch screen.
Options:
| Flag | Description |
|---|---|
--mode xctest|simple |
Capture mode (default: xctest) |
--config PATH |
Config file path (default: storescreens.yml) |
--output DIR |
Override output directory |
--locale LOCALE |
Override locales (repeatable) |
--retries N |
Retry failed test runs per device |
--keep-alive |
Keep simulators running after capture |
--xcresult |
Extract screenshots from .xcresult bundle instead of filesystem |
--only PREFIXES |
Only capture screenshots matching these prefixes (comma-separated) |
--skip-check |
Skip preflight source code check |
--verbose |
Stream full xcodebuild output to terminal (logs are always saved to logs/) |
storescreens check
Scans your Swift source files for patterns that can crash or break on iPad and other device-specific assumptions. Runs automatically before every storescreens capture unless disabled.
$ storescreens check

Preflight Check
  iPad detected in config - running iPad-specific checks
✗ Views/ContentView.swift:47  [toolbar-tabbar-hidden]
    .toolbarVisibility(.hidden, for: .tabBar) without iPad guard - may crash on iPad
! Views/CardView.swift:89  [hardcoded-screen-dimensions]
    Possible hardcoded iPhone screen dimension (390) - use GeometryReader instead

1 error, 1 warning found
Errors block capture. Use --skip-check to bypass.
Detection rules:
| Rule | Severity | What it catches |
|---|---|---|
toolbar-tabbar-hidden |
Error | .toolbarVisibility(.hidden, for: .tabBar) without an iPad device check - can crash on iPad |
unguarded-cloudkit |
Error | CKContainer/CKDatabase usage without an accountStatus check, error handling, or UI-testing guard - crashes in simulator without iCloud account |
uiscreen-main-bounds |
Warning | UIScreen.main.bounds - deprecated, doesn't handle iPad split view or multiple scenes |
hardcoded-screen-dimensions |
Warning | Literal iPhone screen sizes (390, 844, etc.) used in layout context |
navigation-view-stack |
Warning | .navigationViewStyle(.stack) forces stack navigation on iPad |
iPad-specific rules only fire when an iPad is in your configured device list. The scanner is guard-aware - it won't flag .toolbarVisibility(.hidden, for: .tabBar) if it finds a UIDevice / userInterfaceIdiom check in the surrounding lines, and it won't flag CloudKit usage if the file contains an isUITesting guard, accountStatus check, try/catch, or screenshotMode launch argument check.
| Flag | Description |
|---|---|
--config PATH |
Config file path (default: storescreens.yml) |
--directory DIR |
Directory to scan (default: .) |
--verbose |
Show verbose output |
storescreens list
Shows available simulators and which App Store size they map to. By default, only shows devices that match a known App Store size (excludes Apple Watch).
$ storescreens list

Available Simulators
  Name                    State     App Store Size
  ──────────────────────────────────────────────────
  iPad Pro 13-inch (M5)   Shutdown  iPad Pro 13"
  iPhone 17 Pro Max       Shutdown  iPhone 6.9"
  iPhone 17 Pro           Shutdown  iPhone 6.3"
  iPhone 16 Plus          Shutdown  iPhone 6.7"
  ...
| Flag | Description |
|---|---|
--all |
Show all simulators, including non-App Store sizes |
--include-watch |
Include Apple Watch simulators |
--include-mac |
Show Mac App Store screenshot sizes |
--json |
Machine-readable output |
storescreens screenshot
Takes a quick screenshot of a running simulator's current screen. No build, no tests - just captures whatever is on screen and saves it to a file. Intended for quick visual checks during UI development.
# Screenshot the first booted simulator
storescreens screenshot

# Screenshot a specific simulator
storescreens screenshot --simulator "iPhone 17 Pro" --output screenshot.png

# Boot the simulator if it's not running
storescreens screenshot --simulator "iPhone 17 Pro" --boot
| Flag | Description |
|---|---|
--simulator NAME |
Simulator name (default: first booted simulator) |
--udid UDID |
Simulator UDID (alternative to --simulator) |
--output PATH |
Output file path (default: screenshot.png) |
--boot |
Boot the simulator if it's not already running |
--verbose |
Show verbose output |
Configuration
storescreens.yml:
project: "MyApp.xcodeproj"
scheme: "MyApp"

devices:
  - simulator: "iPhone 17 Pro Max"
  - simulator: "iPhone 17 Pro"
  - simulator: "iPad Pro 13-inch (M5)"
  # macOS devices run tests natively (no simulator)
  # - simulator: "Mac 2560x1600"
  #   platform: macOS

# Multiple locales (optional) - runs the full capture once per locale
# locales:
#   - en-US
#   - ja
#   - de-DE

output_dir: "./storescreens-output"

# XCTest mode: which tests to run
test_target: MyAppUITests
test_class: ScreenshotTests

# Preflight source code check (default: true)
# preflight: false
All values can be overridden via CLI flags.
Full config reference# Project or workspace (one required)
project: "MyApp.xcodeproj"
# workspace: "MyApp.xcworkspace"
scheme: "MyApp"
devices:
- simulator: "iPhone 17 Pro Max"
- simulator: "iPhone 17 Pro"
- simulator: "iPad Pro 13-inch (M5)"
# macOS: tests run natively, no simulator needed
# - simulator: "Mac 2560x1600"
# platform: macOS
# Per-device test selection: restrict a device to specific test methods,
# overriding the top-level test_class. Useful for iPad-only or iPhone-only
# screenshots that render poorly on the other form factor.
# - simulator: "iPad Pro 13-inch (M5)"
# tests:
# - testLandscapePolytonic # shorthand, expanded to test_target/test_class/method
# - LandscapeTests/testFoo # class-qualified, expanded to test_target/LandscapeTests/testFoo
# - MyAppUITests/Other/testBar # fully qualified, passed through verbatim
# Locales - runs full capture once per locale
locales:
- en-US
- ja
- de-DE
# Custom flags for the HTML preview gallery (optional).
# Keys are Xcode locale codes. Values are either:
# - A filename (without .svg) from ciscoriordan/svg-flags/circle/languages/
# - A full https:// URL, used as-is
# Merged with built-in defaults; your values win on collisions.
# locale_flags:
# en-IN: in-en
# hi: in-hi
# custom: https://example.com/my-flag.svg
# Filter screenshots by XCTAttachment name
# screenshots:
# - "01_HomeScreen"
# - "02_Settings"
output_dir: "./storescreens-output"
# Run history: 1 = overwrite (default), 0 = keep all, N = keep last N
# keep_runs: 1
# XCTest mode
test_target: MyAppUITests
test_class: ScreenshotTests
# Simple mode: launch arguments (not supported for macOS devices)
# launch_arguments:
# - "--uitesting"
# - "--reset-state"
# Preflight source code check before capture (default: true)
# Scans for iPad-unsafe patterns. Use --skip-check to bypass per-run.
# preflight: true
# Upload after capture (default: false)
# upload: true
App Store Connect Screenshot Sizes
StoreScreens labels devices by physical screen dimension (6.9", 6.3", etc.). Here's how those map to what App Store Connect requires:
| App Store Connect slot | StoreScreens size | Simulator to use |
|---|---|---|
| 6.9" (primary required) | 6.9" | iPhone 17 Pro Max |
| 6.5" (auto-filled from 6.9") ¹ | 6.5" | iPhone 11 Pro Max, iPhone Xs Max ² |
| 6.3" | 6.3" | iPhone 17 Pro, iPhone 17, iPhone Air |
| 6.1" | 6.1" | iPhone 16, iPhone 15 |
| 5.5" | 5.5" | iPhone 8 Plus |
| 4.7" | 4.7" | iPhone SE (3rd generation) |
| iPad 13" (required when iPad supported) | iPad Pro 13" | iPad Pro 13-inch (M5) |
| iPad 11" | iPad Pro 11" | iPad Pro 11-inch (M5) |
| iPad Pro 12.9" (2nd Gen) | iPad Pro 12.9" | iPad Pro 12.9-inch (2nd generation) ³ |
| iPad 10.5" | iPad 10.5" | iPad Air (3rd generation) ³ |
| iPad 9.7" | iPad 9.7" | iPad (6th generation) ³ |
No 6.7" slot exists in App Store Connect.
¹ 6.5" is auto-filled - providing 6.9" screenshots causes App Store Connect to automatically use them for the 6.5" slot too. A dedicated 6.5" simulator is only needed if you want distinct screenshots for that slot.
² 6.5" (1242×2688) is the iPhone XS Max / 11 Pro Max resolution. No current simulator produces it - only these older simulators do.
³ Older iPad slots (12.9" 2nd Gen, 10.5", 9.7") require older simulator runtimes that may not be installed. Most apps only need the 13" slot.
Mac App Store
macOS apps don't use simulators. XCUITests run natively on the Mac. Add macOS devices to your config with platform: macOS:
devices:
  - simulator: "Mac 2560x1600"
    platform: macOS
| Mac App Store slot | StoreScreens size | Notes |
|---|---|---|
| 2880x1800 | Mac 2880x1800 | 15" Retina (MacBook Pro 15") |
| 2560x1600 | Mac 2560x1600 | 13" Retina (MacBook Pro 13", Air M1+) |
| 1440x900 | Mac 1440x900 | Non-Retina |
| 1280x800 | Mac 1280x800 | Minimum required |
macOS XCUITests set the app window size in test code before capturing. Your test should resize the window to the target screenshot dimensions. Example:
// In your ScreenshotTests.swift for macOS
let app = XCUIApplication()
app.launch()

// Resize the window to match the target screenshot size
let window = app.windows.firstMatch
window.frame = CGRect(x: 0, y: 0, width: 1280, height: 800)
Use storescreens list --include-mac to see available Mac App Store sizes.
References:
Output
Screenshots are organized by device size (and locale/appearance if configured), along with an HTML preview and build logs:
storescreens-output/
├── preview.html                    ← index page (card grid linking to each page below)
├── preview_iPhone_6.9_light.html   ← per-device/appearance screenshot gallery
├── preview_iPhone_6.9_dark.html
├── preview_iPad_Pro_13_light.html
├── manifest.json
├── logs/
│   └── test-a1b2c3d4.log          ← per-device build + test output (one per simulator)
├── light/
│   ├── iPhone_6.9_01_Home.png
│   ├── iPhone_6.9_02_SearchResults.png
│   ├── iPad_Pro_13_01_Home.png
│   └── ...
├── dark/
│   └── ...
When capture completes successfully, preview.html automatically opens in your default browser. Each card links to a detail page for that device size and appearance. When multiple locales are configured, each locale section is labeled with its country/language flag.
If you run a new capture that only covers some device/appearance combinations, preview pages from the previous run are kept and labeled "from older run" with their timestamp in the index.
With locales enabled, a locale directory is added:
storescreens-output/
├── en-US/
│   ├── light/
│   │   ├── iPhone_6.9_01_Home.png
│   │   ├── iPad_Pro_13_01_Home.png
│   │   └── ...
│   └── dark/
│       └── ...
├── ja/
│   └── ...
└── de-DE/
    └── ...
Build Logs
Every capture run saves full xcodebuild output to logs/ in the output directory:
test-<id>.log- one per device, containing the full build + test output (compiler errors, element lookups, assertion failures, test durations)test-debug-<id>.log- debug prints from your test code, if you write to the StoreScreens named pipe
When something goes wrong, check these logs first - the root cause is almost always visible in the xcodebuild output. Use --verbose to also stream xcodebuild output to the terminal in real time.
Event flow diagram
This shows what fires during a capture run and where each piece ends up:
xcodebuild (build phase)
  └── stdout ──────────────────────────────────────→ logs/test-<id>.log
                                                       (always saved; --verbose also prints to terminal)

xcodebuild (test execution phase)
  └── writes to .xcresult bundle (no stdout)            ← why terminal goes silent during tests

Your ScreenshotTests.swift
  ├── takeScreenshot() writes PNG ─────────────────→ .storescreens-cache/<Device>/<name>.png
  │     (host filesystem, via SIMULATOR_HOST_HOME breadcrumb)    ↑
  │                                                    live watcher polls this dir every 500ms
  └── print() → storescreens named pipe ───────────→ logs/test-debug-<id>.log

CaptureOrchestrator emits CaptureEvent
  ├── .phase(msg)              → "● msg"
  ├── .deviceLog(device, msg)  → "  msg"  ← xcodebuild stdout (non-TTY/MCP only)
  ├── .screenshotCaptured(…)   → "  ✓ device [slot] name"  ← live watcher (non-TTY) or
  │                                                            organizeFromFilesystem (TTY/CLI)
  ├── .deviceCompleted(…)      → "✓ device: N screenshots"
  ├── .deviceFailed(…)         → "✗ device: error"
  └── .preflightFinding(…)     → "⚑ check:rule - message"

MCP (storescreens-mcp) - get_capture_status
  ├── recent meaningful events from AsyncTaskStore   ← the events above
  ├── tailDeviceLogs()  when silent >60s ───────────→ reads logs/test-<id>.log tail
  └── scanDeviceLogs()  always ─────────────────────→ scans logs/test-<id>.log for errors
Locales
When locales is set in your config:
- XCTest mode: passes
-testLanguageand-testRegiontoxcodebuild, so your app launches in the target language without modifying simulator settings. - Simple mode: modifies the simulator's language preferences and reboots before capturing.
Filtering Screenshots
Use --only to capture a subset of screenshots without modifying your test code. Pass a comma-separated list of prefixes - only screenshots whose names match will be captured:
# Only capture screenshots starting with "14" or "18"
storescreens capture --only 14,18

# More specific prefixes
storescreens capture --only 14_ca_indian,18_tx_military
The filter works by writing a filter file that the test reads at runtime. Navigation still runs for all screenshots (maintaining test state), but takeScreenshot returns early for non-matching names. The filter file is automatically cleaned up after capture completes.
Retries
Simulators can be flaky. Use --retries to automatically retry failed test runs:
storescreens capture --retries 2
Run History
By default, each successful capture replaces the previous output. Failed runs preserve the last good output.
Change this with keep_runs in your config:
| Value | Behavior |
|---|---|
1 (default) |
Overwrite on success. Failed runs keep previous output. |
0 |
Keep all runs in timestamped directories. |
N |
Keep the last N runs. |
With history enabled, a latest symlink always points to the most recent successful run.
Device Size Detection
The CLI reads screen dimensions directly from Xcode's CoreSimulator device profiles at runtime - no hardcoded device list. When Apple releases new devices with existing screen sizes (e.g., iPhone 18 Pro Max with the same resolution as iPhone 17 Pro Max), they appear seamlessly under the correct App Store size category. Devices with entirely new screen sizes are detected automatically and shown with their raw dimensions (e.g., iPhone 1440x3120).
To get friendly display names for new screen sizes (e.g., iPhone 7.1"), update the CLI via Homebrew:
brew upgrade storescreens
Real-Time Test Logging
When your UI tests write to the StoreScreens named pipe, the CLI displays progress in real time:
                  ✓ iPhone 17 Pro Max -> iPhone 6.9"

Building for testing...
✓ Build succeeded

Booting 1 simulators...
✓ Booted iPhone 17 Pro Max

Overriding status bar...
✓ Status bar overridden

Warming up app (10s for setup)...
✓ Launched on iPhone 17 Pro Max
✓ Warmup complete

Running tests on 1 simulators...
  ▸ Launching app with --screenshotMode
  ▸ Waiting for deck list...
  ▸ Deck list ready
  ▸ [1/8] Deck Selection
  ▸ Captured screenshot 01_DeckSelection
  ▸ [2/8] Country/Region Picker
  ▸ Tapping 'Select region' button
Preflight Check
Every storescreens capture run automatically scans your Swift source for common issues before building. This catches problems like unconditional tab bar hiding (which crashes on iPad) before you waste time on a full build + test cycle.
The check is device-aware - iPad-specific rules only run when your config includes an iPad device. If you only capture iPhone screenshots, iPad rules are skipped entirely.
To disable the automatic check, either:
- Add
preflight: falseto yourstorescreens.yml - Pass
--skip-checkto a single capture run
You can also run the check independently:
storescreens check                          # uses storescreens.yml for device context
storescreens check --directory ./MyApp      # scan a specific directory
Agent Skill
Use storescreens-skill to let an AI coding assistant handle the full setup - project detection, config generation, UI test scaffolding, and capture - automatically. The skill also supports targeted screenshots for quick visual checks during development.
Works with Xcode MCP (Xcode 26.3+)
StoreScreens complements Xcode's built-in MCP server. When both are available, the agent can pick the right tool for each situation:
- Xcode
RenderPreview- check a single SwiftUI#Previewin isolation (no simulator needed) - StoreScreens
take_screenshot- capture the full running app in a simulator (<1 second) - StoreScreens
capture- full App Store screenshot suite across multiple devices, locales, and appearances
Alternatives
This tool is for native Apple platforms (iOS, iPadOS, watchOS, macOS). For cross-platform screenshot automation (Android, React Native, Flutter), use fastlane.
License
MIT © 2026 Francisco Riordan
Yorumlar (0)
Yorum birakmak icin giris yap.
Yorum birakSonuc bulunamadi