red-clippy
Health Pass
- License — License: GPL-3.0
- Description — Repository has a description
- Active repo — Last push 0 days ago
- Community trust — 18 GitHub stars
Code Fail
- rm -rf — Recursive force deletion command in .github/workflows/release.yml
Permissions Pass
- Permissions — No dangerous permissions requested
No AI report is available for this listing yet.
open-source pentest management built to be operated by an AI agent
Red Clippy
Your agent tests. Red Clippy keeps the record.
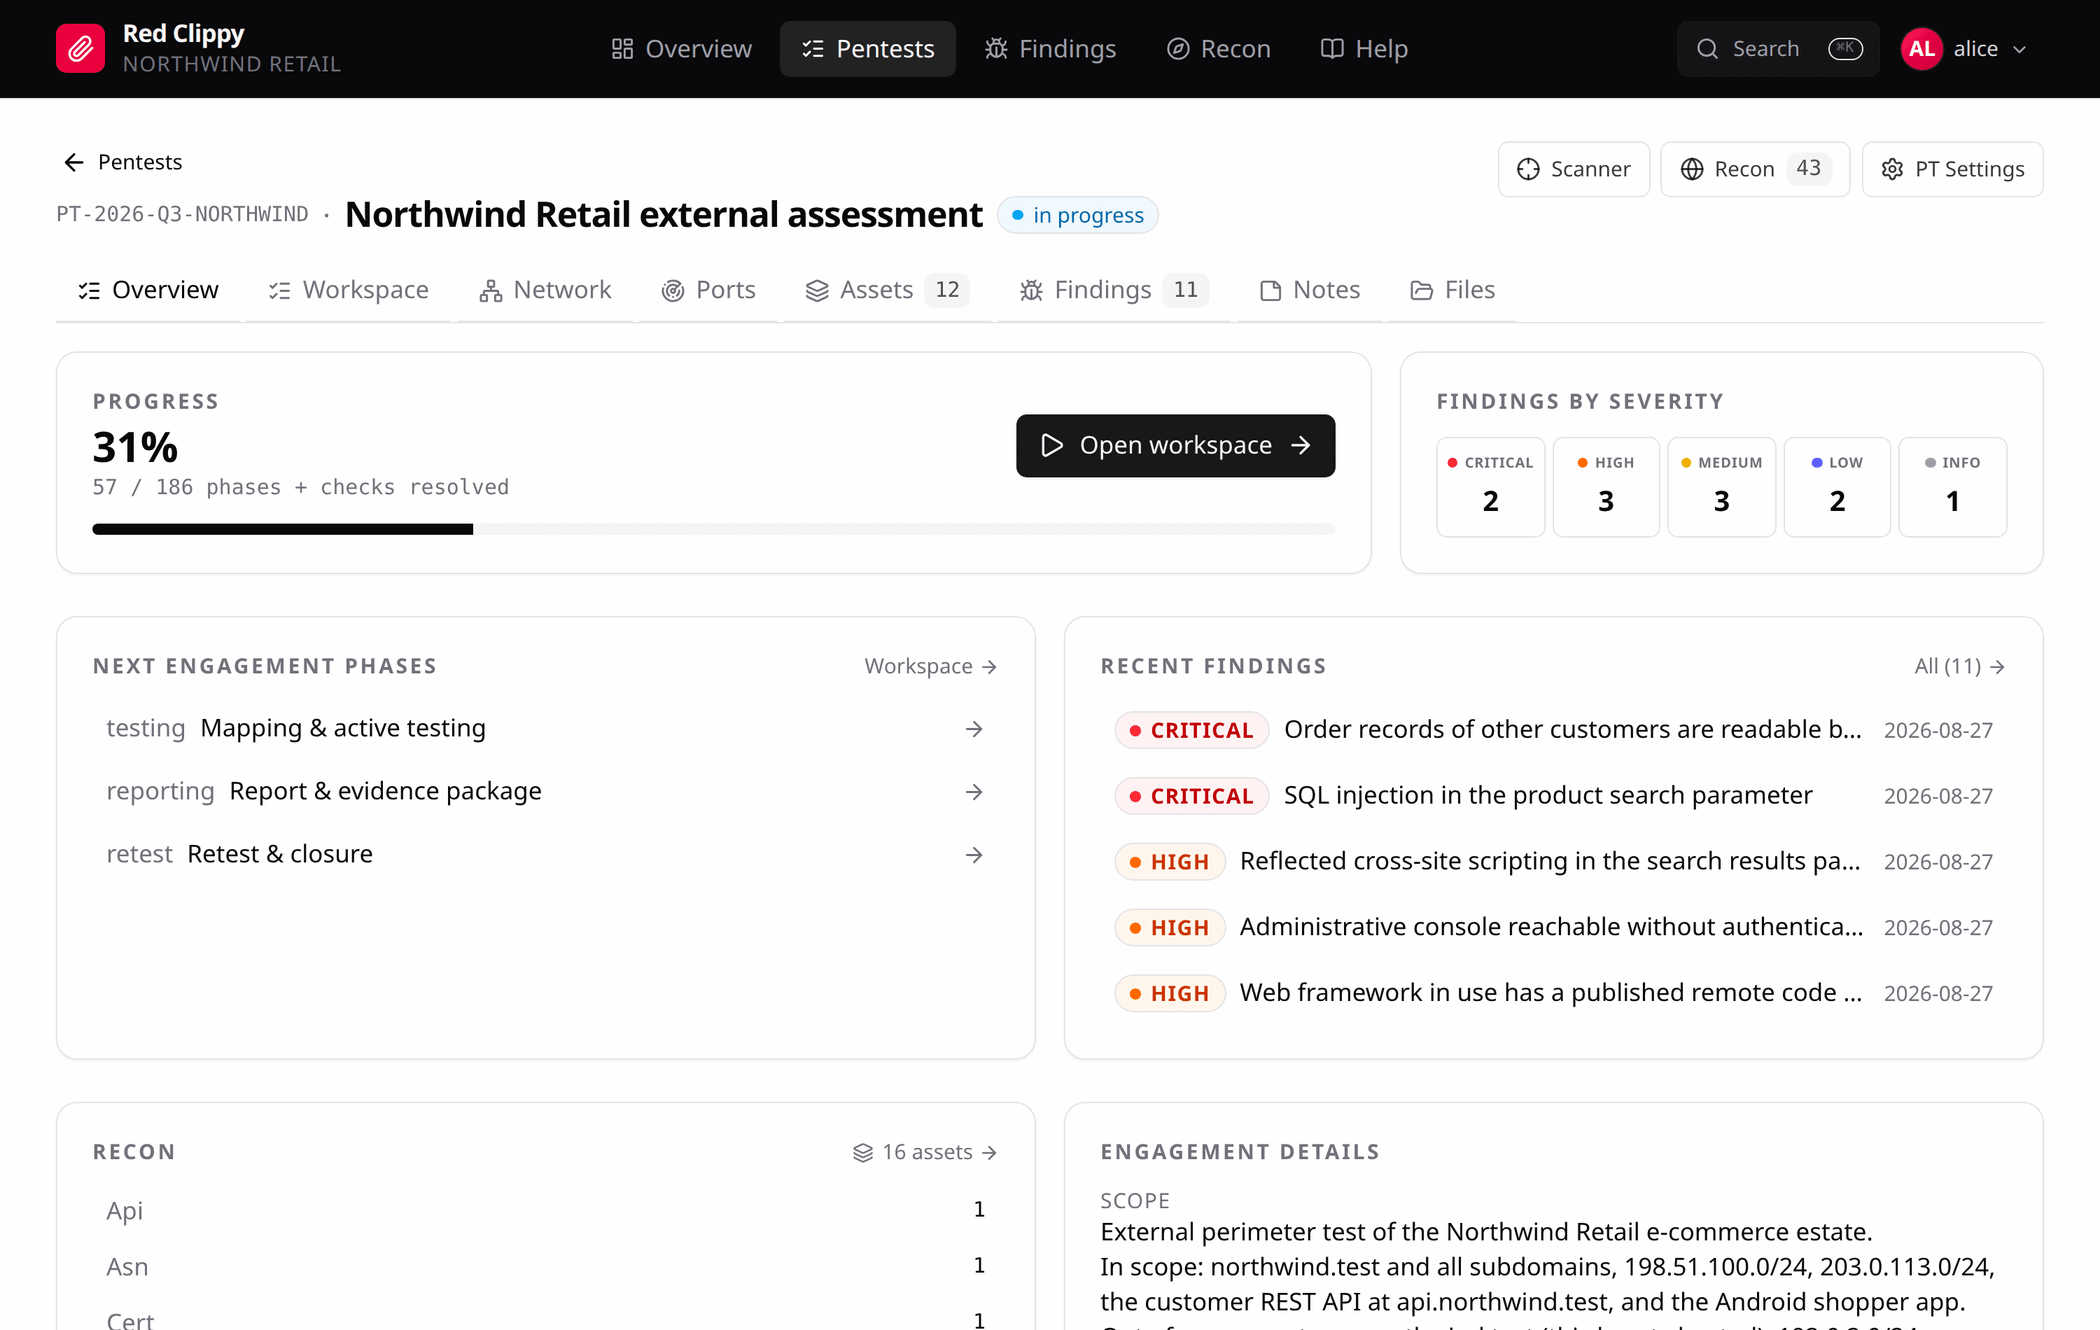
Open-source pentest management built to be operated by an AI agent. Connect it
to Claude Code over MCP and it runs the engagement alongside you: scope and
assets, recon observations, methodology coverage, and findings with CVSS and
evidence.
Built for testers who want an agent's speed without giving up the discipline
of a real engagement. Work does not get repeated, findings do not evaporate
between sessions, and nothing reaches the report that was never proved.
Full documentation: https://cspf-founder.github.io/red-clippy/
Contents
- Why
- Quick start
- How the data is organized
- First run
- Using it
- Connecting an AI agent (MCP)
- Features
- Configuration
- CLI reference
- Building from source
- Development
- Contributing
- License
Why
Coding agents have become genuinely useful testers. They have a shell, they
run the same tooling you do, and they cover ground fast. Point one at a target
and it will find things.
Then the context window fills up, and the engagement is gone. The next session
rescans hosts it already cleared, re-tests what it already ruled out, and
cannot tell you which parts of the scope were ever touched. Somewhere in the
transcript is a confirmed SQL injection nobody wrote down.
Red Clippy fixes that by giving the agent two things it does not have on its
own.
A place to put the work. Every asset, observation, check, and finding
lands in a database as testing happens, not in a scrollback buffer. Coverage
becomes a query instead of a memory: which assets exist, which checks are
cleared on each, what has already been reported. Tomorrow's session picks up
exactly where the last one stopped.
Rules to work by. A Red Team Instructions document reaches the agent in
the MCP handshake, before it does anything: verify before reporting, prove
every claim, take the minimum access needed to demonstrate impact, leave
third-party systems alone. Override it per organization and per engagement,
because house rules differ between teams and clients.
You stay in the loop the whole time. Everything the agent writes is an
ordinary row in the web UI that you can review, correct, reclassify, or throw
away.
[!CAUTION]
Authorized testing only. Red Clippy is for penetration testers working
under an engagement. Test only systems you own or have explicit written
permission to assess. Scope marking and the Red Team Instructions exist to
keep an agent inside the rules of engagement, but they are guardrails, not
authorization. An agent acts on your authority, and you remain responsible
for everything it does.
Quick start
Download a binary from the
latest release and run
it. It sets up the database and serves the panel on 127.0.0.1:7337.
Linux
tar xzf red-clippy-*-x86_64-unknown-linux-musl.tar.gz
cd red-clippy-*-x86_64-unknown-linux-musl
./red-clippy serve
Windows
Unzip the archive, then from that folder:
.\red-clippy.exe serve
Open http://127.0.0.1:7337 and the setup wizard takes over from there.
The database is created in the directory where you run the binary. Uploaded
evidence is stored there too, in red-clippy-storage. Both paths can be
changed in the config file, see Configuration.
Prefer to compile it yourself? See
Building from source.
How the data is organized
Red Clippy groups work into organizations. An organization holds your
pentests, and each pentest holds the assets, findings, and evidence for that
engagement. If you test for one company, a single organization is all you
need. If you consult for several clients, give each client its own: an
organization sees nothing belonging to another, so their engagements never mix.
An organization has two names. The display name ("XYZ Example Corp") is
what you see in the panel and can be changed later. The slug (xyz) is a
short lowercase identifier used in the evidence folder on disk
(red-clippy-storage/org_xyz/pentest_PT-2026-08-27/), so it is fixed once
set.
You can belong to several organizations and switch between them from the
avatar menu. In each one you are either an owner, who can add and remove
people and rename or delete the organization, or a member, who works the
engagements.
First run
On first launch the database is empty, so the browser shows a setup wizard
instead of a login form. It asks for:
- a slug and display name for your first organization
- a username, and optionally an email
- a password (minimum 8 characters)
The account it creates is the owner of that organization. The wizard only
appears while the database has no users; once the first account exists it is
permanently disabled, so it cannot be used to create extra accounts later.
After setup, manage organizations and teammates in the app under
avatar menu > Organizations.
If nobody can sign in, the CLI is the way back:
red-clippy reset-password --username alice --password 'new-one'
Using it
The intended flow is agent-driven. You set up the engagement, then work
through the target with Claude Code while it keeps the record.
You set up:
- Create a pentest. Code, scope, dates. The methodology checklist is
seeded automatically. - Define scope. Add the domains, hosts, and IP ranges you are authorised
to test, and mark anything explicitly out of scope. You can type these in
yourself, or paste the client's scope list to the agent and have it enter
them for you. - Connect the agent over MCP, pinned to this engagement (see below).
The agent then works, and records as it goes:
- Runs recon and testing tools from its own shell, the way it normally would.
- Hands raw scanner output over with
ingest_tool_output, or writes assets
and observations directly. - Promotes real scope units to assets, leaves the rest as observations.
- Marks methodology checks as it clears them.
- Files findings with CVSS, PoC, and evidence attached.
You supervise:
- Watch it land in the browser in real time.
- Correct anything: every row the agent wrote is an ordinary record you can
edit, reclassify, or delete. - Check the coverage view for what is still untouched.
- Review on the cross-engagement dashboard, which shows every finding in the
organization alongside the pentest it came from.
The agent is optional. It works through the same API the panel does, so
anything it records you can also enter, correct, or delete yourself in the
browser. Run an engagement entirely by hand, entirely through the agent, or
switch between the two as you go.
Connecting an AI agent (MCP)
This is the main way Red Clippy is meant to be used.
red-clippy mcp covers the whole application: scope and assets,
observations, methodology coverage, findings, evidence, the attack graph, and
tool-output ingestion. A connected agent works the engagement rather than just
answering questions about it.
On connect, the server hands the client the Red Team Instructions document,
the operating doctrine for how to behave during testing, in the MCP handshake,
so it is in the agent's context before the first tool call. It resolves
most-specific-first, from a per-engagement override, to an organization
default, to the built-in document. Edit the org default under
Settings > Red Team Instructions, or set a per-engagement override from
the pentest's settings page. get_instructions re-reads it on demand.
Create an API key
Issue one under Settings > API keys. The Connect MCP section below it
then gives you ready-to-paste config for each client, with that key, this
server's URL, and the binary's own path already filled in. There is nothing to
substitute by hand.
To create the key from the CLI instead, and paste it into the snippets
yourself:
red-clippy create-api-key --username alice --org xyz --name laptop
# -> rcl_<prefix>_<secret>   (shown once, store it now)
Claude Code
claude mcp add red-clippy \
  --env RED_CLIPPY_URL=http://127.0.0.1:7337 \
  --env RED_CLIPPY_API_KEY=rcl_xxxx_yyyy \
  -- /path/to/red-clippy mcp
The name after add is only a label Claude Code shows. The command after --
is what it actually launches, so use the binary's full path: Claude Code will
not necessarily find red-clippy on its PATH. If you copy the command from
Connect MCP in the panel, the right path is already filled in.
z.ai GLM
z.ai serves an Anthropic-compatible endpoint, so Claude Code can drive Red
Clippy with GLM instead of an Anthropic model.
Add this to Claude Code's settings: .claude/settings.local.json inside your
working folder to scope it to one engagement, or ~/.claude/settings.json to
apply it everywhere.
{
  "env": {
    "ANTHROPIC_BASE_URL": "https://api.z.ai/api/anthropic",
    "ANTHROPIC_AUTH_TOKEN": "your-z-ai-api-key",
    "ANTHROPIC_API_KEY": "",
    "API_TIMEOUT_MS": "3000000",
    "ANTHROPIC_DEFAULT_OPUS_MODEL": "glm-5.3",
    "ANTHROPIC_DEFAULT_SONNET_MODEL": "glm-5.3",
    "ANTHROPIC_DEFAULT_HAIKU_MODEL": "glm-5.3",
    "ANTHROPIC_SMALL_FAST_MODEL": "glm-5.3",
    "CLAUDE_CODE_SUBAGENT_MODEL": "glm-5.3"
  }
}
Two things to substitute:
your-z-ai-api-keywith your own key. Prefer the project-local.claude/settings.local.json, which Claude Code keeps out of git, so the
key does not end up committed.glm-5.3with whichever model z.ai currently offers. Model names change,
so check
z.ai's Claude Code guide
for the current one and set every entry to it.
Then add the MCP server exactly as above. Red Clippy is unaffected by the
choice of model: MCP runs client-side, so the tools behave identically
whichever model is behind the agent.
OpenAI Codex CLI
As per the Codex CLI config, in ~/.codex/config.toml:
[mcp_servers.red-clippy]
command = "/path/to/red-clippy"
args = ["mcp"]
env = { RED_CLIPPY_URL = "http://127.0.0.1:7337", RED_CLIPPY_API_KEY = "rcl_xxxx_yyyy" }
Any other MCP client
red-clippy mcp is a plain JSON-RPC 2.0 stdio server. It needs two things in
its environment, and takes an optional engagement pin:
RED_CLIPPY_URL=http://127.0.0.1:7337 \
RED_CLIPPY_API_KEY=rcl_xxxx_yyyy \
/path/to/red-clippy mcp --pentest PT-2026-Q2-XYZ
--pentest binds the session to one engagement so the agent does not have to
name it on every call. Run one MCP entry per active engagement and switch
engagements by switching servers.
Once connected, you can just ask: "add a finding to PT-2026-Q2-XYZ: reflected
XSS in /search, high severity, here is the PoC".
[!NOTE]
Your agent andred-clippy serverun on the same machine, which is whyRED_CLIPPY_URLpoints at127.0.0.1.
Features
A full MCP tool surface. Near-complete parity with the web UI, not a
token subset. An agent can create and scope assets, attach observations, mark
methodology checks, file and update findings, upload evidence, build graph
edges, and search across the organization.
Scope that stays clean. Assets are the units you actually test: domains,
hosts, URLs, APIs, mobile packages, IP ranges. Each carries its own checklist,
reachability marking, and in/out-of-scope flag. Recon noise (discovered paths,
tech fingerprints, certificates, wayback URLs) attaches to an asset as an
observation rather than entering the scope list, and is promoted to an asset
only when it warrants one. Without that split, a single content-discovery run
leaves the asset list unusable.
Findings through to reporting. Severity, CVSS 3.1 with a calculator built
into the form, CWE/CVE, PoC, remediation, and file evidence. A cross-engagement dashboard lists every
finding in the organization against its source pentest, which is the view a
retest needs.
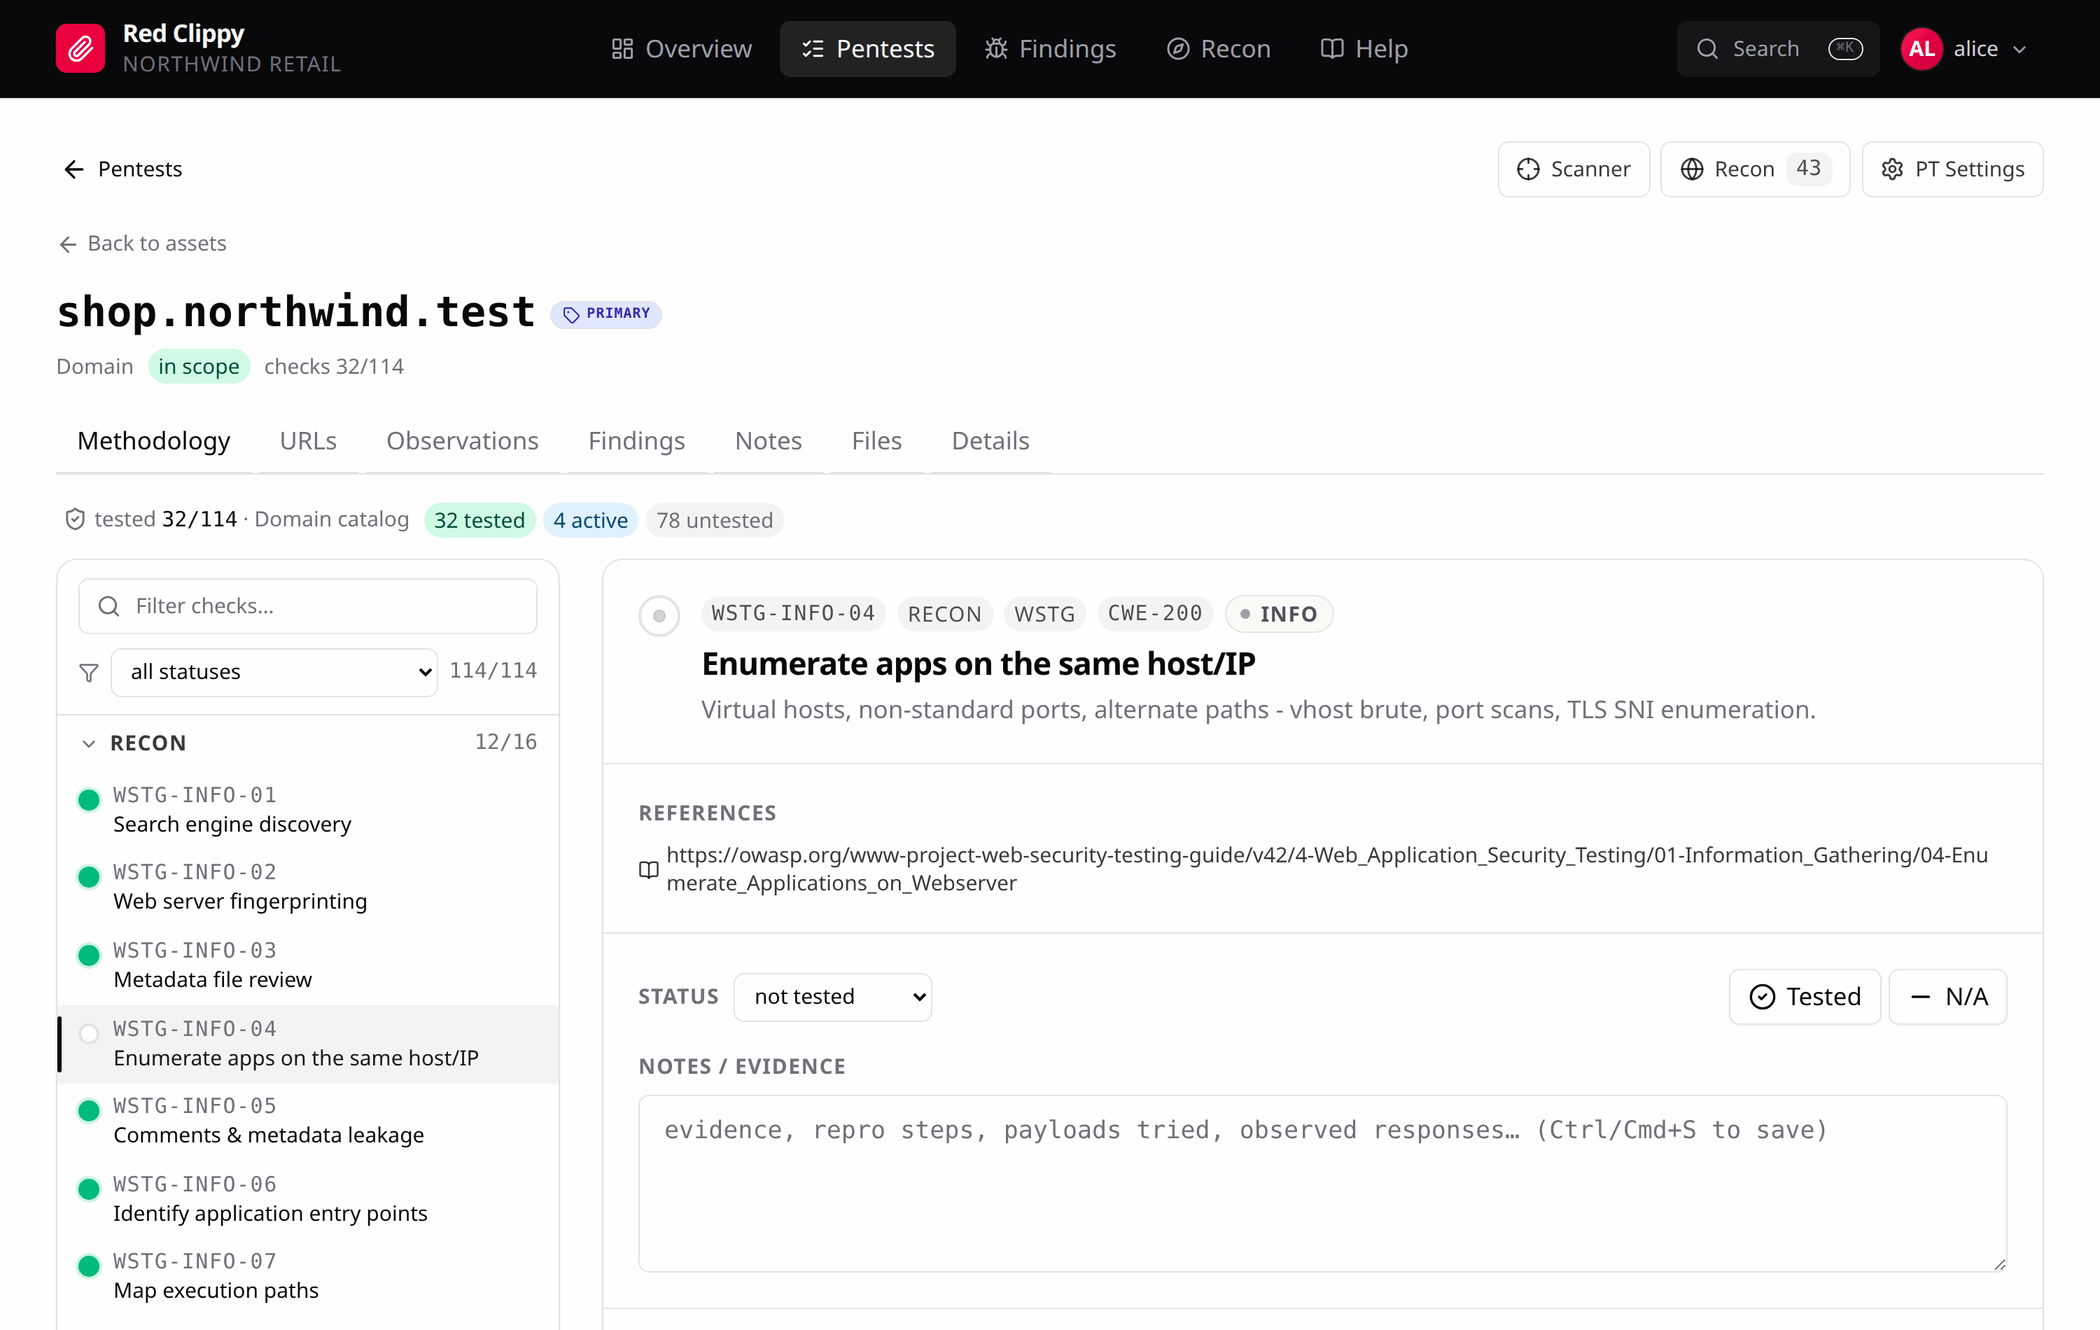
Coverage you can query. 135 built-in checks mapped to OWASP WSTG, plus
recon, network, cloud, and OSINT checks. Rollups report what has been tested
per asset and per engagement, so cleared ground is not re-tested.
Operating doctrine. The Red Team Instructions document, served over MCP
and resolved per-engagement, then per-organization, then built-in default.
Tool output ingestion. Raw scanner output is submitted in a single call,
which is how an agent moves results out of its own shell and into the record.
Parsers for nmap, burp, nessus, openvas, masscan, naabu, andsubfinder, with format auto-detection. Findings, recon, and raw output land
together in one transaction.
An attack graph. Link any two nodes with a free-form relation, then
traverse neighbours or compute shortest attack paths between them.
Multi-tenant. Every record belongs to an organization. One user can belong
to many and switch without signing out, so client data stays separated.
REST API. Org-scoped bearer keys, same surface as everything above.
Optional: a built-in scan runner. A convenience for driving subfinder,nmap, masscan, and naabu from the Scanning page, with resumable
per-target coverage. It exists for manual operator use and is not part of the
normal agent-driven workflow, where the agent runs its own tooling and ingests
the output.
The documentation covers all of this
screen by screen, with the MCP tool reference, the REST API and the data model.
This README covers getting up and running.
Configuration
Settings come from a TOML file. red-clippy serve reads ./red-clippy.toml by
default. Copy the example and edit:
cp red-clippy.toml.example red-clippy.toml
bind             = "127.0.0.1:7337"
database_url     = "sqlite://red-clippy.db?mode=rwc"
storage_root     = "./red-clippy-storage"   # uploaded evidence lives here
max_upload_bytes = 26_214_400               # 25 MiB
Every field can also be set by CLI flag or environment variable. Precedence is
CLI flag > environment variable > TOML > built-in default, per field.
| Setting | CLI flag | Environment variable |
|---|---|---|
bind |
--bind |
RED_CLIPPY_BIND |
database_url |
--database-url |
RED_CLIPPY_DATABASE_URL |
storage_root |
--storage-root |
RED_CLIPPY_STORAGE_ROOT |
max_upload_bytes |
--max-upload-bytes |
RED_CLIPPY_MAX_UPLOAD_BYTES |
frontend_dist |
- | - |
local_open |
- | - |
| config file path | -c, --config |
RED_CLIPPY_CONFIG |
Two settings are file-only:
frontend_distoverrides the built SPA. Release binaries embed it, so this
is normally unset; point it at a directory to serve a patched bundle without
recompiling.local_openlets the Files page's "reveal in file manager" button shell out
toxdg-open/open/explorer.exeon the machine running the server.
It ships off. Turn it on only when the server is your own desktop in a
logged-in graphical session, never under systemd or when serving remotely.
A key it does not recognise stops startup with an error rather than being
ignored, so a typo cannot silently leave you on a default.
Log filtering uses RUST_LOG (default info,sqlx=warn).
Run red-clippy serve --help for the full list.
[!WARNING]
Run it locally. Red Clippy binds to127.0.0.1and is meant to run on
your own machine, next to the agent driving it. It is not built to be
exposed to a network or the internet.
CLI reference
red-clippy serve             Run the web UI and REST API
red-clippy mcp               Run the MCP stdio server
red-clippy init-db           Apply migrations
red-clippy create-org        Create an organization
red-clippy create-user       Create a user
red-clippy add-member        Add a user to an organization
red-clippy reset-password    Break-glass password reset
red-clippy create-api-key    Issue an API key
Add --help to any subcommand for its flags.
The REST API lives under /api/v1 and authenticates withAuthorization: Bearer rcl_<prefix>_<secret>. Keys are org-scoped, so no
endpoint takes an organization in its URL. The in-app Help page documents
the endpoints.
Building from source
| Version | |
|---|---|
| Rust | stable (1.85+), 2024 edition |
| Node.js | 20.19+ or 22.13+ (to build the web UI) |
Linux and macOS
git clone https://github.com/CSPF-Founder/red-clippy.git
cd red-clippy
make all
./target/release/red-clippy serve
make all builds the web UI first, then compiles the binary with that bundle
embedded.
[!NOTE]
Build order. The React bundle is embedded at compile time.
Runningcargo build --releaseon its own works, but if the UI has never
been built the binary ships a placeholder page (cargo prints a warning).
Runmake frontendfirst, or just usemake all.
Windows
Build natively with rustup, the MSVC build tools, and
Node installed:
npm --prefix frontend ci
npm --prefix frontend run build
cargo build --release
.\target\release\red-clippy.exe serve
Or cross-compile from Linux using the mingw-w64 toolchain
(apt install gcc-mingw-w64-x86-64):
rustup target add x86_64-pc-windows-gnu
make frontend
cargo build --release --target x86_64-pc-windows-gnu
# -> target/x86_64-pc-windows-gnu/release/red-clippy.exe
Copy that single .exe to the Windows host and run it. Nothing else to
install.
Development
make help              # list every target
make dev               # Vite dev server, proxies /api to a running backend
make backend-dev       # cargo build (debug)
make test              # Rust test suite
make clippy            # lint with warnings as errors
make install-hooks     # enable the pre-commit clippy gate (once per clone)
Debug builds read frontend/dist from disk at runtime rather than embedding
it, so you can rebuild the UI without recompiling Rust.
Before opening a pull request, run what CI runs: cargo fmt --all --check,make clippy, make test, make lint, and make frontend.make install-hooks wires the formatting and lint gates into a pre-commit
hook. See CONTRIBUTING.md for the fuller version, including
how to add a parser.
Cutting a release
Bump version in Cargo.toml, then push a matching tag:
git tag -a v0.2.0 -m "v0.2.0"
git push origin v0.2.0
CI builds a static Linux binary and a Windows executable, then publishes both
as a GitHub release with checksums. The tag must match the crate version or
the build fails. To rehearse without publishing, run the Release workflow
manually from the Actions tab: it builds and uploads the archives as workflow
artifacts and skips the release step.
Contributing
Bug reports, parsers for new tools, and MCP coverage are welcome - see
CONTRIBUTING.md.
Found a security issue? Please report it privately via
SECURITY.md rather than opening an issue.
License
Copyright (C) 2026 Cyber Security & Privacy Foundation
Released under the GNU General Public License v3.0. This program
comes with ABSOLUTELY NO WARRANTY; see the license for details.
Reviews (0)
Sign in to leave a review.
Leave a reviewNo results found