deltallm
Health Warn
- License — License: MIT
- Description — Repository has a description
- Active repo — Last push 0 days ago
- Low visibility — Only 5 GitHub stars
Code Fail
- rm -rf — Recursive force deletion command in .github/workflows/release-images.yml
- process.env — Environment variable access in artifacts/mockup-sandbox/src/components/mockups/ai-gateway/ModelDetailV2.tsx
Permissions Pass
- Permissions — No dangerous permissions requested
This tool is a self-hosted AI gateway and MCP server that provides a unified, OpenAI-compatible API for routing, managing, and analyzing LLM requests across over 100 different providers. It includes built-in enterprise controls such as budget tracking, guardrails, and team management.
Security Assessment
By design, this server processes highly sensitive data, including user prompts and third-party LLM API keys. It also inherently makes outbound network requests to external LLM providers. The automated scan detected a recursive force deletion command (`rm -rf`) inside a GitHub Actions workflow file. While common in CI/CD pipelines, this is flagged as a standard failure because dangerous shell execution commands can be risky if they ever handle untrusted inputs or modified environment variables. The scan also noted environment variable access in a UI component, which is typical for configurations but requires proper handling. No hardcoded secrets or dangerous repository permissions were found. Overall risk is rated as Medium, primarily due to the sensitive nature of the proxy data it handles and the CI/CD shell execution flag.
Quality Assessment
The project is actively maintained, with its most recent push occurring today. It utilizes the permissive MIT license and features solid documentation, professional badges, and a well-structured README. However, community trust and visibility are currently very low, as indicated by a warning for having only 5 GitHub stars. Users should be aware that this is an early-stage project with limited public community scrutiny.
Verdict
Use with caution — the core tool is safe and well-documented, but early-stage visibility and the inherent risks of proxying sensitive LLM credentials warrant a careful manual review before deploying in a production environment.
Route, manage, and analyze your LLM requests across multiple providers with a unified API interface
![]()
![]()

![]()
![]()


What is DeltaLLM?
DeltaLLM is a self-hosted AI gateway that gives you a single OpenAI-compatible API for 100+ LLM providers — with enterprise controls like routing, budgets, guardrails, and team management built in.
One Line Change
# Before: Direct to OpenAI
client = OpenAI(api_key="sk-...")

# After: Through DeltaLLM
client = OpenAI(
    base_url="http://localhost:4002/v1",  # ← Just change this
    api_key="sk-deltallm-key"
)
That's it. Your existing code works unchanged — now with routing, spend tracking, and guardrails.
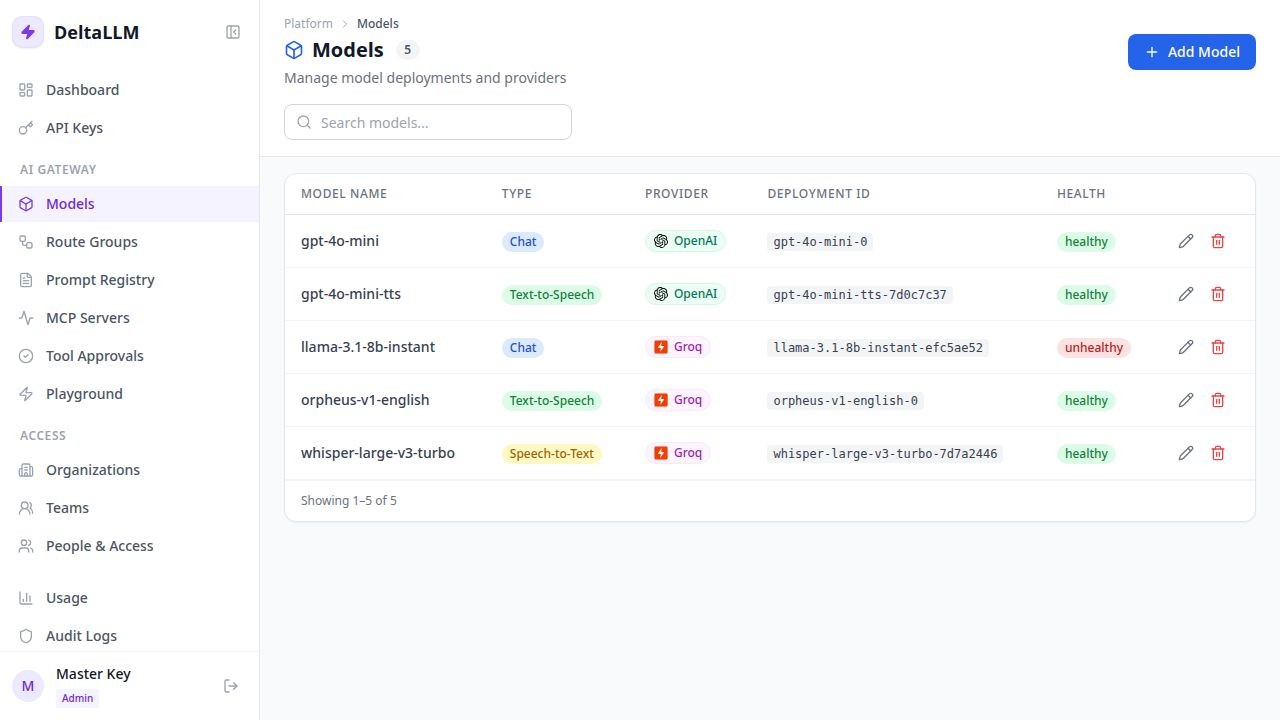
Admin UI
Manage all your model deployments, API keys, teams, and usage from a clean web interface:
Key Features
- Unified API — One OpenAI-compatible endpoint for 100+ LLM providers
- Virtual API Keys — Scoped keys with budgets, rate limits, and model restrictions
- MCP Gateway — Register external MCP servers, expose approved tools safely
- Routing & Failover — Multiple strategies with automatic retries
- Guardrails — Built-in PII detection and prompt injection protection
- Spend Tracking — Per-key, per-team, per-model cost attribution
- RBAC — Role-based access at platform, organization, and team levels
- Admin Dashboard — Full-featured web UI for managing everything
- Response Caching — Memory, Redis, or S3 backends for lower latency and cost
- Observability — Prometheus metrics, request logging, and spend analytics
Docs: https://deltallm.readthedocs.io/en/latest
Choose Your Install Path
- Option 1: Docker Compose: fastest way to run DeltaLLM locally for evaluation.
- Option 2: Kubernetes From a Released Chart: install with Helm from the public chart repository without cloning the repository.
- Option 3: Local Development From the Repo: best path for contributors and for local backend or UI work.
Option 1: Docker Compose
Use Docker Compose if you want the fastest working setup.
1. Clone the repository
git clone https://github.com/deltawi/deltallm.git
cd deltallm
2. Create a local config
cp config.example.yaml config.yaml
For the quickest first successful request, enable one-time model bootstrap in config.yaml:
general_settings:
  model_deployment_source: db_only
  model_deployment_bootstrap_from_config: true
This seeds the sample model_list into the database on first startup. After the first successful boot, set model_deployment_bootstrap_from_config back to false.
3. Generate required secrets
DeltaLLM will not start with placeholder values such as change-me.
python3 -c 'import secrets; print("DELTALLM_MASTER_KEY=sk-" + secrets.token_hex(20) + "A1")'
python3 -c 'import secrets; print("DELTALLM_SALT_KEY=" + secrets.token_hex(32))'
Create a .env file in the project root:
DELTALLM_MASTER_KEY=sk-your-generated-master-key
DELTALLM_SALT_KEY=your-generated-salt-key
OPENAI_API_KEY=sk-your-openai-key
[email protected]
PLATFORM_BOOTSTRAP_ADMIN_PASSWORD=ChangeMe123!
The sample config uses OPENAI_API_KEY. If you want a different provider, edit config.yaml before starting.
4. Start DeltaLLM
docker compose --profile single up -d --build
If you want the full Presidio engine for guardrails instead of the default regex fallback:
INSTALL_PRESIDIO=true docker compose --profile single up -d --build
This starts:
- DeltaLLM on
http://localhost:4002 - PostgreSQL
- Redis
5. Verify the gateway
Check liveliness:
curl http://localhost:4002/health/liveliness
List available models:
curl http://localhost:4002/v1/models \
  -H "Authorization: Bearer $DELTALLM_MASTER_KEY"
If this list is empty, you did not bootstrap a model and must either:
- set
model_deployment_bootstrap_from_config: trueand restart once, or - create a model deployment in the Admin UI before sending requests
6. Send your first request
curl http://localhost:4002/v1/chat/completions \
  -H "Authorization: Bearer $DELTALLM_MASTER_KEY" \
  -H "Content-Type: application/json" \
  -d '{
    "model": "gpt-4o-mini",
    "messages": [
      {"role": "user", "content": "Hello from DeltaLLM"}
    ]
  }'
7. Open the Admin UI
Open http://localhost:4002.
If you set PLATFORM_BOOTSTRAP_ADMIN_EMAIL and PLATFORM_BOOTSTRAP_ADMIN_PASSWORD, you can log in with that initial admin account. You can also keep using the master key for gateway calls.
Option 2: Kubernetes From a Released Chart
Released Helm charts and matching values overlays are published to the public Helm repository at https://deltawi.github.io/deltallm.
helm repo add deltallm https://deltawi.github.io/deltallm
helm repo update
Generate the required secrets first:
export DELTALLM_MASTER_KEY="$(python3 -c 'import secrets; print(\"sk-\" + secrets.token_hex(20) + \"A1\")')"
export DELTALLM_SALT_KEY="$(openssl rand -hex 32)"
Quick-start install with bundled PostgreSQL and Redis:
helm install deltallm deltallm/deltallm \
  --version <chart-version> \
  --namespace deltallm \
  --create-namespace \
  -f https://deltawi.github.io/deltallm/values-eval-<chart-version>.yaml \
  --set secret.values.masterKey="$DELTALLM_MASTER_KEY" \
  --set secret.values.saltKey="$DELTALLM_SALT_KEY" \
  --set-string env[0].name=PLATFORM_BOOTSTRAP_ADMIN_EMAIL \
  --set-string env[0][email protected] \
  --set-string env[1].name=PLATFORM_BOOTSTRAP_ADMIN_PASSWORD \
  --set-string env[1].value='ChangeMe123!'
If you want the Presidio-enabled image variant from the same chart release:
helm install deltallm deltallm/deltallm \
  --version <chart-version> \
  --namespace deltallm \
  --create-namespace \
  -f https://deltawi.github.io/deltallm/values-eval-<chart-version>.yaml \
  --set secret.values.masterKey="$DELTALLM_MASTER_KEY" \
  --set secret.values.saltKey="$DELTALLM_SALT_KEY" \
  --set-string env[0].name=PLATFORM_BOOTSTRAP_ADMIN_EMAIL \
  --set-string env[0][email protected] \
  --set-string env[1].name=PLATFORM_BOOTSTRAP_ADMIN_PASSWORD \
  --set-string env[1].value='ChangeMe123!' \
  --set image.tag=v<chart-version>-presidio
values-eval-<chart-version>.yaml is the self-contained quick-start profile. Use values-production-<chart-version>.yaml with external PostgreSQL and Redis for production.
Use the latest GitHub Release version for <chart-version>. The exact copy-paste install commands for each release live in the release notes.
For full Kubernetes examples and values, see docs/deployment/kubernetes.md.
Option 3: Local Development From the Repo
Use this path if you want to work on the backend or UI locally instead of running the full Compose stack.
Requirements
- Python 3.11+
- Node.js 20+
- PostgreSQL 15+
- Redis 7+ optional
1. Install dependencies
uv is the recommended backend installer because the repo includes uv.lock.
uv sync --dev
If you want the full Presidio engine locally for guardrails:
uv sync --dev --extra guardrails-presidio
In another shell for the UI:
cd ui
npm ci
cd ..
2. Export environment variables
export DATABASE_URL="postgresql://postgres:postgres@localhost:5432/deltallm"
export DELTALLM_CONFIG_PATH=./config.yaml
export DELTALLM_MASTER_KEY="$(python3 -c 'import secrets; print(\"sk-\" + secrets.token_hex(20) + \"A1\")')"
export DELTALLM_SALT_KEY="$(openssl rand -hex 32)"
export OPENAI_API_KEY="sk-your-openai-key"
export PLATFORM_BOOTSTRAP_ADMIN_EMAIL="[email protected]"
export PLATFORM_BOOTSTRAP_ADMIN_PASSWORD="ChangeMe123!"
If Redis is available:
export REDIS_URL="redis://localhost:6379/0"
3. Create config and enable one-time bootstrap if needed
cp config.example.yaml config.yaml
For a fresh database, enable one-time bootstrap in config.yaml if you want the sample model available immediately:
general_settings:
  model_deployment_source: db_only
  model_deployment_bootstrap_from_config: true
4. Initialize Prisma and the database
uv run prisma generate --schema=./prisma/schema.prisma
uv run prisma py fetch
uv run prisma db push --schema=./prisma/schema.prisma
5. Start the backend
uv run uvicorn src.main:app --host 0.0.0.0 --port 8000 --reload
6. Start the UI
cd ui
npm run dev
The local development UI runs at http://localhost:5000 and proxies API requests to the backend on http://localhost:8000.
Useful Links
- Docker quick start
- Local installation
- Gateway usage examples
- Configuration reference
- Model configuration
- Authentication
Testing
uv run pytest
Support & Contribute
⭐ Star this repo if you find it useful!
- 🐛 Report issues
- 💡 Request features
- 📖 Read the docs
- 🤝 PRs welcome — see Local Development to get started
License
See LICENSE.
Reviews (0)
Sign in to leave a review.
Leave a reviewNo results found