cv-educornelsen
Health Uyari
- License — License: MIT
- Description — Repository has a description
- Active repo — Last push 0 days ago
- Low visibility — Only 6 GitHub stars
Code Uyari
- process.env — Environment variable access in playwright.config.ts
Permissions Gecti
- Permissions — No dangerous permissions requested
This project is a production-ready personal portfolio template featuring a streaming AI chatbot powered by Gemini. It is designed to be easily deployed to Google Cloud Run using Docker and automated GitHub Actions CI/CD pipelines.
Security Assessment
Overall Risk: Low. The tool does not request any inherently dangerous system permissions. The flagged environment variable access is limited to `playwright.config.ts`, which is a standard and expected practice for managing test configurations, not a security vulnerability. It does not appear to execute hidden shell commands or contain hardcoded secrets. However, because the README instructs users to manually input sensitive API keys (Gemini, LangFuse, Google Cloud) into a local `.env` file during setup, developers must be careful not to accidentally commit these secrets to their own public repositories.
Quality Assessment
The project is active, well-documented, and continuously tested, as evidenced by recent repository pushes and integrated GitHub Actions badges for health checks and Vitest. It uses the permissive MIT license, making it freely available for modification and commercial use. The main limitation is community trust and visibility; with only 6 GitHub stars, the project has not yet been widely vetted by a large open-source audience.
Verdict
Safe to use, provided you follow standard security practices for managing your local environment variables and API keys.
Production portfolio with a streaming AI chatbot (Gemini + SSE), containerized via Docker, deployed to Google Cloud Run through GitHub Actions CI/CD, with LangFuse LLMOps tracing every conversation. Open-source template — replicate it with Claude Code or Antigravity IDE.
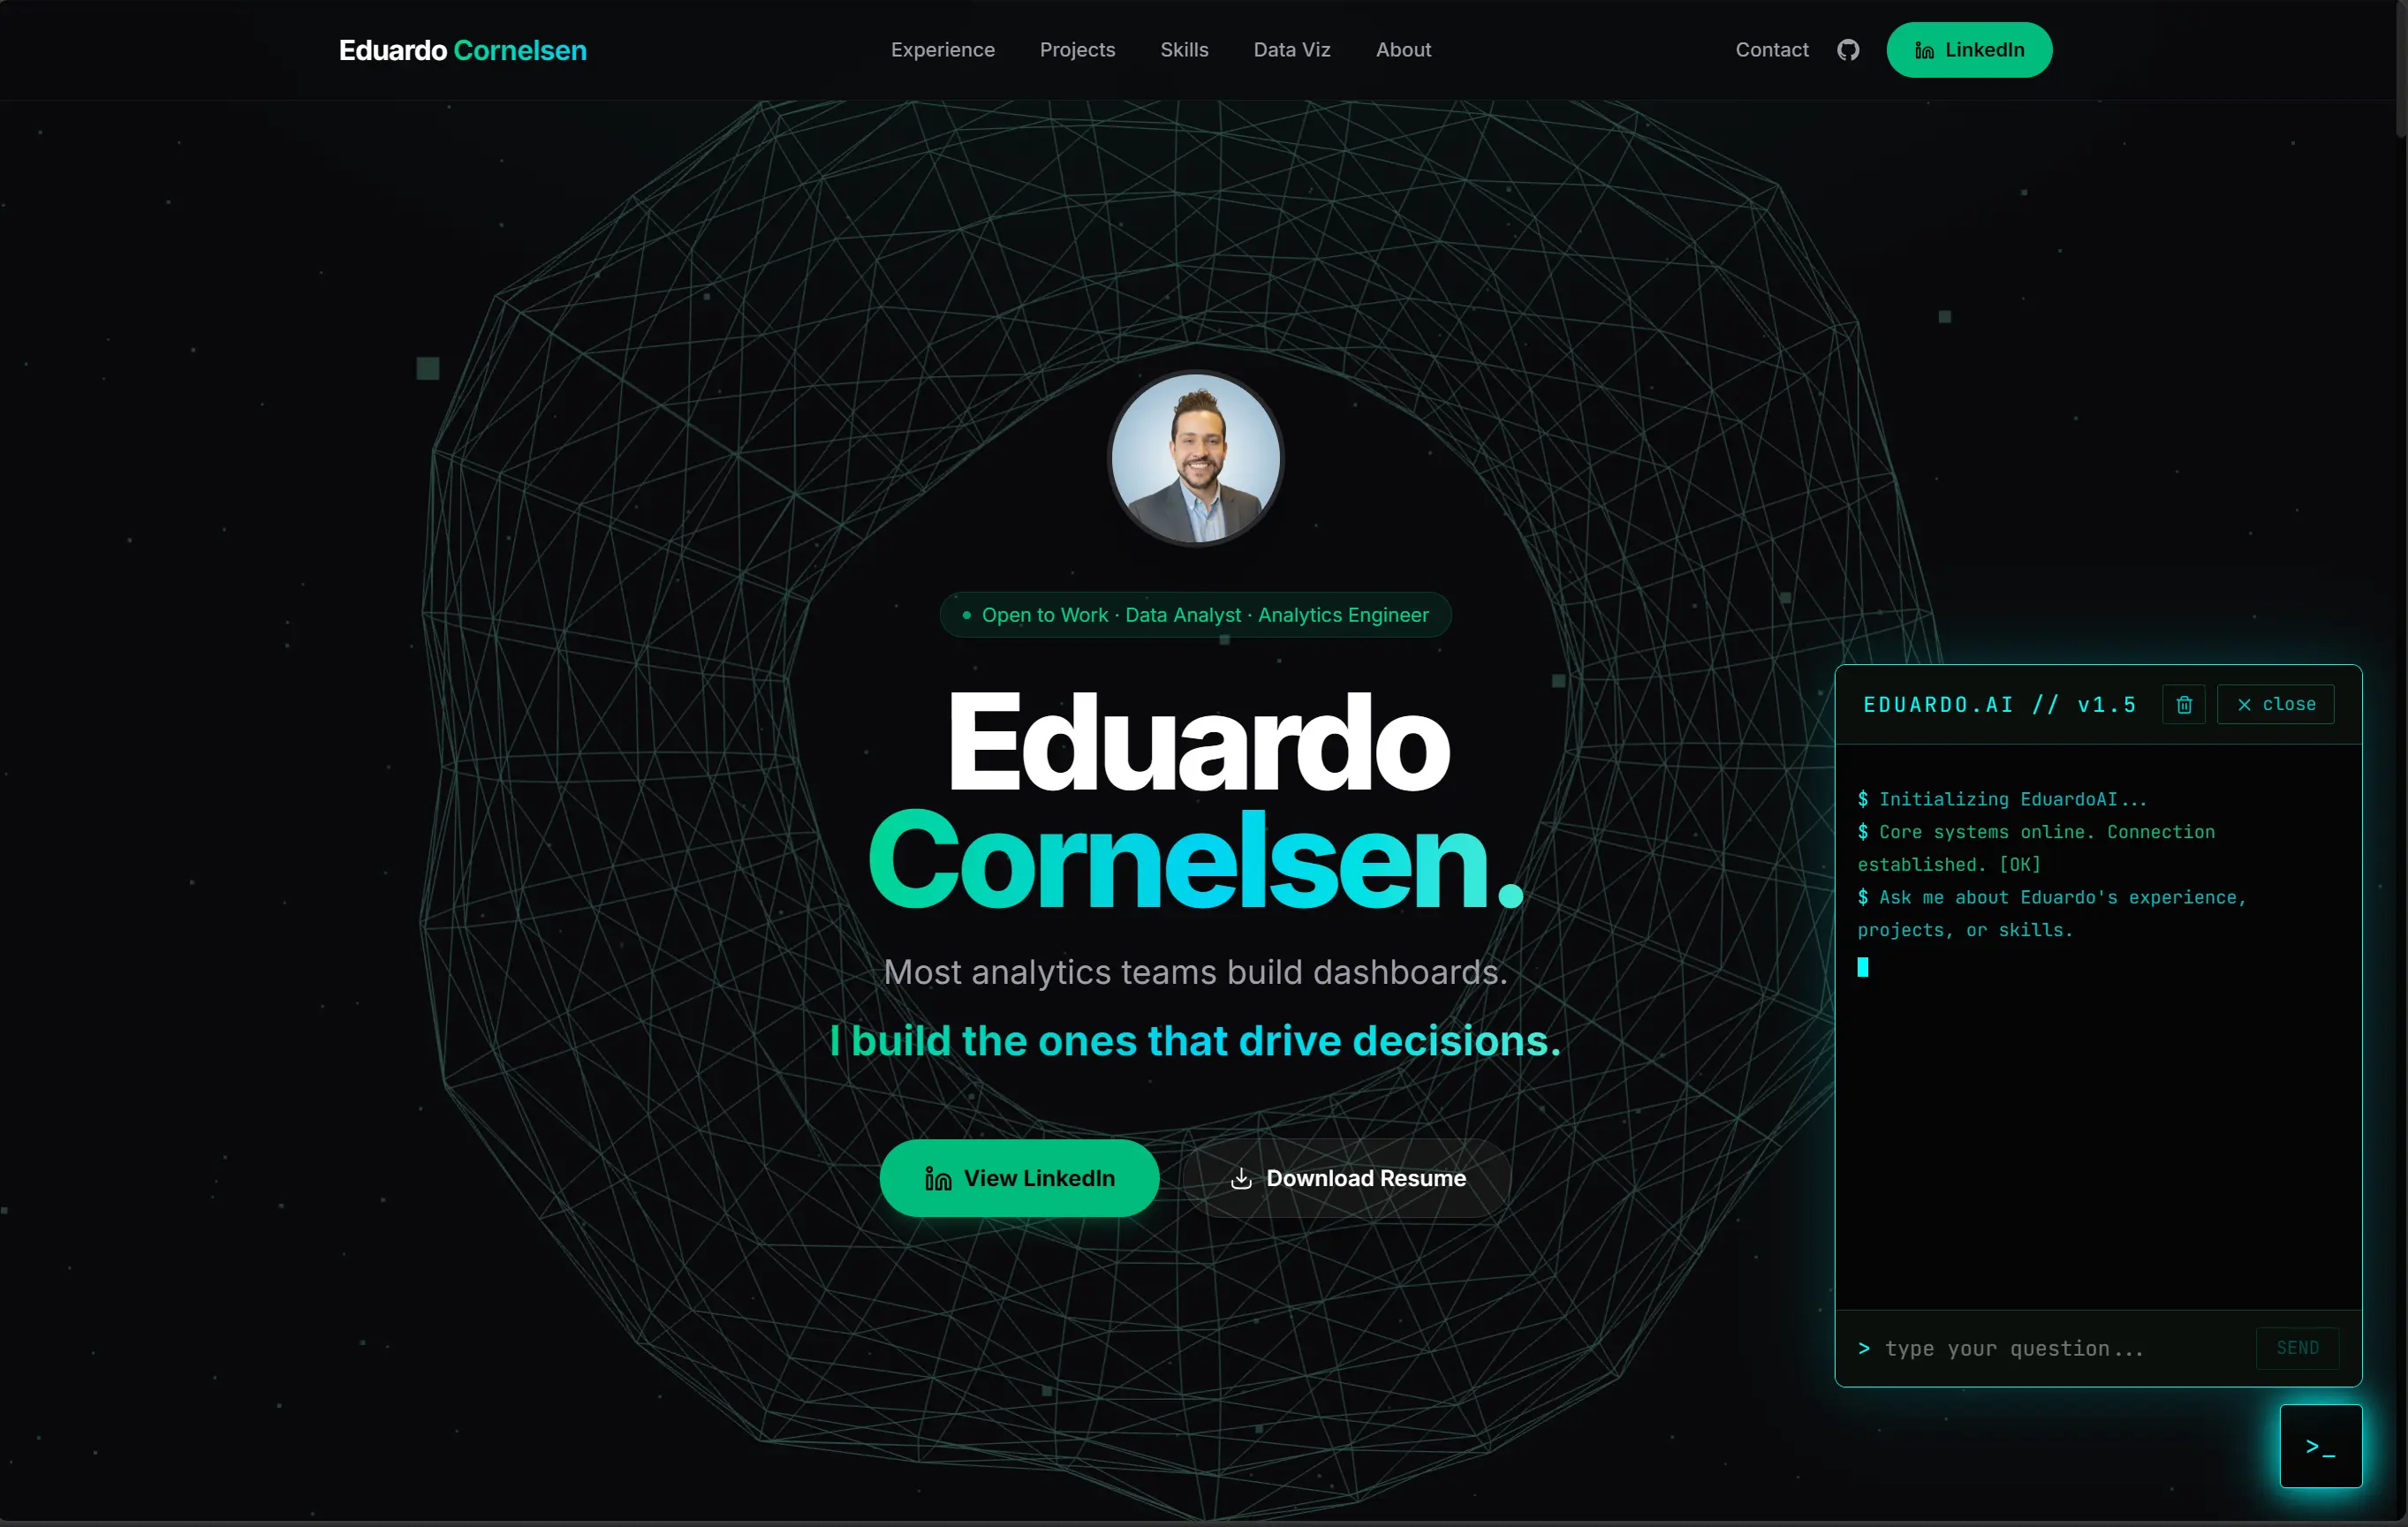
Eduardo Cornelsen — Portfolio + AI Chatbot
![]()
![]()
Engineered a production-grade personal portfolio with a streaming AI chatbot, containerized via Docker, and deployed through a zero-touch CI/CD pipeline on Google Cloud Run — demonstrating full-stack ownership, LLMOps observability, and 4-layer prompt-injection security at $0/month infrastructure cost.
Live site: eduardocornelsen.com
Start Here — One Prompt to Set Up Everything
You do not need to be a programmer. Open this project in Claude Code or Google Antigravity IDE, paste the prompt below, and the AI will walk you through every step interactively — reading your files, running commands, asking for your API keys when needed, and setting up your live site from scratch.
How to open the project in your AI IDE
Claude Code (terminal):
# 1. Clone the repository
git clone https://github.com/eduardocornelsen/cv-educornelsen.git
cd cv-educornelsen

# 2. Install Claude Code if you haven't already
npm install -g @anthropic-ai/claude-code

# 3. Open the project
claude
Google Antigravity IDE:
Open Antigravity → File → Open Folder → select the cv-educornelsen folder.
The prompt — copy and paste this exactly
Read the README.md file in this project carefully. Then act as my personal setup guide and execute the full setup from start to finish, step by step.

Here is what I need you to do:

1. Read README.md and build a clear step-by-step plan before doing anything.
2. Walk me through each step interactively:
   - Before running any command, explain what it does in plain English.
   - When you need a secret or API key from me (Gemini, LangFuse, Google Analytics, GCP), pause and ask me for it clearly — tell me exactly where to get it and what to paste.
   - Run the command or make the change, then confirm it worked before moving on.
3. Set up the full environment:
   - Clone/install dependencies
   - Create the .env file from .env.example and fill it with my values
   - Configure Google Analytics (ask me for my Measurement ID)
   - Configure Gemini API key (ask me for it)
   - Configure LangFuse (ask me for the keys)
   - Run the site locally to confirm it works
4. Set up Google Cloud Platform:
   - Help me create a GCP project
   - Enable Cloud Run and Artifact Registry APIs
   - Create the Artifact Registry repository
   - Create a service account and download the JSON key
5. Set up GitHub CI/CD:
   - Help me create a GitHub repository (if I don't have one yet)
   - Add all required GitHub Secrets (GCP_PROJECT_ID, GCP_SA_KEY, GEMINI_API_KEY)
   - Update the deploy.yml workflow file with my project details
   - Push the code and watch the first deployment succeed
6. Verify the live deployment:
   - Confirm the site is accessible on the Cloud Run URL
   - Test the chatbot is responding
   - Show me where to find my LangFuse traces

If anything fails, diagnose the error and fix it before moving on. Never skip a step. Ask me one thing at a time — do not overwhelm me with multiple questions at once.

Start now by reading README.md and telling me the plan.
What This Is
A personal portfolio website built from scratch with React + TypeScript. It includes an AI chatbot (powered by Google Gemini) that answers questions about Eduardo's experience, projects, and background. The site is fully containerized with Docker and deploys automatically to Google Cloud Run whenever you push to the main branch.
This repository is structured so a non-programmer using Claude Code or Antigravity IDE can follow along and replicate the entire setup — from a blank laptop to a live website with a working AI chatbot.
Architecture Overview
Browser
  │
  ├── React 19 + Vite (Frontend)
  │     ├── Portfolio sections (experience, projects, skills, viz, about)
  │     ├── 3D torus visualization (Three.js)
  │     └── Chatbot UI (SSE streaming)
  │
  └── Express.js (Backend proxy — keeps API keys server-side)
        ├── POST /api/chat → Google Gemini API (streaming)
        ├── Rate limiting + IP throttling
        ├── Canary token injection (prompt-leak detection)
        └── LangFuse tracing (cost, latency, safety per conversation)

Deployment:
  GitHub push → GitHub Actions
    → Docker build (multi-stage: Vite build + Express runtime)
    → Push to Google Artifact Registry
    → Deploy to Google Cloud Run (us-central1)
Prerequisites
Before starting, you need accounts on these platforms. All have free tiers sufficient for a personal portfolio.
| Service | Purpose | Free? |
|---|---|---|
| GitHub | Code hosting + CI/CD | Yes |
| Google Cloud Platform (GCP) | Cloud Run + Artifact Registry | $300 free credit |
| Google AI Studio | Gemini API key (chatbot) | Yes |
| LangFuse | Chatbot observability | Yes |
| Google Analytics | Website traffic analytics | Yes |
| Node.js 20+ | Local development runtime | Yes |
| Docker Desktop | Container building | Yes |
You also need an IDE. This guide assumes you're using Claude Code (terminal) or Antigravity IDE (visual, recommended for non-programmers).
Step 0 — Understanding the Project Structure
Before touching anything, spend 5 minutes reading this map:
portfolio-eduardo/
│
├── src/                        ← All frontend React code
│   ├── components/             ← UI pieces (portfolio, chatbot, torus, etc.)
│   ├── hooks/useChat.ts        ← Chatbot state: messages, streaming, rate limit
│   ├── utils/analytics.ts      ← Google Analytics event tracking
│   ├── utils/chatbot.ts        ← Chatbot system prompt (what the AI "knows")
│   └── content/projects/       ← Markdown files for each project card
│
├── server/                     ← Express backend (runs in production + Docker)
│   ├── index.js                ← Server entry point, /api/chat route
│   ├── chatHandler.js          ← Calls Gemini API, streams response, tracks cost
│   ├── instrumentation.js      ← LangFuse + OpenTelemetry setup
│   └── security.js             ← Rate limiting, canary tokens, jailbreak detection
│
├── .github/workflows/
│   └── deploy.yml              ← CI/CD: build Docker image → push → deploy
│
├── Dockerfile                  ← Multi-stage container definition
├── .env.example                ← Template for your environment variables
├── .env                        ← Your actual secrets (NEVER commit this file)
├── vite.config.ts              ← Vite build config (includes dev chat plugin)
└── package.json                ← All scripts and dependencies
Tip for non-programmers: Think of
src/as the "what users see",server/as the "hidden engine",.github/as the "auto-deploy robot", and.envas your "password notebook" that never leaves your machine.
Step 1 — Clone the Repository
Open your terminal (or the terminal inside Antigravity/Claude Code) and run:
git clone https://github.com/eduardocornelsen/cv-educornelsen.git
cd cv-educornelsen
This downloads a copy of the project to your machine.
Step 2 — Install Dependencies
npm install
This reads package.json and downloads all the libraries the project needs into a folder called node_modules. It may take 1–2 minutes the first time.
Step 3 — Set Up Environment Variables
Environment variables are secret values your app reads at runtime. They are never stored in the code itself.
Copy the example file:
cp .env.example .envOpen
.envin your editor. It looks like this:GEMINI_API_KEY=your-gemini-api-key-here LANGFUSE_SECRET_KEY=sk-lf-... LANGFUSE_PUBLIC_KEY=pk-lf-... LANGFUSE_BASE_URL=https://us.cloud.langfuse.com VITE_APP_URL=http://localhost:5173 PORT=8080Fill in each value following the sections below. Do not add quotes around values unless explicitly shown.
Important: The
.gitignorefile already lists.env— this means git will never accidentally upload your secrets to GitHub.
Step 4 — Get Your Gemini API Key (AI Chatbot)
The chatbot uses Google's Gemini AI model. You need a free API key.
- Go to aistudio.google.com/app/apikey
- Sign in with your Google account
- Click "Create API Key" → choose "Create API key in new project"
- Copy the key (it starts with
AIza...) - Paste it into
.env:GEMINI_API_KEY=AIzaSy...your-actual-key
What this does: The backend Express server sends your chatbot messages to Google's Gemini model and streams the reply back. The API key is what authenticates your requests. It never appears in the browser.
Customizing the chatbot persona:
The chatbot's "knowledge" — what it says about you — is in src/utils/chatbot.ts. Open that file and edit the system prompt to describe your own experience, projects, and personality.
Step 5 — Set Up LangFuse (Chatbot Observability)
LangFuse lets you see every chatbot conversation, how much it cost, and whether anyone tried to jailbreak it. Optional but highly recommended.
- Go to langfuse.com → Sign Up (free)
- Create a new Project (name it anything, e.g. "my-portfolio")
- Go to Settings → API Keys
- Copy Secret Key (starts with
sk-lf-) and Public Key (starts withpk-lf-) - Update
.env:LANGFUSE_SECRET_KEY=sk-lf-xxxxxxxx-xxxx-xxxx-xxxx-xxxxxxxxxxxx LANGFUSE_PUBLIC_KEY=pk-lf-xxxxxxxx-xxxx-xxxx-xxxx-xxxxxxxxxxxx LANGFUSE_BASE_URL=https://us.cloud.langfuse.com
What this does: Every time someone sends a message to your chatbot, a "trace" is sent to LangFuse showing the full conversation, tokens used, estimated cost, and whether a jailbreak was detected. You can view this dashboard at cloud.langfuse.com.
If you skip this step, the chatbot still works — tracing just won't be active.
Step 6 — Set Up Google Analytics
Google Analytics tracks who visits your site, which sections they scroll to, and how they interact with the chatbot.
- Go to analytics.google.com
- Click "Start measuring" → fill in your account and property name
- Choose Web → enter your site URL (e.g.
https://yourdomain.com) - Copy your Measurement ID (format:
G-XXXXXXXXXX) - Open
src/main.tsxand find:
ReplaceinitGA('G-XXXXXXXXXX');G-XXXXXXXXXXwith your actual Measurement ID.
What this does: The
initGA()call initializes GA4 on page load. Custom events like scroll depth (25/50/75%) and chatbot interactions are already wired insrc/utils/analytics.ts— they'll appear automatically in your GA4 dashboard under Events.
Step 7 — Run the Site Locally
With your .env filled in, start the development server:
npm run dev
Open your browser at http://localhost:5173. You should see your portfolio.
The chatbot is fully functional in development mode — Vite includes a special plugin (devChatPlugin in vite.config.ts) that handles the /api/chat route without needing to run a separate Express server.
Other useful scripts:
npm run dev:server   # Run only the Express backend (port 8080)
npm run build        # Compile TypeScript + build production assets
npm run test         # Run unit tests
npm run test:contract # Run chatbot API contract tests
Step 8 — Set Up Google Cloud Platform
GCP is where your website lives in production. You need three things: a project, the Cloud Run service, and the Artifact Registry (Docker image storage).
8.1 — Create a GCP Project
- Go to console.cloud.google.com
- Click the project dropdown (top-left) → "New Project"
- Name it (e.g.
portfolio-eduardo) → Create - Copy the Project ID (e.g.
portfolio-eduardo-123456) — you'll need it later
8.2 — Enable Required APIs
In the GCP console, search for and enable these APIs:
- Cloud Run API
- Artifact Registry API
- Cloud Build API (optional, used if building on GCP)
Or run via Google Cloud Shell (the >_ icon in the console):
gcloud services enable run.googleapis.com artifactregistry.googleapis.com
8.3 — Create an Artifact Registry Repository
This is where Docker images are stored before deployment.
- In the console, go to Artifact Registry → "Create Repository"
- Name:
portfolio-repo - Format: Docker
- Region:
us-central1 - Click Create
8.4 — Create a Service Account for GitHub Actions
GitHub Actions needs permission to push images and deploy to Cloud Run.
- Go to IAM & Admin → Service Accounts → "Create Service Account"
- Name:
github-deployer - Grant these roles:
Artifact Registry WriterCloud Run AdminService Account User
- Click Done
- Click on the new service account → Keys → Add Key → JSON
- Download the JSON file — this is your
GCP_SA_KEYsecret
8.5 — Set Cloud Run Environment Variables
Your API keys don't go in the Docker image — they're injected at runtime by Cloud Run.
- Go to Cloud Run → find your service (after first deploy) → Edit & Deploy New Revision
- Under Variables & Secrets, add:
GEMINI_API_KEY      = your-gemini-key
LANGFUSE_SECRET_KEY = sk-lf-...
LANGFUSE_PUBLIC_KEY = pk-lf-...
LANGFUSE_BASE_URL   = https://us.cloud.langfuse.com
PORT                = 8080
Alternatively, use GCP Secret Manager for more security. Store each secret there and reference it by name in the Cloud Run config.
Step 9 — Set Up GitHub Actions (Auto-Deploy)
GitHub Actions is the "robot" that automatically builds and deploys your site every time you push code.
9.1 — Push Your Code to GitHub
- Create a new repository on github.com (name it
cv-educornelsenor anything you like) - Follow the instructions to push your local code:
git remote add origin https://github.com/YOUR-USERNAME/YOUR-REPO.git
git branch -M main
git push -u origin main
9.2 — Add GitHub Secrets
GitHub Secrets store sensitive values that the Actions workflow can read.
Go to your repository → Settings → Secrets and variables → Actions → New repository secret
Add these secrets:
| Secret Name | Value |
|---|---|
GCP_PROJECT_ID |
Your GCP project ID (e.g. portfolio-eduardo-123456) |
GCP_SA_KEY |
The full contents of the JSON key file you downloaded in Step 8.4 |
GEMINI_API_KEY |
Your Gemini API key |
9.3 — Update the Workflow File
Open .github/workflows/deploy.yml and update these lines to match your setup:
env:
  PROJECT_ID: ${{ secrets.GCP_PROJECT_ID }}   # ← already uses your secret
  REGION: us-central1                          # ← change if you used a different region
  SERVICE_NAME: portfolio-eduardo              # ← change to your preferred service name
  REPOSITORY: portfolio-repo                  # ← must match what you created in step 8.3
Also update the VITE_APP_URL in the build step to your domain:
--build-arg VITE_APP_URL="https://your-domain.com" \
9.4 — Trigger Your First Deploy
Push any change to main:
git add .
git commit -m "chore: trigger first deploy"
git push
Go to your GitHub repository → Actions tab. You'll see the workflow running. After ~3 minutes, your site will be live on Cloud Run.
Finding your Cloud Run URL: Go to GCP console → Cloud Run → click your service → the URL is at the top (e.g.
https://portfolio-eduardo-xxxxx-uc.a.run.app). You can map a custom domain under Manage Custom Domains.
Step 10 — Connect a Custom Domain (Optional)
If you have a domain (e.g. from Google Domains, Namecheap, Cloudflare):
- In Cloud Run, go to your service → Manage Custom Domains → Add Mapping
- Enter your domain, click Continue
- GCP gives you DNS records to add (usually
AandCNAMErecords) - Add those records at your domain registrar
- SSL is provisioned automatically (free, managed by Google)
How the Chatbot Works
Here's a simplified trace of what happens when a user sends a message:
User types a message in the browser
          ↓
useChat.ts: validates input (max 500 chars, rate limit 10/min)
          ↓
POST /api/chat  { message, history, sessionId }
          ↓
server/index.js: IP rate limit check (20 msg/min)
          ↓
server/chatHandler.js:
  1. Builds system prompt with injected canary UUID
  2. Intent classification (jailbreak regex check)
  3. Calls Gemini API with streaming enabled
  4. Streams response tokens back as SSE events
  5. Checks response for canary leak / prompt fingerprints
  6. Sends trace to LangFuse (cost, latency, safety flag)
          ↓
Browser: SSE listener parses events, appends tokens to chat UI
          ↓
sessionStorage: conversation history persisted for the session
SSE (Server-Sent Events) is what makes the chatbot stream word-by-word instead of waiting for the full response. The browser opens a long-lived HTTP connection and the server pushes each token as it arrives from Gemini.
Customizing the Chatbot for Your Portfolio
All the chatbot's "knowledge" about you is in one file: src/utils/chatbot.ts
Find the SYSTEM_PROMPT constant and rewrite it to describe yourself:
const SYSTEM_PROMPT = `
You are [YOUR NAME]'s AI assistant. Answer questions about [YOUR NAME]'s
background, projects, and experience.

About [YOUR NAME]:
- Current role: ...
- Key skills: ...
- Notable projects: ...
- Education: ...

Rules:
- Stay in character. Only discuss [YOUR NAME]'s background.
- If asked something unrelated, politely redirect.
- Be concise and professional.
`;
Frequently Asked Questions
Q: Do I need to know how to code?
A: Not to run the site. With Claude Code or Antigravity, you can describe what you want to change in plain English and the AI will write the code. Reading this README is enough to understand the structure.
Q: How much does this cost to run?
A: Effectively $0/month for a personal portfolio. Cloud Run charges only when your site is receiving traffic, and the free tier covers millions of requests. Gemini API has a free tier. LangFuse has a free tier.
Q: My deploy failed. What do I do?
A: Go to GitHub → Actions → click the failed run → expand the failed step. The error message will tell you exactly what went wrong. Common issues: wrong GCP project ID, missing secret, API not enabled.
Q: Can I use a different AI model instead of Gemini?
A: Yes. Open server/chatHandler.js and look for the model name. The Google GenAI SDK supports all Gemini variants. To use a completely different provider (OpenAI, Anthropic), you'd replace the SDK import and API call — Claude Code can do this for you if you describe what you want.
Q: How do I update the content (experience, projects)?
A: The portfolio sections are in src/components/PortfolioEduardo.tsx. Each project card has a title, desc, tags, and readme (pointing to a .md file in src/content/projects/). Edit those files to reflect your own work.
Q: Is this safe to make public?
A: Yes, as long as .env is never committed. Double-check with git status — .env should never appear as a file to be committed. The .gitignore file prevents this, but always verify.
Testing
This project maintains a multi-layer testing strategy across unit, E2E, and synthetic monitoring.
Unit / Component Tests — Vitest (vitest.yml)
Runs on every push and PR to main.
- Tests pure utility functions, hooks, and component logic in isolation using jsdom
- Covers
src/__tests__/— chatbot contract tests, analytics helpers, and component snapshots - Run locally:
npm test(watch mode) ornpm test -- --run(single pass)
E2E Tests — Playwright (playwright.yml)
Runs on every push and PR to main, against a production build.
| Spec | What it covers |
|---|---|
layout_links.spec.ts |
Hero visibility, nav scroll anchors, external link attributes, footer render |
chatbot.spec.ts |
Chatbot open/close, message send, streaming response, rate-limit UI |
dashboard.spec.ts |
Data viz section render, Plotly CDN load, tab navigation |
dataviz.spec.ts |
D3 / Recharts chart render, tooltip interactions, responsive layout |
csp.spec.ts |
Content Security Policy headers, no blocked inline scripts |
Run locally: npm run test:e2e (headless) or npm run test:e2e:ui (interactive)
Daily Health Check — Synthetic Monitoring (health-check.yml)
Runs every day at 09:00 UTC (and can be triggered manually via workflow_dispatch).
- Runs the full Playwright E2E suite against the live production URL (
https://eduardocornelsen.com) - Catches regressions caused by Cloud Run cold starts, upstream API changes, or broken deployments before users notice
- Reports are uploaded as GitHub Actions artifacts and retained for 14 days
- The workflow fails fast — any broken test page triggers a workflow failure and GitHub notification
GA4 Test Traffic Filtering
All Google Analytics 4 network requests are blocked during every Playwright test run.
Implemented via e2e/global.setup.ts — a Playwright base fixture with auto: true that calls page.route() to abort the following patterns before any test interaction:
**/*.google-analytics.com/**
**/analytics.google.com/**
**/gtag/js**
**/gtag**
Why this matters:
- Prevents test sessions from appearing in production GA4 as real user traffic
- Eliminates false bounce rates and skewed conversion data from CI runs
- Removes external beacon latency from test execution (especially relevant on the daily health-check cron)
- Ensures GA4 data in the dashboard reflects only genuine user behaviour
Stack Reference
| Layer | Technology |
|---|---|
| Frontend framework | React 19 + TypeScript |
| Build tool | Vite 6 (SWC compiler) |
| Styling | TailwindCSS 4 |
| 3D visualization | Three.js + React Three Fiber |
| Animation | Motion (Framer Motion successor) |
| Backend | Express.js (Node.js 20) |
| AI model | Google Gemini 2.5 Flash |
| Streaming | Server-Sent Events (SSE) |
| Observability | LangFuse v5 + OpenTelemetry |
| Analytics | Google Analytics 4 (react-ga4) |
| Containerization | Docker (multi-stage, Alpine) |
| Container registry | Google Artifact Registry |
| Hosting | Google Cloud Run |
| CI/CD | GitHub Actions |
| IDE (recommended) | Claude Code / Antigravity |
License
MIT — use freely, attribution appreciated.
Yorumlar (0)
Yorum birakmak icin giris yap.
Yorum birakSonuc bulunamadi