electron-mcp-server
Health Gecti
- License — License: MIT
- Description — Repository has a description
- Active repo — Last push 0 days ago
- Community trust — 70 GitHub stars
Code Basarisiz
- process.env — Environment variable access in src/screenshot.ts
- process.env — Environment variable access in src/security/config.ts
- eval() — Dynamic code execution via eval() in src/security/manager.ts
Permissions Gecti
- Permissions — No dangerous permissions requested
Bu listing icin henuz AI raporu yok.
MCP server that lets AI assistants automate, debug and screenshot any Electron app over the Chrome DevTools Protocol — no app changes required.
Electron MCP Server






Control any Electron app with natural language. An MCP server that lets AI assistants (Claude, Cursor, VS Code, …) drive your Electron app: click buttons, fill forms, take screenshots, read console logs, and run JavaScript inside it — all over the Chrome DevTools Protocol, with no changes to your app.
npx -y electron-mcp-server
Then ask your AI: "Click the Settings button in my Electron app and screenshot the result."
Why you might want it
- 🤖 AI-driven UI automation — describe the interaction ("click Submit", "fill the email field"); no selector wrangling
- 🐛 Debugging without DevTools — console logs and page structure pulled straight into the chat
- 📸 Screenshots on demand — returned as image data the AI can actually look at
- ⚡ Zero app changes — attaches over CDP to any Electron app started with
--remote-debugging-port=9222 - 🔒 Security levels — strict → development, so you choose how much the AI may do
- 🧪 Automated E2E flows — turn manual test steps into repeatable AI-run scenarios
The 4 tools it exposes: get_electron_window_info, take_screenshot, send_command_to_electron (UI interaction + eval), read_electron_logs.
Demo
See the Electron MCP Server in action:
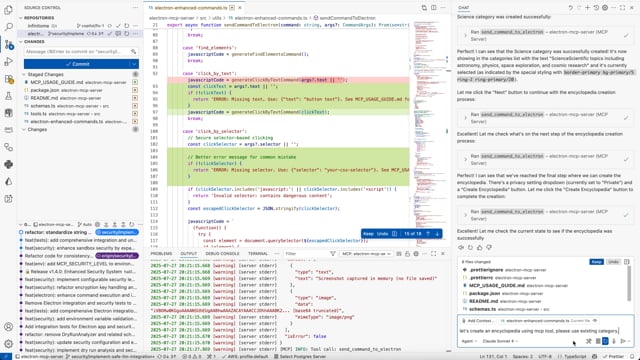
Watch how easy it is to automate Electron applications with AI-powered MCP commands.
🔒 Security & Configuration
Configurable security levels to balance safety with functionality:
Security Levels
- 🔒 STRICT: Maximum security for production environments
- ⚖️ BALANCED: Default security with safe UI interactions (recommended)
- 🔓 PERMISSIVE: More functionality for trusted environments
- 🛠️ DEVELOPMENT: Minimal restrictions for development/testing
Environment Configuration
Configure the security level and other settings through your MCP client configuration:
VS Code MCP Settings:
{
  "mcp": {
    "servers": {
      "electron": {
        "command": "npx",
        "args": ["-y", "electron-mcp-server"],
        "env": {
          "SECURITY_LEVEL": "balanced",
          "SCREENSHOT_ENCRYPTION_KEY":"your-32-byte-hex-string"
        }
      }
    }
  }
}
Claude Desktop Configuration:
{
  "mcpServers": {
    "electron": {
      "command": "npx",
      "args": ["-y", "electron-mcp-server"],
      "env": {
        "SECURITY_LEVEL": "balanced",
        "SCREENSHOT_ENCRYPTION_KEY":"your-32-byte-hex-string"
      }
    }
  }
}
Alternative: Local .env file (for development):
# Create .env file in your project directory
SECURITY_LEVEL=balanced
SCREENSHOT_ENCRYPTION_KEY=your-32-byte-hex-string
Security Level Behaviors:
| Level | UI Interactions | DOM Queries | Property Access | Assignments | Function Calls | Risk Threshold |
|---|---|---|---|---|---|---|
strict |
❌ Blocked | ❌ Blocked | ✅ Allowed | ❌ Blocked | ❌ None allowed | Low |
balanced |
✅ Allowed | ✅ Allowed | ✅ Allowed | ❌ Blocked | ✅ Safe UI functions | Medium |
permissive |
✅ Allowed | ✅ Allowed | ✅ Allowed | ✅ Allowed | ✅ Extended UI functions | High |
development |
✅ Allowed | ✅ Allowed | ✅ Allowed | ✅ Allowed | ✅ All functions | Critical |
Environment Setup:
- Copy
.env.exampleto.env - Set
SECURITY_LEVELto your desired level - Configure other security settings as needed
cp .env.example .env
# Edit .env and set SECURITY_LEVEL=balanced
Secure UI Interaction Commands
Instead of raw JavaScript eval, use these secure commands:
// ✅ Secure button clicking
{
  "command": "click_by_text",
  "args": { "text": "Create New Encyclopedia" }
}

// ✅ Secure element selection
{
  "command": "click_by_selector",
  "args": { "selector": "button[title='Create']" }
}

// ✅ Secure keyboard shortcuts
{
  "command": "send_keyboard_shortcut",
  "args": { "text": "Ctrl+N" }
}

// ✅ Secure navigation
{
  "command": "navigate_to_hash",
  "args": { "text": "create" }
}
See SECURITY_CONFIG.md for detailed security documentation.
🎯 Proper MCP Usage Guide
⚠️ Critical: Argument Structure
The most common mistake when using this MCP server is incorrect argument structure for the send_command_to_electron tool.
❌ Wrong (causes "selector is empty" errors):
{
  "command": "click_by_selector",
  "args": "button.submit-btn"  // ❌ Raw string - WRONG!
}
✅ Correct:
{
  "command": "click_by_selector",
  "args": {
    "selector": "button.submit-btn"  // ✅ Object with selector property
  }
}
📋 Command Argument Reference
| Command | Required Args | Example |
|---|---|---|
click_by_selector |
{"selector": "css-selector"} |
{"selector": "button.primary"} |
click_by_text |
{"text": "button text"} |
{"text": "Submit"} |
fill_input |
{"value": "text", "selector": "..."} or {"value": "text", "placeholder": "..."} |
{"placeholder": "Enter name", "value": "John"} |
send_keyboard_shortcut |
{"text": "key combination"} |
{"text": "Ctrl+N"} |
eval |
{"code": "javascript"} |
{"code": "document.title"} |
get_title, get_url, get_body_text |
No args needed | {} or omit args |
🔄 Recommended Workflow
- Inspect: Start with
get_page_structureordebug_elements - Target: Use specific selectors or text-based targeting
- Interact: Use the appropriate command with correct argument structure
- Verify: Take screenshots or check page state
// Step 1: Understand the page
{
  "command": "get_page_structure"
}

// Step 2: Click button using text (most reliable)
{
  "command": "click_by_text",
  "args": {
    "text": "Create New Encyclopedia"
  }
}

// Step 3: Fill form field
{
  "command": "fill_input",
  "args": {
    "placeholder": "Enter encyclopedia name",
    "value": "AI and Machine Learning"
  }
}

// Step 4: Submit with selector
{
  "command": "click_by_selector",
  "args": {
    "selector": "button[type='submit']"
  }
}
🐛 Troubleshooting Common Issues
| Error | Cause | Solution |
|---|---|---|
| "The provided selector is empty" | Passing string instead of object | Use {"selector": "..."} |
| "Element not found" | Wrong selector | Use get_page_structure first |
| "Command blocked" | Security restriction | Check security level settings |
| "Click prevented - too soon" | Rapid consecutive clicks | Wait before retrying |
🛠️ Security Features
Enterprise-grade security built for safe AI-powered automation:
- 🔒 Sandboxed Execution: All code runs in isolated environments with strict resource limits
- 🔍 Input Validation: Advanced static analysis detects and blocks dangerous code patterns
- 📝 Comprehensive Auditing: Encrypted logs track all operations with full traceability
- 🖼️ Secure Screenshots: Encrypted screenshot data with clear user notifications
- ⚠️ Risk Assessment: Automatic threat detection with configurable security thresholds
- 🚫 Zero Trust: Dangerous functions like
eval, file system access, and network requests are blocked by default
Safety First: Every command is analyzed, validated, and executed in a secure sandbox before reaching your application.
�🚀 Key Features
🎮 Application Control & Automation
- Launch & Manage: Start, stop, and monitor Electron applications with full lifecycle control
- Interactive Automation: Execute JavaScript code directly in running applications via WebSocket
- UI Testing: Automate button clicks, form interactions, and user workflows
- Process Management: Track PIDs, monitor resource usage, and handle graceful shutdowns
📊 Advanced Observability
- Screenshot Capture: Non-intrusive visual snapshots using Playwright and Chrome DevTools Protocol
- Real-time Logs: Stream application logs (main process, renderer, console) with filtering
- Window Information: Get detailed window metadata, titles, URLs, and target information
- System Monitoring: Track memory usage, uptime, and performance metrics
🛠️ Development Productivity
- Universal Compatibility: Works with any Electron app without requiring code modifications
- DevTools Integration: Leverage Chrome DevTools Protocol for powerful debugging capabilities
- Build Automation: Cross-platform building for Windows, macOS, and Linux
- Environment Management: Clean environment handling and debugging port configuration
📦 Installation
VS Code Integration (Recommended)

Add to your VS Code MCP settings:
{
  "mcp": {
    "servers": {
      "electron": {
        "command": "npx",
        "args": ["-y", "electron-mcp-server"],
        "env": {
          "SECURITY_LEVEL": "balanced",
          "SCREENSHOT_ENCRYPTION_KEY": "your-32-byte-hex-string-here"
        }
      }
    }
  }
}
Claude Desktop Integration
Add to ~/Library/Application Support/Claude/claude_desktop_config.json:
{
  "mcpServers": {
    "electron": {
      "command": "npx",
      "args": ["-y", "electron-mcp-server"],
      "env": {
        "SECURITY_LEVEL": "balanced",
        "SCREENSHOT_ENCRYPTION_KEY": "your-32-byte-hex-string-here"
      }
    }
  }
}
Global Installation
npm install -g electron-mcp-server
🔧 Available Tools
launch_electron_app
Launch an Electron application with debugging capabilities.
{
  "appPath": "/path/to/electron-app",
  "devMode": true,  // Enables Chrome DevTools Protocol on port 9222
  "args": ["--enable-logging", "--dev"]
}
Returns: Process ID and launch confirmation
get_electron_window_info
Get comprehensive window and target information via Chrome DevTools Protocol.
{
  "includeChildren": true  // Include child windows and DevTools instances
}
Returns:
- Window IDs, titles, URLs, and types
- DevTools Protocol target information
- Platform details and process information
take_screenshot
Capture high-quality screenshots using Playwright and Chrome DevTools Protocol.
{
  "outputPath": "/path/to/screenshot.png",  // Optional: defaults to temp directory
  "windowTitle": "My App"  // Optional: target specific window
}
Features:
- Non-intrusive capture (doesn't bring window to front)
- Works with any Electron app
- Fallback to platform-specific tools if needed
send_command_to_electron
Execute JavaScript commands in the running Electron application via WebSocket.
{
  "command": "eval",  // Built-in commands: eval, get_title, get_url, click_button, console_log
  "args": {
    "code": "document.querySelector('button').click(); 'Button clicked!'"
  }
}
Enhanced UI Interaction Commands:
find_elements: Analyze all interactive UI elements with their properties and positionsclick_by_text: Click elements by their visible text, aria-label, or title (more reliable than selectors)fill_input: Fill input fields by selector, placeholder text, or associated label textselect_option: Select dropdown options by value or visible textget_page_structure: Get organized overview of all page elements (buttons, inputs, selects, links)get_title: Get document titleget_url: Get current URLget_body_text: Extract visible text contentclick_button: Click buttons by CSS selector (basic method)console_log: Send console messageseval: Execute custom JavaScript code
Recommended workflow: Use get_page_structure first to understand available elements, then use specific interaction commands like click_by_text or fill_input.
read_electron_logs
Stream application logs from main process, renderer, and console.
{
  "logType": "all",  // Options: "all", "main", "renderer", "console"
  "lines": 50,       // Number of recent lines
  "follow": false    // Stream live logs
}
close_electron_app
Gracefully close the Electron application.
{
  "force": false  // Force kill if unresponsive
}
build_electron_app
Build Electron applications for distribution.
{
  "projectPath": "/path/to/project",
  "platform": "darwin",  // win32, darwin, linux
  "arch": "x64",         // x64, arm64, ia32
  "debug": false
}
💡 Usage Examples
Smart UI Interaction Workflow
// 1. First, understand the page structure
await send_command_to_electron({
  command: 'get_page_structure',
});

// 2. Click a button by its text (much more reliable than selectors)
await send_command_to_electron({
  command: 'click_by_text',
  args: {
    text: 'Login', // Finds buttons containing "Login" in text, aria-label, or title
  },
});

// 3. Fill inputs by their label or placeholder text
await send_command_to_electron({
  command: 'fill_input',
  args: {
    text: 'username', // Finds input with label "Username" or placeholder "Enter username"
    value: '[email protected]',
  },
});

await send_command_to_electron({
  command: 'fill_input',
  args: {
    text: 'password',
    value: 'secretpassword',
  },
});

// 4. Select dropdown options by visible text
await send_command_to_electron({
  command: 'select_option',
  args: {
    text: 'country', // Finds select with label containing "country"
    value: 'United States', // Selects option with this text
  },
});

// 5. Take a screenshot to verify the result
await take_screenshot();
Advanced Element Detection
// Find all interactive elements with detailed information
await send_command_to_electron({
  command: 'find_elements',
});

// This returns detailed info about every clickable element and input:
// {
//   "type": "clickable",
//   "text": "Submit Form",
//   "id": "submit-btn",
//   "className": "btn btn-primary",
//   "ariaLabel": "Submit the registration form",
//   "position": { "x": 100, "y": 200, "width": 120, "height": 40 },
//   "visible": true
// }
Automated UI Testing
// Launch app in development mode
await launch_electron_app({
  appPath: '/path/to/app',
  devMode: true,
});

// Take a screenshot
await take_screenshot();

// Click a button programmatically
await send_command_to_electron({
  command: 'eval',
  args: {
    code: "document.querySelector('#submit-btn').click()",
  },
});

// Verify the result
await send_command_to_electron({
  command: 'get_title',
});
Development Debugging
// Get window information
const windowInfo = await get_electron_window_info();

// Extract application data
await send_command_to_electron({
  command: 'eval',
  args: {
    code: 'JSON.stringify(window.appState, null, 2)',
  },
});

// Monitor logs
await read_electron_logs({
  logType: 'all',
  lines: 100,
});
Performance Monitoring
// Get system information
await send_command_to_electron({
  command: 'eval',
  args: {
    code: '({memory: performance.memory, timing: performance.timing})',
  },
});

// Take periodic screenshots for visual regression testing
await take_screenshot({
  outputPath: '/tests/screenshots/current.png',
});
🏗️ Architecture
Chrome DevTools Protocol Integration
- Universal Compatibility: Works with any Electron app that has remote debugging enabled
- Real-time Communication: WebSocket-based command execution with the renderer process
- No App Modifications: Zero changes required to target applications
Process Management
- Clean Environment: Handles
ELECTRON_RUN_AS_NODEand other environment variables - Resource Tracking: Monitors PIDs, memory usage, and application lifecycle
- Graceful Shutdown: Proper cleanup and process termination
Cross-Platform Support
- macOS: Uses Playwright CDP with screencapture fallback
- Windows: PowerShell-based window detection and capture
- Linux: X11 window management (planned)
🧪 Development
Prerequisites
Node.js 20+
TypeScript 4.5+
Electron - Required for running and testing Electron applications
# Install Electron globally (recommended)
npm install -g electron

# Or install locally in your project
npm install electron --save-dev
Target Application Setup
For the MCP server to work with your Electron application, you need to enable remote debugging. Add this code to your Electron app's main process:
const { app } = require('electron');
const isDev = process.env.NODE_ENV === 'development' || process.argv.includes('--dev');

// Enable remote debugging in development mode
if (isDev) {
  app.commandLine.appendSwitch('remote-debugging-port', '9222');
}
Alternative approaches:
# Launch your app with debugging enabled
electron . --remote-debugging-port=9222

# Or via npm script
npm run dev -- --remote-debugging-port=9222
Note: The MCP server automatically scans ports 9222-9225 to detect running Electron applications with remote debugging enabled.
Setup
git clone https://github.com/halilural/electron-mcp-server.git
cd electron-mcp-server

npm install
npm run build

# Run tests
npm test

# Development mode with auto-rebuild
npm run dev
Testing
The project includes comprehensive test files for React compatibility:
# Run React compatibility tests
cd tests/integration/react-compatibility
electron test-react-electron.js
See tests/integration/react-compatibility/README.md for detailed testing instructions and scenarios.
React Compatibility
This MCP server has been thoroughly tested with React applications and handles common React patterns correctly:
- ✅ React Event Handling: Properly handles
preventDefault()in click handlers - ✅ Form Input Detection: Advanced scoring algorithm works with React-rendered inputs
- ✅ Component Interaction: Compatible with React components, hooks, and state management
Project Structure
src/
├── handlers.ts      # MCP tool handlers
├── index.ts         # Server entry point
├── tools.ts         # Tool definitions
├── screenshot.ts    # Screenshot functionality
├── utils/
│   ├── process.ts   # Process management & DevTools Protocol
│   ├── logs.ts      # Log management
│   └── project.ts   # Project scaffolding
└── schemas/         # JSON schemas for validation
🔐 Security & Best Practices
- Sandboxed Execution: All JavaScript execution is contained within the target Electron app
- Path Validation: Only operates on explicitly provided application paths
- Process Isolation: Each launched app runs in its own process space
- No Persistent Access: No permanent modifications to target applications
🤝 Contributing
We welcome contributions! Please see our Contributing Guide for details.
Before reporting issues: Please use the standardized ISSUE_TEMPLATE.md for proper bug reporting format. For React compatibility problems or similar technical issues, also review REACT_COMPATIBILITY_ISSUES.md for detailed debugging examples, including proper command examples, error outputs, and reproduction steps.
- Fork the repository
- Create a feature branch (
git checkout -b feature/awesome-feature) - Commit your changes (
git commit -m 'Add awesome feature') - Push to the branch (
git push origin feature/awesome-feature) - Open a Pull Request
📄 License
MIT License - see LICENSE file for details.
☕ Support
If this project helped you, consider buying me a coffee! ☕

Your support helps me maintain and improve this project. Thank you! 🙏
🙏 Acknowledgments
- Model Context Protocol - Standardized AI-application interface
- Chrome DevTools Protocol - Universal debugging interface
- Playwright - Reliable browser automation
- Electron - Cross-platform desktop applications
🔗 Links
- GitHub Repository
- NPM Package
- Model Context Protocol
- Chrome DevTools Protocol Docs
- Issue Template - Standardized bug reporting format
- React Compatibility Issues Documentation - Technical debugging guide for React applications
Ready to supercharge your Electron development with AI-powered automation? Install the MCP server and start building smarter workflows today! 🚀
Yorumlar (0)
Yorum birakmak icin giris yap.
Yorum birakSonuc bulunamadi