codelight
Health Uyari
- License — License: MIT
- Description — Repository has a description
- Active repo — Last push 0 days ago
- Low visibility — Only 9 GitHub stars
Code Gecti
- Code scan — Scanned 1 files during light audit, no dangerous patterns found
Permissions Gecti
- Permissions — No dangerous permissions requested
Bu listing icin henuz AI raporu yok.
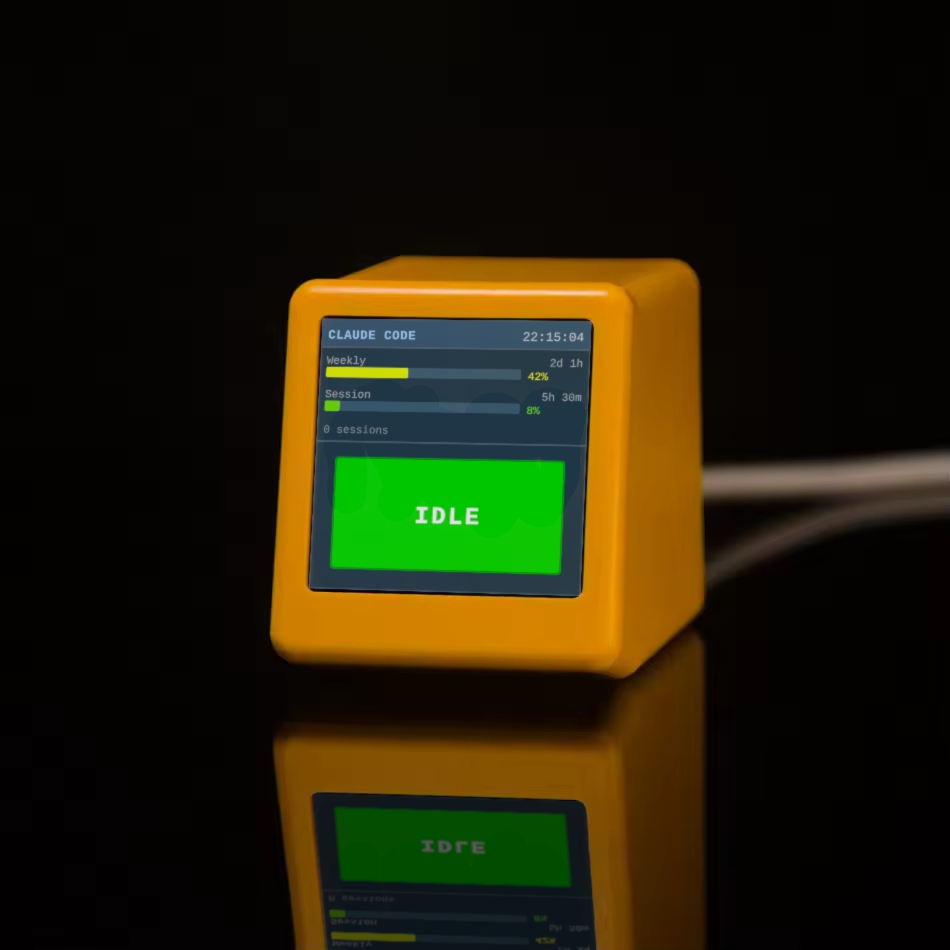
A physical desktop status display and token limit tracker for Claude Code, built with a $10 GeekMagic Ultra screen.
codelight — Claude Code status display
Work in progress — not yet fully verified on real hardware. The firmware compiles
and the companion script runs, but the full stack has not been tested on an actual
GeekMagic Ultra. I accidently ripped the screen flex cable while testing/flashing. Still waiting for new screens to arrive from Aliexpress for final test.
Custom firmware for the GeekMagic Ultra that turns it into a live Claude Code
dashboard. A companion Python script on your computer polls usage and session state
and pushes it to the device over WiFi.
 |
 |
 |
Hardware
| Chip | ESP8266 (80 MHz, ~45 KB RAM) |
| Display | ST7789V 240×240 IPS TFT |
| Flash | 4 MB |
| Connectivity | 2.4 GHz WiFi only (no Bluetooth), USB - power only, 6-pad debug header |
| Price | 10-15 USD - GeekMagic Ultra on Aliexpress (affiliate link) |
Building
Install PlatformIO, then:
pio run
The firmware binary ends up at .pio/build/geekmagic_ultra/firmware.bin.
Flashing
Option A — Stock firmware OTA (easiest, no disassembly)
The GeekMagic Ultra ships with a stock firmware that exposes a web OTA page.
- Power on the device. It creates a WiFi AP — connect to it from your computer.
- Open the stock firmware's update page in a browser (usually
http://192.168.4.1/update
or check the screen for the address). - Upload
.pio/build/geekmagic_ultra/firmware.bin. - The device reboots into the new firmware and shows a setup screen.
Option B — FTDI serial adapter (if stock OTA isn't available)
The device has a 6-pad debug header. With a 3.3 V FTDI adapter you can flash
directly over serial without any tools.
Use 3.3 V logic only. 5 V will damage the ESP8266.
Pad layout
⬜ 1  GND
⚪ 2  TXD0   ← connect to FTDI RX
⚪ 3  RXD0   ← connect to FTDI TX
⚪ 4  3V3    ← connect to FTDI 3.3 V out
⚪ 5  GPIO0  ← pull LOW to enter bootloader
⚪ 6  RST
Wiring
| Device pad | FTDI pin |
|---|---|
| 1 GND | GND |
| 2 TXD0 | RX |
| 3 RXD0 | TX |
| 4 3V3 | 3V3 |
| 5 GPIO0 | GND (via jumper wire) |
Note that TX/RX are crossed: the device's transmit (TXD0) connects to the
adapter's receive (RX), and vice versa.
Enter bootloader mode
ESP8266 enters its serial bootloader when GPIO0 is held LOW at reset:
- Connect GPIO0 (pad 5) to GND (pad 1) with a jumper wire.
- Power the device through the FTDI adapter (connect 3V3 and GND last).
— or briefly bridge RST (pad 6) to GND if it's already powered. - The screen stays dark — the ESP8266 is now waiting for a flash command.
Flash
# Install esptool if needed
python3 -m pip install esptool

python3 -m esptool --port /dev/ttyUSB0 --baud 921600 \
    write_flash 0x0 .pio/build/geekmagic_ultra/firmware.bin
Replace /dev/ttyUSB0 with your actual serial port (/dev/ttyACM0, COM3, etc.).
- Remove the GPIO0–GND jumper.
- Reset the device (bridge RST to GND briefly, or power-cycle).
Option C — OTA after first flash
Once the custom firmware is running, subsequent updates go through the built-in
ElegantOTA page at http://<device>.local/update. No cables needed.
First-time WiFi setup
On first boot (or when no configured network is reachable) the device starts in AP
mode and shows setup instructions on screen:
- Connect your computer to the WiFi AP
claude-screen-setup. - Open
http://192.168.4.1in a browser. - Enter your WiFi credentials (up to 3 networks, tried in order on every boot).
- Set a device name — it becomes the mDNS hostname, e.g.
my-screen
→ reachable ashttp://my-screen.local. - Click Save & apply. The device reboots and connects to your network.
Config is stored in LittleFS and survives firmware OTA updates.
Companion script
The Python script companion/claude_monitor.py runs on your computer and pushes
status data to the device every 2 seconds.
Dependencies
Arch Linux
sudo pacman -S python-requests
Debian / Ubuntu
sudo apt install python3-requests
Run
python3 companion/claude_monitor.py --device claude-screen.local
On first run the script automatically installs Claude Code hooks in~/.claude/settings.json so it can track working/waiting state in real time.
Use --dry-run to print the payload without posting, and --verbose to see
raw usage captures and session scans.
Run as a systemd user service
Create ~/.config/systemd/user/claude-monitor.service:
[Unit]
Description=Claude Code status monitor

[Service]
ExecStart=/usr/bin/python3 -u /path/to/companion/claude_monitor.py \
    --device claude-screen.local
Restart=always
RestartSec=15

[Install]
WantedBy=default.target
network-online.target is a system target not available in user units — omit it.
The script retries failed POSTs automatically, so it handles startup races without
ordering constraints.
systemctl --user daemon-reload
systemctl --user enable --now claude-monitor
systemctl --user status claude-monitor   # verify it's running

# To start at boot without being logged in:
sudo loginctl enable-linger $USER
Useful commands:
journalctl --user -fu claude-monitor     # live logs
systemctl --user restart claude-monitor  # restart after config change
systemctl --user disable --now claude-monitor  # disable
Optional: shared secret
If multiple people are on the same network, set a secret in the device config
page and pass it to the script:
python3 companion/claude_monitor.py --device claude-screen.local --secret mypassword
How it works
Claude Code                    claude_monitor.py              GeekMagic Ultra
───────────────                ─────────────────              ───────────────
hooks fire on     ──────────►  reads state files
tool use /         --hook       every 2 s          ─────────►  POST /status
messages           mode                                         (JSON payload)

                               polls claude.ai API
                               every 60 s
                               (session & weekly %)
Status detection — hooks
Claude Code hooks are shell commands that Claude Code invokes at specific points
during a session. On first run, claude_monitor.py registers entries in~/.claude/settings.json for events such as PreToolUse, PostToolUse,PermissionRequest, and SessionEnd. When an event fires, Claude Code runs:
python3 claude_monitor.py --hook working
with session metadata on stdin. The hook mode writes a small JSON state file to~/.claude/monitor_state/<sessionId>.json and exits immediately — it is designed
to be fast and never block Claude Code.
Usage data — claude.ai API
Every 60 seconds the monitor fetches https://claude.ai/api/oauth/usage using
the OAuth access token from ~/.claude/.credentials.json — the same credential
Claude Code itself uses, so no extra authentication is needed. The response
contains:
five_hour.utilization— current 5-hour session window (0–100 %)seven_day.utilization— rolling 7-day total (0–100 %)resets_at— ISO-8601 timestamp for each window reset
Values are cached between polls so the display always shows something even when
the API is temporarily unreachable.
Display update — POST /status
Every 2 seconds the monitor reads the state files, computes an overall status
(working / waiting / inactive), merges the cached usage percentages and
reset countdowns, and POSTs a JSON payload to http://<device>/status. The
ESP8266 re-renders the full display on each received payload.
Uninstalling
Stop the monitor — Ctrl-C, or if running as a service:
systemctl --user disable --now claude-monitorRemove the hooks from
~/.claude/settings.json. Open the file and delete
all hook entries whosecommandfield containsclaude_monitor. The monitor
registers hooks underPreToolUse,PostToolUse,UserPromptSubmit,PermissionRequest,PermissionDenied,MessageDisplay, andSessionEnd.
If any of those event lists become empty after removing the monitor entries,
delete the key as well.If you have no other hooks configured you can remove the entire
"hooks"
object from the file.The monitor does not remove its own hooks on exit. If you skip this step,
Claude Code will continue trying to invoke the script on every tool use and
print errors to the terminal.Remove leftover state files (optional):
rm -rf ~/.claude/monitor_state
Multiple screens on one network
Each device must have a unique name. Set them via the config page before
connecting to the shared network. Each person runs their own companion script
pointing to their own device — no other coordination needed.
Yorumlar (0)
Yorum birakmak icin giris yap.
Yorum birakSonuc bulunamadi