Adobe_Premiere_Pro_MCP
Health Pass
- License — License: MIT
- Description — Repository has a description
- Active repo — Last push 0 days ago
- Community trust — 433 GitHub stars
Code Fail
- fs.rmSync — Destructive file system operation in cep-plugin/bridge-cep.js
- os.homedir — User home directory access in cep-plugin/bridge-cep.js
- process.env — Environment variable access in cep-plugin/bridge-cep.js
- fs module — File system access in cep-plugin/bridge-cep.js
- process.env — Environment variable access in scripts/doctor-macos.sh
- fs module — File system access in scripts/doctor-macos.sh
- rm -rf — Recursive force deletion command in scripts/install-macos.sh
- process.env — Environment variable access in scripts/install-macos.sh
- fs module — File system access in scripts/install-macos.sh
- process.env — Environment variable access in scripts/live-tool-sweep.mjs
- rm -rf — Recursive force deletion command in scripts/uninstall-macos.sh
- process.env — Environment variable access in scripts/uninstall-macos.sh
- fs module — File system access in scripts/uninstall-macos.sh
- process.env — Environment variable access in src/__tests__/bridge/index.test.ts
Permissions Pass
- Permissions — No dangerous permissions requested
No AI report is available for this listing yet.
281 tools for AI-driven Adobe Premiere Pro video editing via MCP, for Codex, Claude, and other MCP clients.
Adobe Premiere Pro MCP Server
English | 日本語 | Tiếng Việt | 简体中文 | 繁體中文 | 한국어 | Deutsch | Español | Français | Italiano | Dansk | Polski | Русский | Bosanski | العربية | Norsk | Português (Brasil) | ไทย | Türkçe | ភាសាខ្មែរ
Control Adobe Premiere Pro through MCP using Codex, Claude Code, Claude Desktop, or any other MCP client.
Building Something Better

|
Adobe Premiere Pro was not built for AI agents — and it shows. I'm building Monet, an AI-first video editor designed from day one for full coding-agent control for claude code and openai codex. No workarounds. No scripting hacks. Just a clean API built for the way agents actually work. |
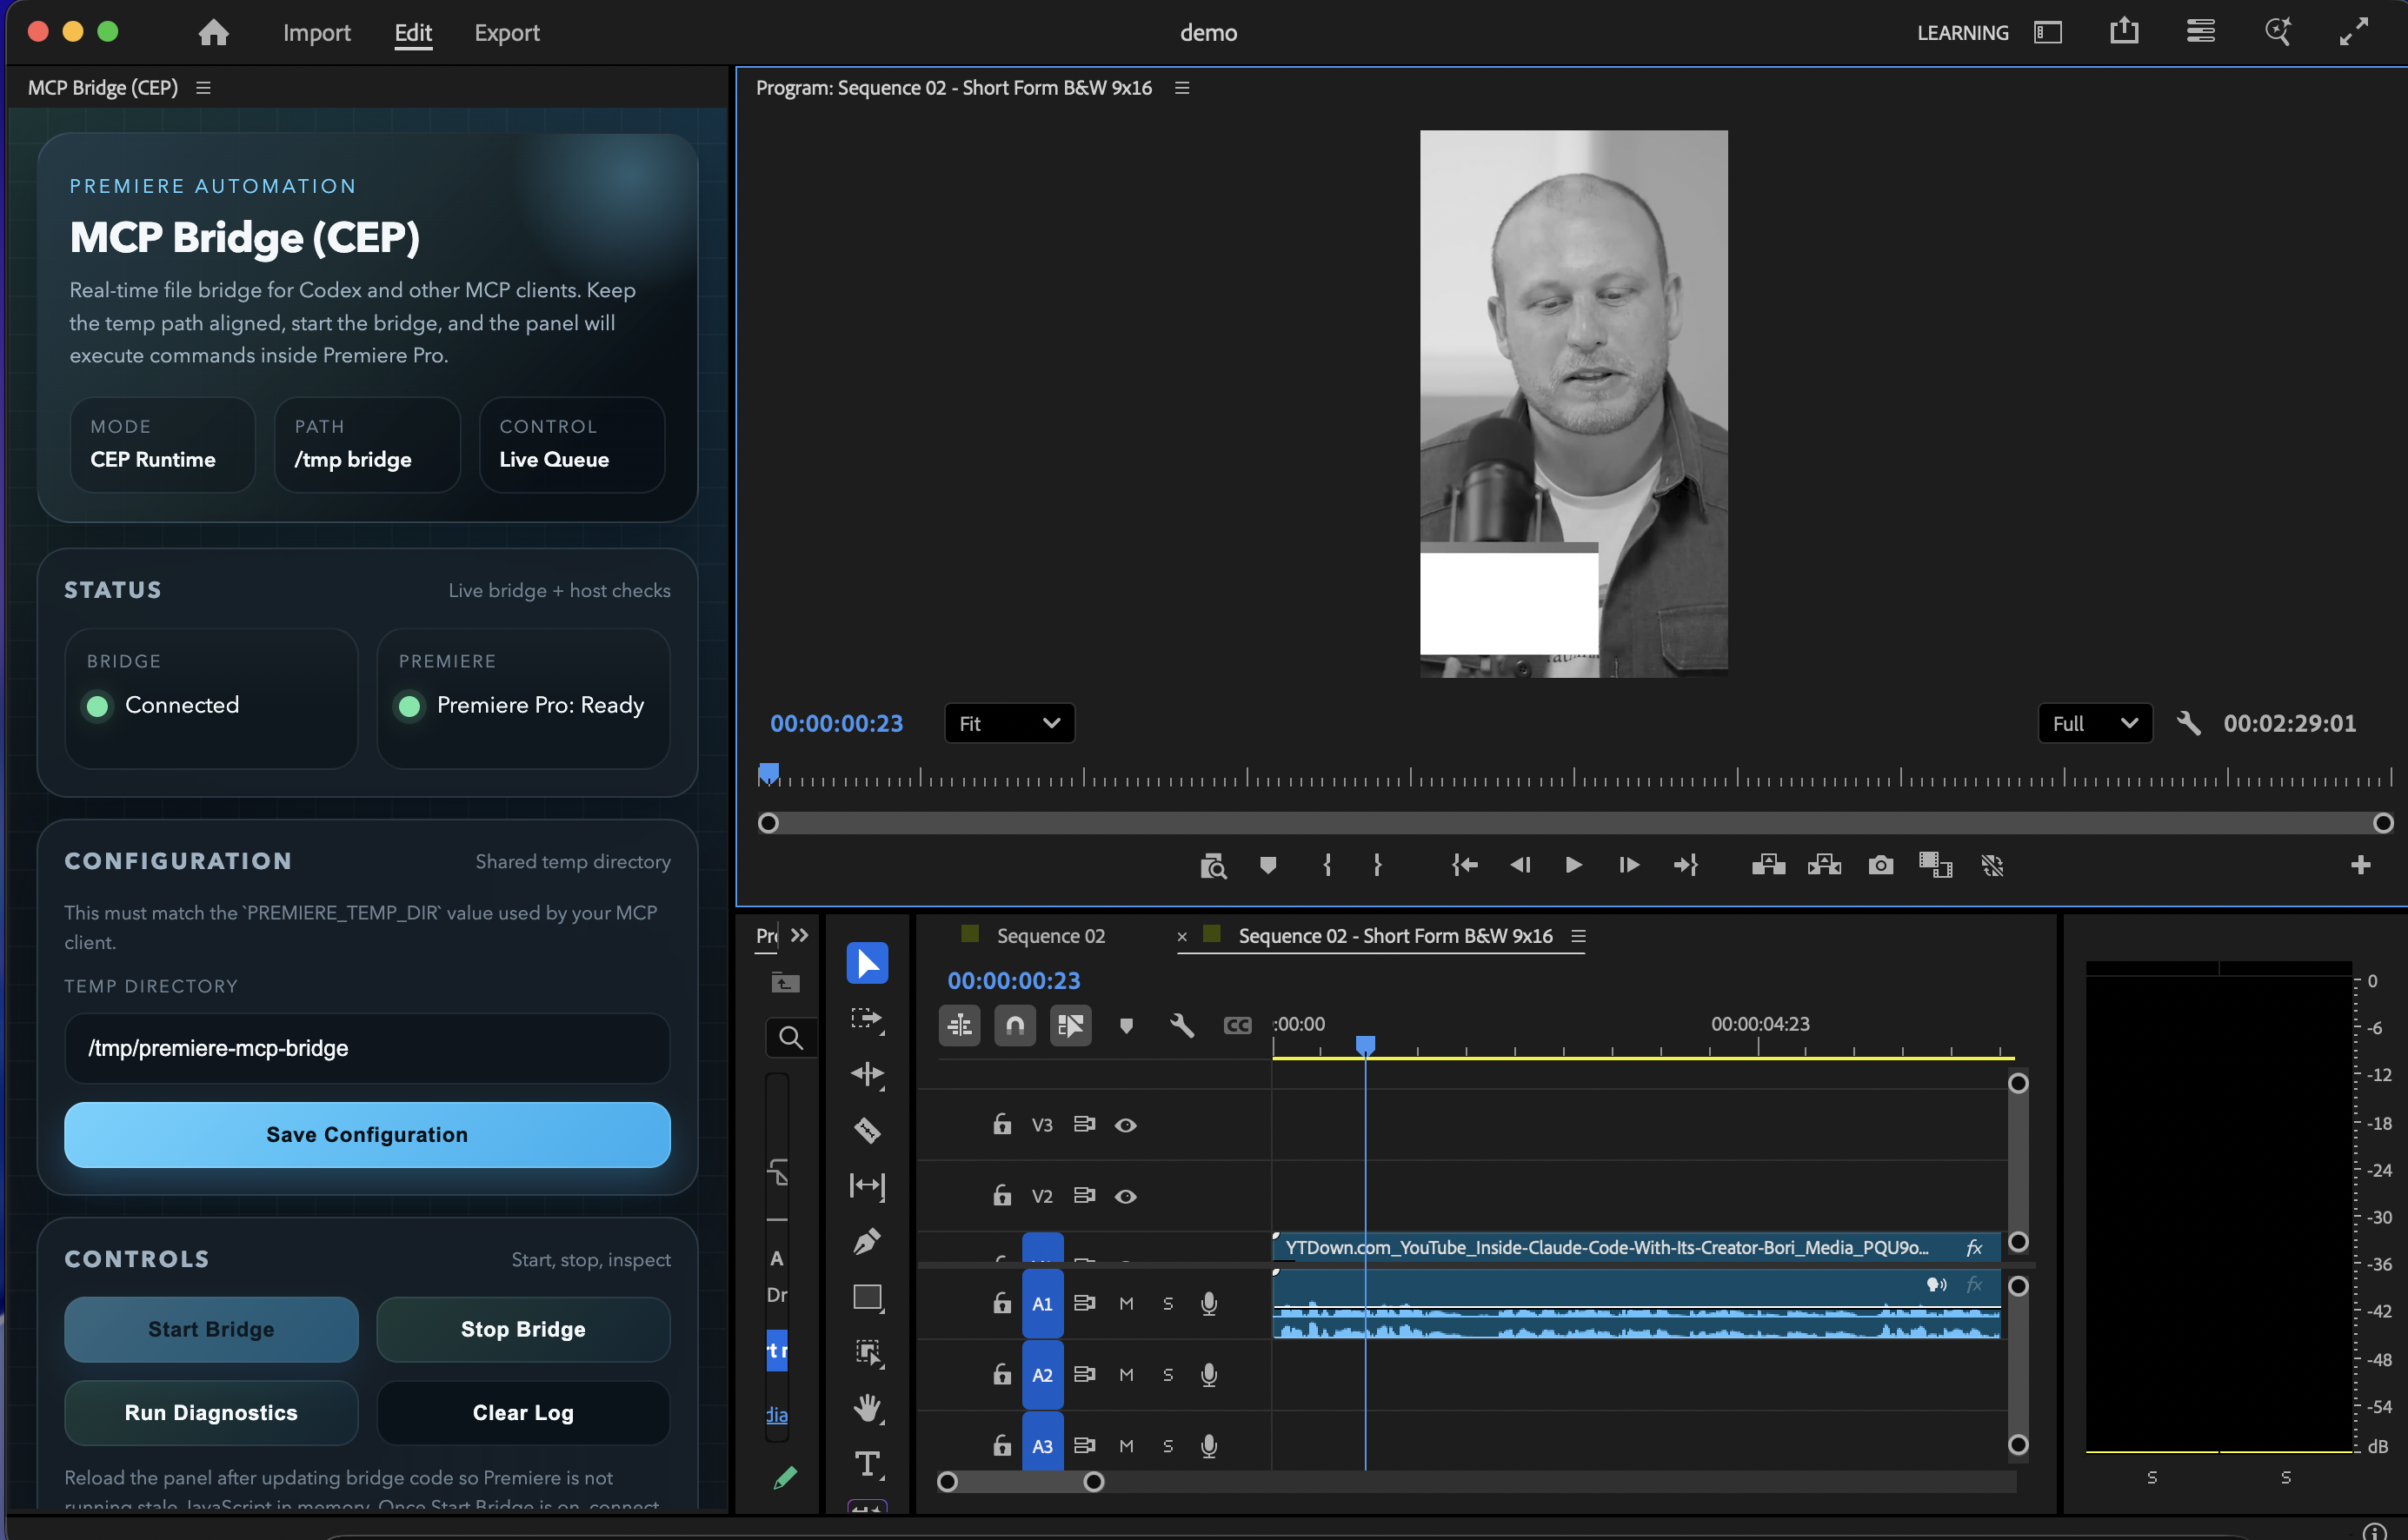
Current CEP panel UI inside Premiere Pro, using the refreshed bridge controls and status layout.
Current Status
This repository is currently validated for:
- macOS
- Windows installer/config smoke checks through GitHub Actions
- Adobe Premiere Pro 2020+ (actively used and tested on Premiere Pro 26.0)
- Node.js 20+
- MCP v2 server transport with modern stateless protocol discovery
- the included macOS installer path for Claude Desktop
- the included Windows installer path for GitHub Copilot in VS Code and Claude Desktop config
- manual MCP registration for Codex, Claude Code, and similar MCP clients
Current catalog status as of July 29, 2026:
281Premiere Pro MCP tools are exposed for AI-driven video editing- coverage spans project setup, media ingest, bins, sequences, timeline editing, transitions, effects, keyframes, captions, markers, metadata, proxies, multicam, color, audio, exports, and higher-level assembly workflows
- the catalog includes practical agent workflows such as product-spot assembly, motion-graphics demos, timeline razoring, caption reads, audio ducking, scene edit detection, EDL import, export readiness validation, and linked audio/video operations
Most recent completed local live validation:
281active tools are exposed;validate_project_for_exportreplaces the removed AE comp import path with a non-destructive export readiness audit, and the merged main branch includesdetect_silence0known parked or placeholder tools are advertisedimport_ae_compsis intentionally not advertised because Premiere returnedfalsefor real.aepfixtures in this environment and a generic.aepimport can wedge the CEP bridge
The full live sweep output is written to /tmp/premiere-mcp-bridge/live-tool-sweep.json when you run the verifier.
What You Get
The server covers project operations, ingest, sequence creation, timeline editing, transitions, effects, keyframes, metadata, exports, and higher-level assembly workflows.
Example prompts:
- "List all sequences and show me which one is active."
- "Import these three shots and build a rough product spot."
- "Add cross dissolves to every cut on video track 1."
- "Apply Gaussian Blur to the middle clip."
- "Apply the
Black & Whiteeffect to the active short-form clip." - "Razor the interview sequence at 12.5 seconds across all audio and video tracks."
- "Export the active sequence as FCP XML."
For monochrome looks, prefer apply_effect with Black & White instead of trying to force black and white through generic saturation-only adjustments.
Before editing, you can also attach the premiere://config/get_instructions resource to give the model Premiere-specific operating guidance.
High-level workflow tools included:
build_motion_graphics_demoassemble_product_spotbuild_brand_spot_from_mogrt_and_assets
assemble_product_spot and build_brand_spot_from_mogrt_and_assets now support an optional clipPlan argument so an LLM can direct per-clip timing, track placement, transitions, motion, trims, effects, and color adjustments instead of relying on fixed template defaults.
Agent Skill
If you want Codex, Claude Code, or another agent to handle installation, verification, and day-to-day usage correctly, install the included Agent Skill:
npx skills add hetpatel-11/Adobe_Premiere_Pro_MCP --skill premiere-pro-mcp
Or install directly from the skill path:
npx skills add https://github.com/hetpatel-11/Adobe_Premiere_Pro_MCP/tree/main/skills/premiere-pro-mcp
The skill teaches agents how to install the MCP, start and verify the CEP bridge, use the Premiere tools safely, import real media before editing, prefer sequence-aware operations, and run diagnostics when something fails.
Fastest Install (macOS)
git clone https://github.com/hetpatel-11/Adobe_Premiere_Pro_MCP.git
cd Adobe_Premiere_Pro_MCP
npm run setup:mac
That installer will:
- install dependencies
- build
dist/index.js - enable Adobe CEP debug mode
- install the
MCP Bridge (CEP)extension - create
/tmp/premiere-mcp-bridge - add the
premiere-proMCP entry to Claude Desktop
Important:
- the supported UI bridge in this repo is the
MCP Bridge (CEP)extension - the installer enables Adobe CEP debug mode automatically
- if Premiere does not expose the extension cleanly on your machine, enable UXP Plugins > Enable developer mode in Premiere Pro preferences before opening the bridge panel
npm run setup:macis the easiest path for Claude Desktop on macOS because it updates Claude Desktop config automatically
After the installer finishes:
- Quit and reopen your MCP client if it reads config on startup. If you used the installer, that means Claude Desktop.
- Quit and reopen Premiere Pro.
- In Premiere Pro on macOS, open
Premiere Pro > Preferences > Pluginsand enable UXP Plugins > Enable developer mode. - Restart Premiere Pro if the setting was changed.
- Open
Window > Extensions > MCP Bridge (CEP). - Set
Temp Directoryto/tmp/premiere-mcp-bridge. - Click
Save Configuration. - Click
Start Bridge. - Connect from Codex, Claude Code, Claude Desktop, or another MCP client using the same temp directory.
- If commands fail, click
Run Diagnosticsand send back/tmp/premiere-mcp-bridge/premiere-mcp-diagnostics-latest.json.
If you need a visual reference for the developer mode toggle, it looks like this:
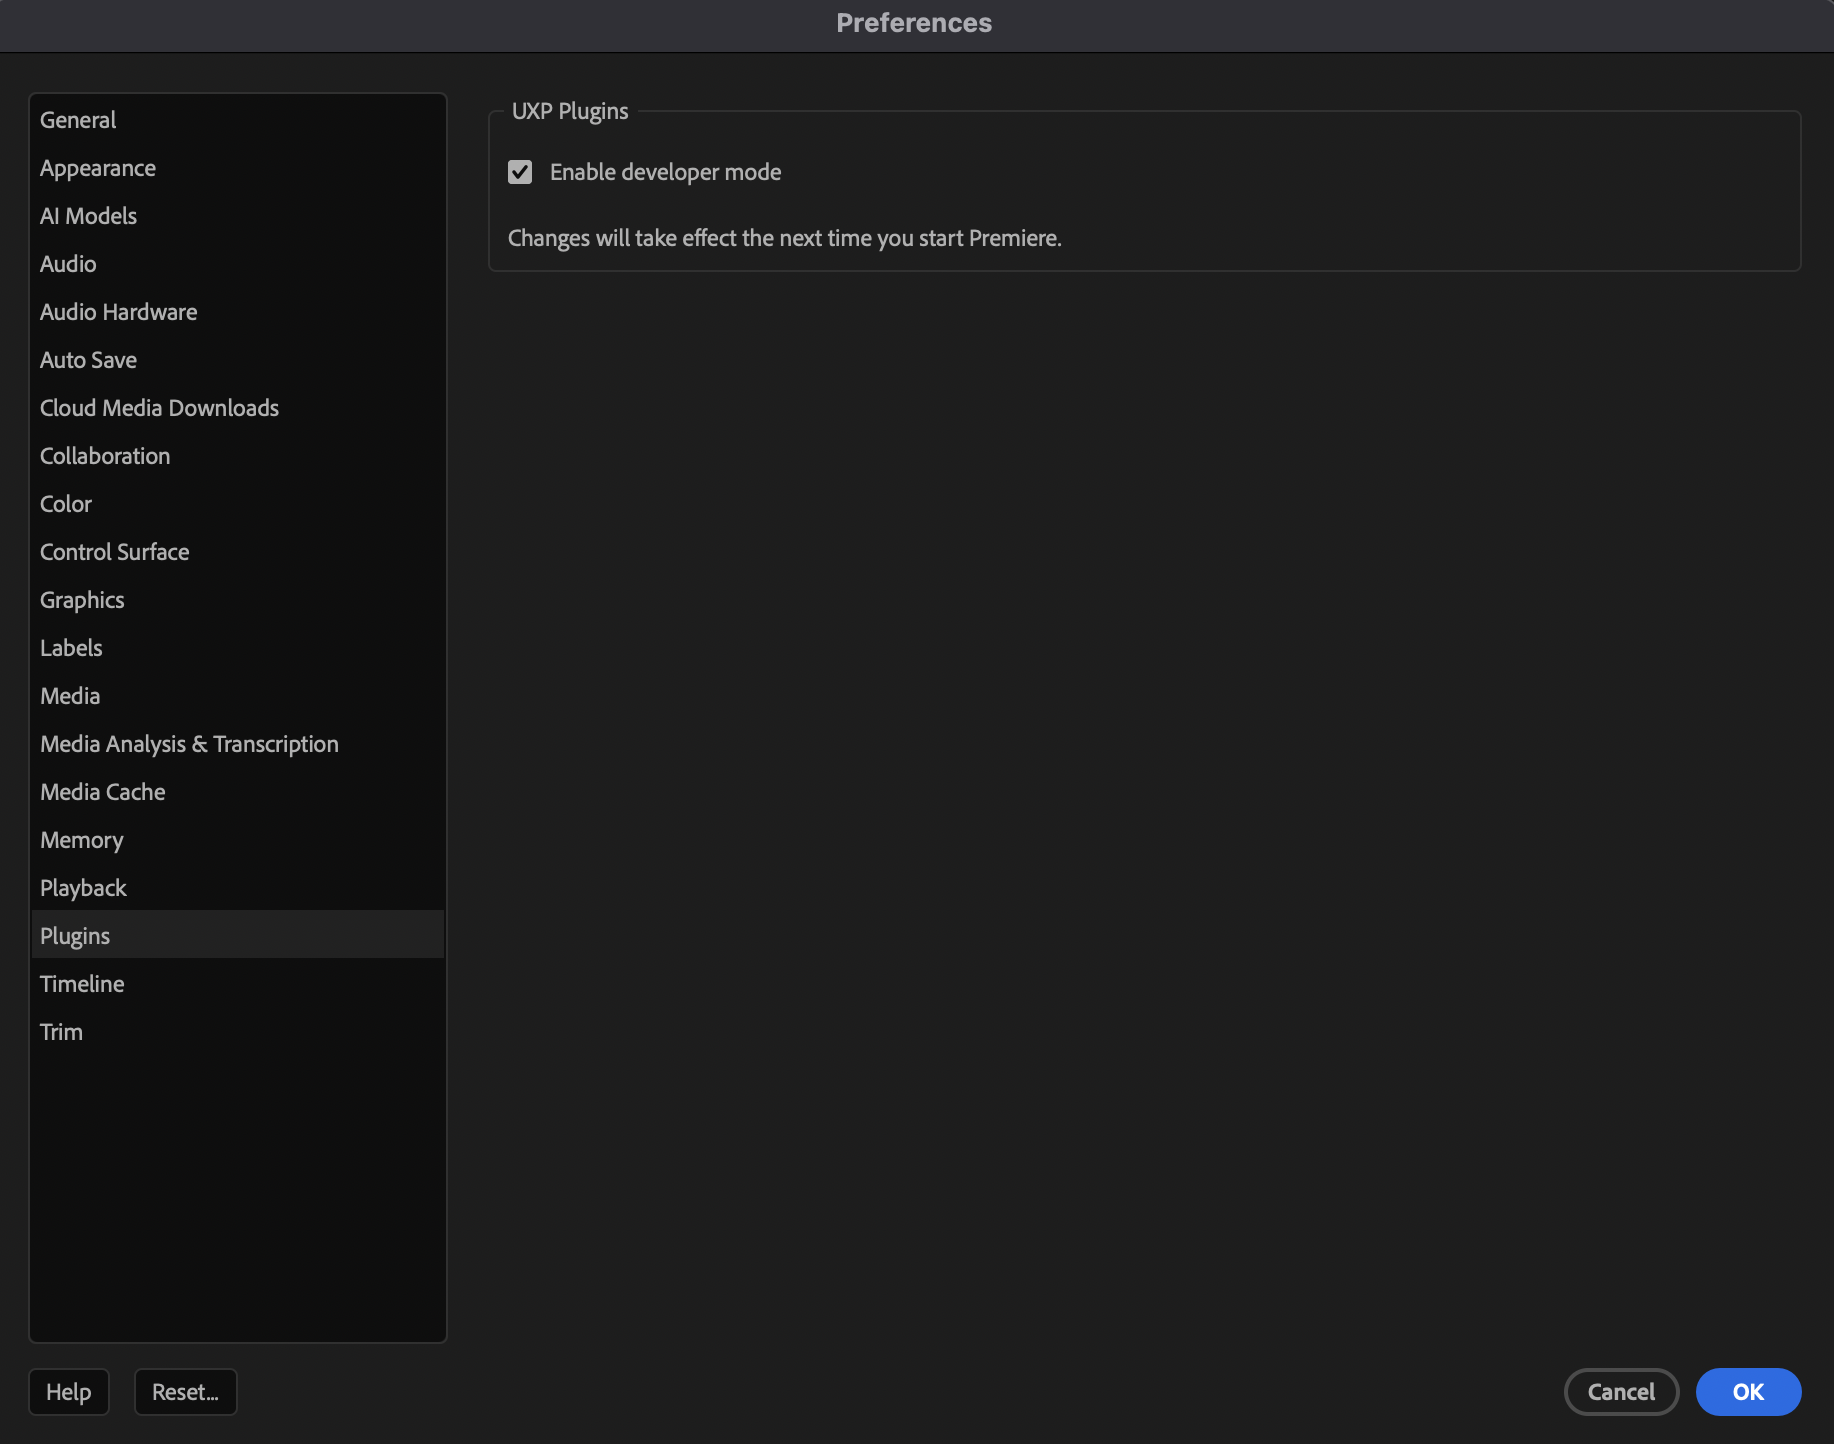
If the panel reports that Premiere is ready after Start Bridge, the bridge is live.
Fastest Install (Windows)
git clone https://github.com/hetpatel-11/Adobe_Premiere_Pro_MCP.git
cd Adobe_Premiere_Pro_MCP
npm run setup:win
That installer will:
- install dependencies
- build
dist\index.js - enable Adobe CEP debug mode under
HKCU:\Software\Adobe\CSXS.9throughCSXS.15 - install the
MCP Bridge (CEP)extension into%APPDATA%\Adobe\CEP\extensions\MCPBridgeCEP - create
%TEMP%\premiere-mcp-bridge - add the
premiere-proMCP entry to GitHub Copilot in VS Code at%APPDATA%\Code\User\mcp.json - add the
premiere-proMCP entry to Claude Desktop at%APPDATA%\Claude\claude_desktop_config.json
Optional flags:
powershell -NoProfile -ExecutionPolicy Bypass -File .\scripts\install-windows.ps1 -SkipCopilotConfig
powershell -NoProfile -ExecutionPolicy Bypass -File .\scripts\install-windows.ps1 -SkipClaudeDesktopConfig
powershell -NoProfile -ExecutionPolicy Bypass -File .\scripts\install-windows.ps1 -SkipAdobeDebugMode
After the installer finishes:
- Quit and reopen VS Code and/or Claude Desktop.
- Quit and reopen Premiere Pro.
- Open
Window > Extensions > MCP Bridge (CEP). - Set
Temp Directoryto%TEMP%\premiere-mcp-bridge. - Click
Save Configuration. - Click
Start Bridge. - Click
Test Connection.
Windows note: the installer and config path are smoke-tested on GitHub Actions Windows runners. A full Windows Premiere validation still requires a real Windows machine with Premiere Pro installed, the CEP panel visible in Premiere, and a live bridge round trip.
Install By Client
Claude Desktop
On macOS, use:
npm run setup:mac
On Windows, use:
npm run setup:win
Both installers automatically write the MCP entry for Claude Desktop.
GitHub Copilot in VS Code
On Windows, use:
npm run setup:win
The installer writes this server to VS Code's MCP config at %APPDATA%\Code\User\mcp.json. Restart VS Code after the installer finishes, then use VS Code's MCP server list to confirm premiere-pro is available.
Codex
Build the server first:
npm install
npm run build
Then add the MCP server on a single line:
codex mcp add premiere_pro --env PREMIERE_TEMP_DIR=/tmp/premiere-mcp-bridge -- node /absolute/path/to/Adobe_Premiere_Pro_MCP/dist/index.js
Replace /absolute/path/to/Adobe_Premiere_Pro_MCP with the real absolute path to your clone. For example:
codex mcp add premiere_pro --env PREMIERE_TEMP_DIR=/tmp/premiere-mcp-bridge -- node /Users/yourname/Downloads/Adobe_Premiere_Pro_MCP/dist/index.js
Before restarting Codex, verify the built entrypoint exists:
ls -l /Users/yourname/Downloads/Adobe_Premiere_Pro_MCP/dist/index.js
Claude Code
Build the server the same way:
npm install
npm run build
Then register the MCP server in Claude Code using the same built dist/index.js entrypoint and the same temp directory:
command: node /absolute/path/to/Adobe_Premiere_Pro_MCP/dist/index.js
env: PREMIERE_TEMP_DIR=/tmp/premiere-mcp-bridge
If you use a local MCP config file instead of a helper command, point it at the same dist/index.js and set the same env var.
Other MCP Clients
Use the same manual registration approach as Claude Code:
command: node /absolute/path/to/Adobe_Premiere_Pro_MCP/dist/index.js
env: PREMIERE_TEMP_DIR=/tmp/premiere-mcp-bridge
Important for all manual client setups:
- keep the command on one line
- use the real absolute path to
dist/index.js - restart the client after adding or updating the MCP entry
- start the CEP bridge inside Premiere and confirm the temp directory is exactly
/tmp/premiere-mcp-bridge
Verify the Install
Run the built-in checks:
npm run setup:doctor
That validates:
- Node.js version
- built server output
- CEP extension install
/tmp/premiere-mcp-bridge- Adobe CEP debug mode
- the Claude Desktop config entry when you use the installer path
- CEP panel diagnostics written to
/tmp/premiere-mcp-bridge/premiere-mcp-diagnostics-latest.json
On Windows, run:
npm run setup:doctor:win
That validates the built server, CEP extension install, %TEMP%\premiere-mcp-bridge, Adobe CEP debug mode, the GitHub Copilot VS Code MCP config, and the Claude Desktop MCP config.
For a deeper end-to-end check, use a disposable Premiere project and run:
node scripts/live-tool-sweep.mjs
This creates temporary Sweep ... sequences in the currently open project so the toolchain is exercised against real data.
How the Bridge Works
+-----------+        +-----------+        +-----------+
|  Client   |  MCP   | Node.js   | Files  | CEP Panel |
| (Codex+)  |<------>| MCP Server|<------>| (Premiere)|
+-----------+        +-----------+        +-----------+
                                                 |
                                                 v
                                          +-----------+
                                          | Premiere  |
                                          | DOM / QE  |
                                          +-----------+
- The client calls an MCP tool.
- The Node server generates ExtendScript plus shared helpers.
- The script is written into
/tmp/premiere-mcp-bridge. - The CEP panel polls that directory and runs the script through
CSInterface.evalScript(). - The panel writes the result back to the response file.
- The server returns structured JSON to the MCP client.
Tool Coverage
The 281 exposed tools are grouped roughly like this:
- Discovery and project inspection
- Project and sequence management
- Media import and bin management
- Timeline placement and clip operations
- Effects, transitions, color, and keyframes
- Markers, metadata, labels, and work-area control
- Export and interchange helpers
- MOGRT, captions, proxies, and relink helpers
- High-level ad / promo assembly workflows
Use MCP introspection in your client to see the full tool catalog and exact schemas.
Real Limits
This project is much more usable than the original prototype, but it is not magic.
- Premiere scripting still does not expose every UI operation cleanly.
- Professional title design still depends on real MOGRT assets or external graphics workflows.
get_render_queue_statusis only useful when Adobe Media Encoder integration is available.- The best results come from real source footage, real audio, and real brand assets. The automation layer assembles and manipulates them; it does not replace editorial judgment.
Troubleshooting
If the tools are visible but calls fail:
- Confirm Premiere Pro is open with a project loaded.
- Open
Window > Extensions > MCP Bridge (CEP). - Confirm the temp directory is exactly
/tmp/premiere-mcp-bridge. - Click
Start Bridge. - If you updated the bridge code, right-click the panel and choose
Reload. - Retry the command.
If the MCP client cannot find the server:
- Verify the absolute path to
dist/index.js. - Verify
PREMIERE_TEMP_DIR=/tmp/premiere-mcp-bridge. - Restart the MCP client after changing config.
- Run
npm run setup:doctor.
Developer Notes
Useful commands:
npm run build
npm test -- --runInBand
npm run setup:doctor
node scripts/live-tool-sweep.mjs
See:
QUICKSTART.mdfor the shortest install pathKNOWN_ISSUES.mdfor current limitsCONTRIBUTING.mdfor development workflow
Reviews (0)
Sign in to leave a review.
Leave a reviewNo results found