rushes
Health Warn
- License — License: MIT
- Description — Repository has a description
- Active repo — Last push 0 days ago
- Low visibility — Only 5 GitHub stars
Code Fail
- fs module — File system access in .github/workflows/ci.yml
- process.env — Environment variable access in e2e/cues.spec.ts
- spawnSync — Synchronous process spawning in e2e/fixture.ts
- process.env — Environment variable access in e2e/fixture.ts
- network request — Outbound network request in e2e/fixture.ts
- network request — Outbound network request in e2e/formats.spec.ts
Permissions Pass
- Permissions — No dangerous permissions requested
No AI report is available for this listing yet.
Your agent shoots. You give notes. A local review desk for video made with AI agents: pin notes to the exact frame and your agent fixes them.

Your agent shoots. You give notes.
The review desk for video made with AI agents. Pin notes to the exact frame, edit the script,
pick the voice and the music. Your agent reads every note and fixes it.




Get started · How it works · The desk · Plain files · FAQ · For agents
https://github.com/user-attachments/assets/b9b3d872-297a-4afc-8657-902d11d175a1
Chat is a poor place to review a film
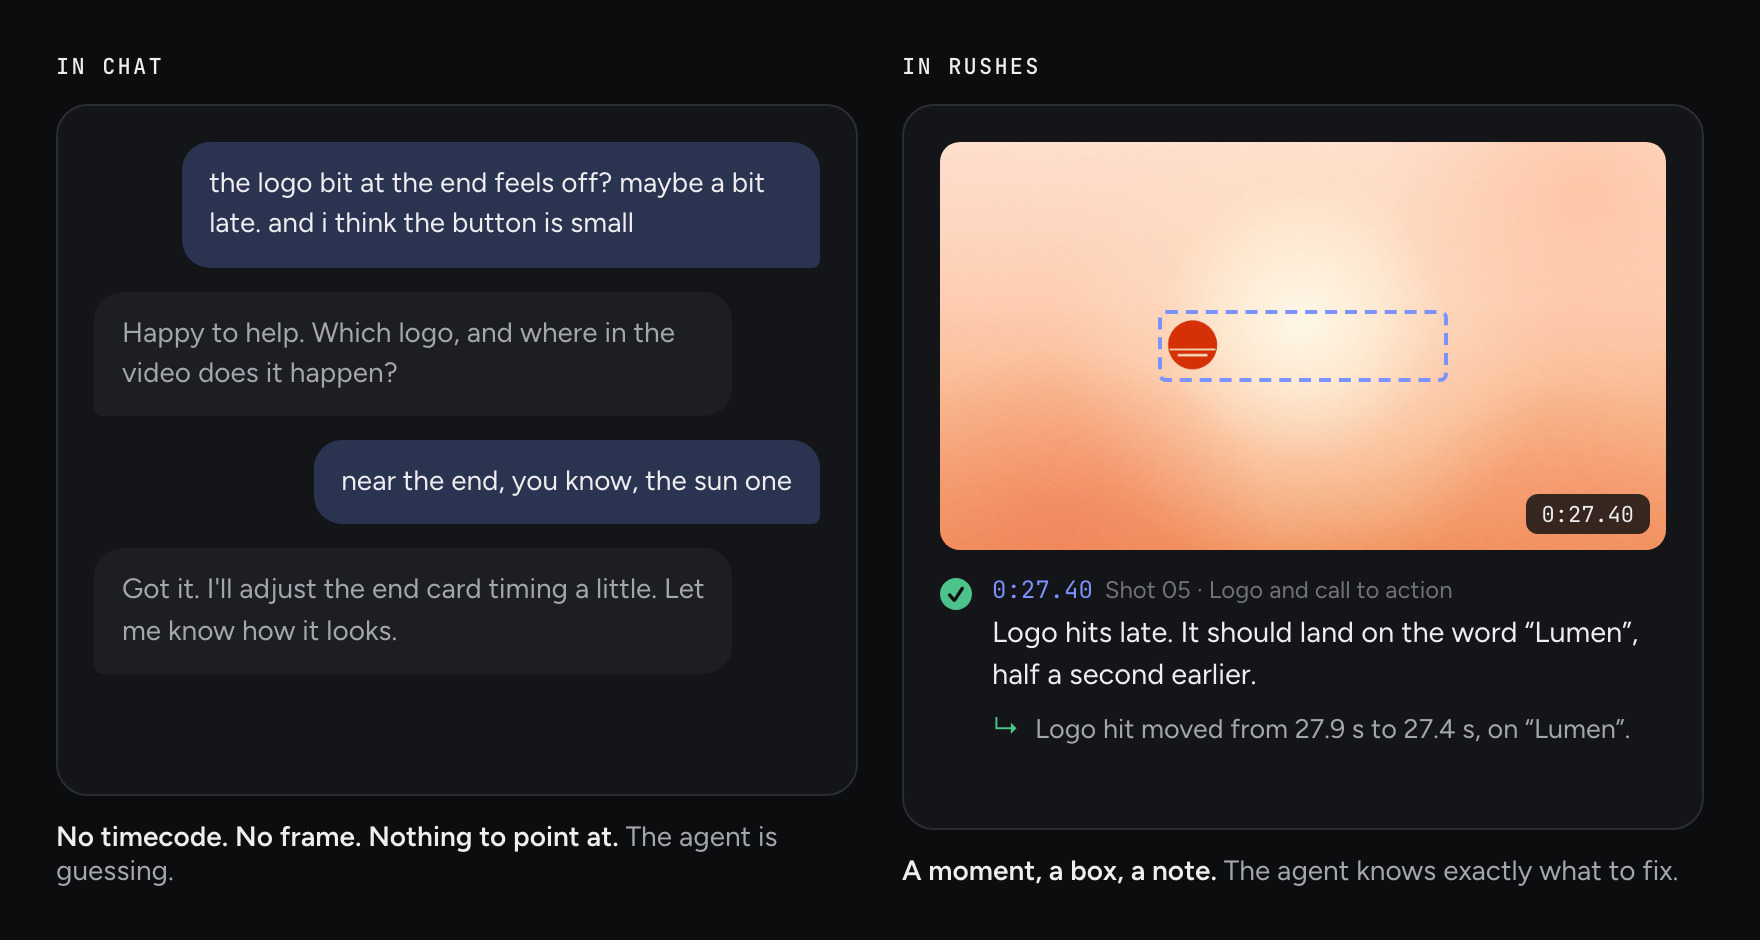
More and more video is made by agents. Claude, Codex and the rest can write the script, render the cut, and generate the voiceover, the music and the sound effects. What they can't do is show you the work. You get a folder of files and a filename. Then you type "the logo bit at the end feels off" into a chat box, and the agent asks which logo, and where.
Rushes is the desk that's missing. It shows each stage of the work in your browser, lets you mark it up the way an editor would, and hands every note back to your agent with the exact moment, box or line it's about.
Get started
Tell your agent:
Use github.com/iamredmh/rushes to start a new film.
That's all. Your agent reads the setup steps for agents and sets itself up. Then it asks you up to three questions, writes a brief and a script for you to approve, sketches the shots, and only builds once you've said yes.
Already have a film? Tell your agent:
Use github.com/iamredmh/rushes as my review tool for video, voiceover and music.
If you started it in the chat, your agent writes the brief from the conversation and registers the script, stills and files you've already made, and says what it had to guess.
It runs on your machine. There's no account, no API key and no server to sign up for. You need Node.js 20.19 or newer (or 22.12+ on the 22 line).
No project to hand? npx -y rushes demo builds an example on your machine and opens it.
Status: early. The Plan, Review, Visuals and Assets workspaces, the MCP tools and the CLI all work today.
How it works
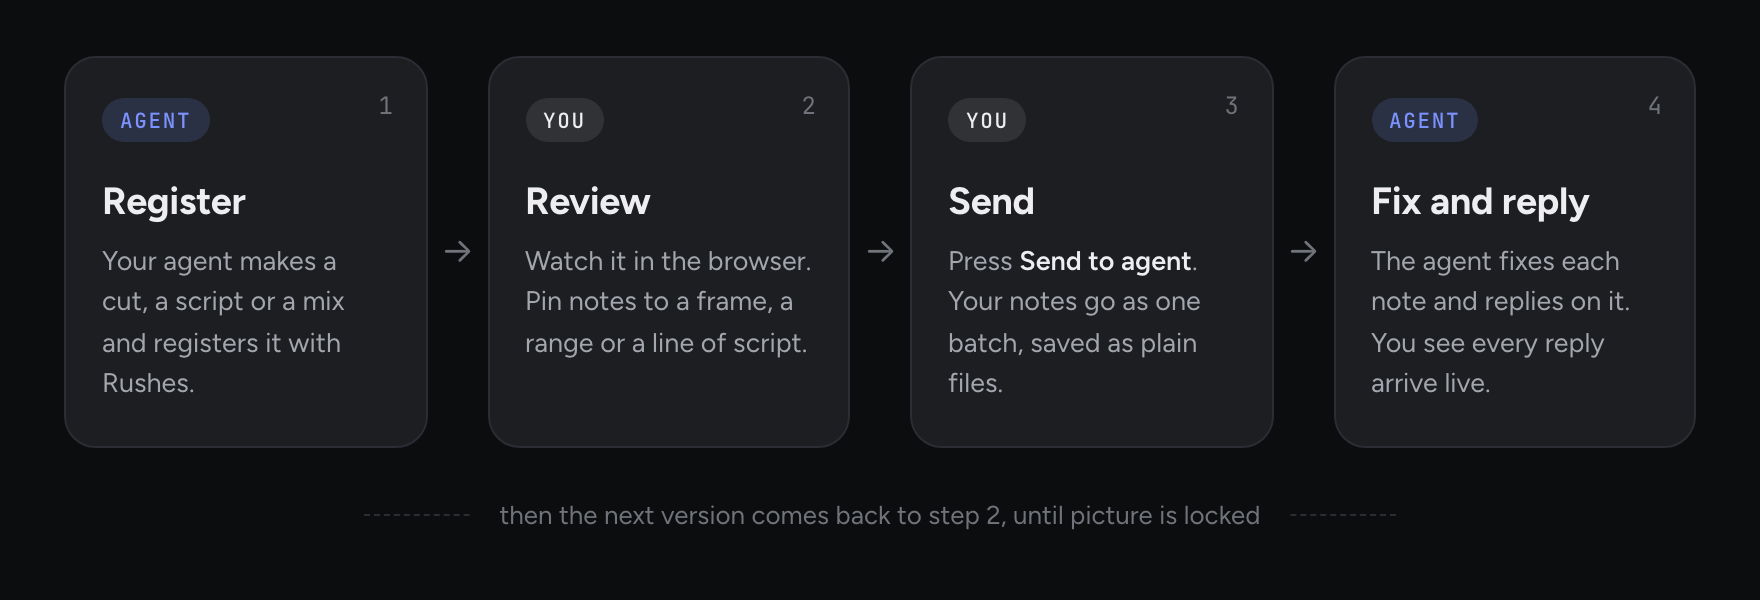
Your agent registers what it makes. You review it in the browser. When you press Send, at the foot of the notes panel, your notes go as one batch, saved as plain files in your project. The agent reads the batch, fixes each note and replies on it, and you see each reply arrive.
Every stage in one place
Four workspaces in the top bar, in the order the work happens; the first, Plan, has a switch for Brief, Script and Storyboard. Review holds the cut on the Timeline tab and a tab for each sound: Voice, Music and Effects. Then come Visuals and Assets. A tab unlocks as soon as it has something in it, and a locked tab tells you what to ask your agent for. The notes panel sits on the right, with its Notes and Activity tabs and Send at its foot. On Visuals and Assets, which have no notes panel, the status bar at the bottom offers Send while anything is waiting.
Timeline: point at the exact frame
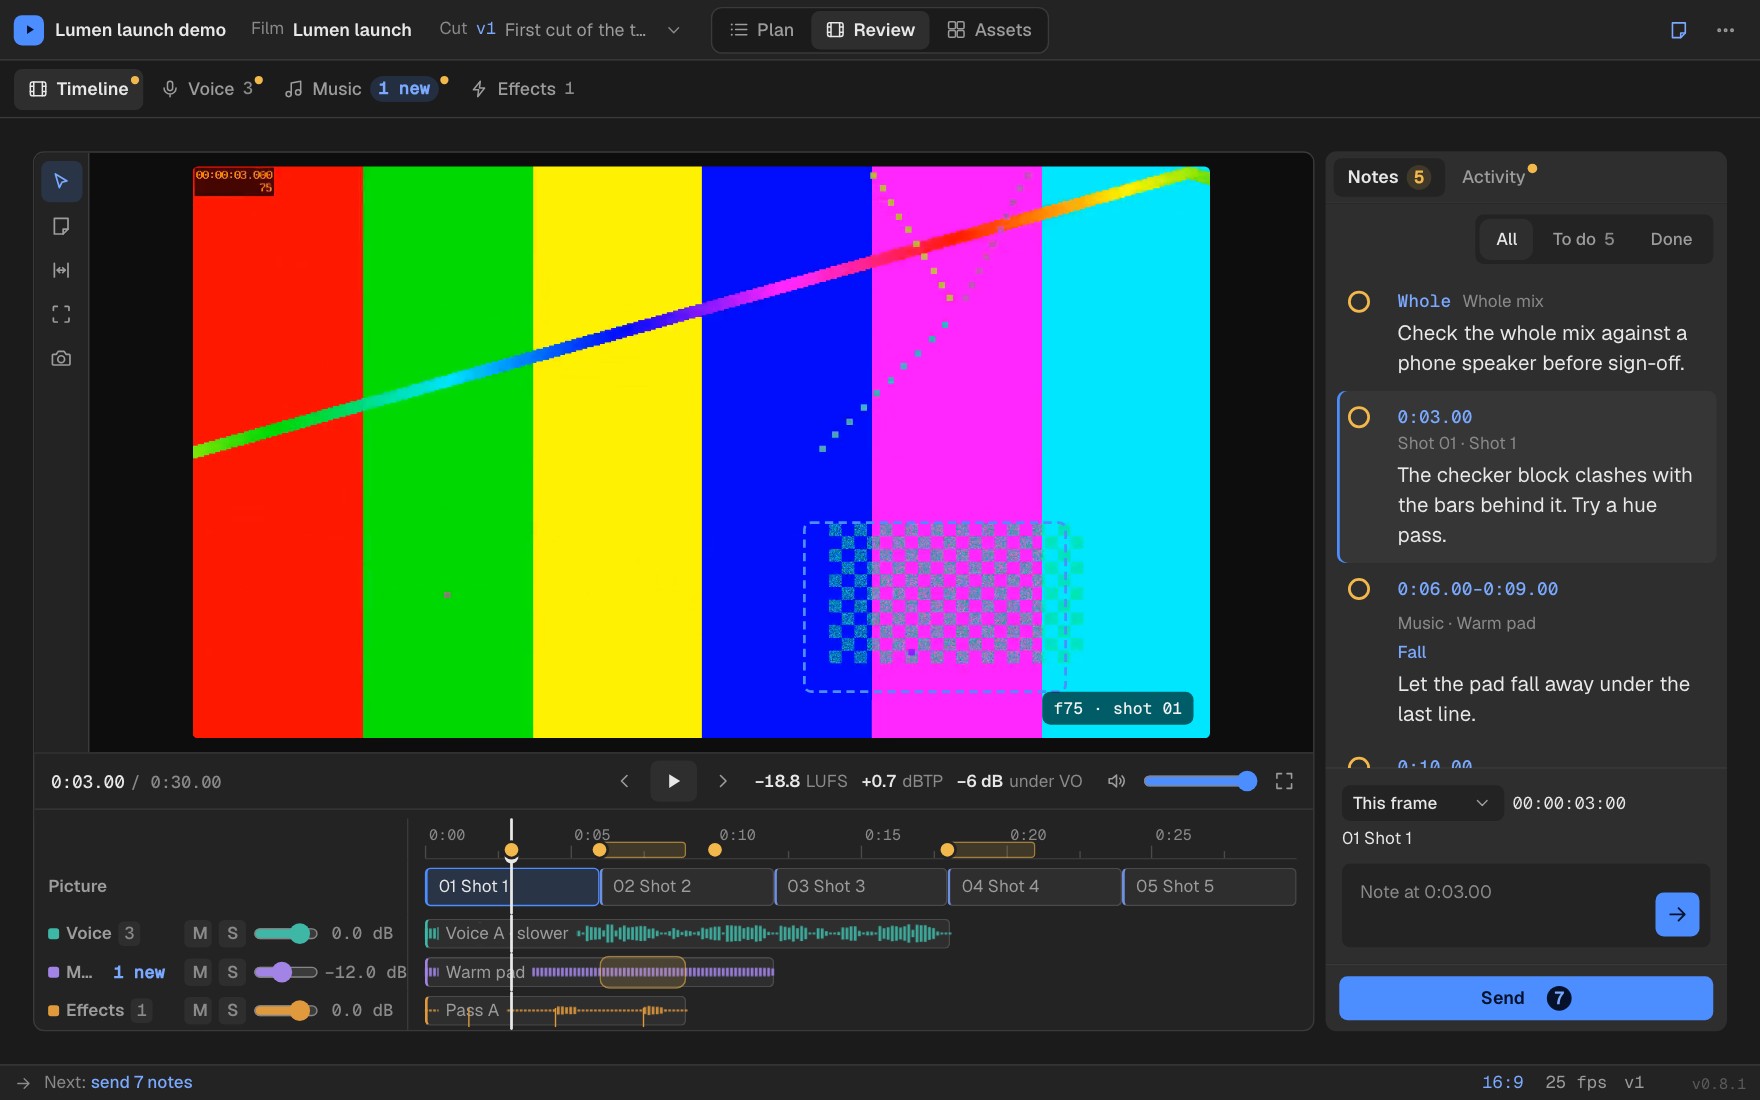
Pin a note to a moment, to a range, or to a box drawn on the frame. Grab a frame to show what you mean. Every note records the shot it falls in.
The agent replies on every note
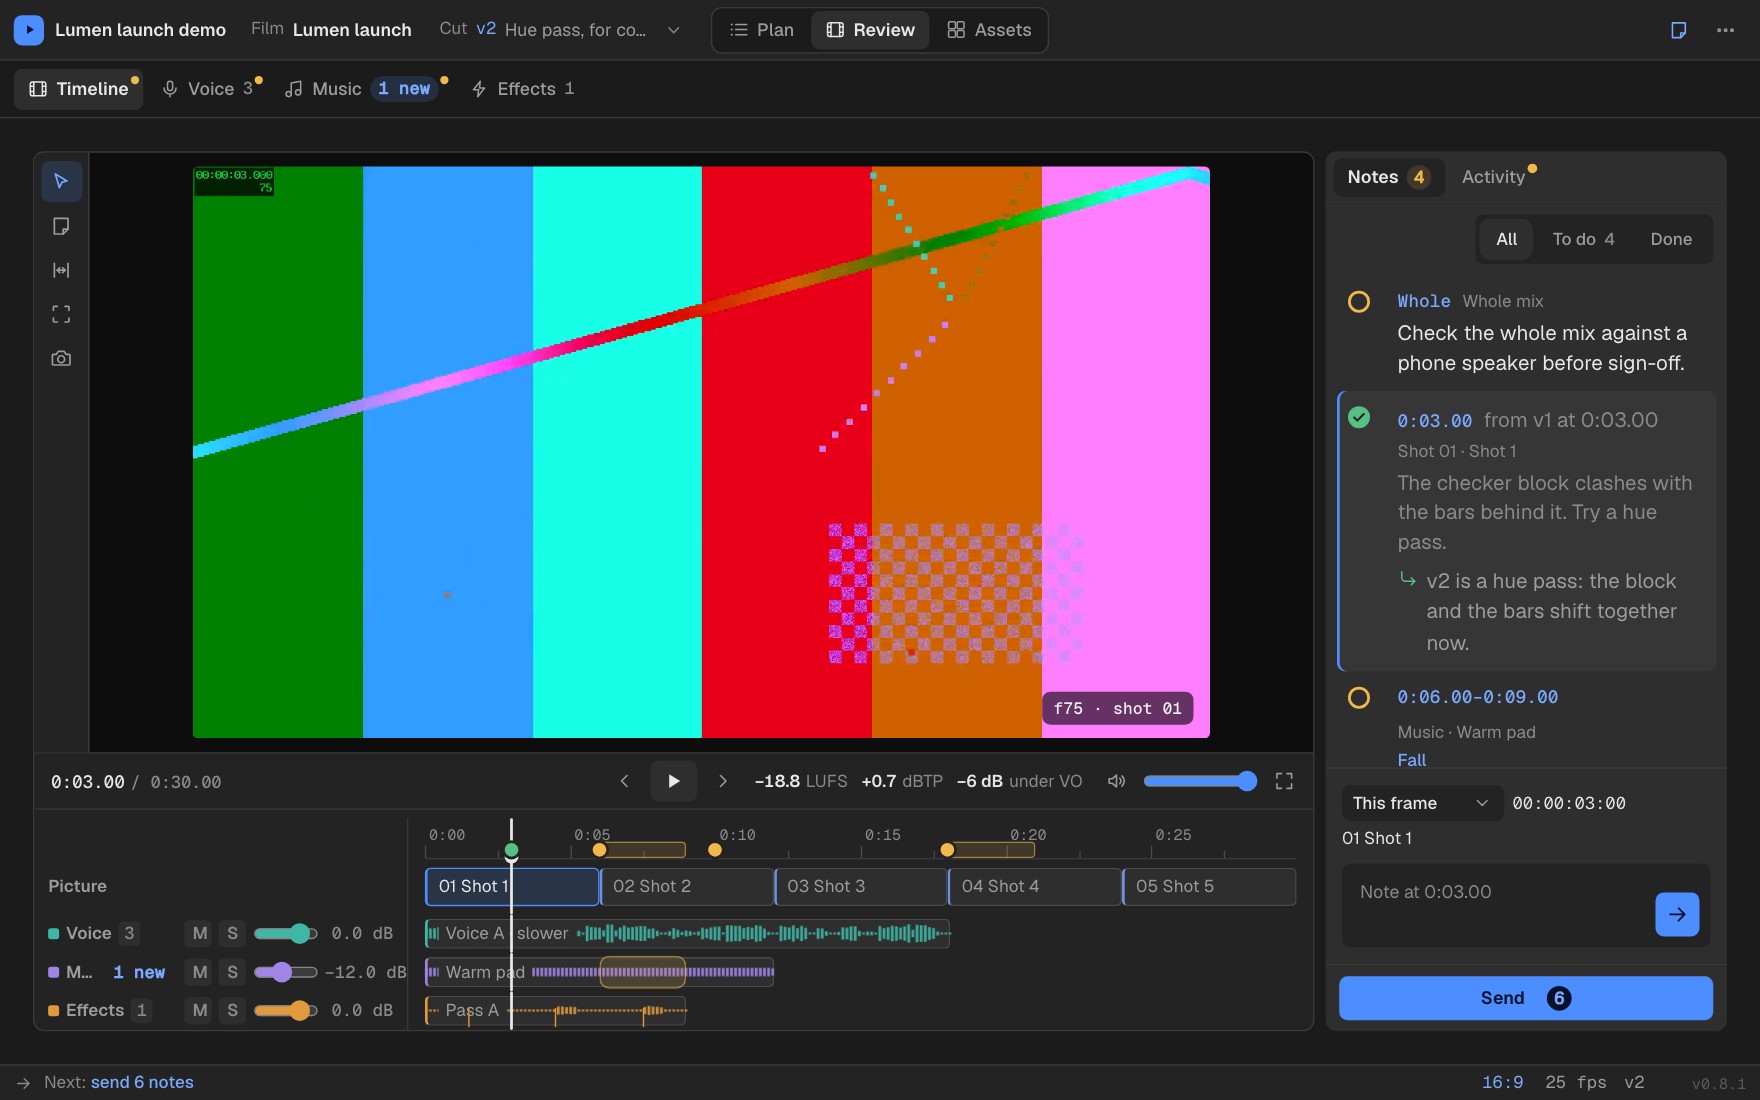
When the agent delivers a new cut, each note shows where it landed in the new version and what the agent did about it. A green tick means it's done. Anything the agent didn't fix stays open, with a reason.
Plan: the brief, the script and the storyboard
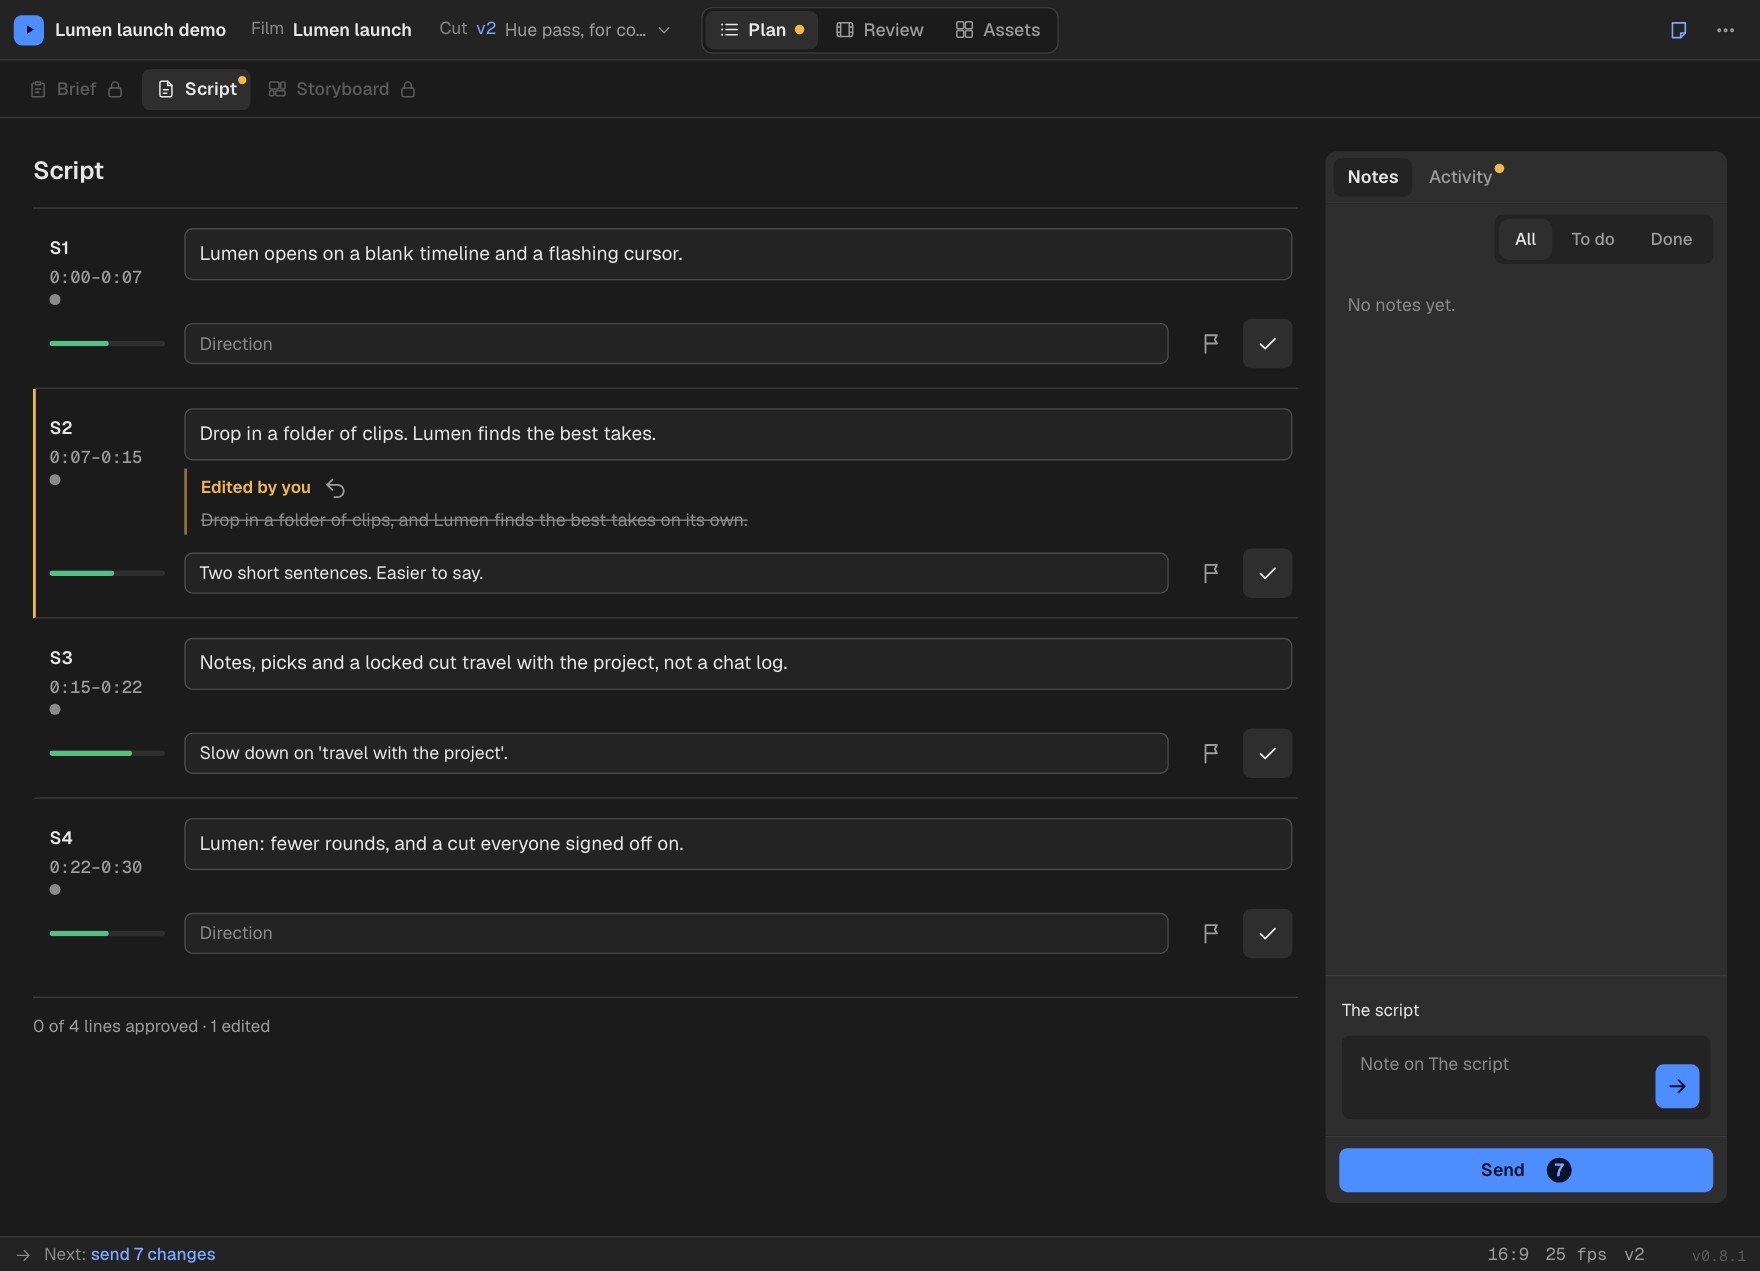
Rewrite a line, add a direction, flag it or approve it. Every line sits in a field; once you change one, its row says Edited by you, with the agent's wording struck through beneath it and a button to go back to it, and the change goes with your next Send. The bar on each row shows whether the line still fits its slot. When the agent adopts your edit, it records the next voice read from the corrected script.
Plan is one workspace, so planning never crowds the review. A switch at its top opens Brief, Script and Storyboard, each with a tick once it is approved and a dot while it has edits you haven't sent; key 1 comes back to the page you used last. Brief shows brief.md in your project folder, one field per section. Edit a section and Rushes writes it into the file; press Approve brief and it sets the file's status line. If your agent rewrites brief.md, the page follows without a reload. Storyboard works the same way over storyboard.md: a row per shot with its still (click it to enlarge), its description, a direction line and a tick to approve it. A line at the foot of each page counts what is approved and what you have edited. When the brief, every script line (if the film has a script) and every shot are approved, the Plan tab in the top bar shows a green check and the row above the page says Ready to build, with a prompt to copy. Rushes never stops your agent building before then: it only says what is still waiting.
Voice: compare reads, round by round
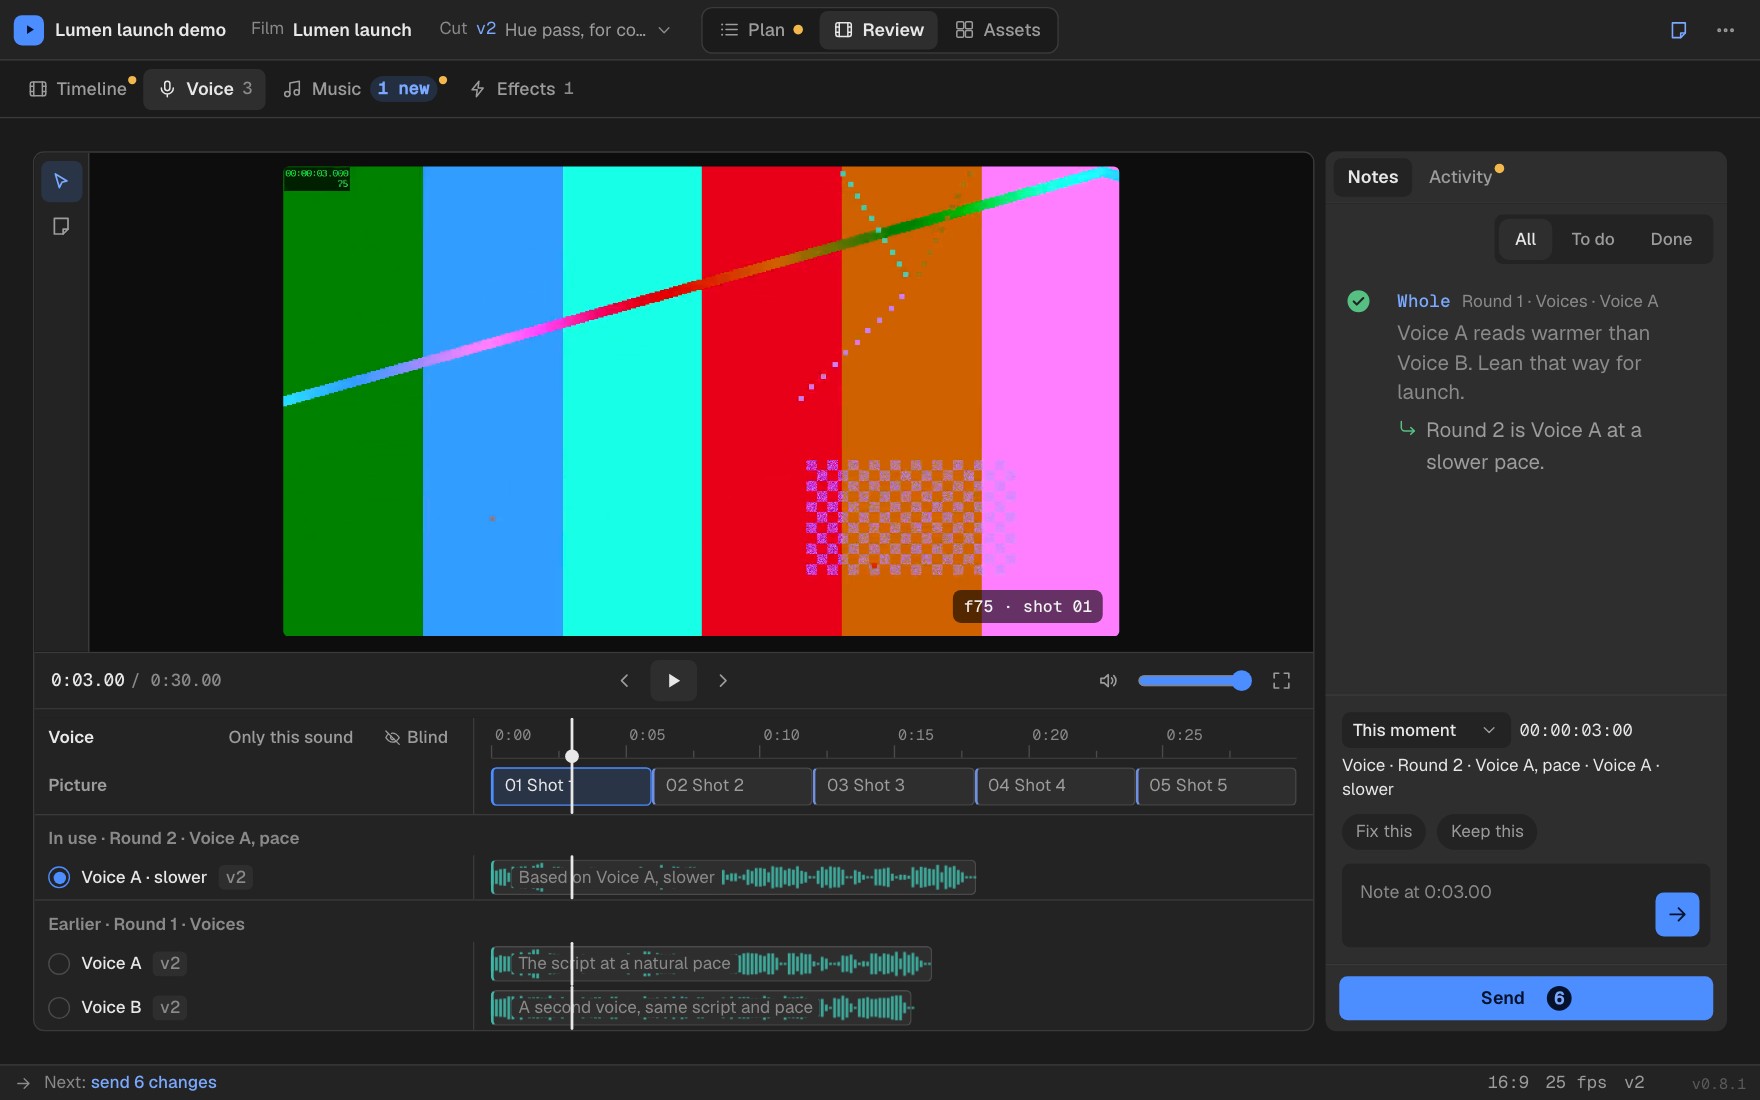
Reads of the same script sit side by side in rounds. Switch between them with no gap in playback, or turn on Blind to hide which is which. Leave a note on a whole read, or at a point in it. Each sound's tab lists its takes as New, In use, Earlier and Put away; a take isn't on the timeline until you pick it.
Music: audition the beds
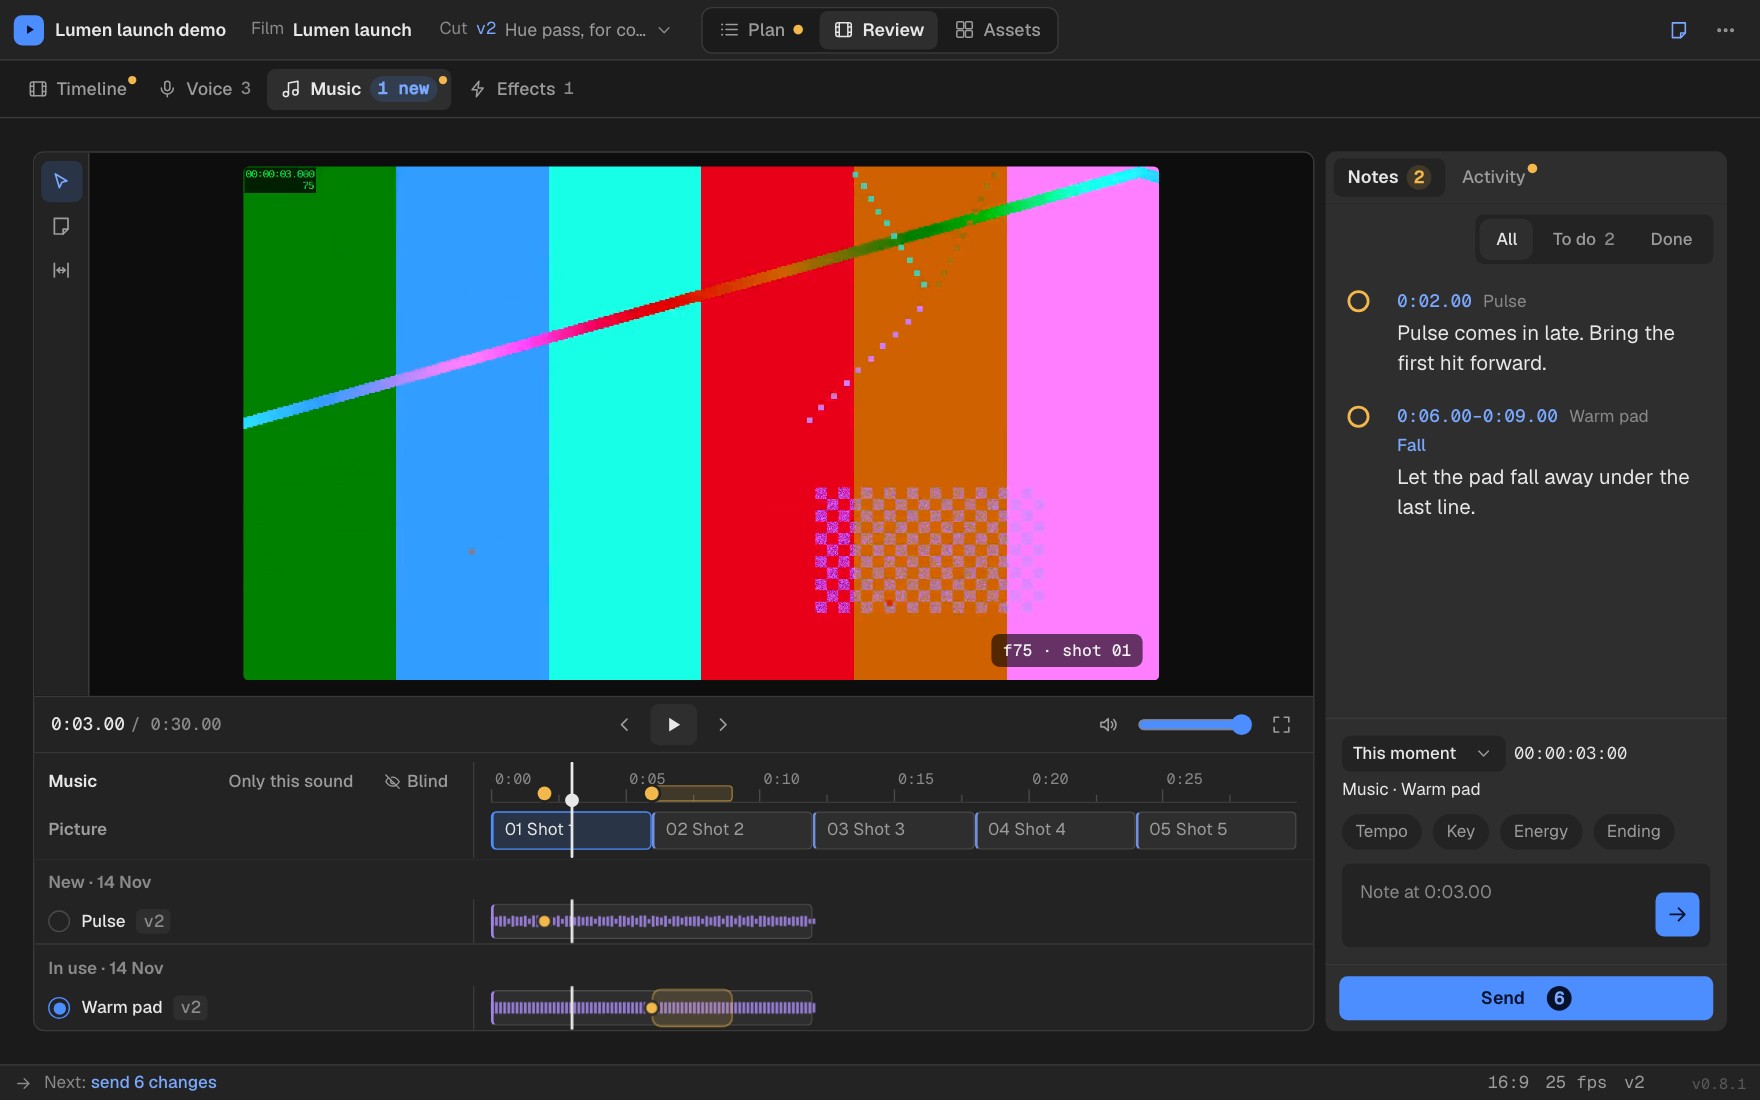
Switch beds instantly while the picture plays. Mark a range as Rise, Fall, Louder or Quieter, and your agent gets it as a note it can act on.
Visuals: mark up stills and carousels
The Visuals workspace (key 7) is for the stills, standalone images and carousels your agent makes next to a video. Each is a visual: one post, in the aspect ratios it comes in, shown one page at a time in a large frame. It scrolls from one visual to the next, and whichever visual crosses the middle of the view is the current one: it gets the outline, and it is the only one you can add a note to. A carousel has Previous and Next, a count, Full screen (for looking closely; you mark in the workspace) and a strip of its pages with the open notes on each.
Drag on the picture to mark a region, click to drop a point, or press Whole image for a note about all of it. The composer always says where the note will go ("Adding to: Launch carousel · page 3 · 4:5 · v2"), and a draft stays with the visual you began it on. Notes belong to a page, a ratio and a version, never to where you have scrolled, so every mark is still there when you come back. The notes column lists the whole workspace, grouped by visual and page, with the visual you are looking at highlighted and the rest faded; click a note to jump to it. When your agent registers a new version, your old notes stay with the version they were made on ("from v1"), marked until you tick them done.
Shelve a film
A film that went nowhere can be set aside without losing it. Open the More menu (⋯, at the right of the top bar) and choose Shelve film, or press Shift+S. The film leaves the Film menu's films in play, a toast offers Undo, and its open notes stop counting: they leave the Send count, the tab to-do counts, batches and Export notes, and they come back when you restore the film. Nothing is deleted: its cuts, notes, picks and files stay as they were.
The Film menu in the top bar switches films, each listed with its open notes. Shelved (N) at its foot lists the shelved films: choose one to look at it, view-only, under a "Shelved" banner, and Restore it from the menu or the banner. A new cut from your agent also brings a shelved film back. Your agent can see which films are shelved, but never shelves or restores one.
Effects: layers by sound
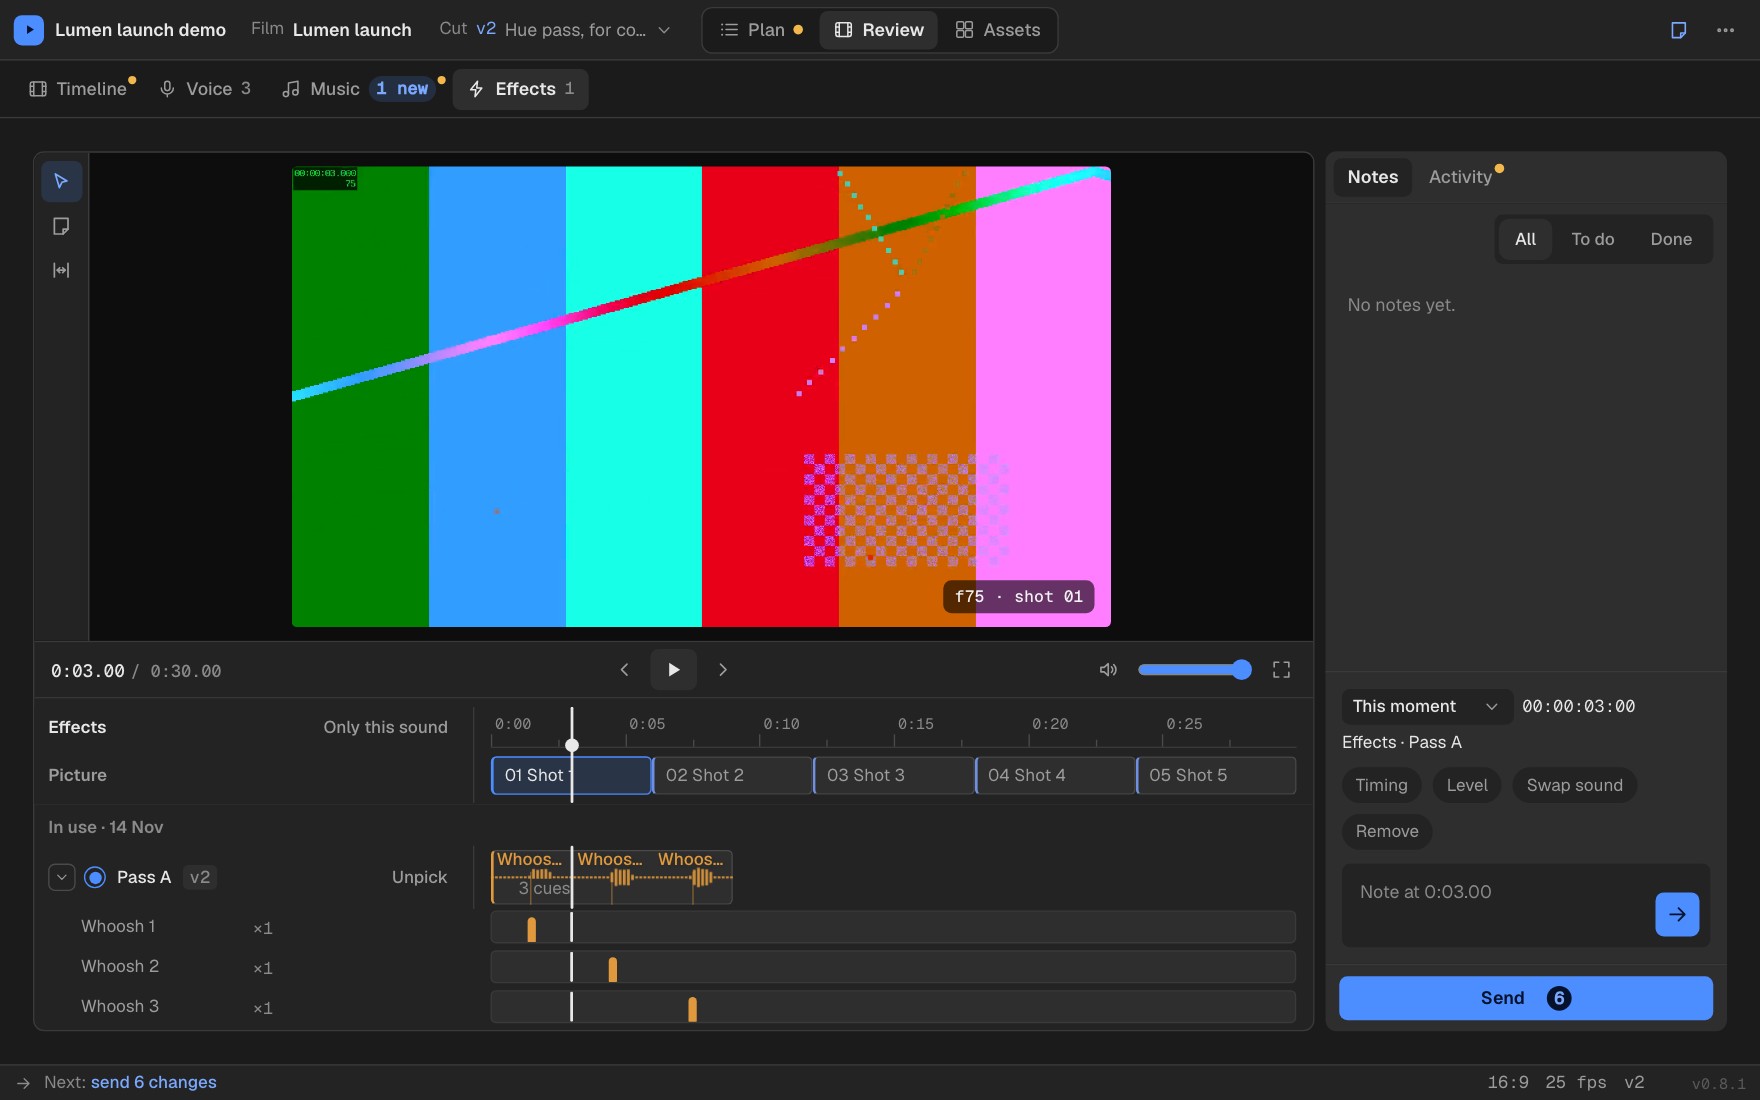
Every cue is labelled on the waveform. Open the pass into layers by sound: one row per sound, with a count, and a tick wherever it plays. Click a layer's file to hear that sample on its own.
Everything together on the Timeline
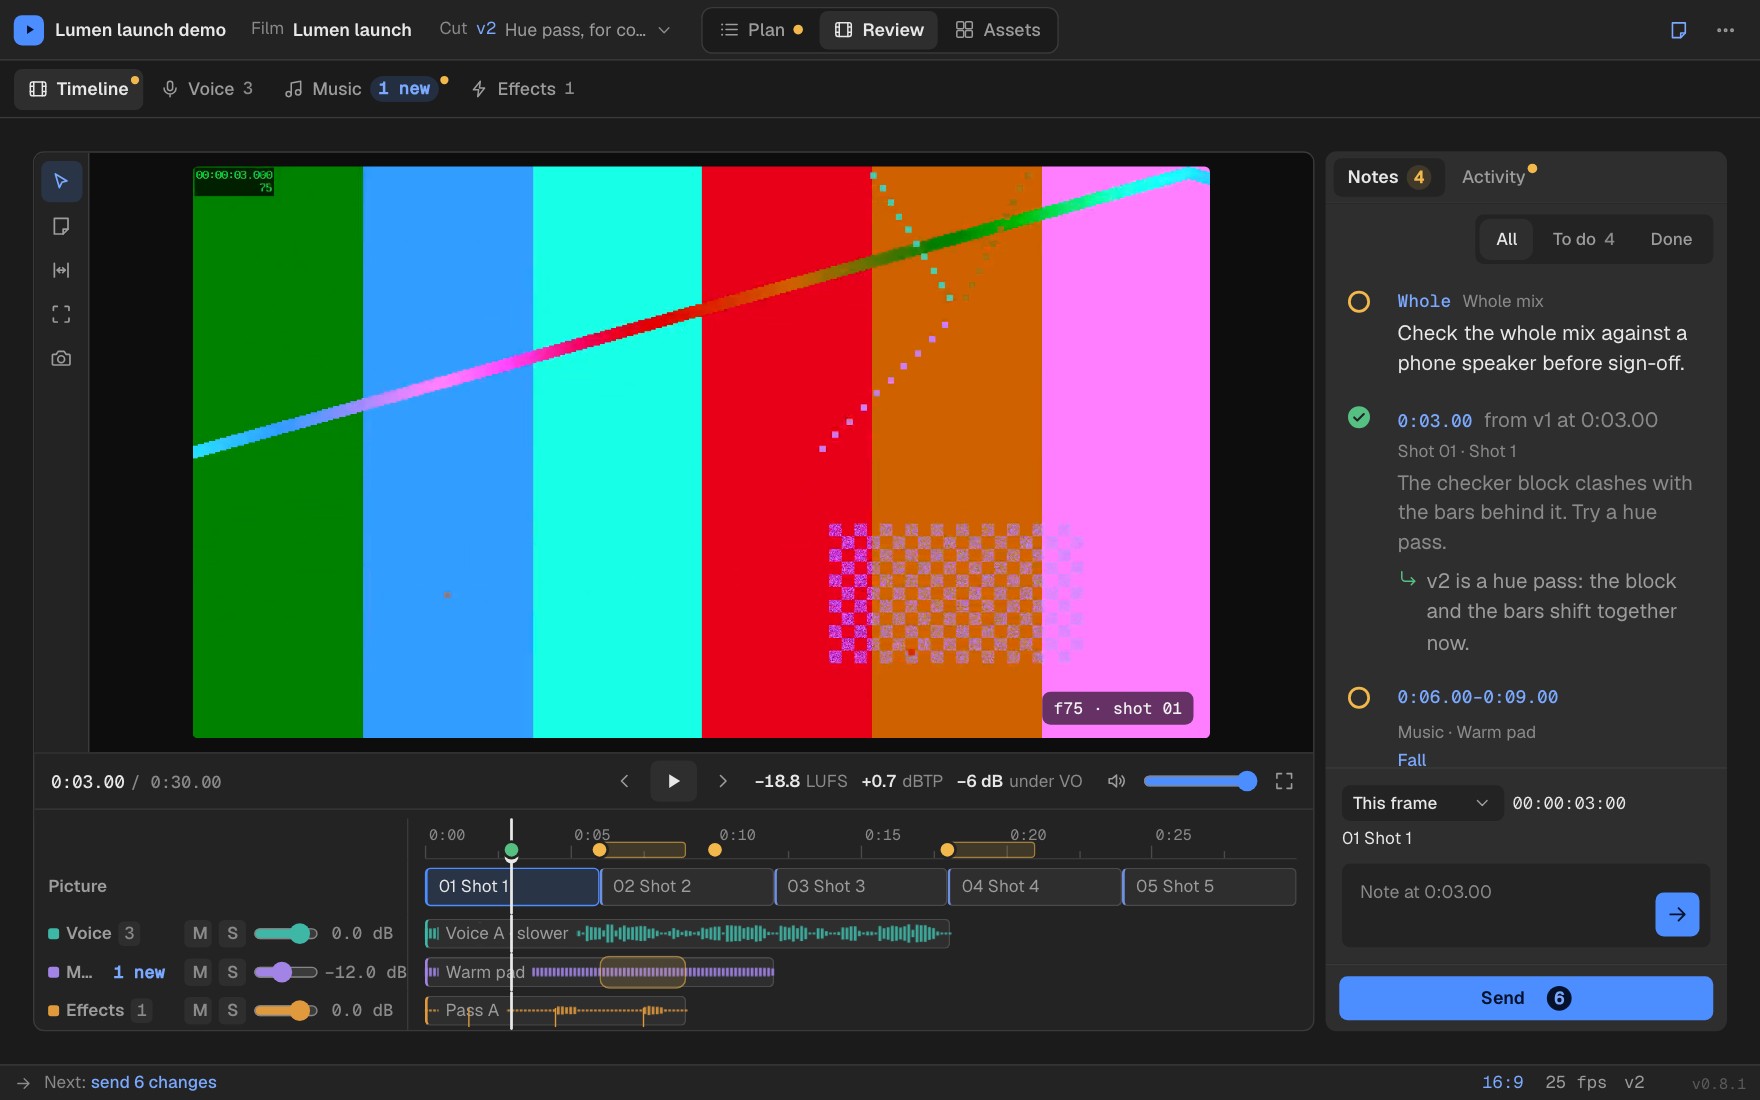
There is no separate mix: the takes in use play together against the picture on the Timeline tab. Each sound has its own row there with mute (M), solo (S) and a level, and the tab reads the loudness and true peak (with ffmpeg installed).
Activity: the Change Log
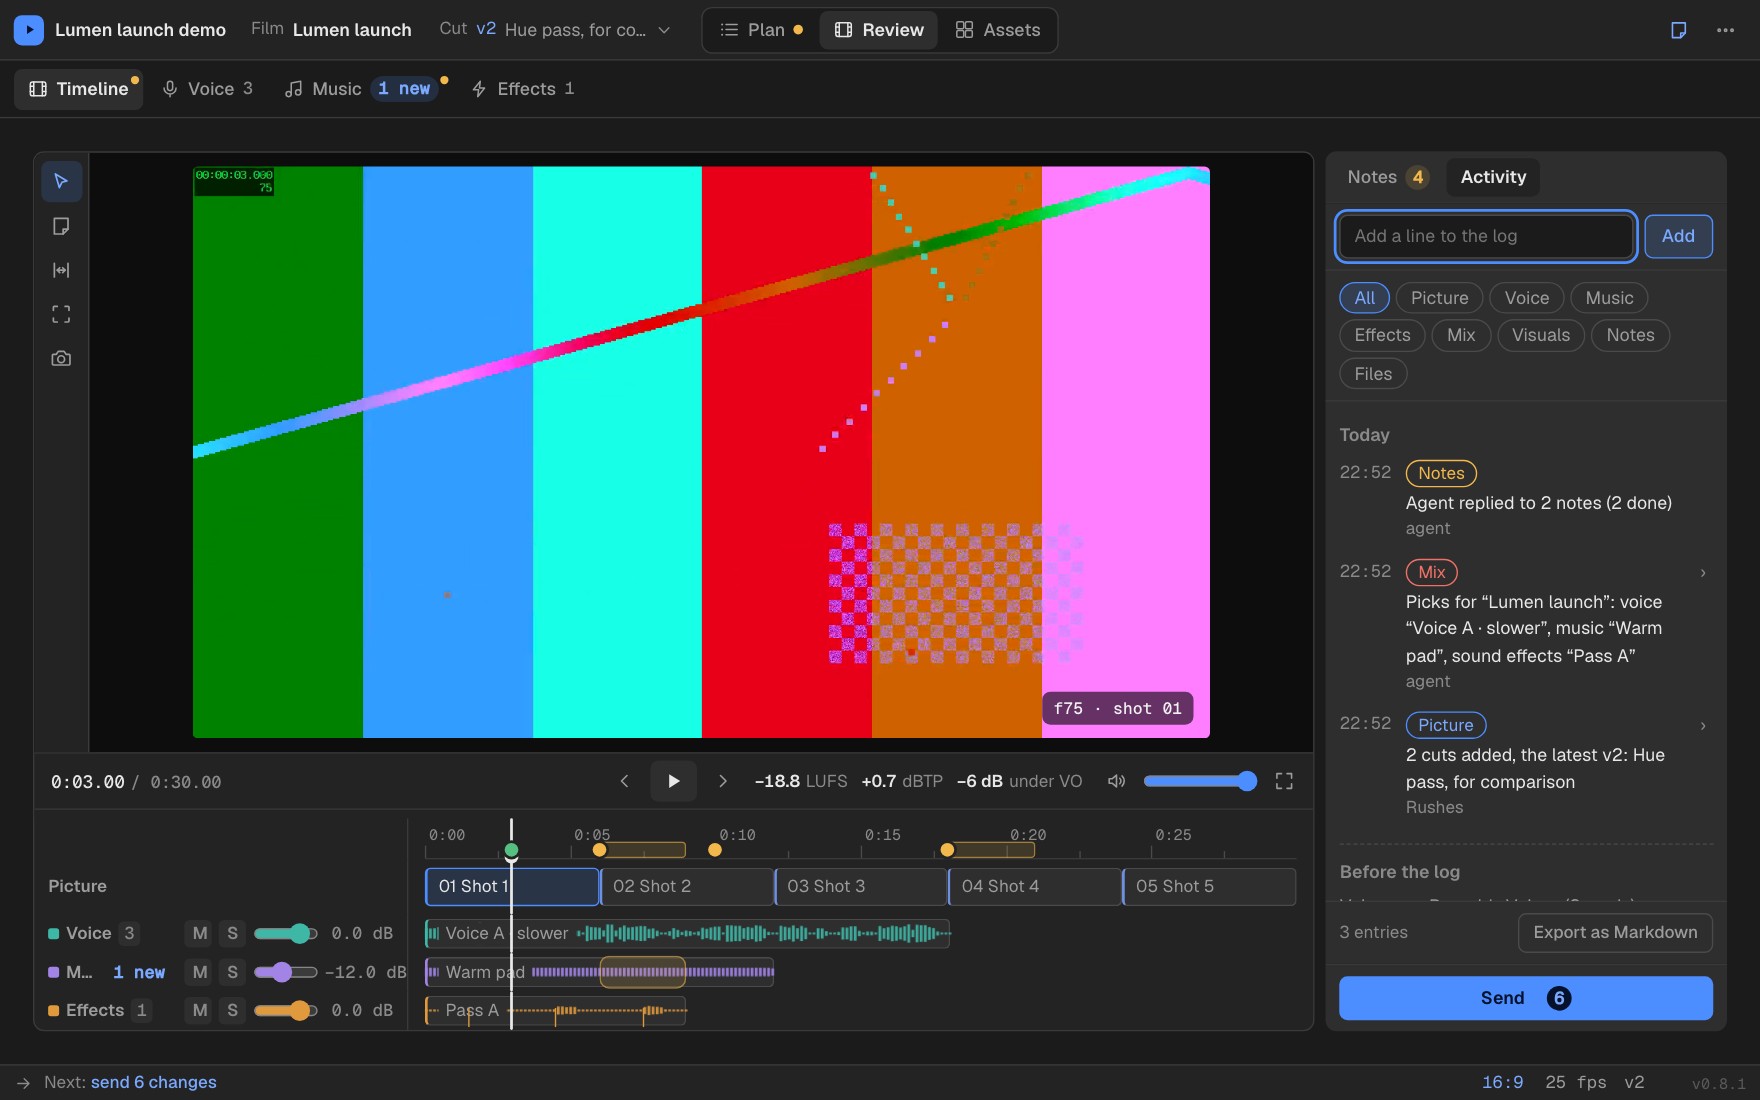
Rushes keeps a running log of what happened, in the Activity tab of the notes panel: each cut, read, bed and pass as it arrives, notes sent, and the agent's replies. Export it as Markdown for whoever needs to catch up.
Why Rushes
- Notes your agent can act on. Each one carries its stage, a timecode or range, an optional box on the frame, a frame grab, and the shot it falls in.
- Everything in one batch. Send sends every open note from every tab and every film, wherever you press it, so nothing waits behind.
- Versions keep their history. Notes follow the work from cut to cut, and you can lock picture when it's done.
- Local, with no sign-up. No account, no API key, nothing uploaded. It runs on your machine.
- Works with the agent you already use. One MCP server for Claude Code, Codex, Cursor, Claude Desktop and Gemini CLI, a plugin and skill for Claude Code, and a command line for anything else.
- Plain files, so the work is yours. Notes, script and picks live in your project folder. Commit them with the rest.
Your notes are plain files
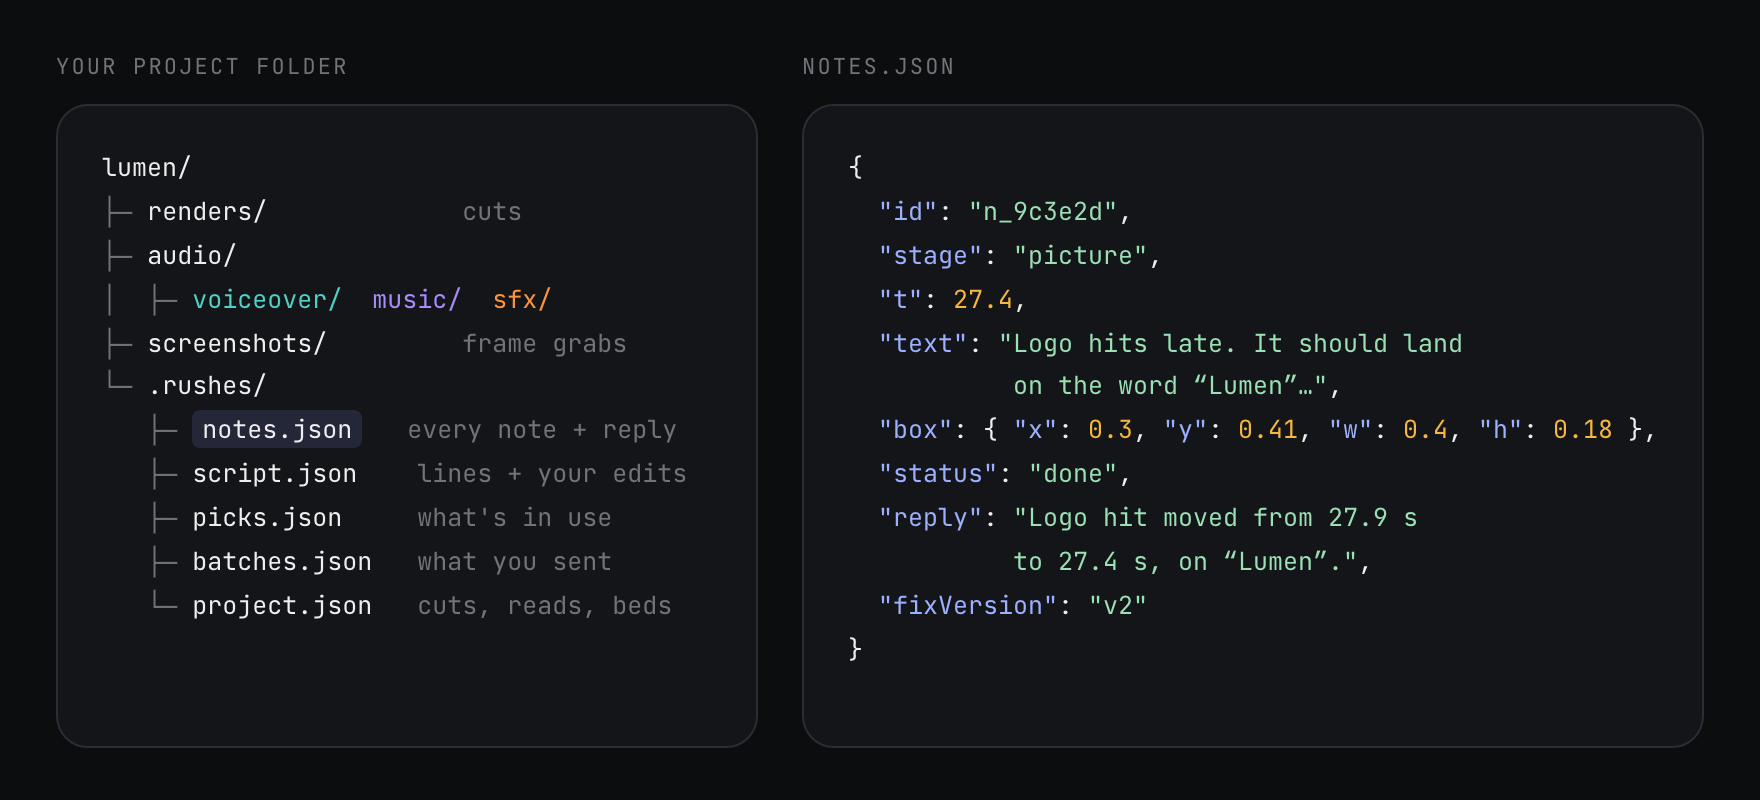
Rushes keeps your review in a .rushes/ folder in the project. The agent reads those files, fixes the work and writes its reply back, and a single local server is the only thing that writes to them. Add .rushes/ to git if you want your review history kept with the project. More in What gets saved.
FAQ
Does my video leave my machine? No. Rushes serves the review desk from your own computer and reads your project folder from disk. There's no upload, no account and no key.
Which agents does it work with? Any that can run a local MCP server: Claude Code, Codex, Cursor, Claude Desktop and Gemini CLI today. Agents with no MCP support can use the command line. See Manual setup.
Can I use it without an agent? Yes. Review, leave notes, and run Export notes for a dated Markdown file you can send to a person. The agent loop is where it pays off most.
Does it need ffmpeg? No, but it helps. With ffmpeg installed Rushes reads frame rates and durations, makes browser-playable proxies of heavy cuts, and measures loudness on the Timeline tab. Run rushes doctor to check.
Can it handle big files? Cuts that play badly in a browser (4K and above, huge files, ProRes and similar) get an offer of a light 1080p proxy. Your original is never changed. See Proxies.
Where do I report a bug or ask for something? Open an issue. Please say which agent and operating system you're using, and attach the output of rushes doctor.
The rest of this page is the reference: setup for agents, manual setup, the command line, shortcuts and every feature in detail.
For agents: set yourself up
If your user asked you to use Rushes, do this:
Run this once. It finds every supported harness on the machine and registers the Rushes MCP server, plus the Rushes skill where the harness supports skills:
npx -y rushes setup(Before publishing to npm, the GitHub form also works:
npx -y github:iamredmh/rushes setup.)It prints one line per harness. Existing config is kept and a
.rushes.bakbackup is written first. Run it with--dry-runfirst if you want to show the user the changes before making them. A machine already set up through the GitHub form is recognised as Rushes too — setup switches it to the npm launch instead of adding a second registration.If it added anything, tell the user to restart the app (or start a new session) so the
rushes_*tools load.From then on, follow AGENTS.md. If the user wants a new film, start with Starting a film in AGENTS.md: plan it with them first, then build. Otherwise, in short: register what you made, call
rushes_open, wait for the user to press Send, thenrushes_get_batch, fix the notes, andrushes_reply.
The MCP server has twenty-four tools: rushes_open, rushes_status, rushes_add_version, rushes_add_format, rushes_add_visual, rushes_add_variant, rushes_set_films, rushes_set_script, rushes_get_script, rushes_add_take, rushes_list_notes, rushes_list_assets, rushes_get_batch, rushes_reply, rushes_get_picks, rushes_set_shots, rushes_lock_picture, rushes_add_file, rushes_export_notes, rushes_log, rushes_get_log, rushes_scan, rushes_bring_in and rushes_doctor.
If you can't run commands, give the user the matching line from Manual setup below.
Manual setup
| Harness | How |
|---|---|
| Claude Code: plugin, which includes the skill | /plugin marketplace add iamredmh/rushes then /plugin install rushes@iamredmh |
| Claude Code: MCP only | claude mcp add --scope user rushes -- npx -y rushes mcp |
| Codex | add to ~/.codex/config.toml:[mcp_servers.rushes]command = "npx"args = ["-y", "rushes", "mcp"] |
Cursor (~/.cursor/mcp.json), Claude Desktop (claude_desktop_config.json), Gemini CLI (~/.gemini/settings.json) |
{ "mcpServers": { "rushes": { "command": "npx", "args": ["-y", "rushes", "mcp"] } } } |
On Windows, rushes setup writes the launch as cmd /c npx -y rushes mcp (in JSON: "command": "cmd", "args": ["/c", "npx", "-y", "rushes", "mcp"]), because harnesses can't start npx directly there. Do the same if you set it up by hand.
Other harnesses
Any MCP client that can launch a local stdio server works. Point it at npx -y rushes mcp. Agents with no MCP support can use the CLI instead (rushes add, including rushes add format for another shape of a cut, rushes notes, rushes reply): see AGENTS.md.
ChatGPT's apps can't run local MCP servers yet. Use Codex, OpenAI's agent, instead.
Use it yourself
cd your-project
npx -y rushes open    # opens the review desk in your browser
npx -y rushes stop    # stops it
rushes open also looks through the folder for the files that go with the cut, and says what it brought in and what it left (see Finding your other files).
Each project opens at its own address, http://127.0.0.1:4580/p/<id>/ — safe to run several projects at once.
A server your agent starts in the background stops by itself after two hours with nothing connected.
Start a film: rushes new
npx -y rushes new my-film # creates ./my-film and opens it
It makes the project folder with renders/ and audio/ ready, and a brief.md for your agent to fill in with you. You say yes to the brief, the script and the storyboard before anything is built. A folder that's already a Rushes project is refused, and an existing brief.md is never overwritten. Pass --name to set the project's name and --no-browser to skip opening it.
Try it first: rushes demo
No project to hand? Build one:
npx -y rushes demo # creates ./rushes-demo and opens it
It generates a complete example on your machine — a 30 s test film in two cuts, a short script, voice reads in two rounds, two music beds, an SFX pass, and example notes on the cut, the voice reads, the music and the mix — so every tab has something in it from the start. Nothing is downloaded and nothing ships with Rushes; it's all made locally with ffmpeg and, where available, your system's text-to-speech. It needs ffmpeg — without it, demo says so and points you at rushes doctor. It refuses to write into a folder that isn't empty. Pass a folder name to put it somewhere else, and --no-browser to skip opening it.
Health check: rushes doctor
npx -y rushes doctor          # Node, ffmpeg, which agents have Rushes, this project, free disk space
npx -y rushes doctor --json   # the same checks as data
Each check prints ✓ or ✗ with a plain fix, e.g. ✗ Claude Code — the Rushes MCP server isn't registered. Fix: rushes setup --only claude-code. Only the Node version (and, inside a project, its files) has to pass; ffmpeg is recommended (proxies and loudness need it) but not required, and doctor warns when your ffmpeg was built without libx264, which proxies and the demo encode with. Run it from inside a project folder to add file, server and disk checks. Agents get the same checks from the rushes_doctor tool.
Shortcuts
On the Timeline tab:
- Space play or pause
- ←/→ step one frame (Shift: ten)
- I/O set in and out
- B draw a box
- G grab a frame
- N new note
- V the select tool
- F full screen
On the Voice, Music and Effects tabs:
- Space play or pause
- ←/→ step one frame (Shift: ten)
- I/O set in and out
- N new note
- ←/→ with a cue or a layer's tick focused: the previous or next cue (Home/End: the first or last); Enter moves the playhead there; Esc hides the card
Anywhere:
- 1–8 switch place (1: Plan, which opens the page you used last; 2 and 6: Timeline; 3, 4, 5: Voice, Music, Effects; 7: Visuals; 8: Assets)
- \ hide or show the notes panel
- [ / ] previous/next film in play
- Shift+S shelve the current film, or restore it if it is shelved
- Alt+←/→ previous/next format (Timeline)
- ? shortcuts
- Esc close
Locked tabs
Every tab is visible from the start, in workflow order, even before there's anything in it. A locked tab isn't a dead end: open it and it explains itself — what the tab is for, what unlocks it, and a Copy prompt for your agent button that copies a ready-to-paste request naming your project, the film, and the tool your agent should use, e.g.:
In Rushes project "Launch", make two or three music beds for "Hero" and add each with rushes_add_variant (stage "music") with a one-line description.
When the project's folder already holds files for a locked Voice, Music or Effects tab, its page also says how many were found and offers a Review button, such as "14 music files found in this project". See Finding your other files, below.
Hovering a locked tab shows a short tooltip, e.g. "Locked: ask your agent for music beds". The Assets workspace follows the same rule.
The Change Log
The Activity tab of the notes panel (what was the Change Log button) is a log of what happened, newest first and grouped by day:
- each cut, format (another shape of a cut: "9:16 added to v2"), voice read, music bed, sound-effects pass and take as it arrives;
- the script, picks and notes sent;
- the agent's replies.
Rushes writes it itself, one short line per event, and a burst of registrations is one line. You can:
- type a line of your own at the top;
- filter by tab;
- click a line to open that cut or variant.
A dot on the Activity tab means new lines since you last looked. Export as Markdown writes exports/change-log-<date>.md; Export notes (in the More menu, or in Assets › Exports) writes it too, beside the notes. A project made before the log existed starts it from the dates it already has (cuts, notes sent and files); its older audio is listed undated, under "Before the log".
The Cut menu's version list shows each cut's short label (the agent's, or one taken from its note) and how long ago it arrived, with its full note beside the list.
Agents read and write the same log with rushes_get_log and rushes_log, or from the command line:
rushes log --limit 20          # newest first
rushes log --area music
rushes log --md                # the same Markdown the export writes
rushes log add "Kept the wide shot" --area picture
rushes log add --area mix -- "-3 dB on the bed"   # text that starts with a dash goes after --
Finding your other files
An agent only shows what it registers, but the work that goes with a cut usually sits in the same folder: the voiceover, the music, the effects. So when a project is opened, Rushes looks through the folder itself, and brings in the current set for the newest cut so those tabs have something to review.
- When. On open (
rushes open, or your agent'srushes_open) and whenever you press Look again or runrushes scan. There's no folder watcher. - Where. Only inside the project folder, up to eight folders deep. It never follows a symlink out of it, never reads a file's contents, and skips hidden folders,
node_modulesand Rushes' own.rushes,proxies,screenshotsandexports. It examines up to 5,000 files. The dashboard never waits for it: a big folder shows "Looking through the folder…" and fills in as it goes. - What each file probably is. The nearest folder or file-name word decides:
vo,voice,narrationfor voiceover;bed,music,scorefor music;sfx,foley,whooshfor sound effects. Audio with no such word is "Other audio", and you choose its kind. Video files other than the registered cut are offered as other cuts. - The current set. Each audio file is scored against the cut: a similar length, being made around the same time, and sharing a word or version (such as
v20) with its name. For each kind, the best file comes in on its own only when it clearly beats the rest. That's at most one voice read, one music bed and one sound effects pass, and nothing else. Nothing is ever picked: files come in unpicked, and you choose in the dashboard. Each one carries its reasons, in plain words. - Assets › Found. Everything else stays one step away, in the Found folder at the top of Assets. Files are grouped by folder, with their length, size and reasons, and you can play one before you bring it in. The Assets tab in the top bar carries the count of files found until you've looked, and Bring in new files in the More menu opens it.
- Bring in registers the ticked files: voiceover, music and sound effects as variants, and video as cuts. It takes up to 12 files of each kind at a time, so the tabs stay quick; each voiceover folder becomes its own round.
- Not these hides the ticked files for good. A Hidden list brings them back with Restore.
- Look again runs the scan once more, and a filter box and kind buttons narrow the list.
- Files already in the project are never offered twice.
- Locked tabs say so. If the folder holds files for a tab that's still locked, its page adds a line under the prompt, such as "14 music files found in this project" (or "1 music file found in this project"), with a Review button that opens Found filtered to that kind. The line follows the live count.
If the guess is wrong, ask your agent to bring in the right file: rushes_bring_in, or include on rushes_open for files it made for this cut, which come in whatever they score and win over the guess. rushes_scan lists what's left, with reasons.
The same from the command line:
npx -y rushes scan [--film NAME] [--json]
npx -y rushes bring-in <file>... [--kind voice|music|sfx|cut|doc] [--round NAME] [--film NAME]
rushes scanlooks again, brings in the current set as opening does, and prints what it brought in and the top candidates left with their reasons.--jsonprints all of them as data.rushes bring-inbrings the named files in. Paths are read from the folder you run it in.--kindis needed when a name doesn't say (doctakesmd,txtandpdf),--roundnames the voiceover round, and--filmpicks the film a cut joins. It prints one line per file, says why for any it can't bring in (a path outside the project folder is always refused), and exits 1 if any failed.
Screenshots and the Assets library
Press G, or the camera button, to grab the current frame. It's saved as a PNG to screenshots/, named for the film, version and timecode (and, on a cut with several formats, the ratio on screen) — grabbing the same frame twice overwrites the same file.
The Assets tab (key 8) is a library with a folder sidebar: Screenshots, Cuts, Voiceover, Music, Sound effects, Scripts & docs, Images, Captions, Exports, Delivery, Edit files and Proxies. Each folder has search and a sort order; Screenshots, Images, Cuts and Delivery also get a grid/list toggle, and Screenshots, Cuts and Delivery get a film filter — every other folder is list-only. Audio plays inline, one at a time, and Markdown or text files get a read-only preview. Every item has five actions: Download, Save as (Chrome and Edge only — other browsers just get Download), Open, Show in Finder and Copy path. A file your agent registered from outside the project folder (or reached through a link out of it) plays and downloads only if it is a media or document type (audio, video, images, PDF, Markdown, text, captions), and a cut or a format only if it is video or audio; for anything else, such as an editor project file on another drive, use Show in Finder or Copy path. Open appears, and is accepted, only for a fixed list of safe, non-executable types — never scripts, apps or archives. Top-level .md, .txt, .pdf, .srt and .vtt files, plus anything in exports/, are picked up automatically; everything else your agent registers with rushes_add_file. The Exports folder also has an Export notes button, which writes every note to a dated Markdown file there.
Rushes recommends this layout for a project folder:
my-film/
  renders/              cuts               hero-60s_v3.mp4
  audio/
    voiceover/          voice reads        gerald.wav
    music/              music beds         deep-house.wav
    sfx/                SFX passes         sfx_pass-a.wav
  screenshots/          frame grabs        hero-60s_v3_00m12.10s_f726.png
  exports/              exported notes, plus anything you save there
  .rushes/              Rushes' own records (hidden; not for editing by hand)
Rushes creates screenshots/ itself on the first grab. It never creates the other folders — they're a convention for agents to follow.
Packs, picture lock and shots
A project with more than one film gets a Film menu in the top bar — [/] switch between the films in play, and each film remembers its own version and playhead. The Cut menu beside it lists the film's cuts, with Lock picture at its foot: lock a film at a cut and the dashboard opens on that cut until you unlock it. A version can carry a shot list from the storyboard, shown on the timeline's picture row, and every note on the cut records the shot it falls in.
Formats
A piece often ships in several shapes — 9:16, 4:5, 1:1, 16:9 — the same edit reframed. Your agent registers each shape with rushes_add_format (or all of them at once with rushes_add_version's formats, or rushes add format <file> from the command line); Rushes measures each ratio itself. The monitor then shows a switch, always in the same order (9:16, 4:5, 1:1, 4:3, 16:9), with a count of open notes on each. Switching keeps your place and whether it's playing. Alt+←/→ steps through them.
A new note belongs to the format on screen: the switch above the note box reads This format | All formats, and you can change it on the note afterwards. A note for one format shows only there; notes for the other formats wait in a quiet Other formats row at the foot of the list. A drawn box always stays on the format it was drawn on. With one format there's no switch, and nothing changes. Assets › Cuts lists each format under its cut, and a frame grab is named with its ratio, such as hero_v1_9x16_00m01.00s_f30.png.
A format's file can sit outside the project folder, like any registered cut, and plays by the same rules. A second render of a shape the cut already has is refused: a re-render is a new version.
The format keys never fire while you're typing a note. In a text field, Alt+←/→ keeps its usual meaning: on macOS it jumps a word, and on Windows and Linux the browser may take it as Back, so click outside the note box first (or use the switch on the monitor) to switch format.
Proxies
Some cuts play badly in a browser: 4K or larger, over 1.5 GB, a codec browsers can't play reliably (ProRes, DNx, HEVC 10-bit — anything that isn't H.264, VP9 or AV1), or one that threw a playback error. Rushes checks with ffprobe as the cut is added, and if it's likely to struggle, a bar appears under the player saying why in a few words, with a Create proxy button. It makes a lightweight 1080p H.264 copy on your drive — your original file is never changed — with visible progress and Cancel. Notes, timecodes and frame numbers are identical on the proxy and the original.
Once it's ready, a Proxy / Original switch appears on the player (defaults to Proxy, remembered per film). Grab this frame (G) always takes the still from the original at full quality, whichever one you're watching. Turn on Make lighter copies of new cuts automatically in the More menu (off by default, saved per project) to skip the offer next time. The Assets tab has a Proxies folder listing each one with its size and a Delete proxy button; deleting removes only the proxy file, never the original.
Without ffmpeg, no proxy is ever offered.
Audio review
On the Timeline, Voice, Music and Effects tabs, switching what you hear is instant and never restarts playback or knocks picture out of sync.
Voice works in rounds: the same script read by a few voices, then variations of whichever one you pick. Each sound's tab lists its takes in four groups: New (on Voice, a heading per round), In use, Earlier and Put away.
- The circle beside a take (Use this one) picks a music bed, SFX pass or voice read, which then shows as In use and plays on the Timeline tab. Clicking a take's block auditions it without changing the pick. Unpick on the take in use clears the pick, and Put away moves a take you don't want out of the list's way (Bring back returns it).
- Blind (Voice and Music) renames the beds
Bed 1,Bed 2… — on Voice, each round's readsRead 1,Read 2… — in a shuffled order and masks their descriptions, so you can compare without knowing which is which. - On Voice, a note is on the whole read, a point (marked at the playhead) or a range of the read (I and O), to have a stretch replaced. There are no Rise/Fall/Louder/Quieter marks there. Say what you want in the note itself: there are no preset prompts.
- On the Timeline tab a note is on the film (this frame, or the whole mix), never on one sound's take: to note a take, open its sound's tab.
- On a range of a music bed or an effects pass, a note can carry marks: toggle Rise, Fall, Louder or Quieter (with a dB amount, 3 by default) to say how a range should change — "Fall" or "Quieter 3 dB".
- The Timeline tab shows a loudness readout — integrated LUFS, true peak, and the music's level under the VO — measured over exactly what the timeline plays, using the newest round's picked voice read. It needs ffmpeg on your PATH; without it, the readout shows "—". After a timeout or an error, click the readout to measure again.
- Each sound's row on the Timeline tab (Voice, Music, Effects) has mute (M), solo (S) and a level slider, −24 dB to +6 dB in 0.5 dB steps, shown as e.g.
−14.0 dB. Double-click resets it to 0; arrow keys move it 0.5 dB at a time. Levels are saved with your picks, never change a file, and the loudness readout is measured with them applied. - On Effects, rest the pointer on a cue's label or tick (or Tab to it) for a card with its full name, its time, where it falls in the pass (
cue 5 of 80) and, when your agent sent one, its source file. The arrow beside a pass's name opens its layers by sound: one row per sound, in the order it first comes in, with a count (thud ×19) and a tick everywhere it plays. Click a tick to move the playhead there; click a layer's file name to hear that sample on its own (it stops the tab, and Play stops it). The layers stay open while you work, until you reload. The Effects row on the Timeline tab has the card too.
What gets saved
your-project/.rushes/
  project.json   videos, versions, audio lanes and variants
  script.json    VO sections: the agent's line, your version, direction, takes
  notes.json     every note, with the agent's replies
  picks.json     which variant or take is in use, and each sound's level
  batches.json   what you sent to the agent
  log.json       the Change Log (the Activity tab): what happened, one line each
Add .rushes/ to git if you want your review history kept with the project — and screenshots/ alongside it, since notes point to the grabs there. Keep proxies/ out of git: proxies can run to gigabytes, and Rushes can always make them again. Rushes ignores its own temporary files.
Develop
git clone https://github.com/iamredmh/rushes && cd rushes
npm install
npm test
npm run rushes -- open ../some-project
ffmpeg and ffprobe are optional. With them installed, Rushes reads frame rates and durations and can make browser-playable copies.
Publishing (maintainers)
Run npm login once in Terminal — it confirms in your browser. Then, with the maintainer's OK at the time, npm publish. npm may ask for a one-time code; enter it when it does.
Licence
MIT © Red Morley Hewitt
Reviews (0)
Sign in to leave a review.
Leave a reviewNo results found