workbuddian
Health Pass
- License — License: NOASSERTION
- Description — Repository has a description
- Active repo — Last push 0 days ago
- Community trust — 23 GitHub stars
Code Warn
- fs module — File system access in src/features/chat/input.ts
Permissions Pass
- Permissions — No dangerous permissions requested
No AI report is available for this listing yet.
Chat with the local WorkBuddy / CodeBuddy CLI as an AI agent inside your Obsidian vault — the WorkBuddy counterpart to Claudian.
Workbuddian
Turn the local WorkBuddy / CodeBuddy CLI into an AI agent that lives inside your Obsidian vault. Chat with streaming replies, paste in a screenshot for visual analysis, reference your notes with
@, and manage whole conversations — without ever leaving your notes.




⚠️ Windows and macOS are supported. Linux is not supported yet.
Requires Obsidian 1.7.2+.
⭐ If Workbuddian is useful to you, please star the repo — it helps more people discover it.
✨ What's New
- v1.2.1 — Fix (Windows): referencing a large note or file with
@no longer crashes withspawn ENAMETOOLONG— the prompt is now piped through stdin instead of the command line, so there's no length limit. - v1.2.0 — Instruction mode (
#): type#your rulein the chat to set a persistent instruction / persona that applies to every conversation (edit or clear it anytime from the toolbar).@any file: reference not just notes but any vault file — markdown is read inline, other files are attached for the CLI to read. - v1.1.0 — Image vision: paste a screenshot or drag an image into the chat and the agent analyzes it.
Features
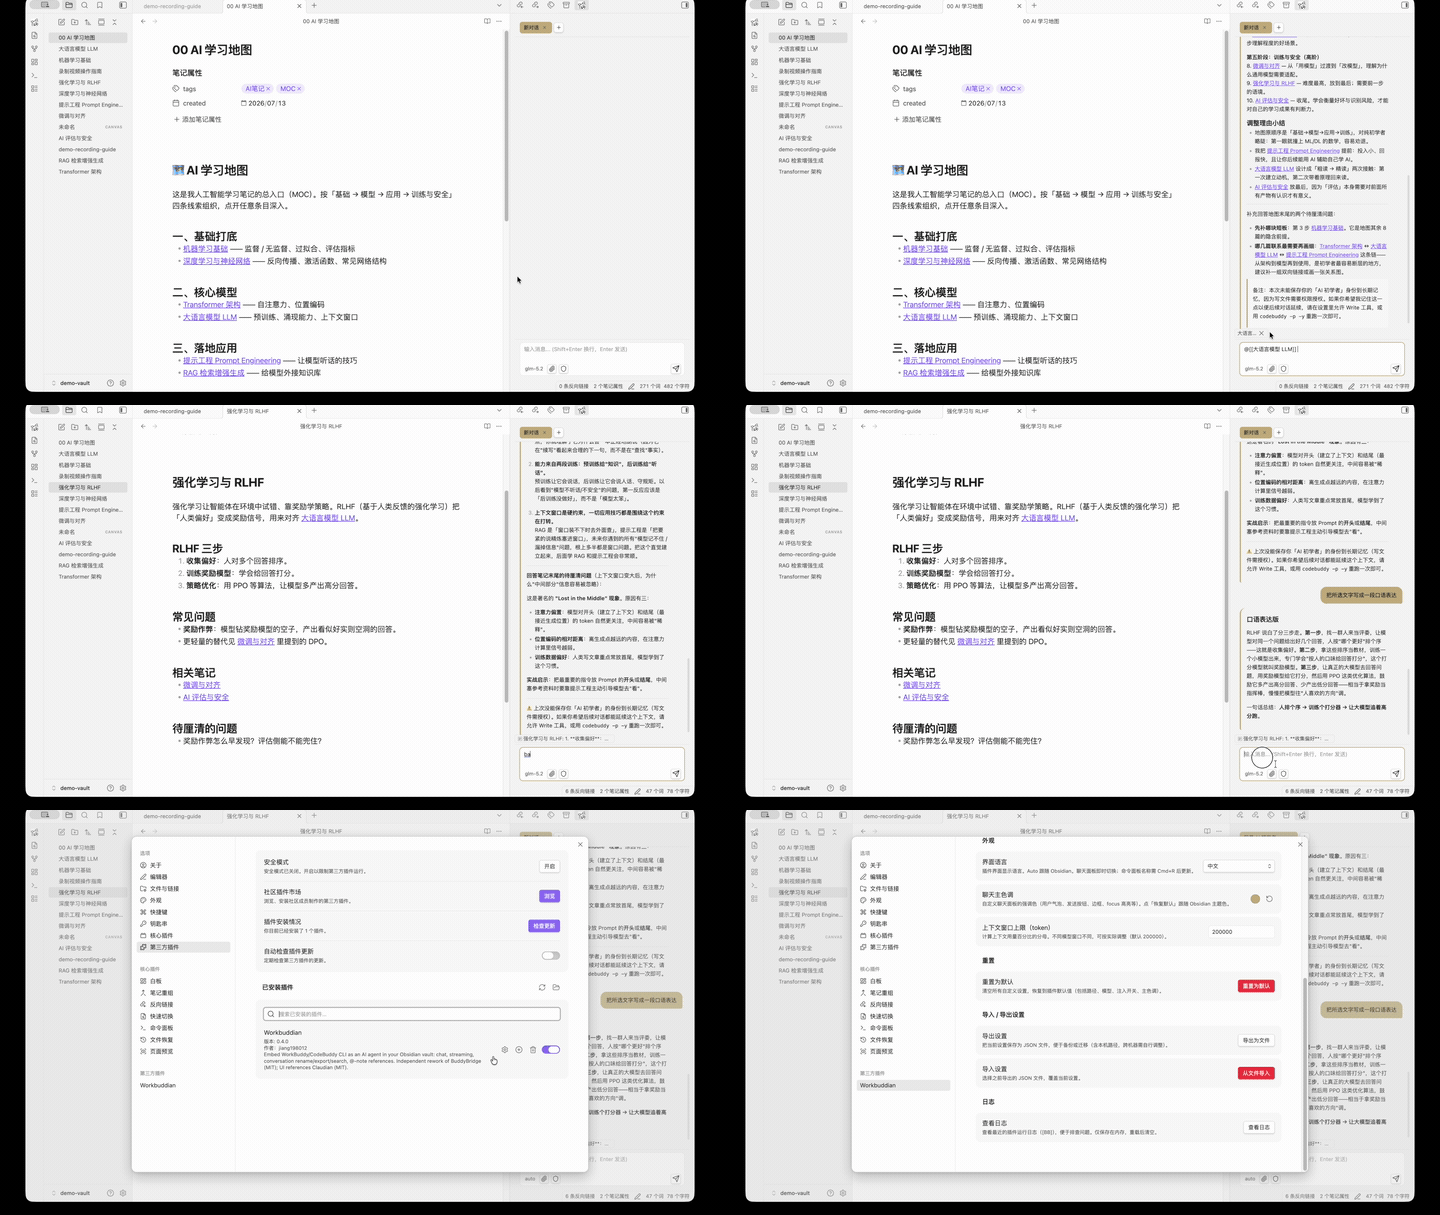
- Streaming chat in the sidebar or a full-width main-area tab, with collapsible thinking and tool-call cards, and Markdown rendering (code, tables, lists, quotes).
- Image vision — paste / drag a screenshot or image for the agent to analyze.
- Instruction mode (
#) — a persistent custom instruction / persona injected into every message. @-references any vault file — notes are read inline; other files are attached for the CLI to read; selected note text is sent as read-only context automatically.- File attachments — inject any file path for the CLI to read.
- Conversation management — multiple tabs, rename (double-click or right-click), export a conversation to a note or copy to clipboard, and full-text search across titles and messages; history persists across restarts.
- In-chat toolbar — switch model and permission mode inline; slash commands with autocomplete (built-in + your vault's
.codebuddy/commands); inline edit with a diff preview; real stop-generation to interrupt a running response. - Bilingual UI (中文 / English) with instant switching, a custom accent color, and settings import/export.
- Cross-platform auto-discovery of the CodeBuddy CLI and Node.js on Windows and macOS (WorkBuddy install, npm global, PATH, bundled Node, Homebrew, nvm/volta).
Requirements
- Obsidian 1.7.2 or later (desktop).
- Windows or macOS (Linux is not supported yet).
- WorkBuddy desktop app (≥ 5.0.5) with CodeBuddy CLI installed, or a custom CodeBuddy path configured in settings.
Installation
From the community plugins directory (recommended)
- In Obsidian: Settings → Community plugins → Browse.
- Search "Workbuddian" → Install → Enable.
Via BRAT (to track the latest beta)
- Install the BRAT community plugin.
- BRAT → Add Beta Plugin → enter
jiang198012/workbuddian. - Enable Workbuddian in Settings → Community plugins.
Manual
- Download
main.js,manifest.json, andstyles.cssfrom the latest release. - Copy the three files into
.obsidian/plugins/workbuddian/inside your vault. - Restart Obsidian, then enable Workbuddian in Settings → Community plugins.
First-time setup
If Workbuddian cannot find CodeBuddy or Node.js automatically, follow the environment setup prompt once (see the Chinese section below or open 提示词-授予Vault读写权限.md).
Usage
- Click the robot ribbon icon or run the command "Workbuddian: Open chat panel" from the command palette.
- A chat panel opens in the right sidebar, joining the existing tab group (like Outline or Backlinks) so it takes the full sidebar height when active. To open it as a full-width tab in the main editor area instead, run the command "Workbuddian: Open chat panel in main editor area".
- Type your message and press Enter to send. Use Shift + Enter to insert a new line.
- Switch between conversations using the tabs at the top, or click + to start a new one.
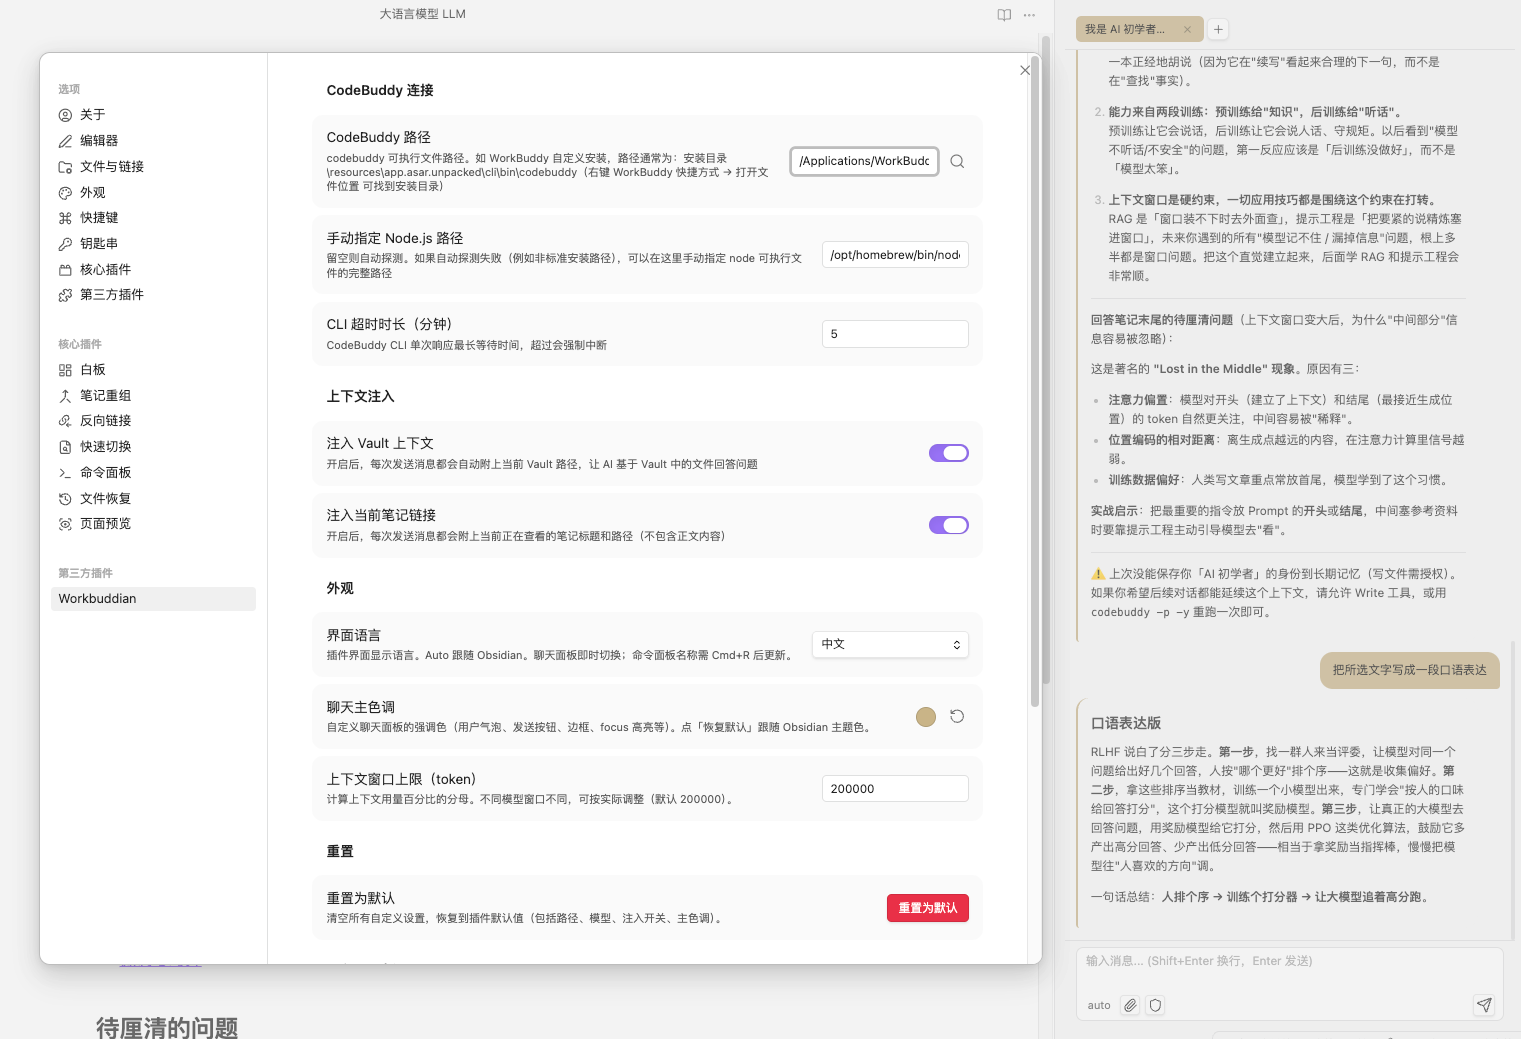
- Open Settings → Workbuddian to configure the CodeBuddy CLI path manually if needed.
Troubleshooting
| Symptom | Cause | Solution |
|---|---|---|
Cannot find codebuddy CLI |
Auto-detection failed | Fill the CodeBuddy path in plugin settings. Default location: WorkBuddyInstallDir\resources\app.asar.unpacked\cli\bin\codebuddy |
Cannot find Node.js |
Node.js is not configured | Run the first-time environment setup prompt (Chinese section below) |
| Stuck on "Thinking..." | Streaming ended without text chunks | Fixed |
Related
Use Obsidian with Claude Code and know Claudian? Workbuddian is the counterpart for the WorkBuddy / CodeBuddy CLI — it turns that local coding agent into an in-vault chat panel. Same idea (a CLI agent living inside your notes), different backend.
中文说明
将 Obsidian 连接到 WorkBuddy/CodeBuddy CLI,实现侧边栏 AI 聊天。
✨ 更新
- v1.2.1 —— 修复(Windows):用
@引用大笔记 / 大文件提问时不再报spawn ENAMETOOLONG——prompt 改经 stdin 传入,不再受命令行长度限制。 - v1.2.0 —— 指令模式
#:聊天框输#你的规则设一条常驻指令 / 人设,对所有对话生效(工具栏可随时改 / 清)。@引用任意文件:不只笔记——markdown 读正文嵌入,其它文件作附件交 CLI 读。 - v1.1.0 —— 图片视觉:粘贴截图 / 拖拽图片,交给 AI 分析。
功能亮点
- 流式对话 —— 侧边栏或主编辑区全宽标签;可折叠的思考过程与工具调用卡片;Markdown 渲染。
- 图片视觉 —— 粘贴 / 拖拽截图或图片,交给 AI 分析。
- 指令模式
#——#你的规则设常驻指令 / 人设,对所有对话生效,工具栏可随时改 / 清。 @引用任意文件 —— markdown 读正文嵌入,其它文件作附件交 CLI 读;笔记里选中的文字自动作只读上下文。- 文件附件 —— 注入任意文件路径交 CodeBuddy CLI 读取。
- 会话管理 —— 多标签、重命名(双击 / 右键)、导出为笔记 / 复制、全文搜索;重启后恢复历史。
- 输入框工具栏 —— 内联切换模型 / 授权模式;斜杠命令 + 自动补全;Inline Edit + Diff;真实停止生成。
- 中英双语界面 —— 即时切换、自定义主色、设置导入 / 导出。
- 跨平台自动发现 CodeBuddy CLI 与 Node.js(Windows/macOS:WorkBuddy 安装、npm 全局、PATH、自带 Node、Homebrew、nvm/volta)。
安装
从社区插件目录安装(推荐)
- Obsidian 里:设置 → 第三方插件 → 浏览。
- 搜索 "Workbuddian" → 安装 → 启用。
通过 BRAT(追踪最新 beta)
- 安装社区插件 BRAT。
- BRAT → Add Beta Plugin → 填
jiang198012/workbuddian。 - 在 设置 → 第三方插件 里启用 Workbuddian。
手动
- 从 latest release 下载
main.js、manifest.json、styles.css。 - 复制到 Vault 目录下的
.obsidian/plugins/workbuddian/。 - 重启 Obsidian。
- 进入 设置 → 第三方插件 → 关闭安全模式 → 开启 Workbuddian。
使用方法
- 点击左侧的 机器人图标,或从命令面板运行 "Workbuddian: 打开聊天面板"。
- 聊天面板会加入右侧栏现有的标签组(和大纲、反向链接一样),激活时占满整个侧边栏高度。如需在主编辑区打开为全宽标签页,请运行 "Workbuddian: 在主编辑区打开大面板" 命令。
- 输入消息后按 Enter 发送;Shift + Enter 换行。
- 顶部标签可切换对话,点击 + 新建对话。
- 如需手动指定 CodeBuddy CLI 路径,进入 设置 → Workbuddian。
前置条件
- 已安装 WorkBuddy 桌面版(≥ 5.0.5)
- 已安装 Obsidian(≥ 1.7.2)
首次使用:环境初始化
如果插件无法自动找到 CodeBuddy 或 Node.js,将以下提示词完整复制到 WorkBuddy 对话中执行一次即可:
请帮我配置 Workbuddian 插件的运行环境,步骤如下:
搜索 WorkBuddy 安装目录下的
vendor/node.zip(常见位置:C:\Program Files\WorkBuddy、D:\Program Files\WorkBuddy、%LOCALAPPDATA%\Programs\WorkBuddy)如果
~/.workbuddy/binaries/node/versions/下还没有可用的 node.exe,将 node.zip 里的node-v*-win-x64/目录解压,把其中的文件复制到~/.workbuddy/binaries/node/versions/{版本号}/(版本号从目录名提取,如22.22.2)执行
~/.workbuddy/binaries/node/versions/{版本号}/node.exe --version确认可用可选:同样处理
vendor/PortableGit.zip
完成后告诉我环境是否就绪。
执行完毕后,重启 Obsidian,Workbuddian 即可正常使用。
自动发现
插件启动时自动搜索以下位置:
| 搜索目标 | Windows 路径 |
|---|---|
| WorkBuddy 安装 | %LocalAppData%\Programs\WorkBuddy\...、%ProgramFiles%\WorkBuddy\...、C/D/E 盘全覆盖 |
| npm 全局安装 | %AppData%\npm\codebuddy.cmd、%ProgramFiles%\nodejs\... |
| 系统 PATH | 遍历 PATH 中每个目录查找 codebuddy.cmd / codebuddy.exe |
| WorkBuddy 自带 Node | ~/.workbuddy/binaries/node/versions/*/ |
| 多盘符 Node | C:\Program Files\nodejs、D 盘、E 盘 |
故障排查
| 现象 | 原因 | 解决 |
|---|---|---|
找不到 codebuddy CLI |
自动检测未找到(如自定义安装路径) | 在插件设置中手动填写路径。默认路径:WorkBuddy安装目录\resources\app.asar.unpacked\cli\bin\codebuddy。右键 WorkBuddy 快捷方式 → 打开文件位置 可找到安装目录 |
找不到 Node.js 来运行 codebuddy |
Node.js 未正确配置 | 完成上方的「环境初始化」 |
| 一直显示「思考中」 | 流式结束未清理占位元素 | 已修复 |
| 重启后对话丢失 | chatView 未正确持有导致无法加载历史 | 已修复 |
(无响应,请重试) |
本轮流式结束但没收到任何正文(纯工具调用轮 / CLI 超时 / 模型空回复) | 直接重试;仍旧则打开开发者控制台看 [WB] 日志(chunk 类型、exit code、stderr)判断 |
权限授权
插件需要 CodeBuddy 对 Vault 有读写权限才能正常工作。如果使用时提示权限不足,将 提示词-授予Vault读写权限.md 的完整内容发送给 WorkBuddy/CodeBuddy 执行一次即可。
完成后完全退出 WorkBuddy/CodeBuddy(系统托盘右键退出),重新打开即可生效。
设置
| 设置项 | 说明 | 默认值 |
|---|---|---|
| CodeBuddy 路径 | CLI 可执行文件路径(留空自动检测) | 自动 |
| CLI 超时时长(分钟) | 单次响应最长等待时间,超时强制中断 | 5 |
| 手动指定 Node.js 路径 | 留空自动探测;探测失败时手动指定 node 完整路径 | 自动 |
| 注入 Vault 上下文 | 每次消息附上当前 Vault 路径 | 开 |
| 注入当前笔记链接 | 每次消息附上当前笔记标题+路径(不含正文) | 关 |
| 界面语言 | Auto(跟随 Obsidian)/ 中文 / English | Auto |
| 聊天主色调 | 自定义强调色(留空=默认土黄) | 默认 |
模型与授权模式已移到聊天输入框底部工具栏:点当前模型名可切换模型,点盾牌图标切换权限(默认 / 完全访问)。工具栏还有 📎 附件(挑任意文件注入)与
#常驻指令。在笔记里选中文字会实时出现「选区」chip,随消息作只读上下文发送。
开发
npm run dev    # 开发构建
npm run build  # 生产构建
npm test       # 运行测试
相关项目
如果你在 Obsidian 里用 Claude Code,也许见过 Claudian——Workbuddian 就是面向 WorkBuddy / CodeBuddy CLI 的同类:把这个本地编程 agent 变成 vault 内的聊天面板。思路一致(让 CLI agent 住进笔记),后端不同。
Credits / 致谢
Independent rework (derivative) of BuddyBridge (MIT); some code derives from it and stays MIT-licensed. UI references Claudian (MIT) for design patterns only. See LICENSE / NOTICE. Maintained independently; not affiliated with either.
基于 BuddyBridge(MIT)的独立重构(衍生作品),部分代码源自它并保留 MIT;UI 参考 Claudian(MIT,仅设计)。见 LICENSE / NOTICE。独立维护,不隶属于二者。
License
MIT
Reviews (0)
Sign in to leave a review.
Leave a reviewNo results found