sonsery-flow-community
Health Warn
- License — License: MIT
- Description — Repository has a description
- Active repo — Last push 0 days ago
- Low visibility — Only 6 GitHub stars
Code Pass
- Code scan — Scanned 12 files during light audit, no dangerous patterns found
Permissions Pass
- Permissions — No dangerous permissions requested
No AI report is available for this listing yet.
AI workflow automation — bridge web AI (ChatGPT, Claude, Gemini, DeepSeek) with your terminal. No API keys. MIT, open source.
Sonsery Flow Community - AI Workflow Automation



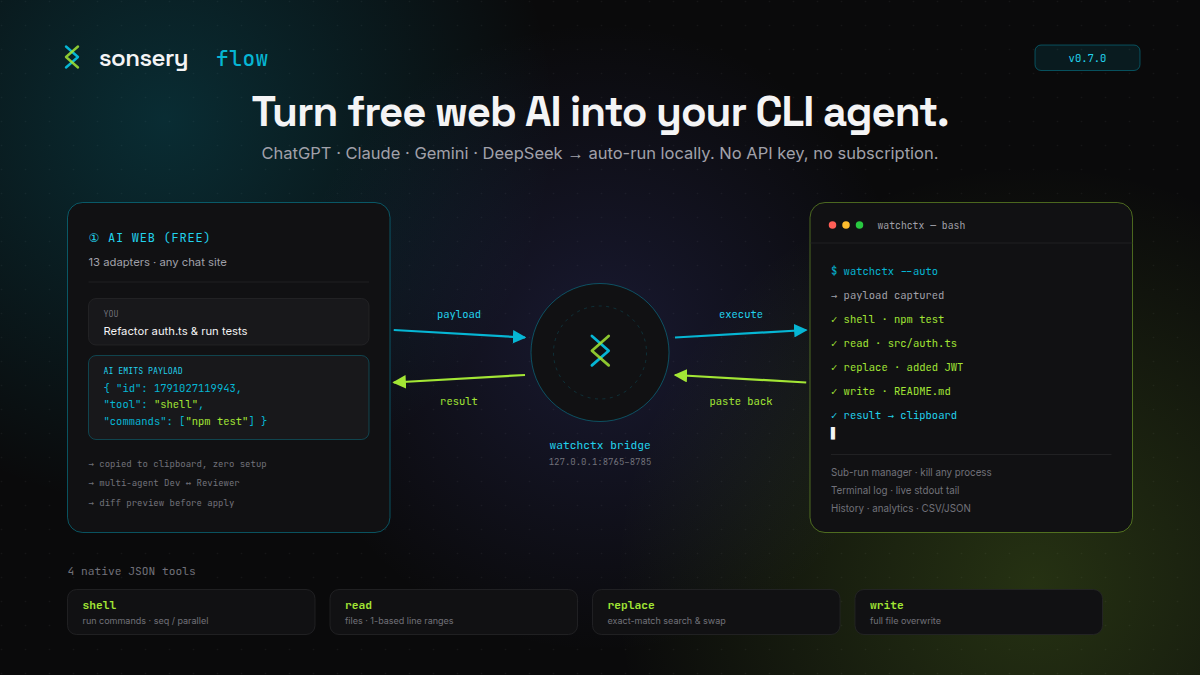
Sonsery Flow — use free web AI (ChatGPT, Claude, Gemini, DeepSeek, and more)
as a coding agent, right inside your terminal. No API keys, no subscriptions,
no token quotas. Copy a payload in the AI chat → the tool runs it on your
machine → the result is pasted back. Automation loop, end to end.
A tool that automates the workflow between AI Chat (ChatGPT, Claude, Gemini, DeepSeek) and the terminal. Community edition — MIT, open source.
How it works
- Copy the payload from AI Chat to the clipboard
watchctxautomatically detects it and executes the command- The result is copied back to the clipboard to paste into AI Chat
Setup — step by step
Follow these steps in order. Each one ends with something you can verify
before moving on. Takes about 5 minutes.
Step 1 — Clone the repo
git clone https://github.com/jsonnguyen19/sonsery-flow-community.git
cd sonsery-flow
Step 2 — Run setup
pnpm setup
No
pnpm? Install it once:npm install -g pnpm(or see
pnpm.io).Don't want pnpm? Run the script directly:
python3 scripts/setup.py.
This creates the venv/ folder, installs Python runtime deps, and writes the
wrapper scripts run and sync at the repo root.
Step 3 — Test it runs
./run
You should see the clipboard watcher start and the HTTP bridge announce a port
in the 8765–8785 range. Leave this terminal running.
On Windows (cmd/PowerShell) use run.bat instead:
.\run.bat
Open a second terminal for the next steps.
Step 4 — Configure the alias (WSL first)
Setup does NOT write aliases for you — add them yourself so you can typewatchctx from any directory.
WSL / Linux / macOS (bash / zsh) — add to ~/.bashrc or ~/.zshrc,
replacing /path/to/sonsery-flow with your actual clone path:
alias watchctx='/path/to/sonsery-flow/run'
alias watchctx-sync='/path/to/sonsery-flow/sync'
Windows PowerShell — add to $PROFILE:
function watchctx      { & "C:\path\to\sonsery-flow\run.bat" @args }
function watchctx-sync { & "C:\path\to\sonsery-flow\sync.bat" @args }
Git Bash — same as WSL, add to ~/.bashrc:
alias watchctx='/c/path/to/sonsery-flow/run'
alias watchctx-sync='/c/path/to/sonsery-flow/sync'
cmd.exe — no native alias. Use doskey in a startup script, or just callC:\path\to\sonsery-flow\run.bat directly.
Step 5 — Reload your terminal
For the new aliases to take effect, either open a new terminal or source
the config file:
source ~/.zshrc      # zsh
. ~/.bashrc          # bash
Step 6 — Verify the terminal
Still in the second terminal, run:
watchctx
You should see the same output as Step 3 (watcher + bridge). If it runs,
your terminal setup is done — Ctrl+C to stop, or leave it as your main
watcher terminal.
If
watchctx: command not found, the alias didn't load. Re-check Step 4
path and re-runsourcefrom Step 5.
Step 7 — Load the Chrome extension
The extension lives in runctx-extension/. To get its exact path (and the
Windows UNC form for WSL), run:
pnpm about
Copy the Extension path it prints. Then:
- Open
chrome://extensions/(oredge://extensions/). - Enable Developer mode (top-right toggle).
- Click Load unpacked → paste the path
(on WSL: paste the Windows UNC path —\\wsl.localhost\<Distro>\home\...\runctx-extension— into the Explorer address bar and press Enter first). - Pin the extension (puzzle-piece icon → pin).
- Reload the extension once (the refresh icon on its card).
Step 8 — Test with DeepSeek
- Open
chat.deepseek.com. - Click the pinned Sonsery Flow icon → the side panel opens.
- Flip the Automation toggle ON.
- Copy this ready-made payload and send it in the chat:
{ "id": 1791016717000, "tool": "shell", "mode": "sequential", "commands": ["pwd"] }
Bump the
idto any newer millisecond timestamp (e.g.Date.now()) if the
extension ever reports the payload as already processed.
- Watch: the payload is copied →
watchctxruns it → the result (your current
working directory) is pasted back into the chat.
If you see the result come back, setup is complete. 🎉
Bonus — a dedicated background Chrome for coding
Recommended. By default Chrome throttles timers, freezes tabs, and sleeps
background windows — this can pause the automation loop when the AI tab loses
focus. Launch Chrome with a separate profile and the flags below so the loop
keeps running even when you minimize or switch away.
| Flag | Purpose |
|---|---|
--user-data-dir="..." |
Separate profile, isolated from your daily Chrome |
--disable-background-timer-throttling |
Don't slow down timers in background tabs |
--disable-backgrounding-occluded-windows |
Don't deprioritize covered/occluded windows |
--disable-renderer-backgrounding |
Don't lower renderer priority in the background |
--intensive-wake-up-throttling-policy=disabled |
Disable aggressive wake-up throttling |
Windows (PowerShell) — creates a Desktop shortcut:
$WshShell = New-Object -ComObject WScript.Shell
$ShortcutPath = "$([Environment]::GetFolderPath('Desktop'))\Chrome Agent.lnk"
$Shortcut = $WshShell.CreateShortcut($ShortcutPath)

$Shortcut.TargetPath = "C:\Program Files\Google\Chrome\Application\chrome.exe"
$Shortcut.Arguments = '--user-data-dir="%LOCALAPPDATA%\Google\Chrome\User Data Agent" --disable-background-timer-throttling --disable-backgrounding-occluded-windows --disable-renderer-backgrounding --intensive-wake-up-throttling-policy=disabled'

$Shortcut.Save()
macOS — launch from Terminal:
open -na "Google Chrome" --args \
  --user-data-dir="$HOME/Library/Application Support/Google/Chrome Agent" \
  --disable-background-timer-throttling \
  --disable-backgrounding-occluded-windows \
  --disable-renderer-backgrounding \
  --intensive-wake-up-throttling-policy=disabled
Linux — save as ~/.local/share/applications/chrome-agent.desktop:
[Desktop Entry]
Name=Chrome Agent
Exec=/usr/bin/google-chrome --user-data-dir=%h/.config/google-chrome-agent --disable-background-timer-throttling --disable-backgrounding-occluded-windows --disable-renderer-backgrounding --intensive-wake-up-throttling-policy=disabled
Type=Application
Terminal=false
Note: For Edge, replace the executable path (
chrome.exe→msedge.exe,Google Chrome→Microsoft Edge) — flag names are identical.
Tip: Install the extension into this dedicated profile once. Keep the
window minimized in the background — the automation loop keeps running.
Commands
| Command | What it does |
|---|---|
pnpm setup |
End-user setup: venv/ + runtime deps + run/sync wrappers |
./run |
Start watchctx (clipboard watcher + HTTP bridge) |
./sync |
Sync prompts into the extension |
pnpm about |
Print extension path, bridge ports, available commands |
pnpm setup:dev |
Contributor setup (.venv-test/ + dev deps) |
Requirements
- Python 3.8+
- Chrome 100+ / Edge 100+ (Manifest V3)
No GPU, no Docker, no admin rights needed.
Documentation
Full docs live in docs/community/.
| Doc | What it covers |
|---|---|
README.md |
This file — overview + setup |
CONTRIBUTING.md |
Contribution guide |
CHANGELOG.md |
Release notes |
SECURITY.md |
Security policy |
CODE_OF_CONDUCT.md |
Community code of conduct |
scripts/README.md |
Every script in scripts/ |
docs/community/getting-started.md |
Install the backend + extension, run the first automation loop, day-to-day usage |
docs/community/tools.md |
Payload & response format for shell / read / replace / write |
docs/community/tabs.md |
The 4 side-panel tabs and what each one does |
docs/community/adapters.md |
The 5 Community AI adapters + how to debug/add one |
docs/community/architecture.md |
How the content script, watcher, and bridge fit together |
Links
- Website / Landing page — https://sonseryflow.vercel.app/
- Community repo — https://github.com/jsonnguyen19/sonsery-flow-community
- Author portfolio — https://jasonnguyen.vercel.app/
- LinkedIn — https://www.linkedin.com/in/son-nguyen-650628344/
- Contact — [email protected]
- Discord — coming soon
Contributing
Contributor / dev setup (dev venv, lint, format, typecheck, tests) lives inCONTRIBUTING.md. End-users never need it.
Repo layout:
watchctx.py— entrypoint: clipboard watcher + HTTP bridgerunctx_core.py— entrypoint: payload processingrunctx/— main packagerunctx-extension/— Chrome/Edge extensionscripts/— setup scripts (seescripts/README.md)prompts/— prompt templatestests/python/— pytest test suite
See CONTRIBUTING.md for the full guide.
Reviews (0)
Sign in to leave a review.
Leave a reviewNo results found