easy-ui-canvas
Health Gecti
- License — License: Apache-2.0
- Description — Repository has a description
- Active repo — Last push 0 days ago
- Community trust — 10 GitHub stars
Code Basarisiz
- network request — Outbound network request in assets/canvas.js
- os.homedir — User home directory access in scripts/export-ui.cjs
- process.env — Environment variable access in scripts/export-ui.cjs
- fs module — File system access in scripts/export-ui.cjs
- fs module — File system access in tests/qr_matrix.js
Permissions Gecti
- Permissions — No dangerous permissions requested
Bu listing icin henuz AI raporu yok.
Local multi-frame canvas for exploring UI designs: comment on elements, click through flows, and let your AI coding agent answer. Python stdlib only, no build step.
Easy UI Canvas
Author: karlarso · Apache-2.0
English | 简体中文
⚠️ No authentication: use it on this machine or on a network you trust only.
Deploying? Hand DEPLOY.md to your AI assistant.
🚀 Deploy in one step
Give your AI assistant (Claude Code, Cursor, Codex, ...) this sentence. It will read DEPLOY.md, interview you about the details (bind address, autostart, ports, data location, optional export) and deploy it only after you confirm the plan. It will also ask whether to install the Easy UI Canvas skill for your AI tool (and where), and install it if you agree.
Read https://raw.githubusercontent.com/karlarso/easy-ui-canvas/main/DEPLOY.md and deploy Easy UI Canvas by following it. Ask me about the bind address and autostart before you change anything.
The default is local-only (127.0.0.1); the assistant must warn you before it opens anything to your network, because the tool has no login. Chinese version: DEPLOY.zh-CN.md.
🎨 What it is
A small local web canvas for exploring UI designs: put several HTML screens (frames) side by side on a zoomable, pannable board, comment on individual elements, click through flows on a phone, and let an AI coding agent read and answer the comments in the next session. It runs on your machine, needs only the Python 3 standard library, and works as an agent skill (Claude Code, Cursor, Codex) or as a plain command-line tool.
✨ Why use it
- 🔌 Works with any AI coding tool. Any assistant that can read files and run commands (Claude Code, Cursor, Codex and others) can use it, so you can switch tools or models without switching canvas.
- 🏠 No account, no token, your data stays on your machine. It needs only the Python standard library: no cloud service, no build step, and one sentence is enough for your AI to deploy it. You decide who can reach it; there is no login, so share it only on a network you trust (see the Security section below).
- ⚡ Fast, precise feedback. A comment is anchored to a specific element, so your AI knows exactly what you mean when it reads it. Once deployed, the whole loop from asking for a screen to commenting on individual elements runs smoothly.
- 🧱 The design is real HTML/CSS, not an image. You can reuse it directly as code, so there is no separate design-to-development step.
💬 Usage examples
Once Easy UI Canvas is running and your assistant has the skill (see “Deploy in one step” above), one plain sentence is enough: the skill already knows how to create the canvas, write the frames, make elements commentable, link the screens and hand you the URL. Three typical situations:
1. Design an app component library
Use Easy UI Canvas to design a component library for a
bookkeeping app: buttons, inputs, cards and list items.
What happens next: the assistant gives you a canvas link. Click elements on the canvas to write comments; the assistant reads them and keeps revising.
2. Improve a page of your own project
Replace the placeholder with a page from your own repository (for example the pricing page).
Use Easy UI Canvas to draw the current state of
<a page in my repo, e.g. the pricing page>,
then give me two improved versions next to it to compare.
What happens next: the assistant gives you a canvas link. Click elements on the canvas to write comments; the assistant reads them and keeps revising.
3. Design a new feature
Use Easy UI Canvas to design the screens for a "shared team album"
feature: create album, invite members and browse.
What happens next: the assistant gives you a canvas link. Click elements on the canvas to write comments; the assistant reads them and keeps revising.
Everything else (frame structure, element ids, tap-through links, the phone preview and how to answer comments) is handled by the skill; see SKILL.md. The phone preview needs a phone that can reach the canvas address, which needs a non-local bind (see DEPLOY.md).
🖼️ Screenshots
Real captures from a running instance, using the bundled example project (a three-screen app design).
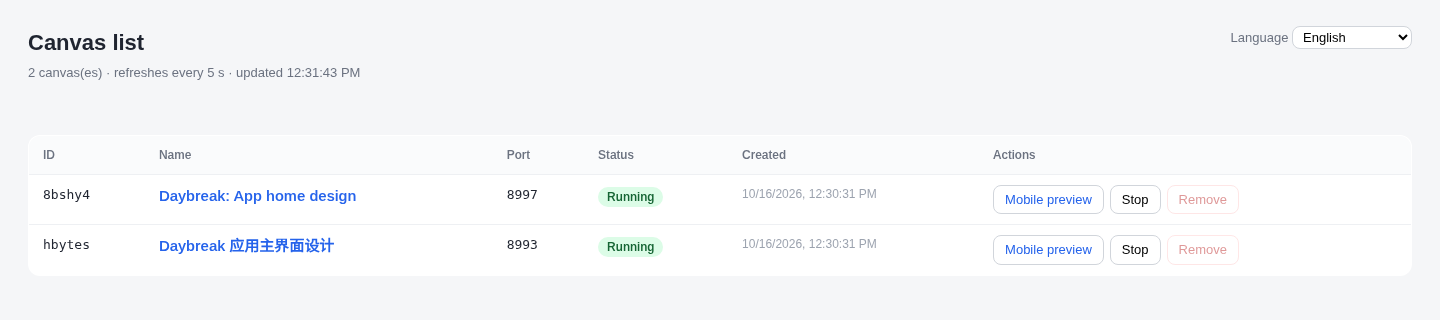
Canvas list: every canvas is its own small server; the list page starts, stops and removes them.
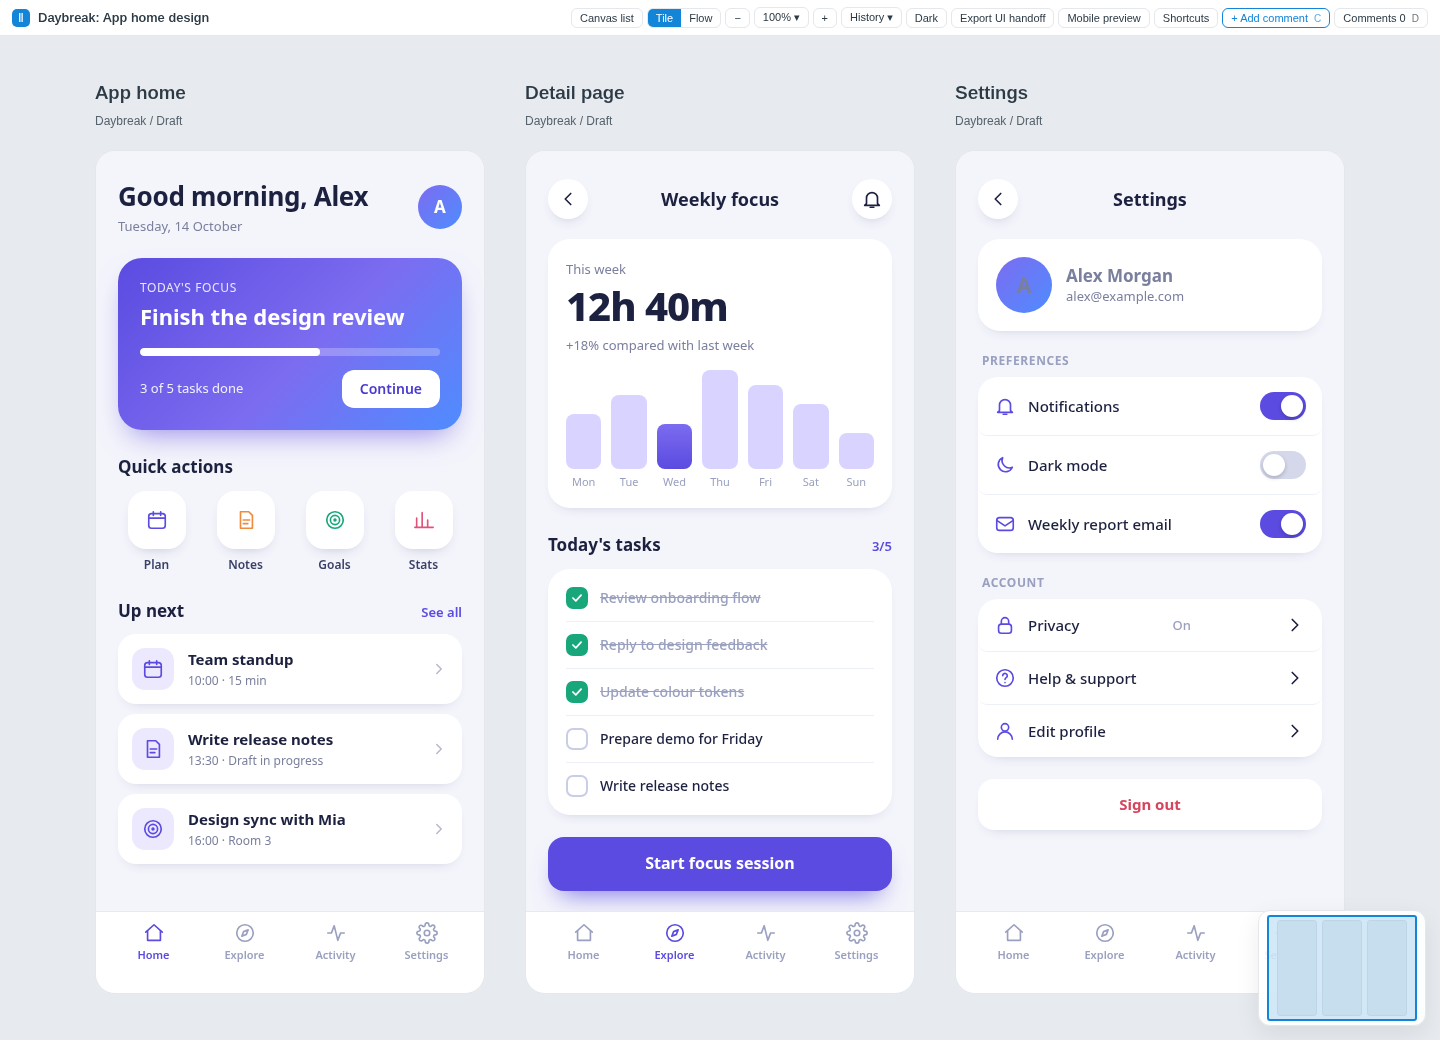
Canvas, tile view: app home, detail page and settings side by side.
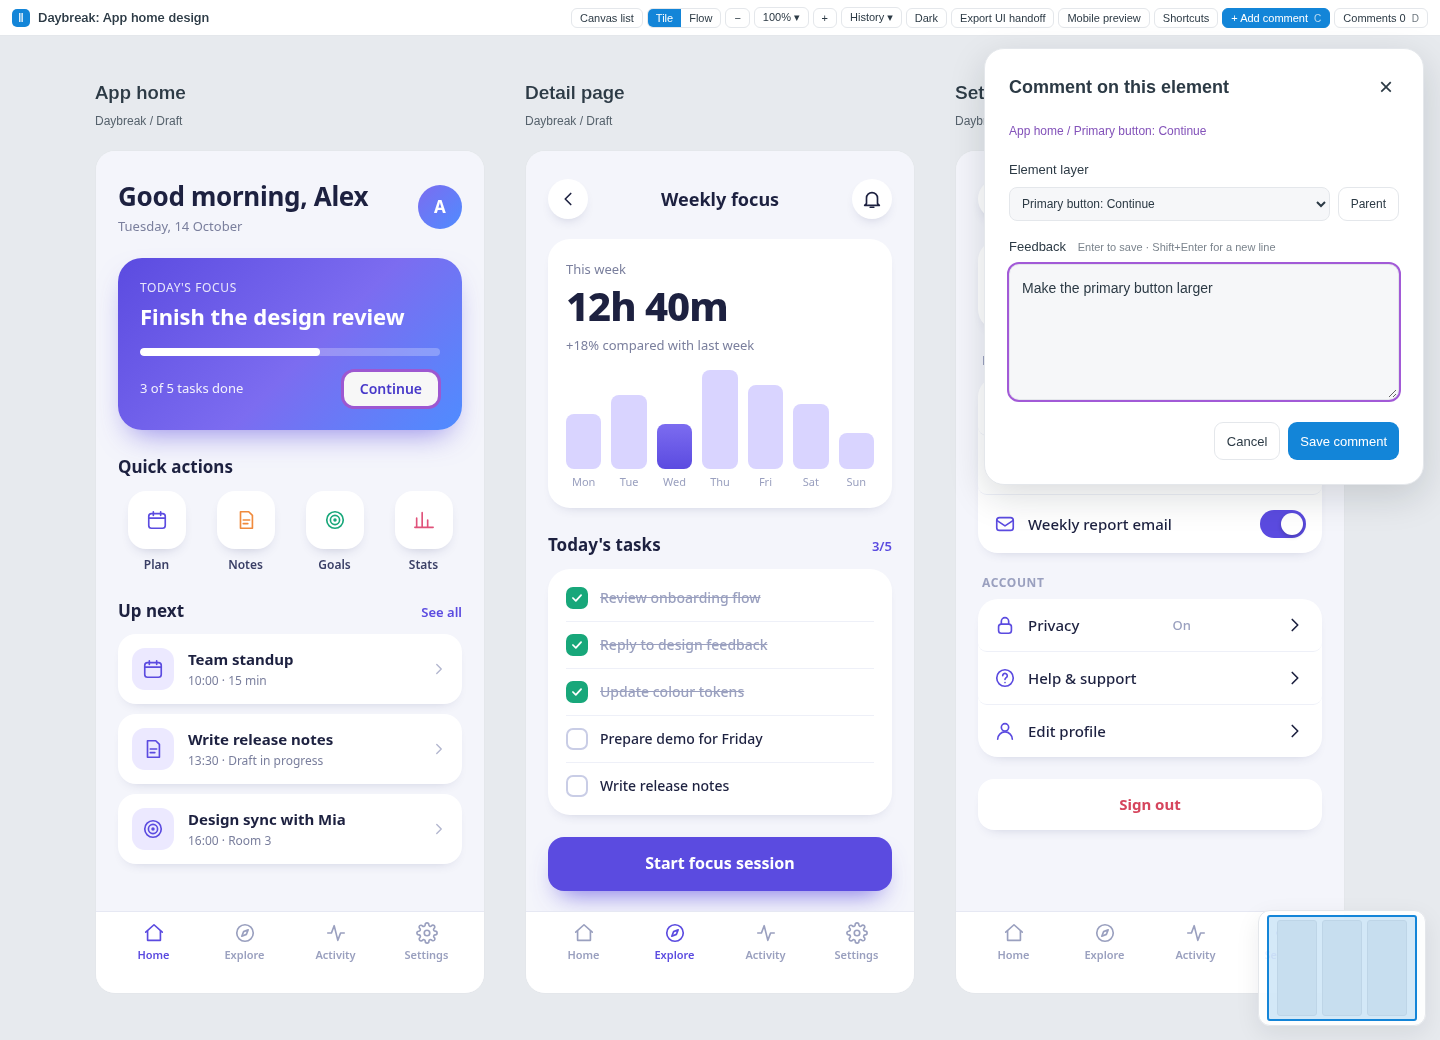
Add a comment: turn on comment mode, click an element (highlighted) and write the feedback.
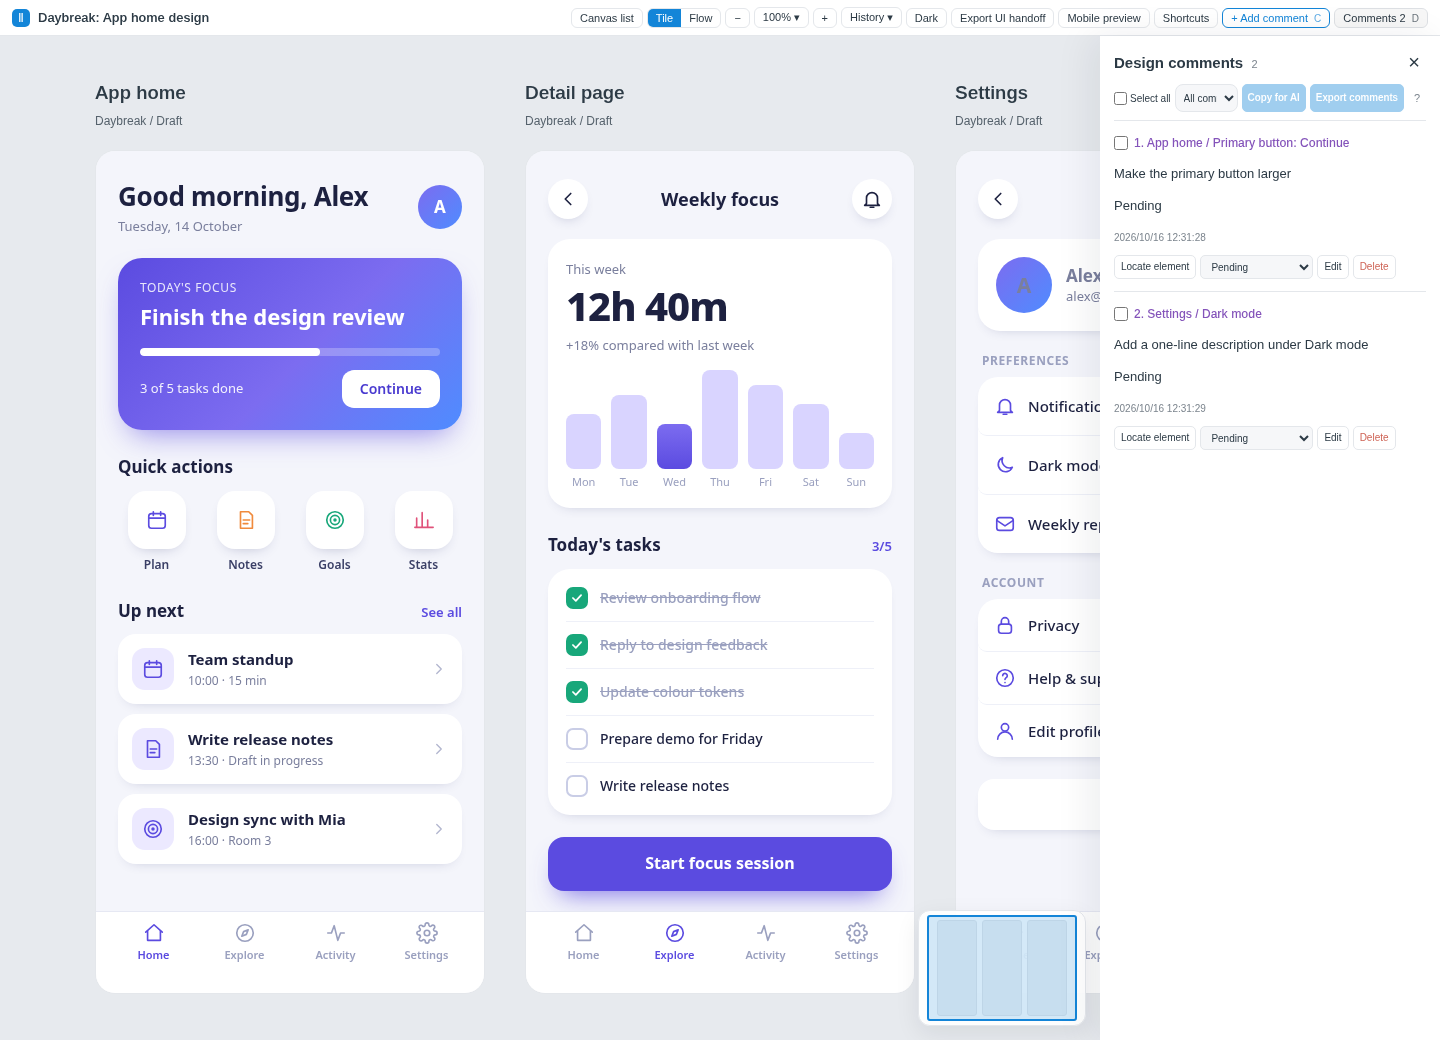
Comments panel: all feedback in one place, with status and "copy for AI".
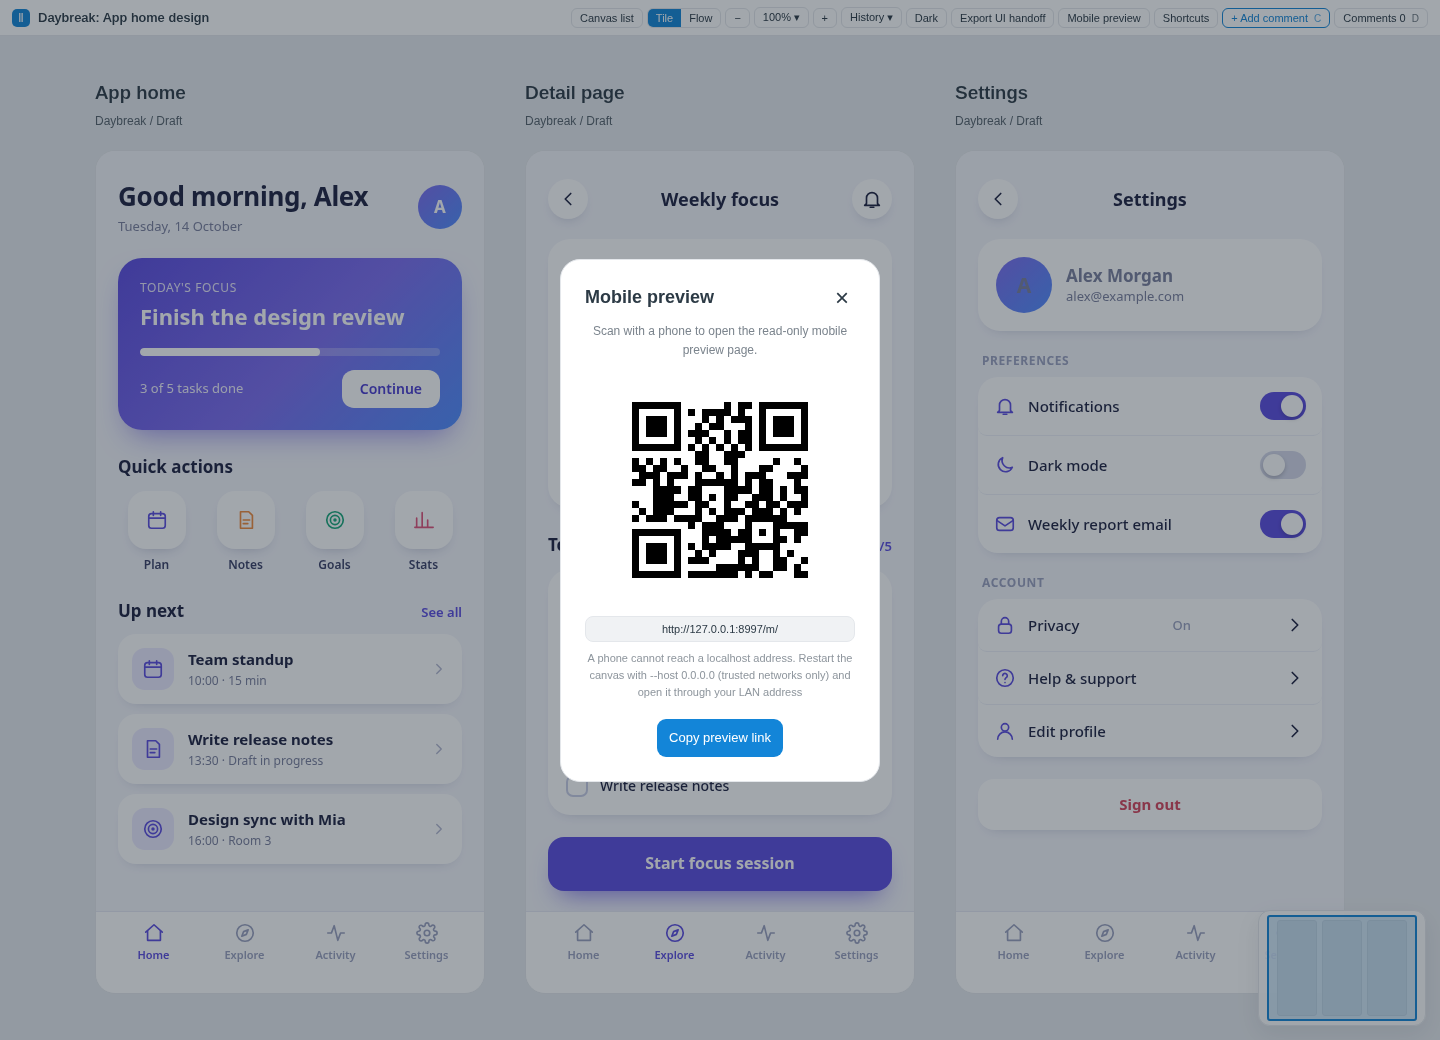
Mobile preview: scan the QR code to open the read-only phone page.
🧩 Features
- 🗂️ Multi-frame canvas: tile view with zoom, pan, minimap and fit-to-window; frames are plain HTML/CSS fragments you or an agent write.
- 💬 Element comments: click any element (or the whole frame), write feedback, track it as pending / changed / needs discussion, copy it for an AI, and reply from the command line.
- 📱 Flow view and phone preview: mark buttons with
data-gototo make a prototype clickable inside the canvas and at/m/on a phone (QR code included). Give the scrolling element of several states of one page the samedata-keep-scroll="name"to keep the scroll position when jumping between them. - 🕘 Snapshots: keep earlier revisions with their comments and look back at them read-only.
- 📋 Many canvases, one list page: each canvas is its own small server; a list page starts, stops and removes them.
- 📤 UI hand-off export: one ZIP with offline pages, screenshots, assets and a
HANDOFF.md(needs optional tools, see below). - 🌐 English and Chinese UI, switchable on the list page; also for server errors and CLI output.
- 🪶 No build step, no CDN, no third-party Python packages.
- 📁 Plain files, git-friendly: a canvas is just files in a directory (HTML, JSON, assets), so it can live in a git repository.
- 📄 Open source: Apache-2.0.
🛠️ Manual setup (without AI-assisted deployment)
Show the manual stepsRequirements: Python 3.9 or newer, macOS or Linux (Windows through WSL).
git clone https://github.com/karlarso/easy-ui-canvas.git easy-ui-canvas
cd easy-ui-canvas
python3 scripts/canvas.py ensure-list                 # starts the list service on http://127.0.0.1:4042/
python3 scripts/canvas.py new --name "My first canvas" # creates a canvas from the example and starts it
Project format: docs/project-format.md.
📦 Dependencies
- Runtime: the Python 3 standard library only. Nothing to
pip install. - "Export UI handoff" (optional) takes full-page screenshots, so you must install Node.js, Playwright and Chromium or Google Chrome yourself (for example
npm install playwrightandnpx playwright install chromium). They are optional external tools, are not bundled or distributed with this repository, and are never installed automatically. SetUI_CANVAS_PLAYWRIGHT_MODULEif Playwright is not found. Everything else works without them. - Tests use only the standard library and Node.js; the browser smoke test and QR cross-check additionally use the optional packages named in their headers and skip themselves when those are missing.
💻 Platforms
macOS and Linux are supported. On Windows use WSL. Autostart is optional; see DEPLOY.md (guided deployment for your AI assistant) and docs/autostart.md (macOS LaunchAgent, Linux systemd, WSL).
🔒 Security
There is no authentication. Anyone who can reach a port can read and change your canvases and comments.
- By default every server listens on
127.0.0.1only, and requests with a non-loopbackHostheader are refused (protection against DNS rebinding). Write endpoints accept same-origin requests only. - To open the canvas to other devices (for example a phone on your Wi-Fi) you must ask for it:
--host 0.0.0.0,--host <address>,--host auto(detected LAN/VPN addresses) orUI_CANVAS_BIND. Do this only on networks you trust. The command output states whether each URL is local-only. - Frame HTML is written by you or your agent; never import untrusted third-party pages as frames (scripts in fragments do not run, but CSS and markup do).
🌐 Language
The UI follows your browser language (Chinese for zh*, English otherwise) until you choose one on the list page; the choice is stored on the server so every canvas, the phone preview and the CLI agree. Details: docs/i18n.md.
📁 Project layout
scripts/canvas.py        CLI and servers (Python stdlib)
scripts/export_ui.py, export-ui.cjs   UI hand-off export
assets/                  front end (canvas.html/js/css, list.html, mobile.html, i18n.js, i18n.json)
examples/en, examples/zh example projects
docs/                    format, behaviour, i18n, autostart
DEPLOY.md, DEPLOY.zh-CN.md   deployment guide to hand to your AI assistant
tests/                   tests
SKILL.md                 agent instructions
To run the tests, see Running the tests in CONTRIBUTING.md.
📄 License
Copyright 2026 karlarso, licensed under Apache-2.0, third-party notice see NOTICE. See LICENSE and NOTICE.
Third-party: the QR encoder in assets/canvas.js is adapted from Project Nayuki's QR Code generator (MIT License); see NOTICE.
Yorumlar (0)
Yorum birakmak icin giris yap.
Yorum birakSonuc bulunamadi