general-readme-skill
Health Pass
- License — License: MIT
- Description — Repository has a description
- Active repo — Last push 0 days ago
- Community trust — 45 GitHub stars
Code Warn
- Code scan incomplete — No supported source files were scanned during light audit
Permissions Pass
- Permissions — No dangerous permissions requested
No AI report is available for this listing yet.
使用 AI 编程助手为任意项目生成专业美化的 README 文件 Generate Professional & Beautified README Files For Any Project Using AI Assistants Skill.
General README Skill
Generate professional README files for any project using AI coding assistants
Zero Dependencies · Multi-Platform · Multi-Language · Supports Claude Code, Copilot, Cursor, and more
English · 中文 · 日本語 · 한국어 · Русский
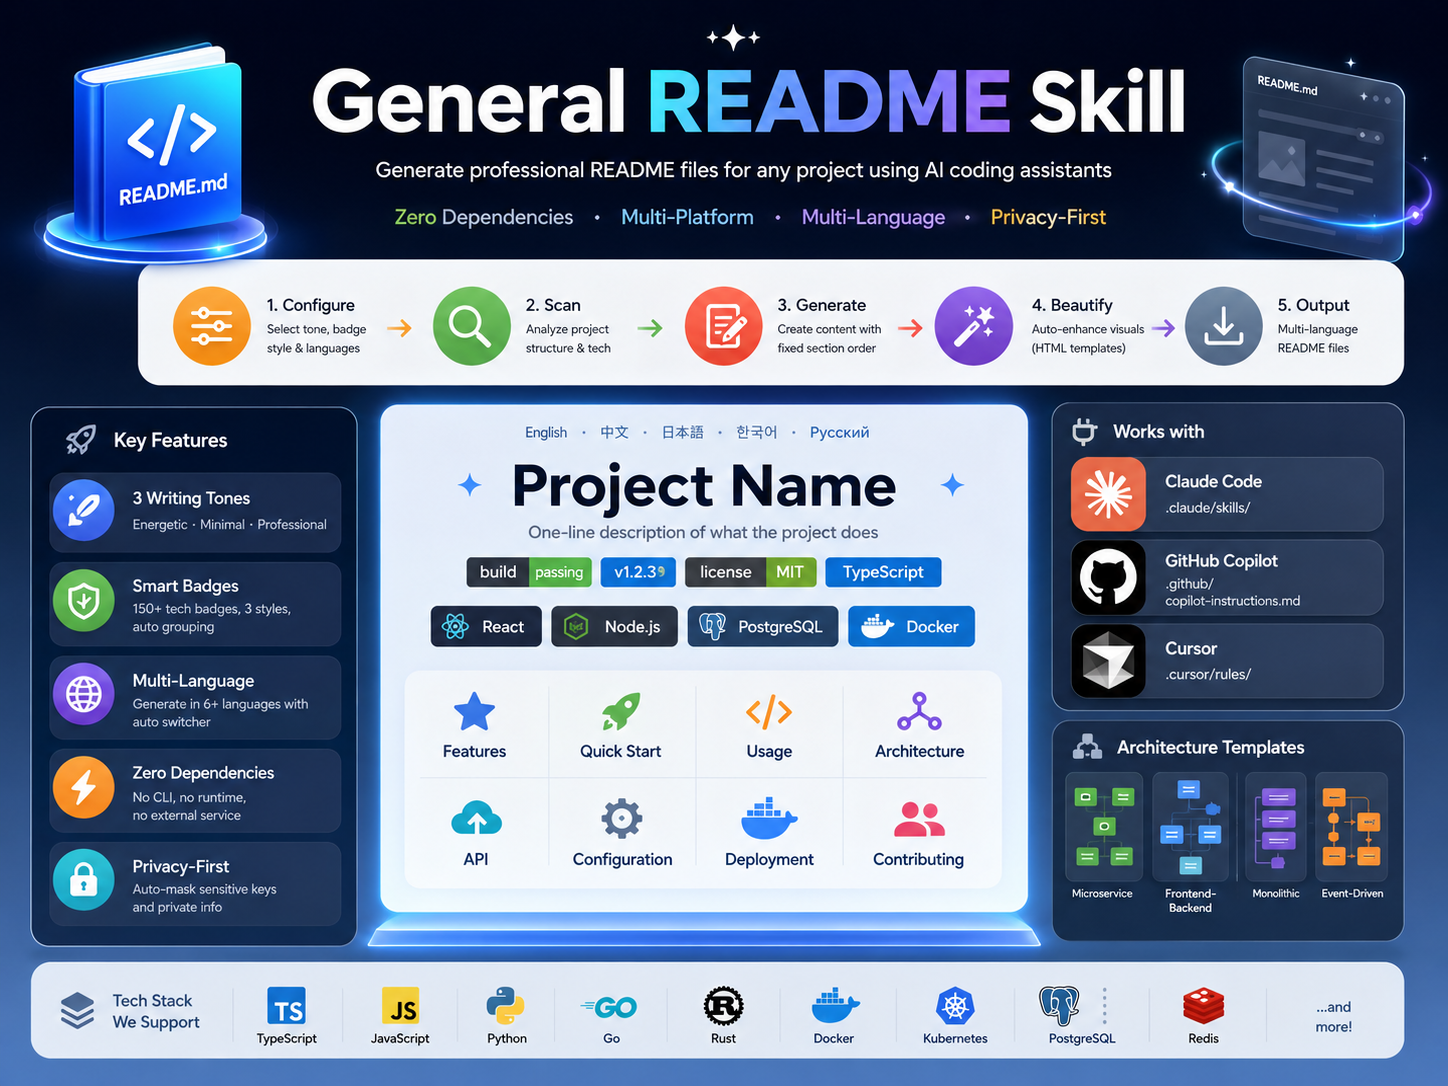
Features
| Feature | Description |
|---|---|
| Multi-Tone Support | Three writing profiles: Energetic, Minimal, and Professional |
| Badge System | Automatic shields.io badge generation with three visual styles |
| Multi-Language | Generate README files in English, Chinese, Japanese, Korean, Russian, and more |
| Zero Dependencies | No external CLI, runtime, or network service required |
| Multi-Platform | Works with Claude Code, GitHub Copilot, and Cursor |
| Privacy-First | Automatic masking of sensitive keys, passwords, and private information |
Workflow Overview
The skill follows a Configure → Scan → Generate → Beautify → Output pipeline:
graph LR
    A[User Trigger] --> B[Phase 1<br/>Configure]
    B --> C[Phase 2<br/>Scan]
    C --> D[Phase 3<br/>Generate]
    D --> E[Phase 4<br/>Beautify]
    E --> F[Phase 5<br/>Output]
    style A fill:#E6A23C,color:#fff
    style B fill:#409EFF,color:#fff
    style C fill:#67C23A,color:#fff
    style D fill:#F56C6C,color:#fff
    style E fill:#9B59B6,color:#fff
    style F fill:#909399,color:#fff
Phase 1: Configuration
Collect configuration options before generation. All options have fixed default values.
1.1 Tone Profile Selection
Choose the README writing style:
| Profile | Voice | Reference | Use Case |
|---|---|---|---|
| Energetic | Direct, confident, allows emojis | FastAPI | Open source, developer tools |
| Minimal | Terse, code-first, no redundancy | Tailwind CSS | CLI tools, libraries |
| Professional | Neutral, structured, formal | Kubernetes | Enterprise, documentation |
Example — Same feature in three tones:
Energetic Style## Features
- ⚡ **Blazing fast** — Sub-millisecond response times
- 🔒 **Secure by default** — JWT auth, CORS, rate limiting out of the box
- 🎯 **Type-safe** — Full TypeScript inference, zero `any`
## Features

- Type-safe API with full inference
- Zero-config TypeScript support
- Built-in authentication and rate limiting
## Features

| Feature | Description |
|---|---|
| Type Safety | Full TypeScript inference with zero configuration |
| Authentication | JWT-based auth with role-based access control |
1.2 Badge Style Selection
Choose shields.io badge appearance:
| Style | Parameter | Preview |
|---|---|---|
| Flat (default) | style=flat |
|
| Flat-square | style=flat-square |
|
| For-the-badge | style=for-the-badge |
1.3 Multi-Language Setting
- Primary language (default: English)
- Secondary languages (optional: Chinese, Japanese, Korean, Spanish, French, Russian, etc.)
File naming follows ISO 639-1 codes:
| Language | File | Code |
|---|---|---|
| English (primary) | README.md |
— |
| Chinese (Simplified) | README-zh.md |
zh |
| Japanese | README-ja.md |
ja |
| Korean | README-ko.md |
ko |
| Russian | README-ru.md |
ru |
Phase 2: Project Scan
Use built-in tools to scan the local project directory. Only read static files — never execute, modify, or delete.
2.1 Detection Pipeline
graph TD
    A[Start Scan] --> B{Manifest<br/>exists?}
    B -->|Yes| C[Parse manifest]
    B -->|No| D{Dependencies<br/>file?}
    D -->|Yes| E[Parse dependencies]
    D -->|No| F[Count file<br/>extensions]
    C --> G[Language &<br/>Framework]
    E --> G
    F --> G
    G --> H[Architecture<br/>Type]
    H --> I[API Style]
    I --> J[License]
    J --> K[Project Type]
    style A fill:#E6A23C
    style G fill:#409EFF
    style K fill:#67C23A
2.2 What Gets Detected
| Detection | Source Files | Output |
|---|---|---|
| Language | package.json, pyproject.toml, go.mod, Cargo.toml | Primary language |
| Framework | dependencies/devDependencies fields | React, Vue, Express, Django, etc. |
| Build/CI | Makefile, Dockerfile, .github/workflows | Build commands, CI pipeline |
| Database | DATABASE_URL, ORM configs | PostgreSQL, Redis, Prisma, etc. |
| Architecture | Directory structure, .proto files | Microservice, Monolithic, etc. |
| API Style | Route files, .proto, .graphql | REST, gRPC, GraphQL, WebSocket |
| License | LICENSE, LICENSE.md | MIT, Apache-2.0, GPL-3.0, etc. |
| Project Type | package.json scripts, bin field | Library, Application, CLI, Static |
2.3 Example Scan Output
For a typical Node.js project with package.json:
┌─ Language: TypeScript
├─ Framework: Express, Prisma
├─ Database: PostgreSQL, Redis
├─ Build: npm scripts, Docker
├─ CI: GitHub Actions
├─ API: REST
├─ License: MIT
└─ Type: Application
Phase 3: Generate Content
Load reference files, then generate content following the Fixed Section Order (Inverted Pyramid).
3.1 Reference Files
All references located in references/ folder:
| File | Purpose |
|---|---|
tone-profiles.md |
Style rules & sample phrases for 3 tones |
badge-styles.md |
Badge layout & grouping rules |
badges.md |
Technology → shields.io badge URL mapping |
diagram-templates.md |
Mermaid templates + SVG fallback |
section-guidelines.md |
Section writing rules & banned phrases |
language-guide.md |
Multi-language naming & switcher rules |
3.2 Fixed Section Order
Sections are generated in this order. Skip any section if no matching project data.
graph TD
    A[1. Hero] --> B[2. Features]
    B --> C[3. Quick Start]
    C --> D[4. Usage]
    D --> E[5. Architecture]
    E --> F[6. Configuration]
    F --> G[7. API]
    G --> H[8. Directory Structure]
    H --> I[9. Tech Stack]
    I --> J[10. Deployment]
    J --> K[11. Contributing]
    K --> L[12. License]
    style A fill:#E6A23C
    style B fill:#409EFF
    style L fill:#67C23A
3.3 Section Examples
Hero Section
# Project Name
> One-line description of what the project does


Features Section (Professional Tone)
## Features

| Feature | Description |
|---|---|
| Type Safety | Full TypeScript inference with zero configuration |
| Authentication | JWT-based auth with role-based access control |
Quick Start Section
## Quick Start

### Prerequisites

- Node.js 18+
- PostgreSQL 14+

### Install

```bash
npm install my-package
```

### Configure

```bash
cp .env.example .env
```

### Run

```bash
npm run dev
```
Architecture Diagram
## Architecture

```mermaid
graph LR
    A[Client<br/>React] --> B[API<br/>Express]
    B --> C[Auth<br/>JWT]
    B --> D[Database<br/>PostgreSQL]
```
Directory Structure
## Project Structure

```
src/
├── api/              # API route handlers
├── services/         # Business logic
├── models/           # Database models
└── index.ts          # Entry point
```
3.4 Diagram Templates
The skill includes pre-built Mermaid templates for common architectures:
Microservice Architecture
graph LR
    A[Client<br/>React] --> B[API Gateway<br/>Express]
    B --> C[User Service<br/>Go]
    B --> D[Order Service<br/>Go]
    B --> E[Payment Service<br/>Go]
    C --> F[(PostgreSQL)]
    D --> F
    E --> G[(Redis)]
Frontend-Backend Separation
graph LR
    A[Frontend<br/>Vue.js] --> B[API Server<br/>Express]
    B --> C[Auth Module<br/>JWT]
    B --> D[Business Logic<br/>TypeScript]
    D --> E[(PostgreSQL)]
    D --> F[(Redis)]
Monolithic Layered
graph TD
    A[UI Layer<br/>React] --> B[Controller Layer<br/>Express]
    B --> C[Service Layer<br/>TypeScript]
    C --> D[Data Layer<br/>Prisma]
    D --> E[(PostgreSQL)]
Event-Driven
graph LR
    A[Producer<br/>Express] --> B[Message Queue<br/>Kafka]
    B --> C[Consumer A<br/>Go]
    B --> D[Consumer B<br/>Python]
    B --> E[Consumer C<br/>Node.js]
    C --> F[(PostgreSQL)]
    D --> G[(MongoDB)]
    E --> H[(Redis)]
3.5 Badge Grouping Rules
Badges are grouped in this order:
| Line | Content | Max |
|---|---|---|
| Line 1 — Identity | Build status, Version, License, Primary language | 4 |
| Line 2 — Tech Stack | Framework, Database, Key tools | 6 |
| Line 3+ — Conditional | Downloads, Stars, Coverage (only if data exists) | — |
Example:


3.6 Critical Generation Rules
- No fabrication — All features, commands, code examples must come from real project files
- Style consistency — All text follows selected Tone Profile
- Badge rules — Follow grouping & style in
badge-styles.md - Privacy protection — Mask sensitive keys, passwords, and private info
- Incremental update — Preserve manual content marked with
<!-- MANUAL-START -->/<!-- MANUAL-END -->
Phase 4: Beautification (Auto-Triggered)
After Phase 3 generates the README, this phase automatically enhances visual presentation by replacing suitable Markdown syntax with HTML.
4.1 Execution Flow
Step 1: Analysis (Automatic)
Scan the generated README and identify beautifiable elements.
Step 2: Confirmation (User Interaction)
Display beautification suggestions to user:
AI: README generation complete! Analyzing beautification opportunities...

Found the following beautification suggestions:

1. ✅ [Hero] Title centered → <h1 align="center">
2. ✅ [Hero] Description centered and bold → <p align="center"><strong>
3. ✅ [Hero] Add CTA buttons
4. ✅ [Hero] Platform badges centered
5. ⚪ [Content] Tables keep Markdown (easier to maintain)
6. ⚪ [Code] Code blocks keep Markdown (has syntax highlighting)

Accept these suggestions?
[Accept All] [Confirm Each] [Reject All]
Step 3: Execution (Automatic)
Apply selected beautifications based on user confirmation.
4.2 Beautification Rules
| Region | Strategy | Reason |
|---|---|---|
| Hero | Always beautify (HTML) | Significant visual improvement |
| Content | Keep Markdown | Easier to maintain |
| Code/Diagrams | Keep Markdown | Syntax highlighting / GitHub native support |
| Structure | Keep Markdown | GitHub styling sufficient |
For detailed rules and HTML templates, see references/beautification-rules.md.
Phase 5: Output
5.1 File Generation
- Generate primary
README.mdin selected primary language - Generate secondary files:
README-{lang}.mdfor each extra language - Add language switcher on top of every README file
Language Switcher Format:
<p align="center">
  <a href="README.md">English</a> · <a href="README-zh.md">中文</a> · <a href="README-ja.md">日本語</a> · <a href="README-ko.md">한국어</a> · <a href="README-ru.md">Русский</a>
</p>
5.2 Output Format
- UTF-8 encoding
- Unified line breaks (LF)
- Clean empty lines between sections
- No trailing whitespace
Quick Start
Claude Code
mkdir -p .claude/skills/general-readme
cp SKILL.md .claude/skills/general-readme/
cp -r references/ .claude/skills/general-readme/
GitHub Copilot
mkdir -p .github
cp SKILL.md .github/copilot-instructions.md
cp -r references/ .github/copilot-instructions/references/
Cursor
mkdir -p .cursor/rules
cp SKILL.md .cursor/rules/general-readme.mdc
cp -r references/ .cursor/rules/references/
Usage
Type /readme or say "generate readme" in your AI coding assistant.
Supported Commands
| Command | Description |
|---|---|
/readme |
Trigger README generation |
generate readme |
Natural language trigger |
write readme |
Natural language trigger |
帮我写 README |
Chinese language trigger |
更新README |
Update existing README |
Example Session
User: /readme

AI: 请选择 README 的写作风格:
    1. Professional (专业) — 默认
    2. Energetic (活力)
    3. Minimal (简约)

User: 1

AI: 请选择徽章样式:
    1. Flat (扁平) — 默认
    2. Flat-square (扁平方形)
    3. For-the-badge (大号)

User: 1

AI: 请选择主要语言:
    1. English (英文) — 默认
    2. Chinese (中文)

User: 1

AI: 是否需要添加次要语言?
    [不需要] [中文] [日语] [韩语]

User: 不需要

AI: 正在扫描项目结构...
    检测到: TypeScript, Express, PostgreSQL
    正在生成 README.md...

    ✅ README.md 生成完成!正在分析美化机会...

    发现以下可美化项目:

    1. ✅ [Hero] 标题居中 → <h1 align="center">
    2. ✅ [Hero] 描述居中加粗 → <p align="center"><strong>
    3. ✅ [Hero] 添加 CTA 按钮
    4. ✅ [Hero] 平台徽章居中
    5. ⚪ [内容] 表格保持 Markdown(更易维护)
    6. ⚪ [代码] 代码块保持 Markdown(有语法高亮)

    是否接受这些建议?
    [全部接受] [逐条确认] [全部拒绝]

User: 全部接受

AI: 正在执行美化...
    ✅ README.md 已生成并美化完成!请检查并根据需要调整。
Project Structure
general-readme-skill/
├── SKILL.md                    # Main skill definition
├── LICENSE                     # MIT License
├── README.md                   # This file
├── examples/                   # Example README files
│   ├── app-readme.md           # Full-stack application example
│   ├── cli-readme.md           # CLI tool example
│   └── library-readme.md       # Library/package example
├── install/                    # Installation guides
│   ├── claude-code.md          # Claude Code setup
│   ├── copilot.md              # GitHub Copilot setup
│   └── cursor.md               # Cursor setup
└── references/                 # Reference files
    ├── badges.md               # Technology badge mapping (150+ entries)
    ├── badge-styles.md         # Badge layout rules
    ├── beautification-rules.md # Phase 4 beautification rules & HTML templates
    ├── diagram-templates.md    # Mermaid + SVG templates
    ├── language-guide.md       # Multi-language rules
    ├── section-guidelines.md   # Section writing rules
    └── tone-profiles.md        # 3 writing tone definitions
Tech Stack
Documentation
| Technology | Purpose |
|---|---|
| Markdown | Primary content format |
| shields.io | Badge generation (150+ technology mappings) |
| Mermaid | Architecture diagrams (4 template types) |
Supported Platforms
| Platform | Integration Method |
|---|---|
| Claude Code | .claude/skills/ directory |
| GitHub Copilot | .github/copilot-instructions.md |
| Cursor | .cursor/rules/ directory |
Contributing
- Fork the repository
- Create a feature branch (
git checkout -b feature/amazing) - Commit your changes (
git commit -m 'feat: add amazing feature') - Push to the branch (
git push origin feature/amazing) - Open a Pull Request
License
Reviews (0)
Sign in to leave a review.
Leave a reviewNo results found