Wee-Orchestrator
Health Uyari
- License — License: GPL-3.0
- Description — Repository has a description
- Active repo — Last push 0 days ago
- Low visibility — Only 5 GitHub stars
Code Gecti
- Code scan — Scanned 12 files during light audit, no dangerous patterns found
Permissions Gecti
- Permissions — No dangerous permissions requested
Bu listing icin henuz AI raporu yok.
🍀 Self-hosted multi-agent AI orchestrator — chat with Claude, Gemini & Copilot CLI from Telegram, WebEx, or browser. 5 runtimes, 17+ models, task scheduling, skill plugins.
🍀 Wee-Orchestrator
One platform. Every AI. Any channel.
![]()
![]()
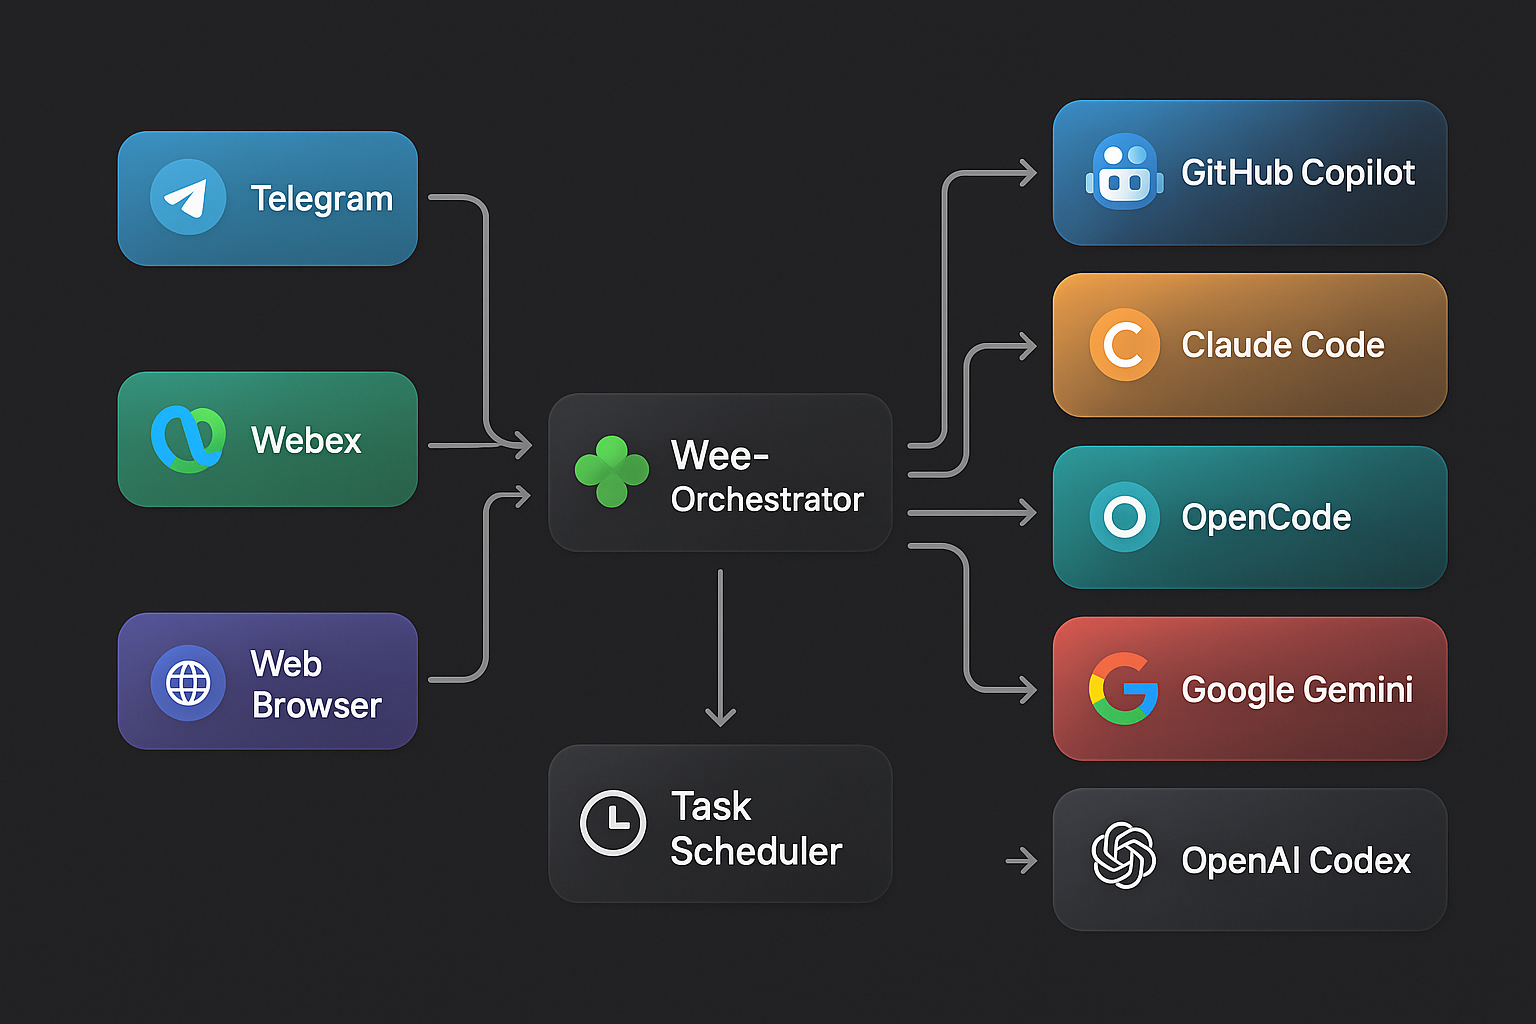
Wee-Orchestrator is a unified AI agent platform that lets you chat with any AI CLI runtime — GitHub Copilot, Claude Code, OpenCode, Google Gemini, or OpenAI Codex — from Telegram, WebEx, or a beautiful browser-based Web UI. Switch models, agents, and runtimes on the fly with slash commands. Schedule recurring AI tasks. Send files and images. All from one place.
✨ Why Wee-Orchestrator?
| Problem | Wee-Orchestrator Solution |
|---|---|
| Juggling multiple AI tools and CLIs | One unified interface across 5 runtimes and 17+ models |
| AI is stuck in the terminal | Chat from anywhere — Telegram, WebEx, or the Web UI |
| No memory between sessions | Persistent sessions with full conversation history |
| Can't automate AI tasks | Built-in task scheduler with cron-like scheduling |
| One-size-fits-all agents | Multi-agent architecture — switch agents per task |
| Complex setup | Zero-config bot creation with the Starter Kit |
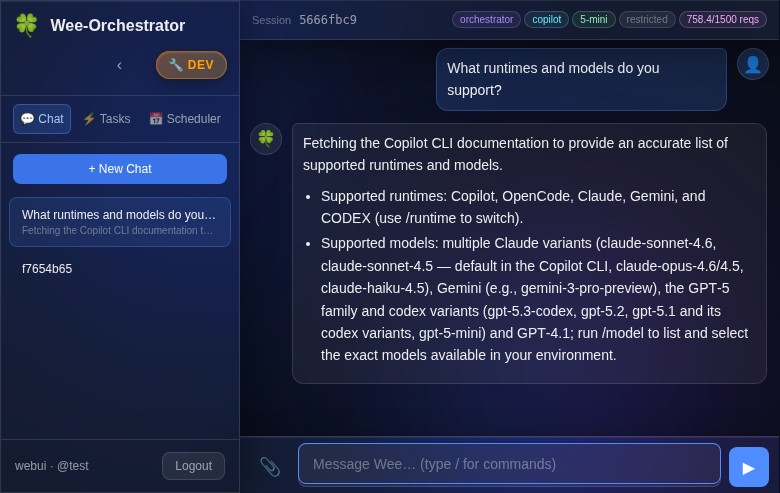
📸 Screenshots
| Chat Interface | Task Scheduler |
 |
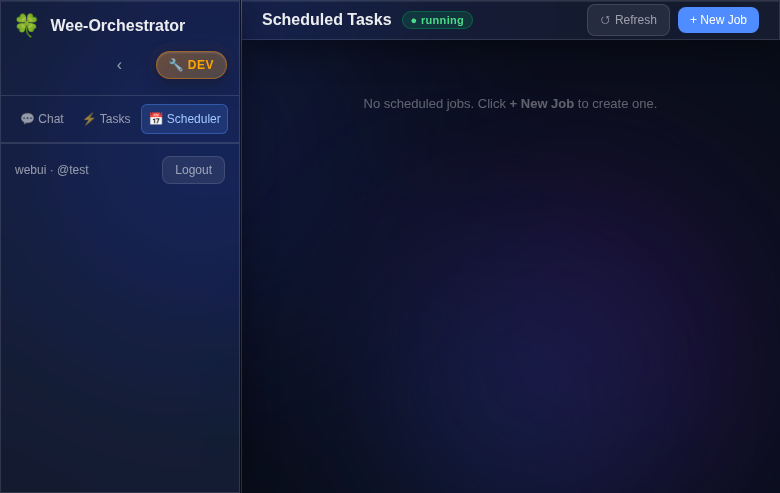 |
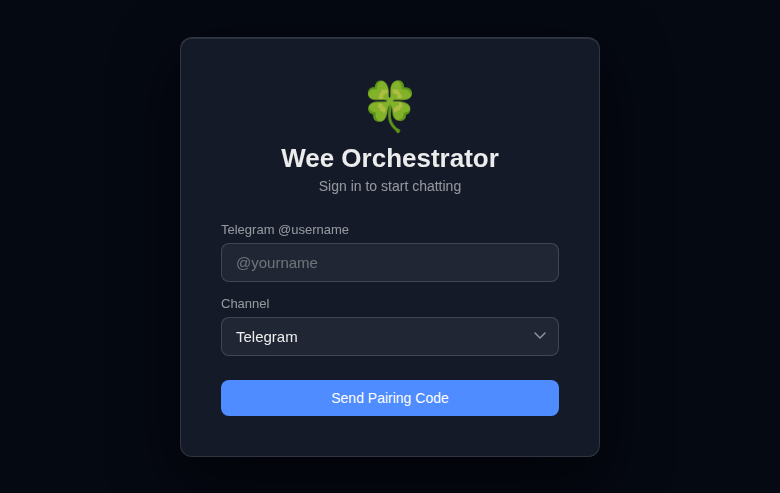
| Secure Pairing Login | Architecture Overview |
 |
|
🚀 Key Features
- 🔀 5 AI Runtimes — GitHub Copilot CLI, Claude Code, OpenCode, Google Gemini, OpenAI Codex
- 💬 3 Channels — Telegram bot, WebEx bot (via RabbitMQ), glassmorphism Web UI with SSE streaming
- 🤖 Multi-Agent — Define specialized agents in
agents.json, switch with/agent; hot-reload on change (no restart needed) - 🔄 Live Model Switching — Change models mid-conversation with
/model - 📅 Task Scheduler — Schedule recurring AI jobs with natural language (
every day at 9am) - 📁 File & Image Support — Upload, download, and inline images across all channels
- 🎤 Audio Transcription — Voice messages auto-transcribed via Whisper (OpenAI or local)
- 🔐 Secure Auth — Pairing-code login, per-user ACLs, agent/model pinning, yolo/restricted modes
- 📜 Session History — Full conversation persistence with search and resume
- ⚡ Background Tasks — Delegate long-running work to background agents
- 🔌 Extensible Skills — Plugin architecture for adding capabilities (Cisco Meraki, Home Assistant, etc.)
🏗️ Architecture
  Telegram ──► TelegramConnector ──┐
                                   │
  WebEx ─────► WebEXConnector ─────┼──► SessionManager ──► AI CLI Runtimes
                                   │       │                (Copilot, Claude,
  Browser ───► FastAPI /api/v1 ────┘       │                 OpenCode, Gemini,
                                           │                 Codex)
                                    TaskScheduler
Each inbound message flows through a channel connector, into the shared SessionManager (which handles slash commands, session state, and agent routing), and out to the selected AI CLI runtime as a subprocess. Responses stream back in real time.
For the full component diagram, sequence diagrams, and deployment topology, see ARCHITECTURE.md.
📋 Overview
Wee-Orchestrator provides a flexible framework to:
- Chat with AI agents from Telegram, WebEx, or the browser-based Web UI
- Call AI CLIs (Copilot, OpenCode, Claude Code, Gemini, Codex) from N8N workflows
- Maintain session affinity across multiple conversation turns
- Switch between different agent repositories dynamically
- Configure agents via JSON config files instead of hardcoding
- Support multiple AI models and runtimes
- Schedule recurring AI tasks with the built-in Task Scheduler
- Execute bash commands directly with
!prefix - Send and receive files and images over Telegram and WebEx
- Enforce per-user agent pinning, model pinning, and yolo/restricted mode ACLs
For release history see RELEASE_NOTES.md.
⚡ Quick Start
# 1. Clone the repo
git clone https://github.com/leprachuan/Wee-Orchestrator.git
cd Wee-Orchestrator

# 2. Install dependencies
pip install -r requirements.txt

# 3. Configure your environment
cp .env.example .env    # Edit with your API keys and bot tokens

# 4. Define your agents
vi agents.json           # Add your agent definitions

# 5. Start the API server
python3 agent_manager.py --api

# 6. (Optional) Start channel connectors
python3 telegram_connector.py   # Telegram bot
python3 webex_connector.py      # WebEx bot
Then open http://localhost:8000/ui in your browser and pair via Telegram or WebEx.
🚀 Want to create your own bot? Use the Wee-Orchestrator Starter Kit to scaffold one in minutes.
💬 Slash Commands
| Command | Description |
|---|---|
/agent <name> |
Switch to a different agent |
/model <model> |
Change AI model mid-conversation |
/runtime <runtime> |
Switch AI runtime (copilot, claude, gemini, opencode, codex, devin) |
/timeout <seconds> |
Adjust execution timeout |
/status |
Check running task status |
/cancel |
Cancel the current running task |
/schedule list |
List all scheduled jobs |
/schedule add <name> | <schedule> | <task> |
Create a scheduled job |
/help |
Show all available commands |
Bot Setup Guide
Wee-Orchestrator enables you to create custom bots — specialized AI agents with their own configuration, knowledge base, and capabilities. Each bot is a self-contained repository that can be integrated with Wee-Orchestrator.
🚀 New here? Use the Wee-Orchestrator Starter Kit to scaffold a new bot in minutes — includes
AGENTS.md, skill management with security scanning, memory structure, and setup scripts.
What is a Bot?
A bot is a Git repository containing:
- Core Configuration — An
AGENTS.mdfile defining agent behavior, preferences, and runtime configurations - Knowledge Base — A
memory/directory using the PARA methodology (Projects, Areas, Resources, Archive) for organizing operational knowledge - Focus Areas — Organized folders for specific domains (e.g.,
email_triage/,smart_home/,infrastructure/) - Skills Integration — References to specialized skills from pot-o-skills or custom skills
- Documentation — README, guides, and workflow documentation
Example Bot Structure
my-bot/
├── README.md                  # Bot overview & usage
├── AGENTS.md                  # Agent behavior & configuration
├── .env                       # Credentials (git-ignored)
├── .gitignore                 # Protect secrets
│
├── memory/                    # Knowledge base (PARA methodology)
│   ├── projects/              # Active multi-step initiatives
│   ├── areas/                 # Ongoing responsibility areas
│   ├── resources/             # Reference material & best practices
│   └── archive/               # Completed/deprecated items
│
├── skills/                    # Custom skill implementations
│   ├── custom-skill-1/
│   └── custom-skill-2/
│
└── domain-folders/            # Domain-specific organization
    ├── email/                 # Email processing
    ├── home-automation/       # Smart home tasks
    └── infrastructure/        # Infrastructure management
Key Components
AGENTS.md
Defines the bot's behavior, preferences, and runtime configuration:
- Agent name, purpose, and timezone
- Preferred models and runtimes (Claude, Copilot, Gemini)
- Tool permissions and access control
- Sub-agent delegation rules
- Skill definitions and repository locations
- Security and credential management
Example excerpt:
---
name: my-bot
runtime: copilot
model: gpt-5-sonnet
timezone: EST/EDT
---

## Behavior

- Preferred AI runtime: Claude > Copilot > Gemini
- Task routing: Delegate to specialized sub-agents for domain expertise
- Notification channel: Telegram
Memory Structure (PARA)
Organize knowledge for long-term retention and reuse:
- Projects/ — Active multi-step work (e.g.,
home-automation-setup.md) - Areas/ — Ongoing responsibilities (e.g.,
orchestration.md,security.md) - Resources/ — Reference material (e.g.,
best-practices.md,api-docs.md) - Archive/ — Completed or deprecated knowledge
Skills
Skills extend your bot's capabilities by providing pre-built integrations with external APIs and services. Skills should be sourced from reputable, official repositories to minimize security risks.
Recommended Skill Sources
pot-o-skills — Community skills for cloud networking and security
- Repository: https://github.com/leprachuan/pot-o-skills
- Skills: Cisco Meraki, Cisco Security Cloud Control, and more
- Status: Public, open-source, actively maintained
- Usage: Clone and link into your bot's
skills/directory
Anthropic Official Skills — Official skills from Anthropic
- Repository: https://github.com/anthropics/skills
- Status: Official, production-ready
- Security: Vetted and maintained by Anthropic team
- Best for: Claude AI integration, code generation, analysis
Custom Skills — Implement your own domain-specific skills
- Location:
./skills/directory in your bot repository - Documentation: Must include SKILL.md, README, and examples
- Security: You control the code and updates
- Location:
⚠️ Skills Security Guidelines
Skills have full access to your system — they can execute commands, read files, and call APIs. Follow these practices:
✅ Only use official skills from original software/service authors
- Example: Use Cisco's official Meraki skill, not community forks
- Example: Use Anthropic's official skills, not third-party versions
✅ Validate before installation
- Review the source code in the skill repository
- Check for hardcoded credentials or suspicious patterns
- Verify the repository is actively maintained
- Look for security issues reported in GitHub Issues
✅ Use trusted repositories
- Official repos (Anthropic, GitHub, etc.)
- Long-standing community projects with active maintainers
- Projects with security policies and issue tracking
- Avoid random GitHub repos without documentation or maintenance
⚠️ Audit custom skills carefully
- Never trust a skill without reviewing its code first
- Check for unintended API calls or data exfiltration
- Validate input sanitization
- Ensure credentials are handled safely
✅ Keep skills updated
- Periodically review and update to latest versions
- Subscribe to security advisories from skill repositories
- Remove unused skills to reduce attack surface
Using Skills in Your Bot
# Link public skills from pot-o-skills (verified, open-source)
ln -s /opt/pot-o-skills/cisco-meraki ./skills/
ln -s /opt/pot-o-skills/cisco-security-cloud-control ./skills/

# Link Anthropic official skills (verified, official)
ln -s /opt/anthropic-skills/code-analysis ./skills/
ln -s /opt/anthropic-skills/file-operations ./skills/

# Or implement custom skills in skills/ directory
mkdir skills/my-custom-skill
Discovering Skills
pot-o-skills: https://github.com/leprachuan/pot-o-skills
cd /opt && git clone https://github.com/leprachuan/pot-o-skills.gitAnthropic Skills: https://github.com/anthropics/skills
cd /opt && git clone https://github.com/anthropics/skills.gitCustom Community Skills: Search GitHub for
topic:agent-skillswith verification:- ✅ Active maintenance (recent commits)
- ✅ Clear documentation
- ✅ Security policy file
- ✅ Public issue tracking
Domain Folders
Organize bot work by area of focus:
- Keep related scripts, templates, and documentation together
- Example:
email/for email processing,home/for automation tasks - Each folder can have its own README with domain-specific guidance
Getting Started
💡 Recommended: Fork the Wee-Orchestrator Starter Kit instead of starting from scratch — it includes everything below pre-configured with best practices, security scanning, and setup scripts.
Create your bot repository:
mkdir my-bot && cd my-bot
git init
git remote add origin https://github.com/username/my-bot.git
Add AGENTS.md:
Copy and customize the AGENTS.md template from Wee-Orchestrator with your bot's preferencesCreate memory directory:
mkdir -p memory/{projects,areas,resources,archive}
echo "# Knowledge Base" > memory/INDEX.md
Add .env and .gitignore:
cp /opt/n8n-copilot-shim-dev/.env.example .env
echo ".env" >> .gitignore
echo "*.key" >> .gitignore
echo "secrets.json" >> .gitignore
Link or implement skills:
mkdir skills
ln -s /opt/pot-o-skills skills/cisco-meraki
Register with Wee-Orchestrator:
Update Wee-Orchestrator'sagents.jsonto include your bot:{ "agents": [ { "name": "my-bot", "path": "/opt/my-bot", "enabled": true } ] }
Best Practices
- Secrets First: Store all credentials in
.env(git-ignored), never commit secrets - Document Decisions: Use
memory/areas/to record architectural decisions and conventions - Skill Reuse: Leverage pot-o-skills before building custom skills
- Domain Organization: Group related work into focused folders for maintainability
- README Clarity: Each folder should have clear purpose and examples
Resources
- Wee-Orchestrator: https://github.com/leprachuan/Wee-Orchestrator
- pot-o-skills: https://github.com/leprachuan/pot-o-skills (Cisco Meraki, SCC, and more)
- AGENTS.md Template: See ./AGENTS.md for full configuration reference
Requirements
This project requires one or more of the following AI CLI tools to be installed:
Claude Code CLI
Prerequisites:
- Node.js 18+ (for npm installation) OR native binary support
- Anthropic API key for authentication
Installation:
Native binary (recommended):
curl -fsSL https://claude.ai/install.sh | bash
Or via npm:
npm install -g @anthropic-ai/claude-code
Supported Systems: macOS 10.15+, Linux (Ubuntu 20.04+/Debian 10+, Alpine), Windows 10+ (via WSL)
Reference: Claude Code Quickstart Documentation
GitHub Copilot CLI
Prerequisites:
- Node.js 22 or higher
- Active GitHub Copilot subscription (Pro, Pro+, Business, or Enterprise plan)
- GitHub account for authentication
Installation:
npm install -g @github/copilot
copilot  # Launch and authenticate
For authentication, use the /login command or set GH_TOKEN environment variable with a fine-grained PAT.
Supported Systems: macOS, Linux, Windows (via WSL)
Reference: GitHub Copilot CLI Installation Guide
OpenCode CLI
Prerequisites:
- Node.js or compatible runtime
Installation (Recommended):
curl -fsSL https://opencode.ai/install | bash
Or via npm:
npm i -g opencode-ai@latest
Alternative package managers:
- Homebrew:
brew install opencode - Scoop (Windows):
scoop bucket add extras && scoop install extras/opencode - Arch Linux:
paru -S opencode-bin
Supported Systems: Windows, macOS, Linux
Reference: OpenCode Documentation
Google Gemini CLI
Prerequisites:
- Python 3.7 or higher
- Google Cloud account with Gemini API access
- Google API key for authentication
Installation:
pip install google-generativeai
# Or using the CLI wrapper
pip install gemini-cli
Authentication:
Set your API key as an environment variable:
export GOOGLE_API_KEY='your-api-key-here'
Or configure it in your shell profile:
echo 'export GOOGLE_API_KEY="your-api-key-here"' >> ~/.bashrc
source ~/.bashrc
Supported Systems: Windows, macOS, Linux
Reference: Google Gemini API Documentation
Tool Permissions & Access Control
All AI runtimes in this system are configured with full tool access to enable read, write, and execute operations without approval prompts. This provides maximum automation capabilities.
Permission Configuration by Runtime
GitHub Copilot CLI
- Flags Used:
--allow-all-tools --allow-all-paths - Enables:
- All MCP tools and shell commands without approval
- Read/write/execute permissions for all files and directories
- Security Note: Gives Copilot the same permissions as your user account
Claude Code CLI
- Flags Used:
--permission-mode bypassPermissions - Enables:
- Auto-approve all file edits, writes, and reads
- Execute shell commands without approval
- Access web/network tools without prompts
- Also Known As: YOLO mode or dontAsk mode
OpenCode CLI
- Configuration: Uses
opencode.jsonfile for permission settings - Required Setup:
- Copy the example config:
cp opencode.example.json opencode.json - Place
opencode.jsonin your agent directories or project root
- Copy the example config:
- Permissions Enabled:
edit: allowwrite: allowbash: allowread: allowwebfetch: allow
- Reference: OpenCode Permissions Documentation
Google Gemini CLI
- Flags Used:
--yolo - Enables:
- Read/write file operations without confirmation
- Shell command execution without approval
- All built-in tools with unrestricted access
- Built-in Tools: read_file, write_file, run_shell_command
OpenAI Codex CLI
- Flags Used:
--dangerously-bypass-approvals-and-sandbox - Enables:
- Disables all approval prompts
- Removes sandbox restrictions (full file system access)
- Allows all shell commands and tools without confirmation
- Security Note: Only use in trusted, controlled environments
Security Considerations
⚠️ Warning: These configurations grant AI agents extensive system access:
- Full file system access: Can read, modify, or delete any file your user can access
- Command execution: Can run any shell command with your user privileges
- No safety prompts: All operations execute automatically without confirmation
Best Practices:
- Use in controlled environments: Development containers, VMs, or sandboxed systems
- Regular backups: Maintain backups of critical files and directories
- Code review: Review AI-generated changes before committing to production
- Limit agent scope: Configure agents to work in specific project directories
- Monitor activity: Review session logs and agent outputs regularly
Recommended Use Cases:
- ✅ Development and testing environments
- ✅ Automated CI/CD pipelines in isolated containers
- ✅ Personal projects with version control
- ❌ Production systems without review
- ❌ Shared systems with sensitive data
- ❌ Public or untrusted environments
Configuration
Agent Configuration
The system loads agents from agents.json or a custom config file. Each agent represents a repository context where the AI CLI will operate.
Config Format:
{
  "agents": [
    {
      "name": "devops",
      "description": "DevOps and infrastructure management",
      "path": "/path/to/MyHomeDevops"
    },
    {
      "name": "projects",
      "description": "Software development projects",
      "path": "/path/to/projects"
    }
  ]
}
Configuration Fields:
name(required): Short identifier for the agent (used in/agent setcommands)description(required): Brief human-readable description of the agentpath(required): Full path to the repository or project directory
Environment Configuration
⚠️
API_HOSTSecurity Warning
Never setAPI_HOST=0.0.0.0— this exposes the server on every network interface
including your LAN and any public NIC. Always bind to specific trusted interfaces
(e.g.127.0.0.1,<tailscale-ip>). See Network Binding & Secure Access.
The default agent, model, and runtime can be customized via environment variables. This is useful for:
- Different users having different defaults
- Docker container configuration
- CI/CD pipeline customization
- Development vs. production setups
Available Environment Variables:
# Default agent for new sessions
COPILOT_DEFAULT_AGENT=orchestrator        # Default: orchestrator

# Default model for new sessions
COPILOT_DEFAULT_MODEL=gpt-5-mini          # Default: gpt-5-mini

# Default runtime for new sessions
COPILOT_DEFAULT_RUNTIME=copilot           # Default: copilot
Usage Examples:
# Set orchestrator as default
export COPILOT_DEFAULT_AGENT=orchestrator
export COPILOT_DEFAULT_RUNTIME=copilot

# Or set family agent with Claude runtime
export COPILOT_DEFAULT_AGENT=family
export COPILOT_DEFAULT_MODEL=claude-sonnet
export COPILOT_DEFAULT_RUNTIME=claude

# Run the agent
python3 agent_manager.py "Your prompt" "session_id"
Docker Example:
ENV COPILOT_DEFAULT_AGENT=orchestrator
ENV COPILOT_DEFAULT_MODEL=gpt-5-mini
ENV COPILOT_DEFAULT_RUNTIME=copilot
Reference Configuration:
Copy .env.example to .env and customize:
cp .env.example .env
# Edit .env with your defaults
When environment variables are not set, the system uses these hardcoded defaults:
- Agent:
orchestrator - Model:
gpt-5-mini - Runtime:
copilot
Setup
Copy the agent manager script:
cp agent_manager.py /usr/local/bin/agent-manager
chmod +x /usr/local/bin/agent-manager
Configure your agents:
- Copy
agents.example.jsontoagents.json - Edit
agents.jsonwith your actual repository paths - Place
agents.jsonin the same directory as the script or current working directory
- Copy
Optional: Specify config location via environment variable
export AGENTS_CONFIG=/path/to/custom/agents.json
Usage
Command Line
The agent manager supports both positional arguments (for backwards compatibility) and named options for more flexibility.
Basic Usage (Positional Arguments)
python agent_manager.py "<prompt>" [session_id] [config_file]
Arguments:
prompt: The prompt/command to send to the AI CLIsession_id(optional): N8N session identifier for tracking conversations (default: "default")config_file(optional): Path to agents.json config file
Examples:
# Basic usage
python agent_manager.py "List all files in the current directory"

# With session ID
python agent_manager.py "Continue debugging the issue" "session-123"

# With custom config file
python agent_manager.py "Deploy the app" "session-456" "/etc/agents.json"
Advanced Usage (Named Arguments)
python agent_manager.py [options] "<prompt>" [session_id]
Options:
Agent Options:
--agent NAME- Set the agent to use (e.g., devops, family, projects)--list-agents- List all available agents and exit
Model Options:
--model NAME- Set the model to use (e.g., gpt-5, sonnet, gemini-1.5-pro)--list-models- List all available models for current runtime and exit
Runtime Options:
--runtime NAME- Set the runtime to use (choices: copilot, opencode, claude, gemini, codex, devin)--list-runtimes- List all available runtimes and exit
Configuration:
--config FILEor-c FILE- Path to agents.json configuration file
Examples:
# List available agents
python agent_manager.py --list-agents

# List available agents with custom config
python agent_manager.py --list-agents --config my-agents.json

# List available runtimes
python agent_manager.py --list-runtimes

# List available models
python agent_manager.py --list-models

# Set agent via CLI
python agent_manager.py --agent devops "Check server status"

# Set runtime and model via CLI
python agent_manager.py --runtime gemini --model gemini-1.5-pro "Analyze this code"

# Combine multiple options
python agent_manager.py --agent family --runtime claude --model sonnet "Find recipes for dinner"

# Use custom configuration file
python agent_manager.py --config /etc/my-agents.json --agent projects "Review pull requests"

# All options together
python agent_manager.py --config my-agents.json --agent devops --runtime claude --model haiku "Deploy to production" "session-123"
Getting Help:
python agent_manager.py --help
Slash Commands
Interact with the agent manager using slash commands:
Bash Commands
!<command> # Execute bash command directly (e.g., !pwd, !ls -la)
Examples:
!pwd                       # Show current working directory
!echo "Hello World"        # Echo a message
!ls -lh                    # List files with details
!date                      # Show current date/time
!git status                # Run git commands
!python3 --version         # Check installed versions
Features:
- Commands execute directly without hitting any AI runtime
- 10-second timeout for safety
- Runs in current working directory
- Supports pipes, redirects, and command chaining (&&, ||, |)
- Returns stdout/stderr output
Runtime Management
/runtime list              # Show available runtimes (copilot, opencode, claude, gemini)
/runtime set <runtime>     # Switch runtime (e.g., /runtime set gemini)
/runtime current           # Show current runtime
Model Management
/model list                # Show available models for current runtime
/model set "<model>"       # Switch model (e.g., /model set "claude-opus-4.5")
/model current             # Show current model
Agent Management
/agent list                # Show all available agents with descriptions
/agent set "<agent>"       # Switch to an agent (e.g., /agent set "projects")
/agent current             # Show current agent and its context
Session Management
/session reset             # Reset the current session (starts fresh next message)
/help                      # Show all available commands
Query Management
/status                    # Check status of running query for this session
/cancel                    # Cancel running query for this session
Query Tracking: When a query is executing, the agent manager tracks its process ID (PID), runtime, agent, and output. Use /status to check if a query is running and see recent output, or /cancel to terminate a long-running query.
N8N Integration
Use in an N8N workflow:
Basic N8N Integration (Positional Arguments)
// Execute the agent manager from N8N
const { exec } = require('child_process');
const prompt = "Your prompt here";
const sessionId = "n8n_session_123";
const configFile = "/path/to/agents.json";

exec(`python agent_manager.py "${prompt}" "${sessionId}" "${configFile}"`,
  (error, stdout, stderr) => {
    if (error) console.error(error);
    console.log(stdout);
  }
);
Advanced N8N Integration (Named Arguments)
// Execute with specific agent, runtime, and model
const { exec } = require('child_process');
const agent = "devops";
const runtime = "claude";
const model = "sonnet";
const prompt = "Check production status";
const sessionId = "n8n_session_123";

const cmd = `python agent_manager.py --agent ${agent} --runtime ${runtime} --model ${model} "${prompt}" "${sessionId}"`;

exec(cmd, (error, stdout, stderr) => {
  if (error) console.error(error);
  console.log(stdout);
});
List Agents from N8N
// Get available agents dynamically
const { exec } = require('child_process');
const configFile = "/path/to/agents.json";

exec(`python agent_manager.py --list-agents --config ${configFile}`,
  (error, stdout, stderr) => {
    if (error) console.error(error);
    // Parse stdout to get agent list
    console.log(stdout);
  }
);
Session Management
Sessions are automatically tracked and stored in:
- Copilot:
~/.copilot/n8n-session-map.json - OpenCode:
~/.opencode/n8n-session-map.json - Claude:
~/.claude/(debug directory) - Gemini:
~/.gemini/sessions/
Each N8N session ID is mapped to:
- A unique backend session ID (for resuming AI CLI sessions)
- Current runtime (copilot/opencode/claude/gemini)
- Current model
- Current agent
Session data persists across requests, allowing multi-turn conversations.
Query Tracking
Running queries are tracked in ~/.copilot/running-queries.json with:
- PID: Process ID for the running query
- Runtime: Which AI runtime is executing the query
- Agent: Which agent context is being used
- Start Time: When the query started
- Last Output: Recent output snippet (last 500 characters)
This enables the /status and /cancel commands to monitor and control long-running queries.
Default Behavior
When creating a new session:
- Runtime: copilot (use
/runtime setto change) - Model: gpt-5-mini (Copilot) / opencode/gpt-5-nano (OpenCode) / haiku (Claude) / gemini-1.5-flash (Gemini)
- Agent: devops (or first available agent from config)
Advanced Features
Dynamic Agent Loading
Instead of hardcoding agent paths, the system:
- Looks for
agents.jsonin the current directory - Falls back to the script directory if not found
- Supports custom config paths via argument
Session Resumption
- The system automatically detects and resumes existing sessions
- If a session is lost or corrupted, it starts a fresh session automatically
- Use
/session resetto explicitly clear session state
Model Resolution
The system intelligently matches model names:
- Exact matches (case-insensitive)
- Substring/suffix matching
- Latest version preference for ambiguous matches
Metadata Stripping
Automatically removes CLI metadata from output:
- Thinking tags (
<think>...</think>) - Token usage statistics
- Session headers and banners
Testing
A comprehensive test suite is included to ensure code quality and prevent regressions when making changes.
Running Tests
Quick Start
# Run all tests
./run_tests.sh

# Or using Python directly
python3 -m unittest discover -s tests -p "test_*.py" -v
Test Options
# Run with verbose output
./run_tests.sh -v

# Run specific test class
./run_tests.sh -t tests.test_agent_manager.TestSlashCommands

# Generate coverage report
./run_tests.sh -c
Test Coverage
The test suite includes 141 tests across two test files:
tests/test_agent_manager.py (62 tests) — core functionality:
- Session Management (5 tests) - Creating, resuming, and persisting sessions
- Agent Configuration (4 tests) - Loading and managing agent configurations
- Slash Commands (9 tests) - All interactive commands (
/help,/runtime,/model,/agent,/session) - Query Tracking (8 tests) - Process tracking for
/statusand/cancelcommands - Model Resolution (5 tests) - Converting model names/aliases to full IDs
- Metadata Stripping (4 tests) - Cleaning CLI output from different runtimes
- Agent Switching (3 tests) - Changing agents and session context
- Session Existence (2 tests) - Checking session state file existence
tests/test_new_features.py (79 tests) — WebUI and scheduler features:
- Auth / pairing flow — pairing code generation, session token validation
- History Manager — per-user session history CRUD
- File upload / download — upload endpoint, file serving, cleanup
- Scheduler endpoints — create, list, get, update, delete, pause, resume, results, logs
- Image search — DuckDuckGo image search integration
- Rate limiting — per-IP sliding window
Test Results
All tests pass with no external CLI dependencies required:
Ran 141 tests in 0.185s
OK
Tests use mocking to isolate functionality and avoid:
- Executing real CLI commands (Copilot, OpenCode, Claude)
- Modifying user's home directory
- Making real API calls
Adding Tests
When adding new features to agent_manager.py:
- Add corresponding test cases to
tests/test_agent_manager.py - Run the full test suite to ensure no regressions
- Aim for high coverage of new functionality
For detailed testing documentation, see tests/README.md.
Web UI
Wee-Orchestrator ships a browser-based chat interface served at /ui by the API server.
Features
- 🍀 Glassmorphism design — frosted-glass panels, animated background blobs, responsive layout
- 💬 Chat panel — markdown rendering, syntax highlighting, image display (no overflow), clickable meta pills
- ⚡ Streaming responses — AI output streams to the browser in real-time via SSE; a blinking cursor shows progress and the bubble is replaced with fully-rendered markdown when complete
- 👤 @username display — shows
@handleinstead of raw numeric IDs in message headers - 🔍 Typeahead —
/commandhighlighting and autocomplete in the input box - 📸 File uploads — drag-and-drop or click to attach images and files to messages
- 🖼️ Auto image search — AI can trigger DuckDuckGo image searches; results are served inline
- 📅 Scheduler panel — switch between Chat and Scheduler from the sidebar navigation (hidden when
SCHEDULER_ENABLED=false)- Job list with status badges (active / paused / disabled)
- Detail drawer with full job configuration
- Create / edit form with agent, runtime, model, and mode (yolo / restricted) selectors
- Daemon status badge showing scheduler health
- Toast notifications for CRUD operations
- 🔐 Pairing auth — 6-digit one-time code sent via Telegram or WebEx; no passwords
Accessing the UI
http://<host>:<port>/ui
Default port is set by API_PORT in .env (default 8000).
🔒 See Network Binding & Secure Access below for
guidance on restricting which interfaces the server listens on.
Network Binding & Secure Access
⚠️ WARNING: Do NOT bind to
0.0.0.0Binding to
0.0.0.0exposes the API and Web UI on every network interface —
including your LAN and any public-facing NIC. This server grants executing
arbitrary shell commands and full file-system access to connected AI agents.
A malicious actor on your LAN or internet could take over your machine.Always restrict
API_HOSTto trusted interfaces only.
Recommended: Tailscale + Localhost
Set API_HOST in .env to a comma-separated list of the interfaces you want to
bind (the server spawns a listener for each):
# ✅ GOOD — localhost and Tailscale only
API_HOST=127.0.0.1,100.x.x.x   # replace with your Tailscale IPv4 (tailscale ip -4)
API_PORT=8001

# ❌ BAD — exposes to entire LAN/internet
# API_HOST=0.0.0.0
After changing .env, restart the API service:
sudo systemctl restart agent-manager-api-dev.service
# Verify — should show ONLY 127.0.0.1 and Tailscale IP:
ss -tlnp | grep 8001
Accessing the Dev Environment Remotely
Option 1 – Tailscale (Recommended)
- Install Tailscale: https://tailscale.com/download
- Join the same Tailscale network (get invite key from admin)
- Access directly via Tailscale IP:
http://100.x.x.x:8001/ui
Option 2 – SSH SOCKS Proxy
# Start SOCKS proxy (-f backgrounds it, -N means no command)
ssh -fN -D 1080 user@your-host

# Browser: configure SOCKS5 proxy  127.0.0.1:1080  (proxy DNS enabled)
# Then open: http://127.0.0.1:8001/ui
Firefox: Settings → Network Settings → Manual proxy → SOCKS Host 127.0.0.1 Port 1080 SOCKS v5 → ✓ Proxy DNS
Chrome/Edge:
google-chrome --proxy-server="socks5://127.0.0.1:1080"
Option 3 – SSH Port Forwarding (single port)
ssh -N -L 8001:127.0.0.1:8001 user@your-host
# Then open: http://localhost:8001/ui
Full details: docs/dev-access.md
Streaming (SSE)
Chat responses from the Web UI use POST /api/v1/sessions/{id}/stream instead of the blocking execute endpoint. The browser receives Server-Sent Events:
| Event | Payload | Description |
|---|---|---|
start |
{} |
Streaming bubble created in the UI |
chunk |
{"text": "…"} |
Raw stdout line from the AI CLI as it arrives |
done |
{"response":"…","runtime":"…","model":"…"} |
Final stripped response; bubble replaced with rendered markdown |
error |
{"message":"…"} |
On failure |
Keepalive comments (: keepalive) are sent every second to prevent proxy/browser timeouts. Slash commands and bash commands (!) skip the chunk loop and emit start → done immediately. All other channels (Telegram, WebEx, N8N) use the original blocking endpoint — streaming is WebUI-only.
Task Scheduler
The built-in task scheduler (task_scheduler.py) runs AI jobs on a schedule without human interaction.
Feature flag: The scheduler can be fully disabled by setting
SCHEDULER_ENABLED=falsein.env. This removes all/api/v1/scheduler/*API endpoints and hides the Scheduler tab in the Web UI. See Feature Flags below.
Features
- 📅 Natural-language schedules —
in 10 minutes,every 2 hours,every day at 9am - 🔄 Recurring or one-shot jobs
- 🤖 Per-job AI config — choose agent, runtime, model, and mode independently for each job
- 🔔 Creator-targeted notifications — results sent back to the Telegram or WebEx user who created the job
- 🔒 Per-user ACL — only allowed users (configured via
SCHEDULER_ALLOWED_TELEGRAM/SCHEDULER_ALLOWED_WEBEXenv vars) can create/manage jobs - ⏸️ Pause / Resume — temporarily disable jobs without deleting them
- 📋 Results history — last N results stored per job, viewable via API or Web UI
REST API Endpoints
| Method | Path | Description |
|---|---|---|
GET |
/api/v1/scheduler/status |
Daemon health / doctor report |
GET |
/api/v1/scheduler/jobs |
List all jobs |
POST |
/api/v1/scheduler/jobs |
Create a new job |
GET |
/api/v1/scheduler/jobs/{id} |
Get job details |
PUT |
/api/v1/scheduler/jobs/{id} |
Update a job |
DELETE |
/api/v1/scheduler/jobs/{id} |
Delete a job |
POST |
/api/v1/scheduler/jobs/{id}/pause |
Pause a job |
POST |
/api/v1/scheduler/jobs/{id}/resume |
Resume a paused job |
GET |
/api/v1/scheduler/jobs/{id}/results |
Retrieve execution results |
GET |
/api/v1/scheduler/jobs/{id}/logs |
Retrieve execution logs |
Quick Start
# Create a daily summary job (via API)
curl -X POST http://localhost:8000/api/v1/scheduler/jobs \
  -H "Authorization: Bearer <token>" \
  -H "Content-Type: application/json" \
  -d '{
    "name": "Daily standup",
    "schedule": "every day at 9am",
    "agent": "devops",
    "runtime": "copilot",
    "model": "gpt-5-mini",
    "mode": "restricted",
    "task": "Summarise open pull requests and any failing CI jobs",
    "notify": true,
    "recurring": true
  }'
Data is stored in /opt/.task-scheduler/ (jobs.json, results/, logs/).
Feature Flags
Wee-Orchestrator exposes a public GET /api/v1/config endpoint that the Web UI reads at boot to determine which features to display. Backend routes for disabled features are never registered.
| Variable | Default | Description |
|---|---|---|
SCHEDULER_ENABLED |
true |
Enable/disable the Task Scheduler API and Web UI panel |
Disabling the Scheduler
# In .env
SCHEDULER_ENABLED=false
Effects when false:
- All
/api/v1/scheduler/*endpoints return 404 (routes not registered) - The 📅 Scheduler tab is hidden from the Web UI sidebar before auth — it never appears
GET /api/v1/configreturns{"scheduler_enabled": false}for the browser to act on
To re-enable, set SCHEDULER_ENABLED=true (or remove the variable) and restart the service.
File Handling
Both the Telegram and WebEx connectors support sending and receiving files and images.
- Receiving: files are downloaded to
webex_downloads/and injected into the agent context as a file path prompt - Sending: agents can produce local file paths that the connector uploads back to the user
- Images: the Web UI serves AI-fetched images from
/ai-media/so the browser can render them inline
See WEBEX_FILE_HANDLING.md and FILE_MEDIA_HANDLING_SKILL.md for details.
Per-User Access Control
Agent & Model Pinning
Users can be locked to a specific agent, runtime, and model via pinned_users in the connector config:
"pinned_users": {
  "8193231291": {
    "agent": "family",
    "runtime": "copilot",
    "model": "gpt-5-mini"
  }
}
Pinned users cannot run /agent set — they receive a clear admin message. The pinned config is re-applied before every query, so even a session reset cannot bypass it.
Yolo Mode Restriction
By default all users may run /mode yolo. To restrict yolo access to a list of user IDs:
"yolo_allowed_users": ["8193231291", "9876543210"]
An empty list preserves the permissive default (all allowed).
File Structure
n8n-copilot-shim/
├── agent_manager.py           # Core: SessionManager, FastAPI app factory, all /api/v1/ endpoints
├── task_scheduler.py          # TaskScheduler class — schedule, pause, resume, results
├── telegram_connector.py      # Telegram bot long-polling connector
├── webex_connector.py         # WebEx webhook/RabbitMQ connector
├── agents.json                # Agent configuration (git-ignored)
├── agents.example.json        # Example configuration template
├── webui/
│   └── dist/                  # Built Web UI assets (index.html, app.js, app.css)
├── tests/
│   ├── test_agent_manager.py  # Core unit tests (62 tests)
│   └── test_new_features.py   # WebUI + scheduler feature tests (79 tests)
├── docs/plans/                # Planning docs
├── run_tests.sh               # Test runner
├── .testrc                    # Test configuration
├── .env.example               # Environment variable template
├── EXAMPLE_WORKFLOW.json      # N8N workflow example
├── ARCHITECTURE.md            # System architecture and Mermaid diagrams
├── RELEASE_NOTES.md           # Version history
└── README.md                  # This file
Architecture Summary
See ARCHITECTURE.md for full detail and Mermaid diagrams.
Key components:
| Component | Description |
|---|---|
SessionManager |
Core AI execution engine — session state, slash commands, CLI dispatch, streaming queues |
HistoryManager |
Per-user, per-channel chat history persistence |
AuthManager |
Pairing-code auth, session token issuance, shared-key validation |
RateLimiter |
Per-IP, per-endpoint sliding-window rate limiting |
TaskScheduler |
Cron-like AI job scheduler embedded in the orchestrator (feature-flagged) |
| FastAPI app | REST API (/api/v1/) + SSE streaming (/stream) + static Web UI mount (/ui) |
TelegramConnector |
Long-polling Telegram bot → SessionManager bridge |
WebEXConnector |
WebEx webhook / RabbitMQ → SessionManager bridge |
Troubleshooting
Agents not loading
- Check that
agents.jsonexists in the script directory or current directory - Verify JSON syntax with
python -m json.tool agents.json - Check file permissions
Session issues
- Run
/session resetto start fresh - Check session storage directories exist:
~/.copilot/session-state/~/.local/share/opencode/storage/session/global/~/.claude/debug/~/.gemini/sessions/
Scheduler not running
- Check
SCHEDULER_JOBS_FILEpath exists and is writable (/opt/.task-scheduler/jobs.json) - Verify the API server is running:
sudo systemctl status agent-manager-api.service - Hit
GET /api/v1/scheduler/statusto see the daemon health report
CLI not found
- Ensure copilot, opencode, claude, and gemini binaries are in PATH or at expected locations
- Check
/usr/bin/copilot,/usr/bin/claude,~/.opencode/bin/opencode, andgeminiin PATH
Web UI auth loop
- Confirm the API server can reach your Telegram or WebEx bot to deliver the pairing code
- Check
PAIRING_CODE_TTL(default 300 s) — request a new code if it expired
Agent Orchestration
This project supports multi-agent orchestration with dynamic agent discovery. See the comprehensive agent documentation:
- AGENTS.md - Agent orchestration overview and usage guide
- SKILL_SUBAGENTS.md - Detailed subagent management and advanced patterns
- ARCHITECTURE.md - Full system architecture with Mermaid diagrams
- agents.json - Agent configuration file (controls available agents)
Quick Agent Start
# List available agents
/agent list

# Switch to an agent
/agent set devops

# Execute in agent context
"Deploy the latest version"

# Resume agent session
"What's the status?"

# Switch to different agent
/agent set family
All agents are loaded dynamically from agents.json, enabling easy expansion and customization.
Telegram Connector
The Telegram connector bridges Telegram chat with your N8N Copilot Shim agents.
Features
- 💬 Receive messages from Telegram users
- 👤 User pairing by Telegram user ID
- 🔐 User access control (whitelist/blacklist)
- 🎯 Route to any configured agent
- ⚙️ Per-user session management
Quick Start
# With environment variable
export TELEGRAM_BOT_TOKEN="your-token-here"
python telegram_connector.py

# Or with token argument
python telegram_connector.py --token "your-token-here"
Managing Users
# Allow specific user
python telegram_connector.py --token TOKEN --allow-user 123456789

# Deny user
python telegram_connector.py --token TOKEN --deny-user 123456789

# List allowed users
python telegram_connector.py --token TOKEN --list-users
See TELEGRAM_CONNECTOR.md for full documentation.
Contributing & Issue Tracking
GitHub Issues for Project Management
This project uses GitHub Issues as the single source of truth for all TODOs, feature requests, and bug reports.
Why GitHub Issues?
- ✅ Centralized tracking across all sub-agents and features
- ✅ Linked to code commits and pull requests
- ✅ Searchable history of decisions and implementations
- ✅ Clear ownership and assignment of work
- ✅ Prioritization through labels and milestones
Issue Categories
We use labels to organize work:
| Label | Purpose | Example |
|---|---|---|
bug |
Bugs and defects | "Message editing fails with 400 error" |
feature |
New features | "Add message reaction support" |
enhancement |
Improvements to existing features | "Improve error messages" |
documentation |
Docs and guides | "Add user guide for slash commands" |
WebEX |
WebEX connector specific | "Implement pinning in group rooms" |
Telegram |
Telegram connector specific | "Add Telegram reactions" |
help wanted |
Open for contributions | Any issue needing external help |
blocked |
Blocked on external dependency | "Waiting for WebEX API update" |
Creating Issues
Before starting work, check for existing issues:
# View all open issues
gh issue list

# View WebEX-related issues
gh issue list --label WebEX

# View bugs
gh issue list --label bug
When NOT to Use TODO Comments
⚠️ Do NOT add TODO comments in code. Instead:
- Create a GitHub issue describing the work needed
- Reference the issue in commit messages:
fix: resolve #42 - Assign ownership so it's tracked and visible
- Move to In Progress when you start work
Example:
# ❌ BAD - TODO in code
def pin_message(self, msg_id, room_id):
    # TODO: implement proper pinning when WebEX adds support
    pass

# ✅ GOOD - GitHub issue + clear code
def pin_message(self, msg_id, room_id):
    """Pin a message.

    Note: WebEX API doesn't support pinning in direct messages.
    See issue #42 for status on group room support.
    """
    pass
Outstanding Work
All outstanding work is tracked in GitHub Issues. Check the repository issues board to see:
- In Progress - Work actively being done
- Backlog - Planned but not started
- Help Wanted - Open for contributions
- Blocked - Waiting on dependencies
Start here: GitHub Issues
Yorumlar (0)
Yorum birakmak icin giris yap.
Yorum birakSonuc bulunamadi