bearmail
Health Uyari
- No license — Repository has no license file
- Description — Repository has a description
- Active repo — Last push 0 days ago
- Low visibility — Only 5 GitHub stars
Code Uyari
- fs module — File system access in .github/workflows/auto-close-prs.yml
Permissions Gecti
- Permissions — No dangerous permissions requested
Bu listing icin henuz AI raporu yok.
Self-hosted company email and calendar for AI agents. Dedicated scoped mailbox per agent, MCP + JMAP, draft-first. Not a Gmail replacement.
BearMail
Give your team and AI agents a real mailbox and calendar on the company
domain. Self-hosted control. Ordinary email and calendar to the rest of
the world.
BearMail brings people and AI agents together in one self-hosted email and
calendar system. Built on a customized Stalwart
backend, its WebUI and MCP integration let Cursor, Claude, and Hermes work
with the same mailboxes people use every day—without handing control to a
managed suite.
5-minute path: docs/QUICKSTART.md.
Prerequisites and limits: docs/LIMITATIONS.md.
Release: v0.1.0 — Linux x86-64 binary, WebUI archive, checksums.
One Linux x86-64 / systemd server, one interactive installer. When it
finishes you have:
- mail on
mail.example.com(SMTP, IMAP, JMAP, admin); - webmail and calendar on
https://webmail.example.com; - HTTPS via Caddy;
- outbound through Brevo (Mailjet optional) when the VPS blocks TCP 25;
- DNS through name.com (other registrars are manual).
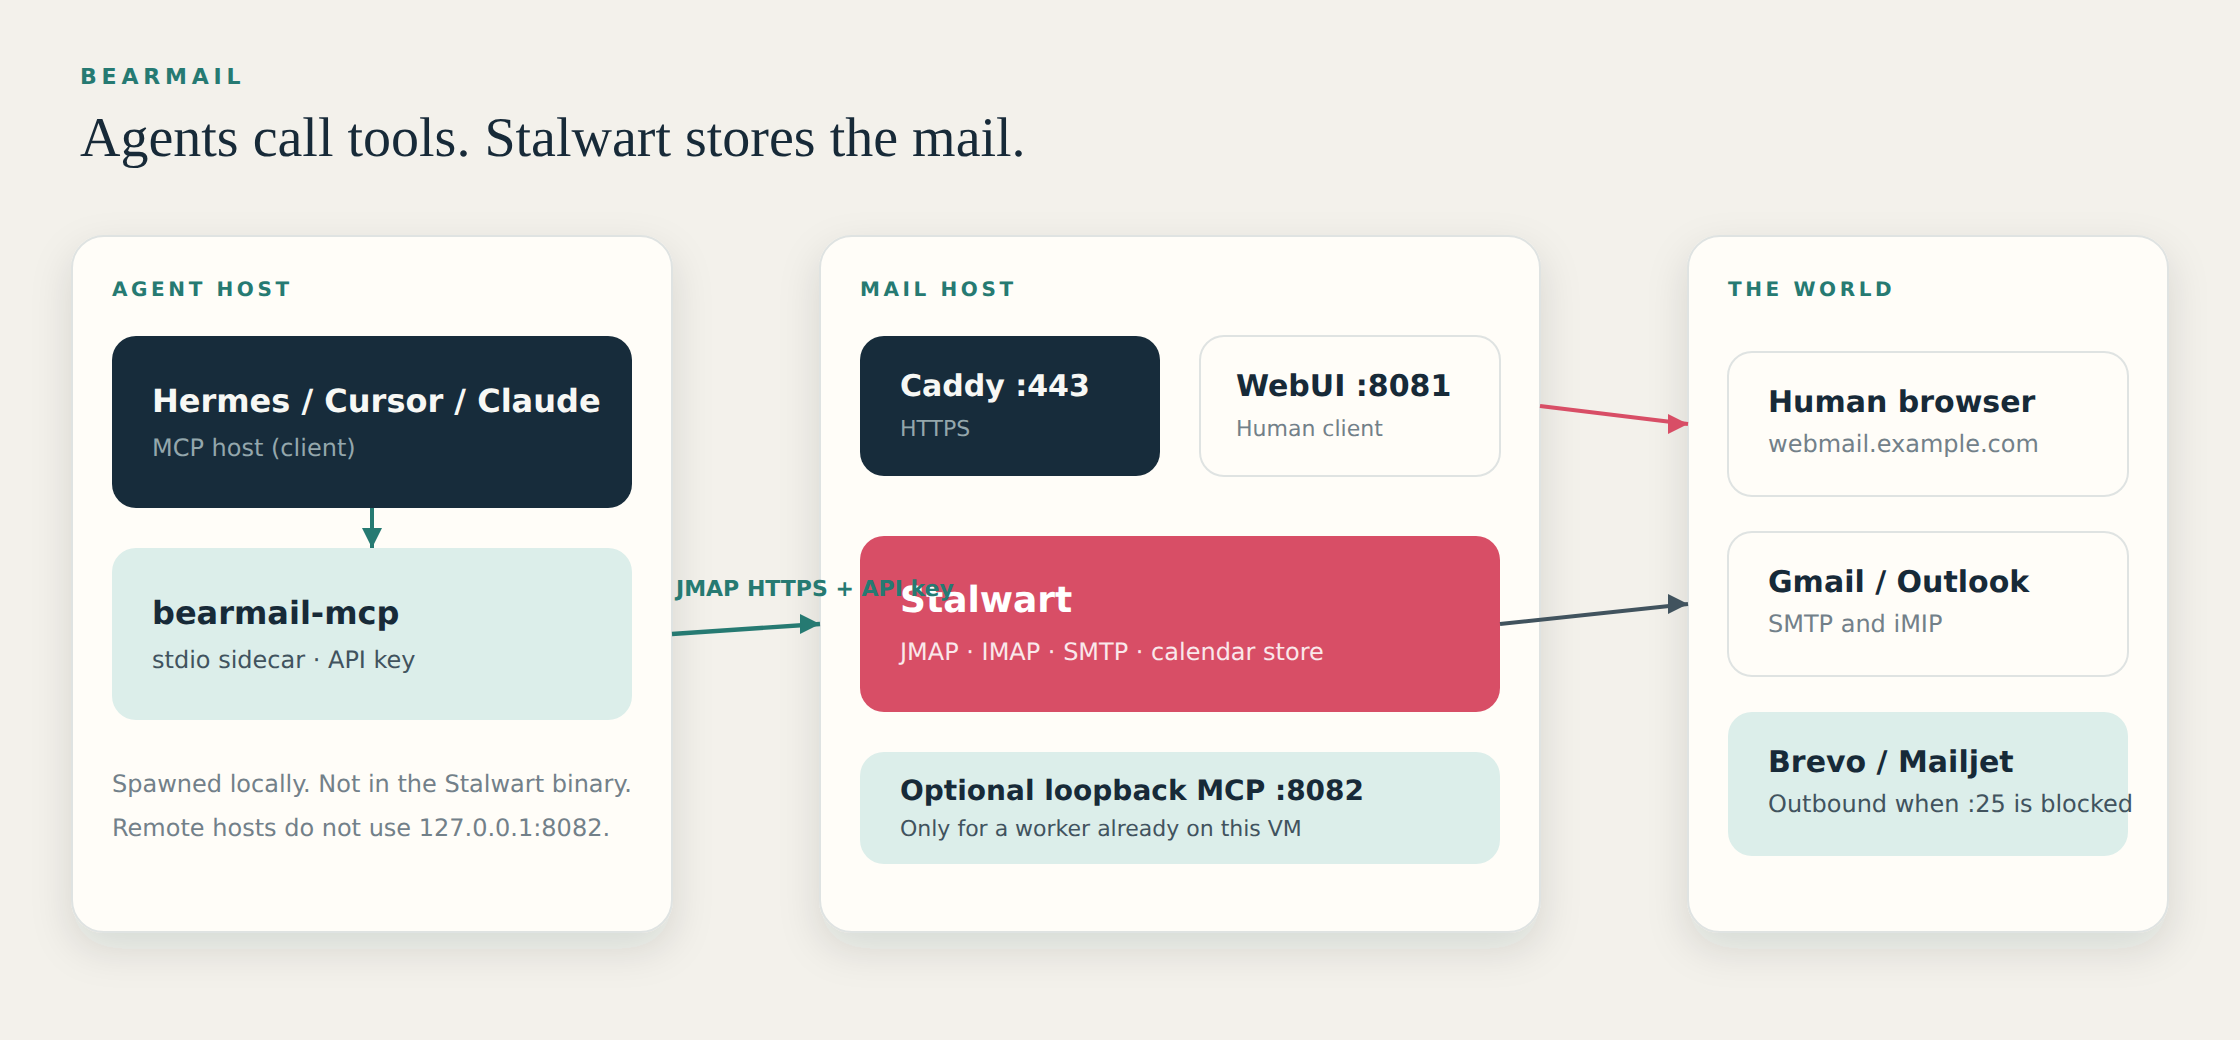
Larger diagram: docs/ARCHITECTURE.md.
Screenshots
| Connect | Calendar | |
|---|---|---|
 |
 |
 |
Connect is a live WebUI capture. Mail and calendar show the same client.
This release does not include
Managed hosting, Google/Microsoft suite parity, Docker/Kubernetes, ARM,
generic one-click catalogues, an SLA, compliance certifications, or
autonomous send from day one. MCP is Draft v0.1.
Quick Install
On a Linux x86-64 server with systemd, from an SSH session:
curl -fsSL https://raw.githubusercontent.com/luoxiprovo/bearmail/main/release_install.sh | sudo bash
That downloads install.sh, the stalwart binary, andstalwart-webui.tar.gz from this GitHub repo, then starts the interactive
setup. Prepare the name.com and
SMTP relay accounts first. The
wizard will ask for them.
Preview the download plan without changing the system:
curl -fsSL https://raw.githubusercontent.com/luoxiprovo/bearmail/main/release_install.sh | sh -s -- --dry-run
1 GB VMs (e2-micro)
After a successful install on a small host (~1 GB RAM), cap RocksDB, add 2 GB
swap, and apply OS memory limits:
curl -fsSL https://raw.githubusercontent.com/luoxiprovo/bearmail/main/small-memory-optimize.sh | sudo bash
Preview with sudo bash -s -- --dry-run. Details:
Small-memory VMs.
AI agents (MCP)
On a server that already has BearMail, add the MCP sidecar. This does not
replace Stalwart, Caddy, DNS, or stored mail:
curl -fsSL https://raw.githubusercontent.com/luoxiprovo/bearmail/main/mcp_install.sh | sudo bash
Preview with sudo bash -s -- --dry-run. If the mail origin cannot be detected:
curl -fsSL https://raw.githubusercontent.com/luoxiprovo/bearmail/main/mcp_install.sh | sudo bash -s -- --server-url https://mail.example.com
Then create a dedicated mailbox (not the founder inbox), issue a
Stalwart API key (API_…), and paste this into the MCP host. Leavedraft-only on until you opt in. Do not use a human password or app_….
{
  "mcpServers": {
    "bearmail": {
      "command": "node",
      "args": ["/opt/bearmail-mcp/dist/stdio.js"],
      "env": {
        "BEARMAIL_SERVER": "https://mail.example.com",
        "BEARMAIL_USERNAME": "[email protected]",
        "BEARMAIL_TOKEN": "API_<stalwart-api-key>",
        "BEARMAIL_SEND_MODE": "draft-only"
      }
    }
  }
}
Guide: How an AI agent uses BearMail.
Copy-paste configs: mcp/mcp.json.example (Cursor),mcp/claude_desktop.json.example,mcp/hermes.json.example.
Upgrade (keep config)
On a host that already has BearMail, replace the Stalwart binary, WebUI, and
MCP sidecar. This does not change config.json, Caddy, DNS, CORS, the SMTP
relay, or stored mail, and it does not ask setup questions:
curl -fsSL https://raw.githubusercontent.com/luoxiprovo/bearmail/main/upgrade.sh | sudo bash
Preview with sudo bash -s -- --dry-run. Do not rerun install.sh for this
update: that wizard re-asks CORS, relay, and DNS. After it finishes,
hard-refresh webmail so the browser loads the new assets.
Prepare these first
Do this before you run the installer. The script will ask for the values;
it does not create the vendor accounts for you.
1. name.com domain and account
- Buy or transfer a domain at name.com.
- Keep the domain on name.com nameservers.
- Sign in and open Account Settings → API Tokens.
- Create a production API token. Two-step verification must allow API
access. - Keep the account username and the token ready. The installer types
the token with echo off and does not save it ininstaller-state.json.
You will also choose two hostnames in that zone, typically:
| Hostname | Role |
|---|---|
mail.example.com |
Mail server, admin, MX, IMAP/SMTP |
webmail.example.com |
BearMail web app |
They may share one public IP. They cannot be the same name.
2. SMTP relay account (Brevo recommended)
Cloud VMs (including Google Cloud) usually block outbound TCP 25. The
installer asks which relay to use. Brevo is the default. Mailjet remains
available.
Brevo (default)
- Create an account at app.brevo.com.
- Settings → Senders, domains & dedicated IPs → add your mail domain
(the part after@, such asexample.com). - Publish Brevo’s domain-ownership TXT (Brevo code) and DKIM as shown there.
The installer can mergeinclude:spf.brevo.cominto SPF when it publishes
DNS through name.com. Add Brevo’s DKIM selector from the dashboard yourself. - Settings → SMTP & API → SMTP
(SMTP page). - Copy the SMTP login (username, often
[email protected]) and the
SMTP key (password). These are not your Brevo website password, and
not a REST API key.
Host is smtp-relay.brevo.com. Port 587 (STARTTLS) is the default; 465
is implicit TLS. See Brevo SMTP relay.
Mailjet (alternative)
- Create an account at app.mailjet.com.
- Account settings → Senders & Domains → add your mail domain.
- Publish Mailjet’s domain-ownership TXT and DKIM. The installer can merge
include:spf.mailjet.cominto SPF when it publishes DNS through name.com. - Account settings → SMTP and SEND API settings
(relay page). - Copy the API key (SMTP username) and secret key (SMTP password).
Host is in-v3.mailjet.com. See Mailjet SMTP relay.
3. A Linux server
- Linux x86-64 with systemd, root (
sudo), and an interactive terminal (SSH is
fine). - A public IPv4 address (IPv6 optional).
- Inbound TCP 80 and 443 open if you use automatic Caddy (recommended).
Install from local artifacts
If you already have the three files on the server, put them in one directory:
install.sh
stalwart
stalwart-webui.tar.gz
Then run:
sudo sh ./install.sh
That installs Stalwart and the WebUI. The MCP sidecar is a later step; it is
not one of these three files.
Build them from this repository (community edition, no enterprise feature
gates):
cargo build --release --package stalwart --locked --no-default-features \
  --features "sqlite postgres mysql rocks s3 redis azure nats"
cp target/release/stalwart ./stalwart
chmod +x ./stalwart

cd webui
npm ci
npm test
npm run build
tar -czf ../stalwart-webui.tar.gz \
  install.sh server.mjs stalwart-webui.service dist
cd ..
After BearMail is up, add MCP from the same checkout (mcp_install.sh plus
the mcp/ tree):
sudo sh ./mcp_install.sh
That uses local mcp/ and does not download GitHub. Preview withsudo sh ./mcp_install.sh --dry-run. If the mail origin cannot be detected,
pass --server-url https://mail.example.com. Then create a dedicated
mailbox, issue a Stalwart API key (API_…), and paste the host config from
AI agents (MCP).
To update only the WebUI on an already-installed server, copy update.sh
and a new stalwart-webui.tar.gz to that host and run sudo sh ./update.sh.
It reuses the live WebUI service and config.json. Details:
How to install BearMail.
Full paths, reinstall, uninstall, and troubleshooting:
How to install BearMail.
What install.sh asks, in order
Press Enter to accept a value in [brackets]. Invalid answers are explained
and asked again; they do not abort the install.
Before any files change
Installation layout
1) Standard system paths (recommended)— binary in/usr/local/bin,
config in/etc/stalwart, data in/var/lib/stalwart.2) Custom self-contained prefix— then it asks for an absolute prefix
such as/opt/stalwart. Use this only if you must keep everything under
one directory.
Path to the compiled Stalwart binary
Default: ./stalwart beside the script. Must be executable and built from
this source (it has to support quick setup).
Path to the prebuilt WebUI tar archive
Default: ./stalwart-webui.tar.gz.
WebUI installation prefix
Default: /opt/stalwart-webui. Must not overlap the mail data, config, or
Node.js paths.
WebUI local service port
Default: 8081. Bound to 127.0.0.1 only. 8080 is reserved for the mail
engine.
Public WebUI origin
Exact HTTPS URL with no path, for example https://webmail.example.com.
This is the URL people and agents open. After you later set the mail domain,
a leftover webmail.example.com example is replaced withhttps://webmail.<your-domain>.
HTTPS publishing
1) Configure Caddy automatically (recommended)— installs Caddy, puts
mail and webmail on ports 80/443, obtains Let’s Encrypt certificates, and
copies the mail-host cert into the engine for IMAPS/SMTPS. Requires
origin on standard port 443. Will not overwrite an operator-owned
Caddyfile.2) Use an existing operator-managed reverse proxy— you routehttps://webmail…to127.0.0.1:8081yourself.
Installation summary then Install both services and run interactive
server setup
Default is no. Type yes to change the system.
Server identity (quick setup)
On a fresh machine the engine then asks:
Public mail hostname — example mail.example.com. Not the cloud
hostname (nothing ending in .internal or .local). Used for MX, TLS, and
the URL the web app calls.
Primary mail domain — example example.com. The part after @.
Press Enter at Quick setup unless you need external Postgres, LDAP,
OIDC, or another store. Advanced setup exposes every bootstrap field;
empty input keeps the displayed default.
On a first internal-directory install, the administrator username and
password are printed once. Save them before continuing.
After services are up
Stalwart administrator username / password
Only if this is a reinstall or an external directory. Needed to set CORS
for the web origin. Password input is hidden.
Outbound SMTP relay
Default Brevo. Choose Mailjet or skip if you can send on TCP 25.
| Prompt (Brevo) | What to enter |
|---|---|
| Brevo SMTP host | smtp-relay.brevo.com |
| Brevo SMTP port | 587 or 465 |
| Brevo SMTP login | SMTP username |
| Brevo SMTP key | SMTP password (hidden) |
Local addresses still deliver on the server. Remote recipients go through
the selected relay.
Have you already published the printed forward-DNS records
Default no. If you answer no, BearMail can publish the table through
name.com:
| Prompt | What to enter |
|---|---|
| name.com domain (DNS zone) | Usually the mail domain, example.com |
| name.com API username | name.com account username |
| name.com API token | Production token (hidden) |
If existing records conflict (old A/MX/SPF), the installer lists them and
asks Replace the conflicting name.com records (default yes). Site
verification TXT and NS records are left alone. Reverse DNS (PTR) is not
in this table; set it at the VPS provider if you send without a relay.
Wait for DNS to resolve, then open:
- Admin:
https://mail.example.com/admin/ - BearMail:
https://webmail.example.com/
Create a user in admin, then sign in to BearMail with that address and
password. User guide: How to sign in and send email.
Finish the selected relay’s domain authentication (Brevo code/DKIM, or
Mailjet’s ownership TXT and DKIM) in that vendor’s dashboard if it is still
pending.
What agents get
MCP tools over the same JMAP mailbox humans use in the WebUI. One agent,
one address ([email protected]), scoped token, draft-only until you
allow send. External people stay reachable with ordinary mail and calendar
invites.
Install the mail host, then paste the prompt in QUICKSTART.md
so the agent follows AGENT_GUIDE.md.
Spec (draft): AGENT_MCP_SPEC.md.
Docs
| Doc | Use |
|---|---|
| QUICKSTART.md | Install, then paste the agent prompt |
| LIMITATIONS.md | Prerequisites, draft-only, caps, what we do not claim |
| ARCHITECTURE.md | Stalwart, WebUI, MCP, SMTP/iMIP |
| INSTALL.md | Full installer, upgrade, uninstall |
| WEBUI_USER_GUIDE.md | Human sign-in and send |
GitHub topics (for discovery): self-hosted, email-server, calendar,jmap, mcp, ai-agents, stalwart.
License
The mail engine in this repository is dual-licensed AGPL-3.0 and the
Stalwart Enterprise License. See
LICENSES. Copyright (C) 2020, Stalwart Labs LLC. BearMail
is a packaging and MCP layer on that engine, not a Stalwart Labs product.
Yorumlar (0)
Yorum birakmak icin giris yap.
Yorum birakSonuc bulunamadi