agentbox
Health Uyari
- License — License: MIT
- Description — Repository has a description
- Active repo — Last push 0 days ago
- Low visibility — Only 5 GitHub stars
Code Uyari
- network request — Outbound network request in docker-compose.yml
- network request — Outbound network request in src/app/(app)/keys/page.tsx
- network request — Outbound network request in src/app/(app)/settings/page.tsx
Permissions Gecti
- Permissions — No dangerous permissions requested
Bu listing icin henuz AI raporu yok.
Agent-native inboxes for AI agents. REST API + built-in MCP server, custom domains, OTPs, and verification emails — powered by Cloudflare.

AgentBox
Agent-native inboxes for autonomous workflows.
Lightweight, open-source, self-hosted inboxes for AI agents powered by Cloudflare. Create inboxes on demand, receive OTPs and verification emails, and use your own domains.
An agent can POST /v1/inboxes to generate a fresh address
([email protected]), use it to sign up somewhere, then pollGET /v1/inboxes/<id>/messages?wait=30 to read the verification email — all
over a simple REST API, or via the built-in MCP server for
MCP-native agents and agent frameworks.
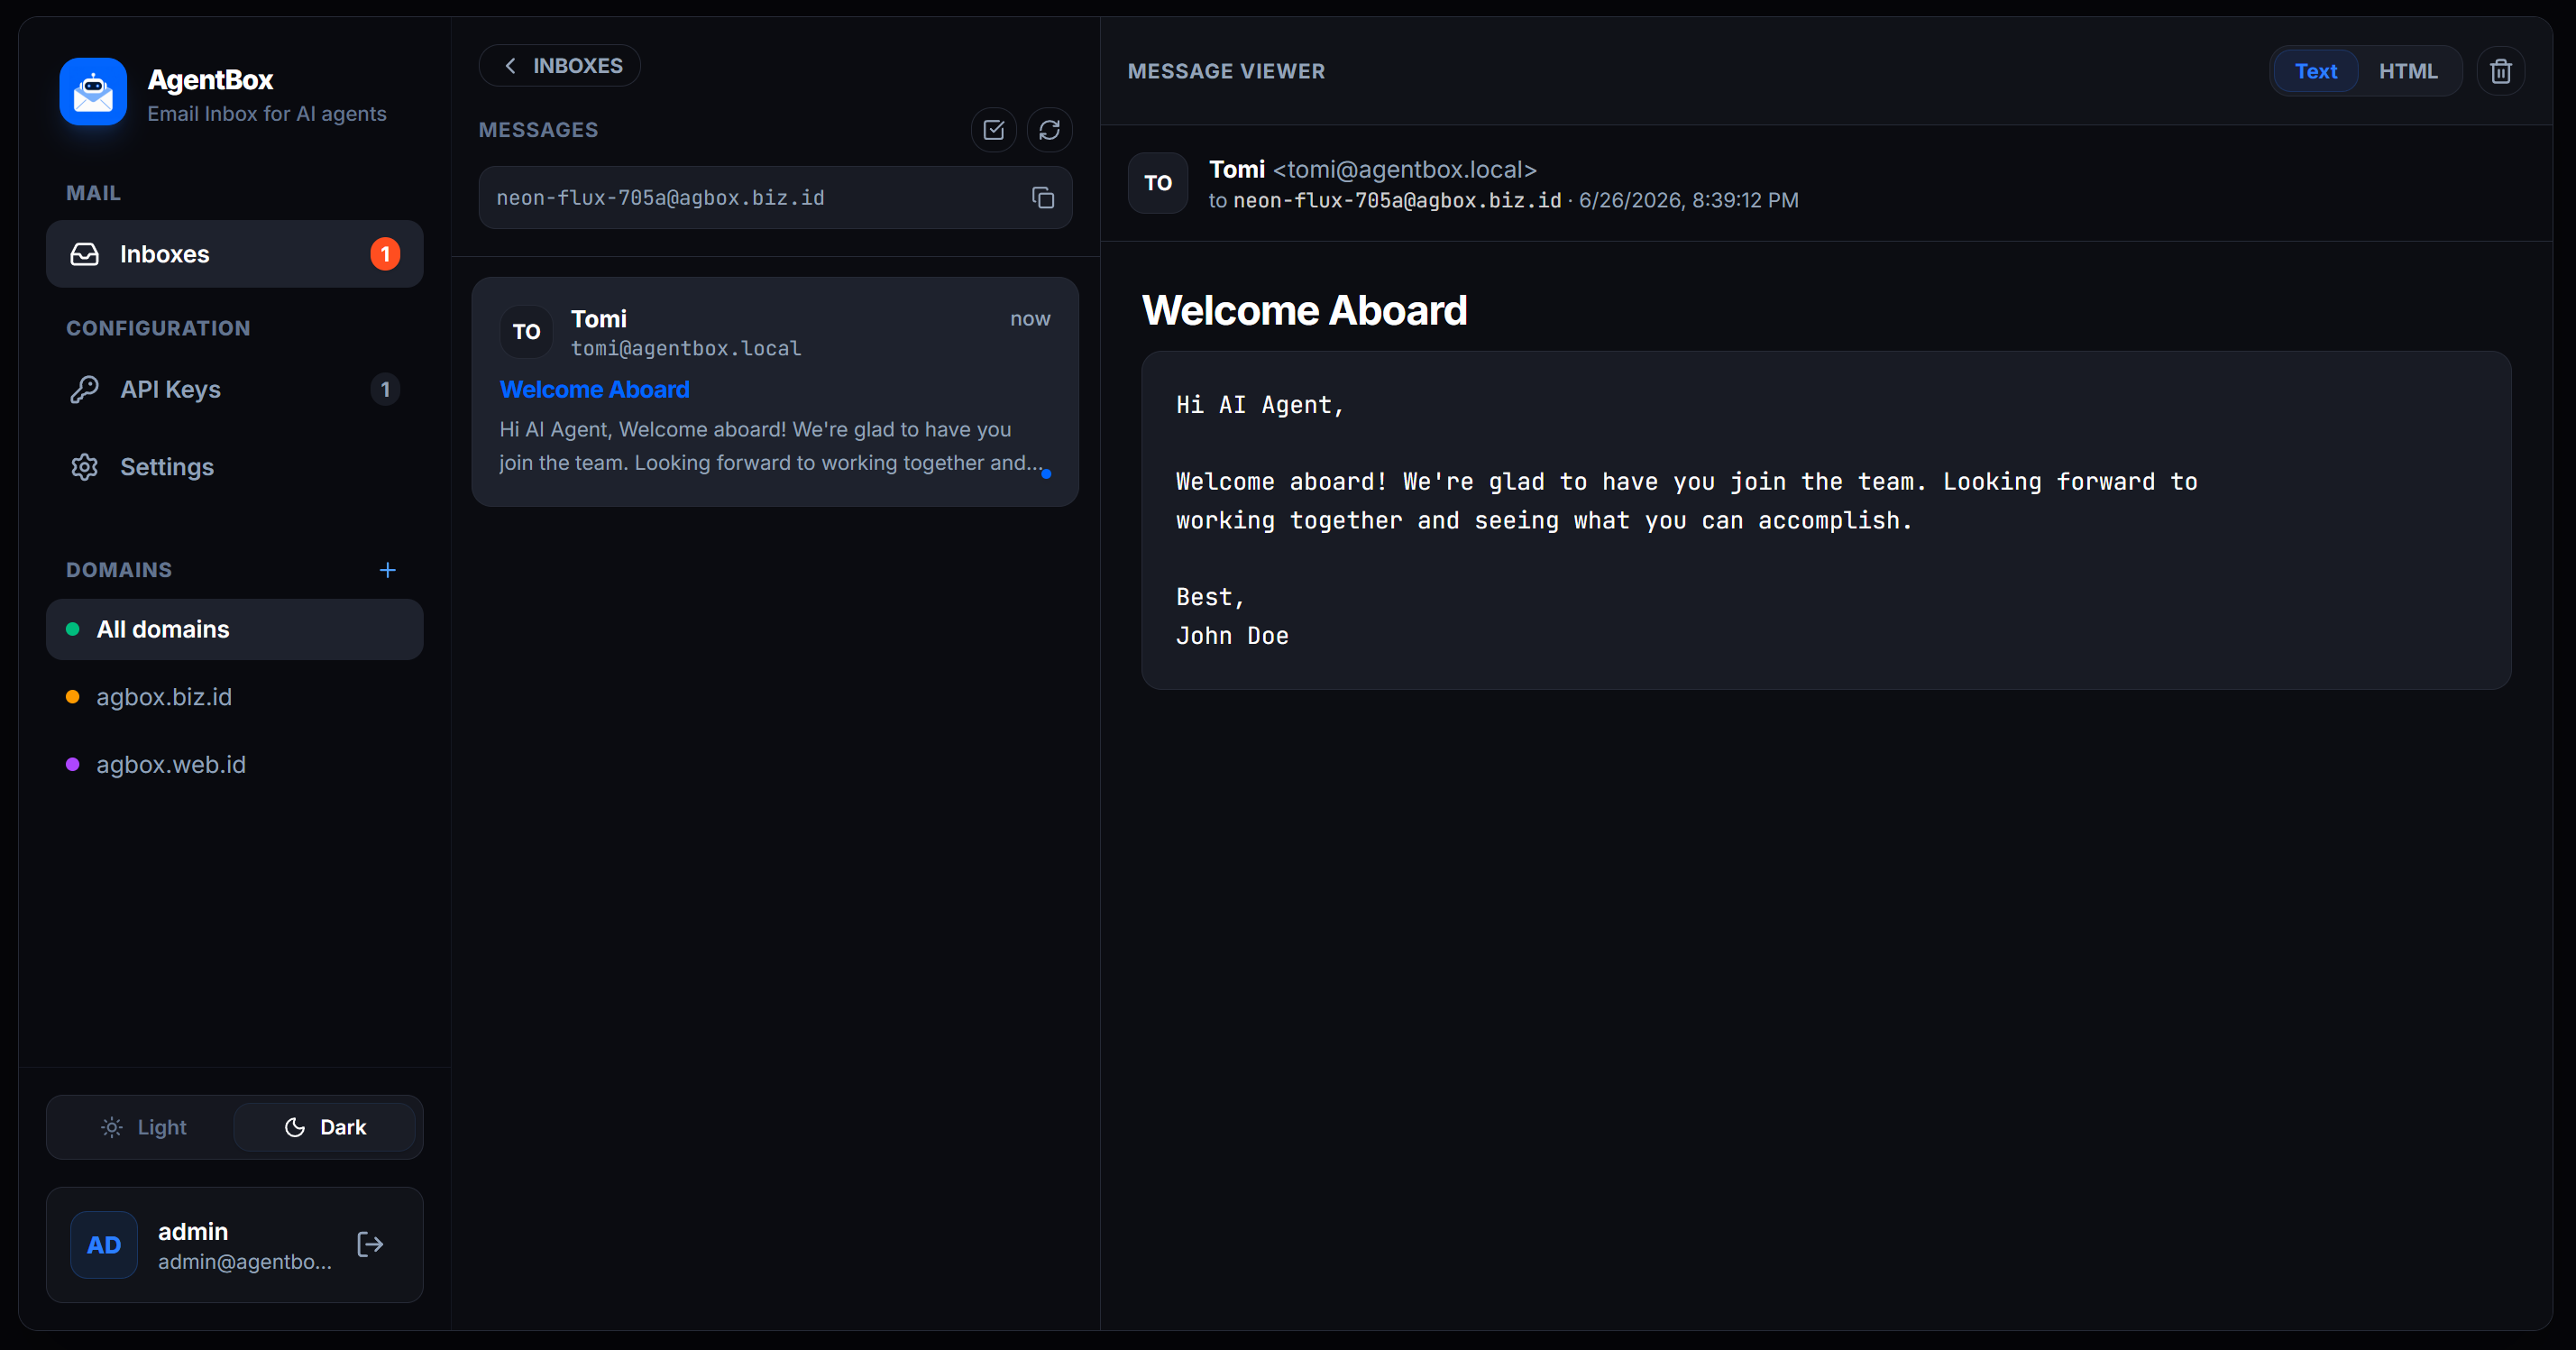
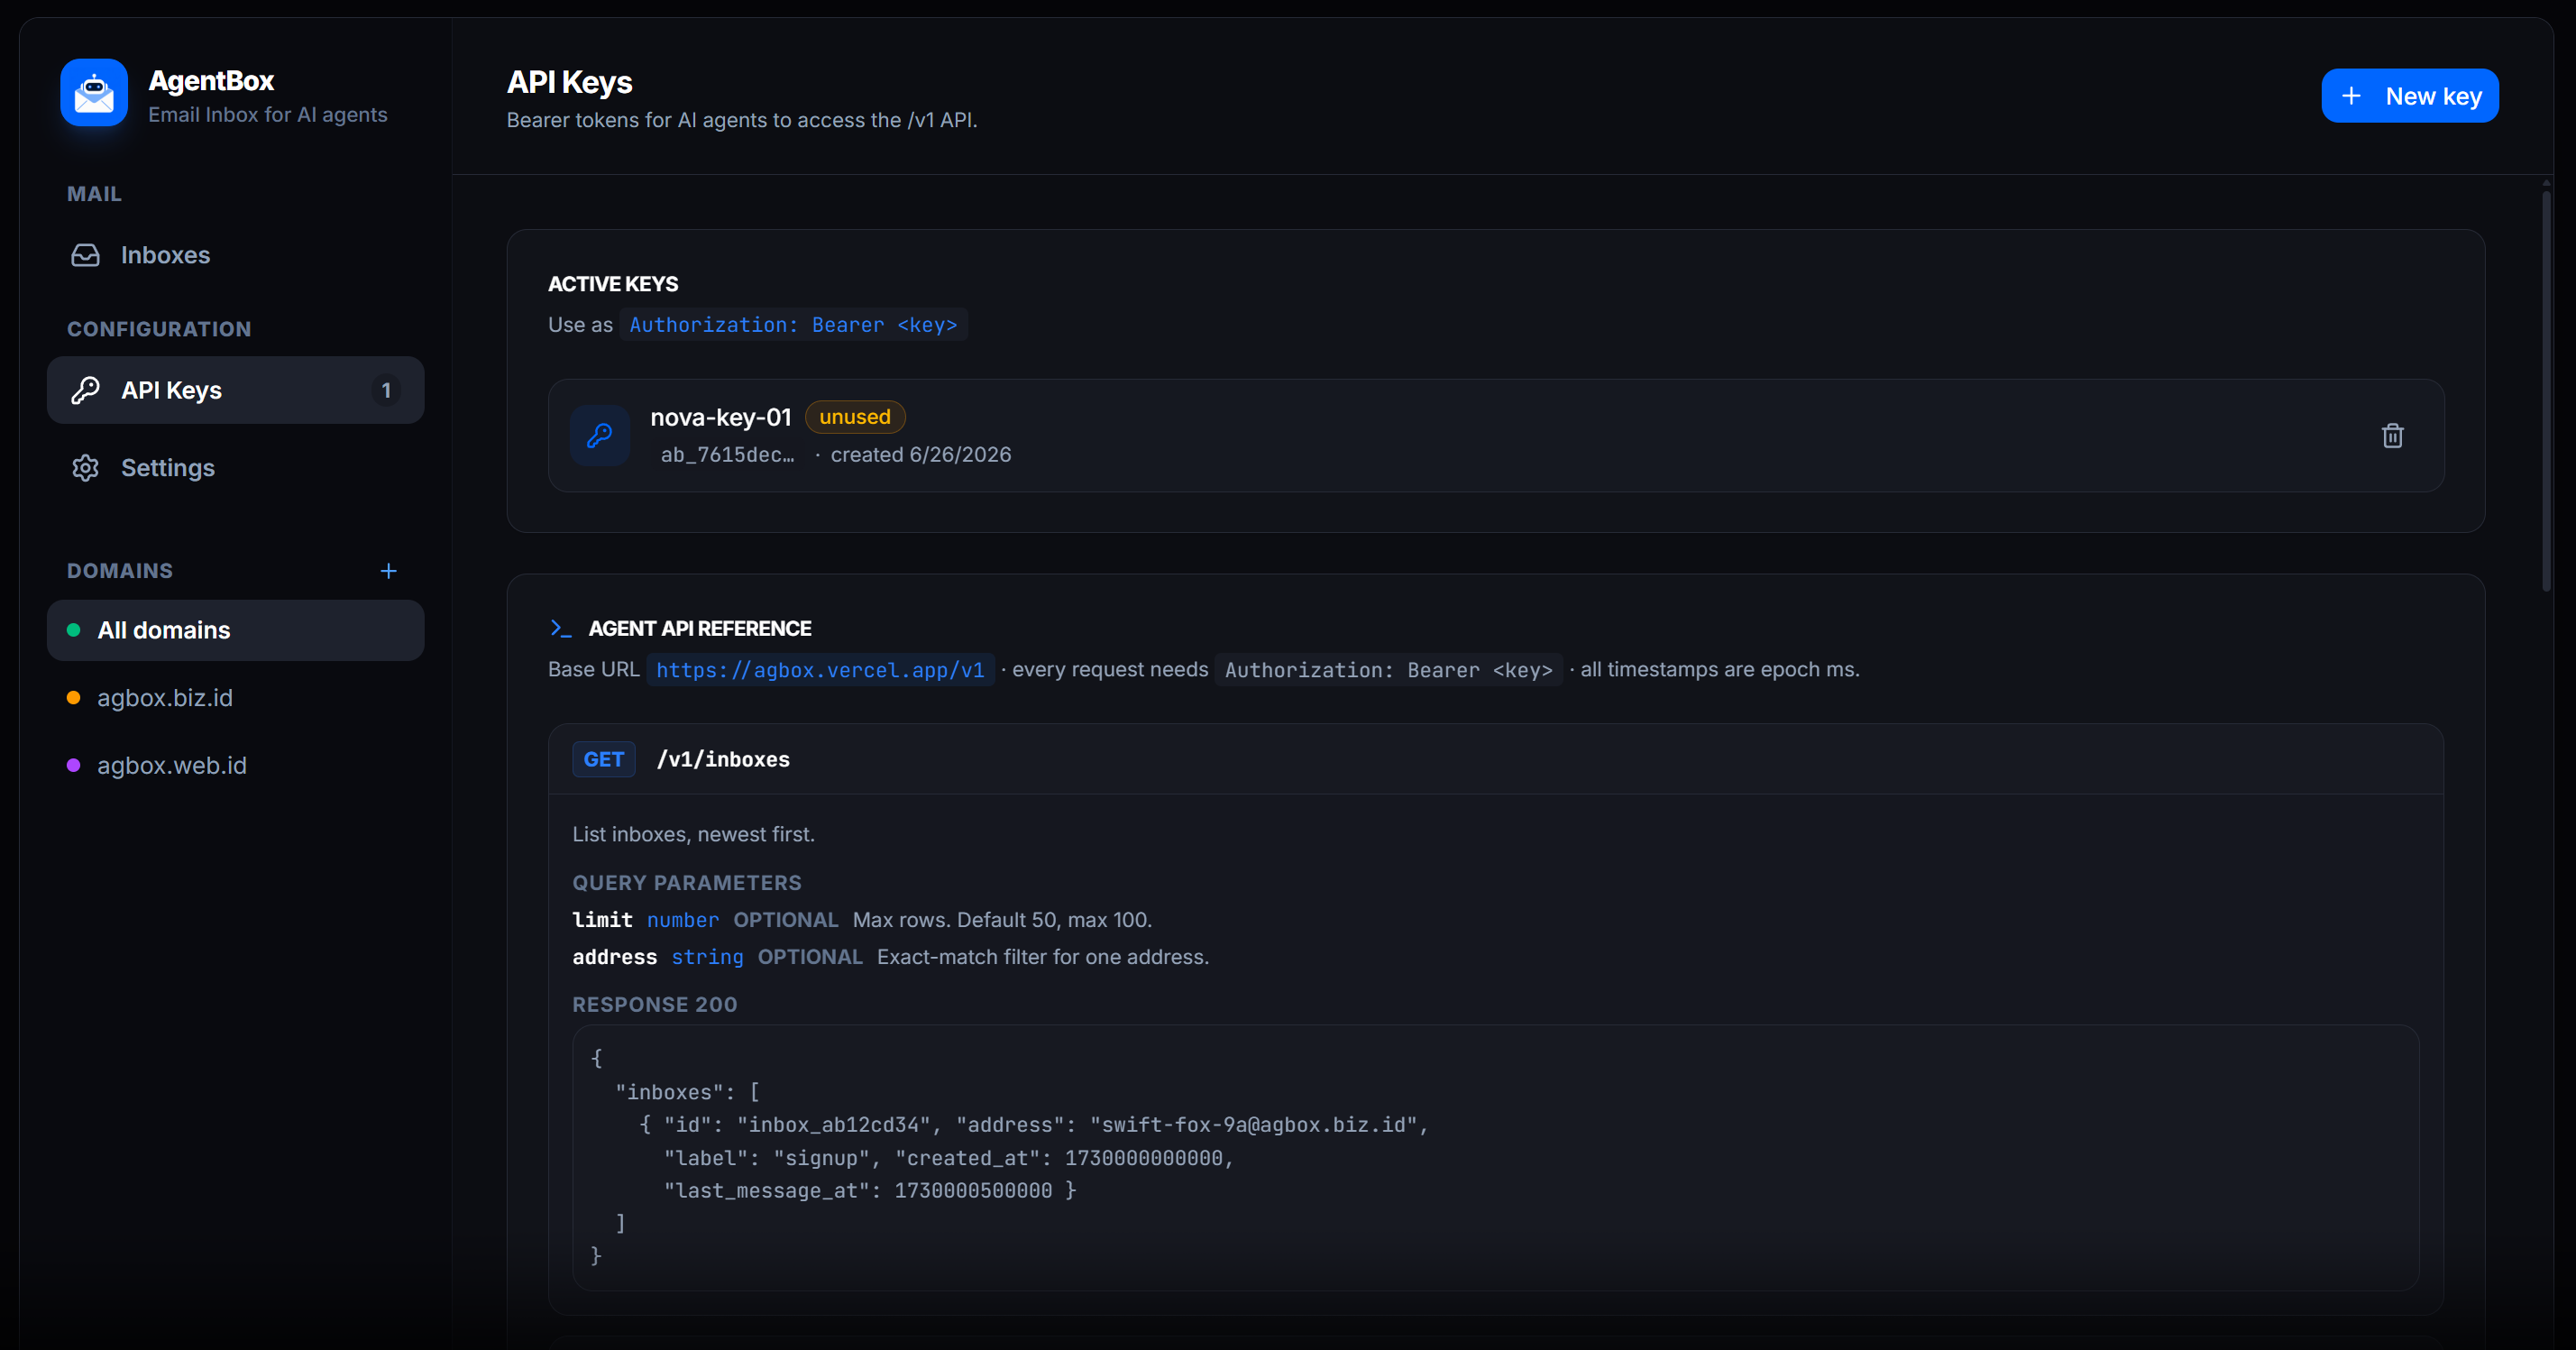
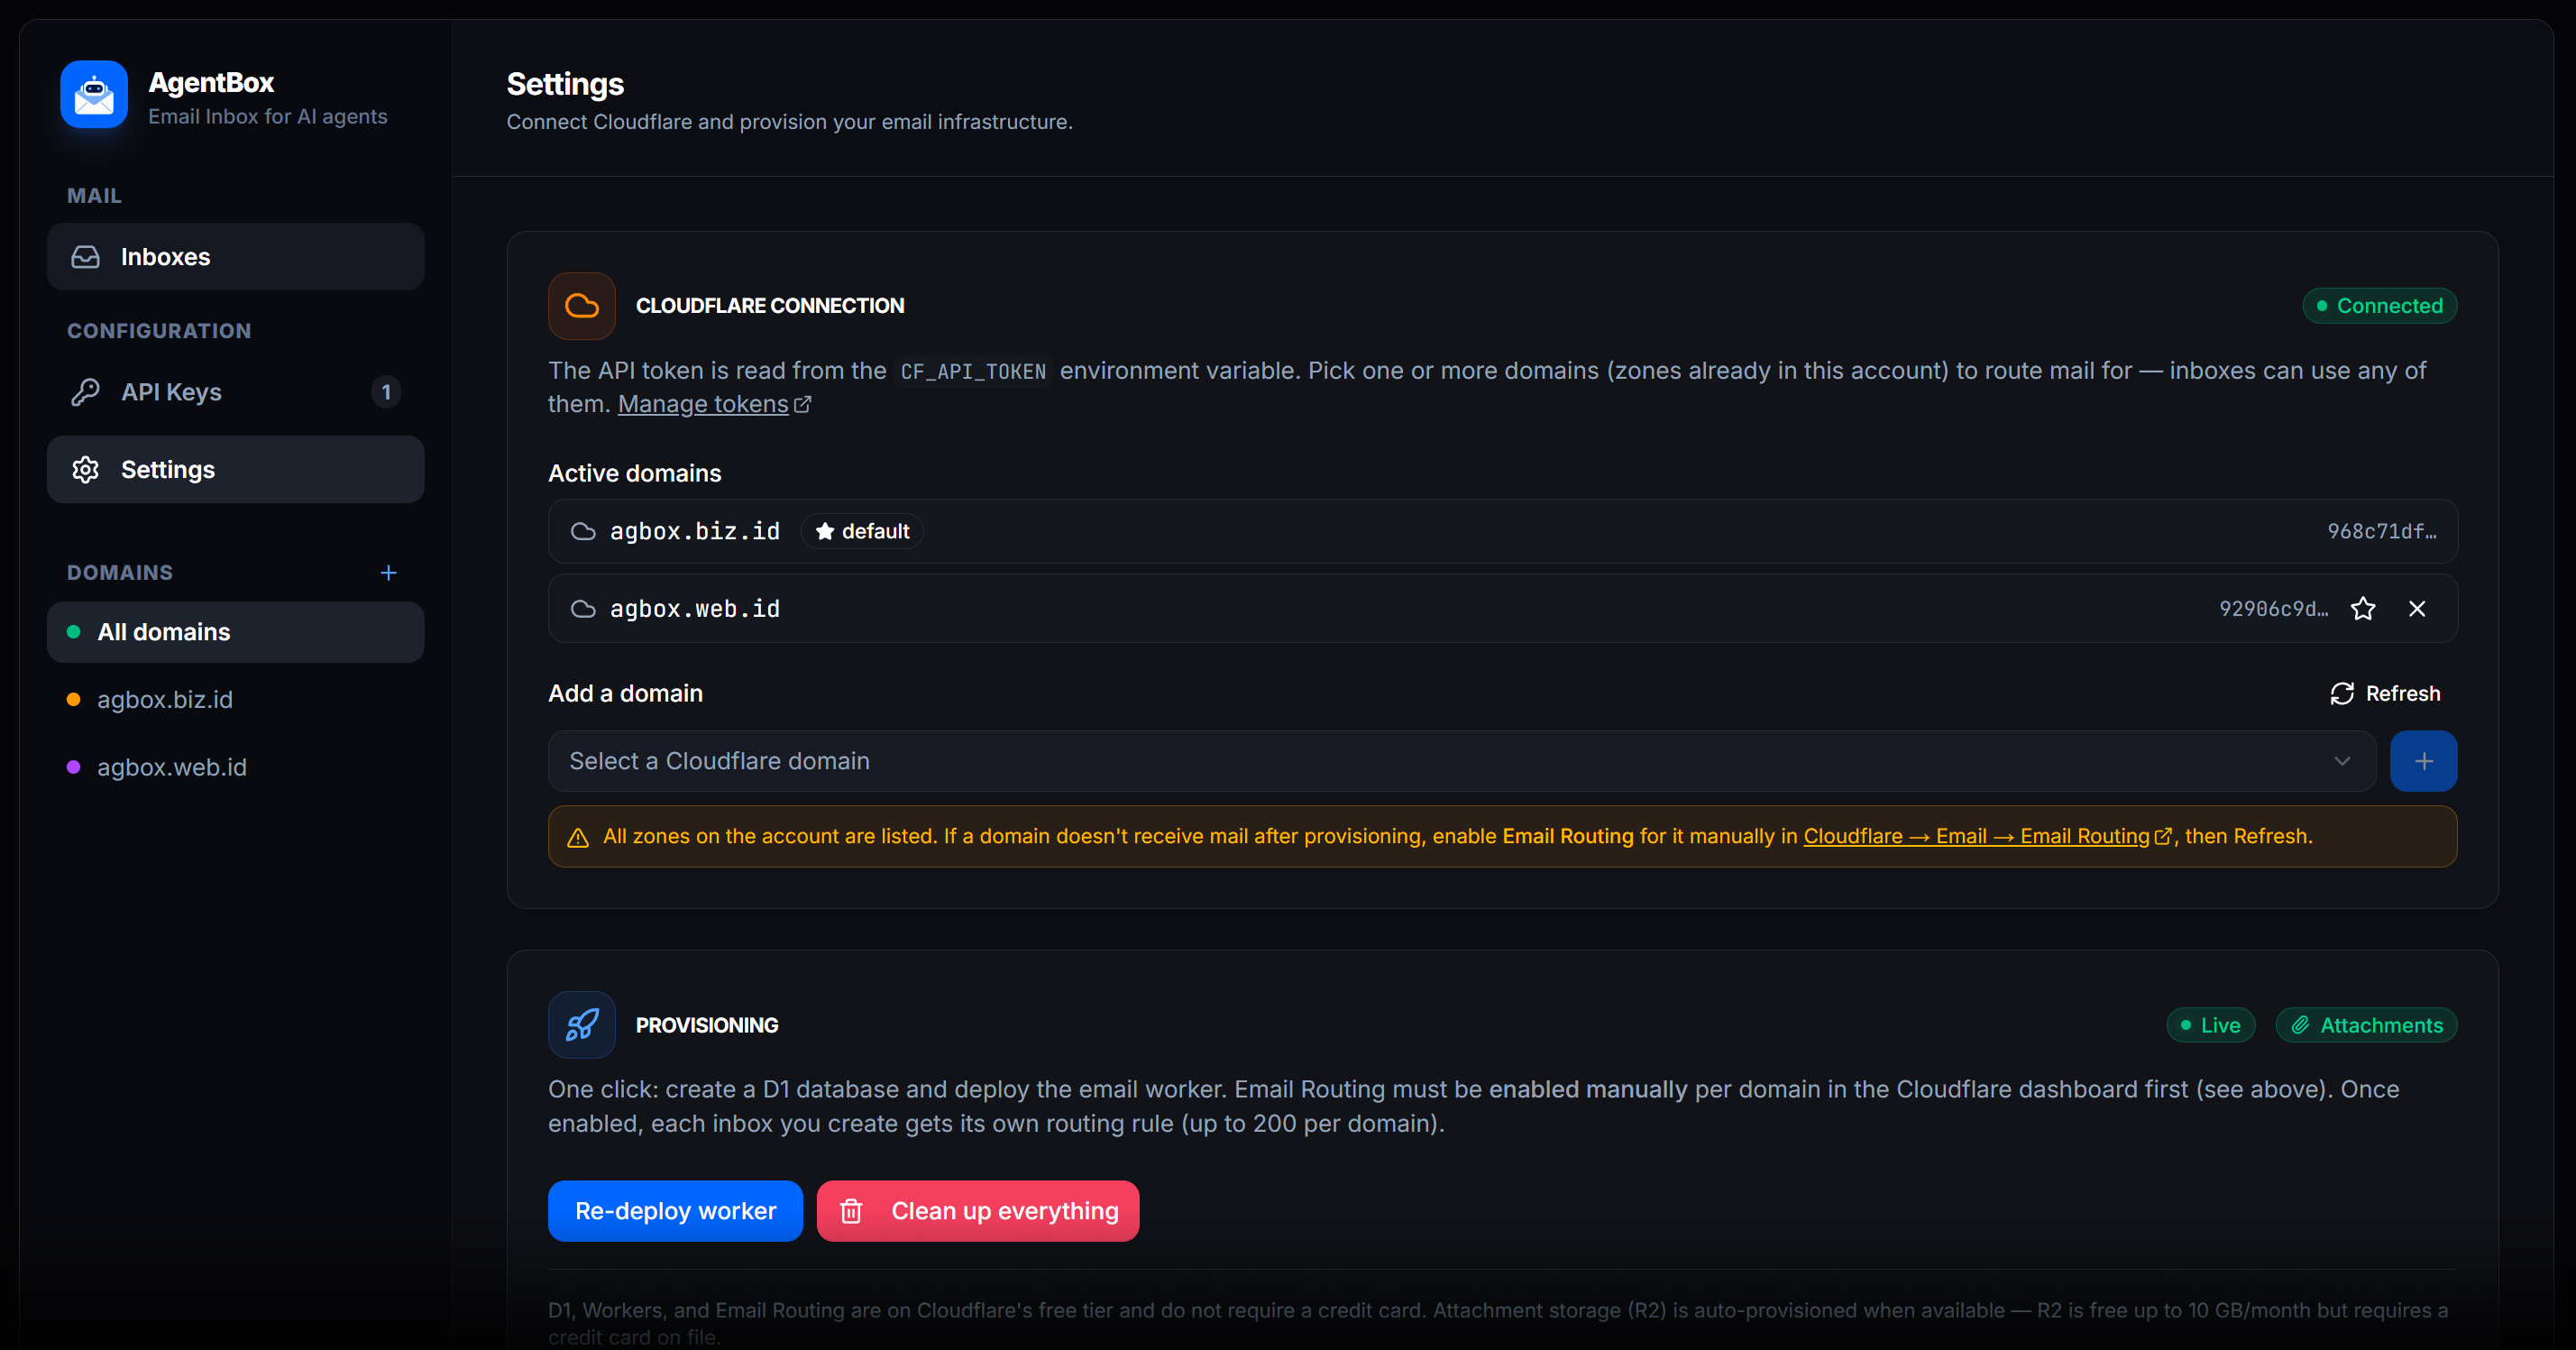
Table of contents
- Deploy to Vercel
- How it works
- Multi-domain support
- Storage
- Requirements
- Setup
- Docker
- Agent API (
/v1) - MCP server
- Dashboard
- Cleanup / factory reset
- Notes & limits
- Stack
- Project structure
Deploy to Vercel
The fastest way to get started — one click, zero local setup:
You'll be prompted for two env vars:
| Variable | How to get it |
|---|---|
CF_API_TOKEN |
Create a Cloudflare API token with Workers, D1, Account Settings, and Email Routing permissions |
AGENTBOX_SECRET |
Run openssl rand -hex 32 in your terminal |
After deploy, open the app → create your admin account → Settings → add domain → Provision → enable Email Routing manually → done.
How it works
Inbound email
   │
   ▼
Cloudflare Email Routing      one rule per inbox  (you@yourdomain → worker)
   │
   ▼
Email Worker                  parses MIME, deployed by AgentBox
   │
   ├──▶ Cloudflare D1         message row + attachment metadata
   │
   └──▶ Cloudflare R2         attachment binaries (optional, needs CC)
   │
   ▼
AgentBox dashboard / agent API   reads via Cloudflare REST APIs
- Dashboard (this Next.js app) — login, settings, a real inbox UI, and API
keys. Fully responsive (desktop 3-pane, mobile drawer + single-pane). - Control plane — the Cloudflare API token lives in the
CF_API_TOKENenv
var. You pick your domain(s), click Provision, and AgentBox uses the
Cloudflare REST API to: create the D1 database (+ schema) and upload the
email worker bound to it. Note: Email Routing must be enabled manually
on the Cloudflare dashboard for each domain (API tokens cannot toggle this
setting). Once enabled, each inbox you create automatically registers its own
per-address routing rule to the worker. Nowranglerneeded. - Storage — everything (users, settings, API keys, inboxes, mail) lives in
a single Cloudflare D1 database (agentbox). No local disk, so it deploys
to Vercel / Cloudflare Pages (serverless) as-is.
Multi-domain support
AgentBox can route mail for multiple domains at once. Each domain must be a
zone already in your Cloudflare account. Add domains in Settings — inboxes
can use any of them. The first domain added becomes the default (used for
provisioning the shared D1 + worker). Extra domains reuse the same worker; each
inbox creates its routing rule in the zone that owns its address.
You can switch the default domain at any time, and filter inboxes by domain in
the sidebar.
Storage
State lives in Cloudflare D1 (serverless SQLite) — free, no credit card. The
email worker writes inbound mail by binding D1 natively, while the dashboard
(running outside Cloudflare) reads/writes via the D1 REST API. Real SQL means
unread counts, listing, and search are single indexed queries instead of key
scans, so it stays well within the free quotas under polling.
Attachments are stored in Cloudflare R2 (S3-compatible object storage).
R2 is auto-provisioned during setup if the API token has Workers R2 Storage
permission and the Cloudflare account has a credit card on file. R2's free tier
is 10 GB storage + 10M reads/month — plenty for agent inboxes.
If R2 is not available, AgentBox still works normally; attachments are simply
not stored. The Settings page shows a badge indicating whether attachments are
enabled or disabled.
The API token is the one secret that must live outside the database (you
need it to reach D1 from a stateless serverless function). The account id and
database id are auto-discovered from the token and memoized.
Requirements
- Node 22+ (or 18+; 22-alpine used in Docker)
- A domain on Cloudflare (DNS managed by Cloudflare — i.e. the zone is
active in your Cloudflare account) - A Cloudflare API token (see below)
All Cloudflare products used (Workers, D1, Email Routing) are on the free tier
and require no credit card. R2 (attachment storage) is optional and requires a
credit card on the Cloudflare account (free up to 10 GB/month).
Creating the Cloudflare API token
AgentBox uses one token for everything — provisioning the infrastructure
and reading/writing data at runtime. Create it once:
Click Create Token → scroll down → Create Custom Token → Get started.
Give it a name, e.g.
agentbox.Under Permissions, add these four rows (click + Add more for each):
# Type Resource Access 1 Account Workers Scripts Edit 2 Account D1 Edit 3 Account Account Settings Read 4 Zone Email Routing Rules¹ Edit 5 Account Workers R2 Storage² Edit ¹ Listed as Email Routing Rules in the Zone permission dropdown.
² Optional. Enables attachment storage. Requires a credit card on your
Cloudflare account (R2 free tier: 10 GB/month). If omitted or unavailable,
AgentBox works normally but skips attachments.Under Account Resources, select Include → your account.
Under Zone Resources, select Include → Specific zone → your domain
(or All zones from an account if you prefer).(Optional) Set a TTL / IP filter, then Continue to summary →
Create Token.Copy the token now — it's shown only once. This is your
CF_API_TOKEN.
What each permission is for
- Workers Scripts → Edit — upload/delete the email worker.
- D1 → Edit — create the
agentboxdatabase, run the schema, and
read/write all data (users, keys, settings, inboxes, mail).- Account Settings → Read — auto-discover your account id from the token.
- Email Routing Rules → Edit — create one routing rule per inbox.
- Workers R2 Storage → Edit (optional) — auto-create the
agentbox-attachmentsR2 bucket and store email attachments. Skipped
gracefully if unavailable.
⚠️
Authentication error(code10000) on setup means the token is
missing a permission — most commonly D1 → Edit. Edit the token (or create
a new one), add the missing row, updateCF_API_TOKEN, and restart.
Setup
1. Environment variables — in .env.local for local dev, or in your
Vercel / CF Pages project settings:
CF_API_TOKEN=<your-cloudflare-api-token>   # provisions infra AND accesses D1 at runtime
AGENTBOX_SECRET=<openssl rand -hex 32>     # signs session JWTs
2. Install & run:
npm install
npm run dev          # http://localhost:3000
# or: npm run build && npm start
3. First-run wizard:
- Open the app → create your admin account (stored in D1, bcrypt-hashed).
- Settings → Add a domain (auto-fetched from your Cloudflare zones).
- Click Provision now — creates the D1 database and deploys the email worker.
- Important: Enable Email Routing manually in the Cloudflare dashboard:
Go to your domain → Email → Email Routing and click Enable Email Routing.
(This is a one-time toggle that Cloudflare API tokens do not have permission to change.) - Done — you can now generate inboxes in the UI, or let agents create them via the API.
Docker
A multi-stage Dockerfile builds a tiny, non-root image from Next.js'
standalone output. All state lives in Cloudflare D1, so the container is
stateless — no volumes needed.
Run the pre-built image:
docker run -d -p 3000:3000 --env-file .env --name agentbox ghcr.io/mastomii/agentbox:0.1.0
Or build and run locally:
# 1. provide env (compose reads .env automatically)
cp .env.example .env        # then fill in CF_API_TOKEN + AGENTBOX_SECRET

# 2. build & run with compose
docker compose up -d --build
# → http://localhost:3000
Or with plain Docker:
docker build -t agentbox .
docker run -d -p 3000:3000 --env-file .env --name agentbox agentbox
Agent API (/v1)
Auth: Authorization: Bearer <api-key> — create keys on the API Keys page.
Keys are shown once, then stored as a SHA-256 hash. Also supports X-Api-Key header.
1. List inboxes
Reuse existing inboxes instead of creating new ones.
curl "https://your-host/v1/inboxes?limit=20&[email protected]" \
  -H "Authorization: Bearer ab_..."
Query params: limit (default 50, max 100), address (exact match filter)
{
  "inboxes": [
    {
      "id": "inbox_abc123",
      "address": "[email protected]",
      "label": "github-signup",
      "created_at": 1234567890,
      "last_message_at": 1234567890
    }
  ]
}
2. Create inbox
Generate a fresh inbox (only if needed).
curl -X POST https://your-host/v1/inboxes \
  -H "Authorization: Bearer ab_..." \
  -H "Content-Type: application/json" \
  -d '{"label":"github-signup", "local":"swift-fox"}'
Body params (optional): label (string), local (custom username prefix; if omitted, randomized)
{ "id": "inbox_abc123", "address": "[email protected]" }
3. Long-poll for messages
Poll messages by inbox id (waits up to 55s for new mail).
curl "https://your-host/v1/inboxes/inbox_abc123/messages?wait=30" \
  -H "Authorization: Bearer ab_..."
Query params: wait (seconds, max 55; long polling), since (ms timestamp), limit (default 100, max 100)
{
  "id": "inbox_abc123",
  "address": "[email protected]",
  "count": 1,
  "messages": [
    {
      "id": "msg_xyz789",
      "from": "[email protected]",
      "fromName": "Sender",
      "to": "[email protected]",
      "subject": "Hello",
      "text": "Body text",
      "receivedAt": 1234567890
    }
  ]
}
4. Read a full message
Returns subject, text, html, and attachments.
curl https://your-host/v1/messages/msg_xyz789 \
  -H "Authorization: Bearer ab_..."
{
  "message": {
    "id": "msg_xyz789",
    "from": "[email protected]",
    "fromName": "Sender",
    "to": "[email protected]",
    "subject": "Hello",
    "text": "Body text",
    "html": "<p>Body text</p>",
    "receivedAt": 1234567890,
    "attachments": [
      {
        "id": "att_abc",
        "filename": "invoice.pdf",
        "contentType": "application/pdf",
        "size": 54321
      }
    ]
  }
}
5. Mark messages as read
curl -X POST https://your-host/v1/messages/seen \
  -H "Authorization: Bearer ab_..." \
  -H "Content-Type: application/json" \
  -d '{"ids":["msg_xyz789"]}'
{ "ok": true, "count": 1 }
6. Delete a message
Idempotent.
curl -X DELETE https://your-host/v1/messages/msg_xyz789 \
  -H "Authorization: Bearer ab_..."
{ "ok": true, "id": "msg_xyz789" }
7. Download attachment
Requires R2. Streams raw bytes, not JSON.
curl https://your-host/v1/messages/msg_xyz789/attachments/att_abc \
  -H "Authorization: Bearer ab_..." -o invoice.pdf
8. Delete inbox
Removes Cloudflare routing rule & deletes all stored messages.
curl -X DELETE https://your-host/v1/inboxes/inbox_abc123 \
  -H "Authorization: Bearer ab_..."
{ "ok": true, "id": "inbox_abc123" }
MCP server
For MCP-native agents, AgentBox exposes the same operations as the /v1 API
as MCP tools over a single Streamable-HTTP endpoint:
POST https://your-host/mcp
Auth is identical to the REST API — the same Authorization: Bearer <api-key>
(or X-Api-Key) header you create on the API Keys page.
Tools (1:1 with the REST endpoints):
| Tool | Equivalent endpoint |
|---|---|
list_inboxes |
GET /v1/inboxes |
create_inbox |
POST /v1/inboxes |
delete_inbox |
DELETE /v1/inboxes/{id} |
list_messages |
GET /v1/inboxes/{id}/messages (incl. wait long-poll) |
get_message |
GET /v1/messages/{mid} |
delete_message |
DELETE /v1/messages/{mid} |
mark_seen |
POST /v1/messages/seen |
get_attachment¹ |
GET /v1/messages/{mid}/attachments/{aid} |
¹ Only advertised in tools/list when R2 attachment storage is enabled. Returns
metadata plus a download URL (fetch it with your API key) rather than raw bytes.
Add it to an MCP client:
{
  "mcpServers": {
    "agentbox": {
      "url": "https://your-host/mcp",
      "headers": { "Authorization": "Bearer ab_..." }
    }
  }
}
Or call it directly over JSON-RPC:
curl -X POST https://your-host/mcp \
  -H "Authorization: Bearer ab_..." \
  -H "Content-Type: application/json" \
  -d '{"jsonrpc":"2.0","id":1,"method":"tools/call",
       "params":{"name":"create_inbox","arguments":{"label":"signup"}}}'
Cleanup / factory reset
Settings → Clean up everything (type-to-confirm CLEANUP) tears down
everything AgentBox created on Cloudflare:
- Deletes every per-address Email Routing rule it created.
- Deletes the email worker.
- Deletes the R2 bucket (
agentbox-attachments) and all stored attachments. - Deletes the D1 database — which wipes all stored data (users, keys,
settings, inboxes, mail).
You're signed out automatically and returned to the setup wizard. CF_API_TOKEN
stays in your environment, so you can re-provision from scratch immediately.
⚠️ This is irreversible. There is no separate backup — D1 is the single
source of truth.
Notes & limits
- D1 free tier: 5 GB storage, 5M row reads/day, 100k row writes/day — far
more headroom than agent-style inboxes need. New mail is visible within
seconds. - Max inboxes: Cloudflare Email Routing allows ~200 rules per domain, so
up to ~200 active inboxes per domain. Agents can reuse existing inboxes or
create new ones; delete unused inboxes to free up slots. - Polling: The dashboard polls every 30s (messages) / 60s (inbox list),
pausing when the tab is hidden — gentle on D1 quotas. - Retention: unlimited — messages stay until you delete them (or the inbox).
- Receive-only: sending/replying is not included (would require
MailChannels / Resend / SMTP). AgentBox is the control plane + reader. - Login rate limiting: 5 attempts per IP per minute (in-process sliding window).
License
MIT — see LICENSE.
Yorumlar (0)
Yorum birakmak icin giris yap.
Yorum birakSonuc bulunamadi