MindFlock
Health Uyari
- License — License: Apache-2.0
- Description — Repository has a description
- Active repo — Last push 0 days ago
- Low visibility — Only 5 GitHub stars
Code Gecti
- Code scan — Scanned 12 files during light audit, no dangerous patterns found
Permissions Gecti
- Permissions — No dangerous permissions requested
Bu listing icin henuz AI raporu yok.
MindFlock turns your ticket queue into a queue of pull requests — work assigned to you in Jira, Linear, GitHub Issues, Shortcut or Asana becomes an isolated AI coding session, seeded and already running. You review the diff and merge.
🐦⬛ MindFlock
MindFlock turns your ticket queue into a queue of pull requests.




-lightgrey)

What is it? •
What it looks like in use •
How is this different? •
Quick Start •
Download •
How It Works •
Documentation
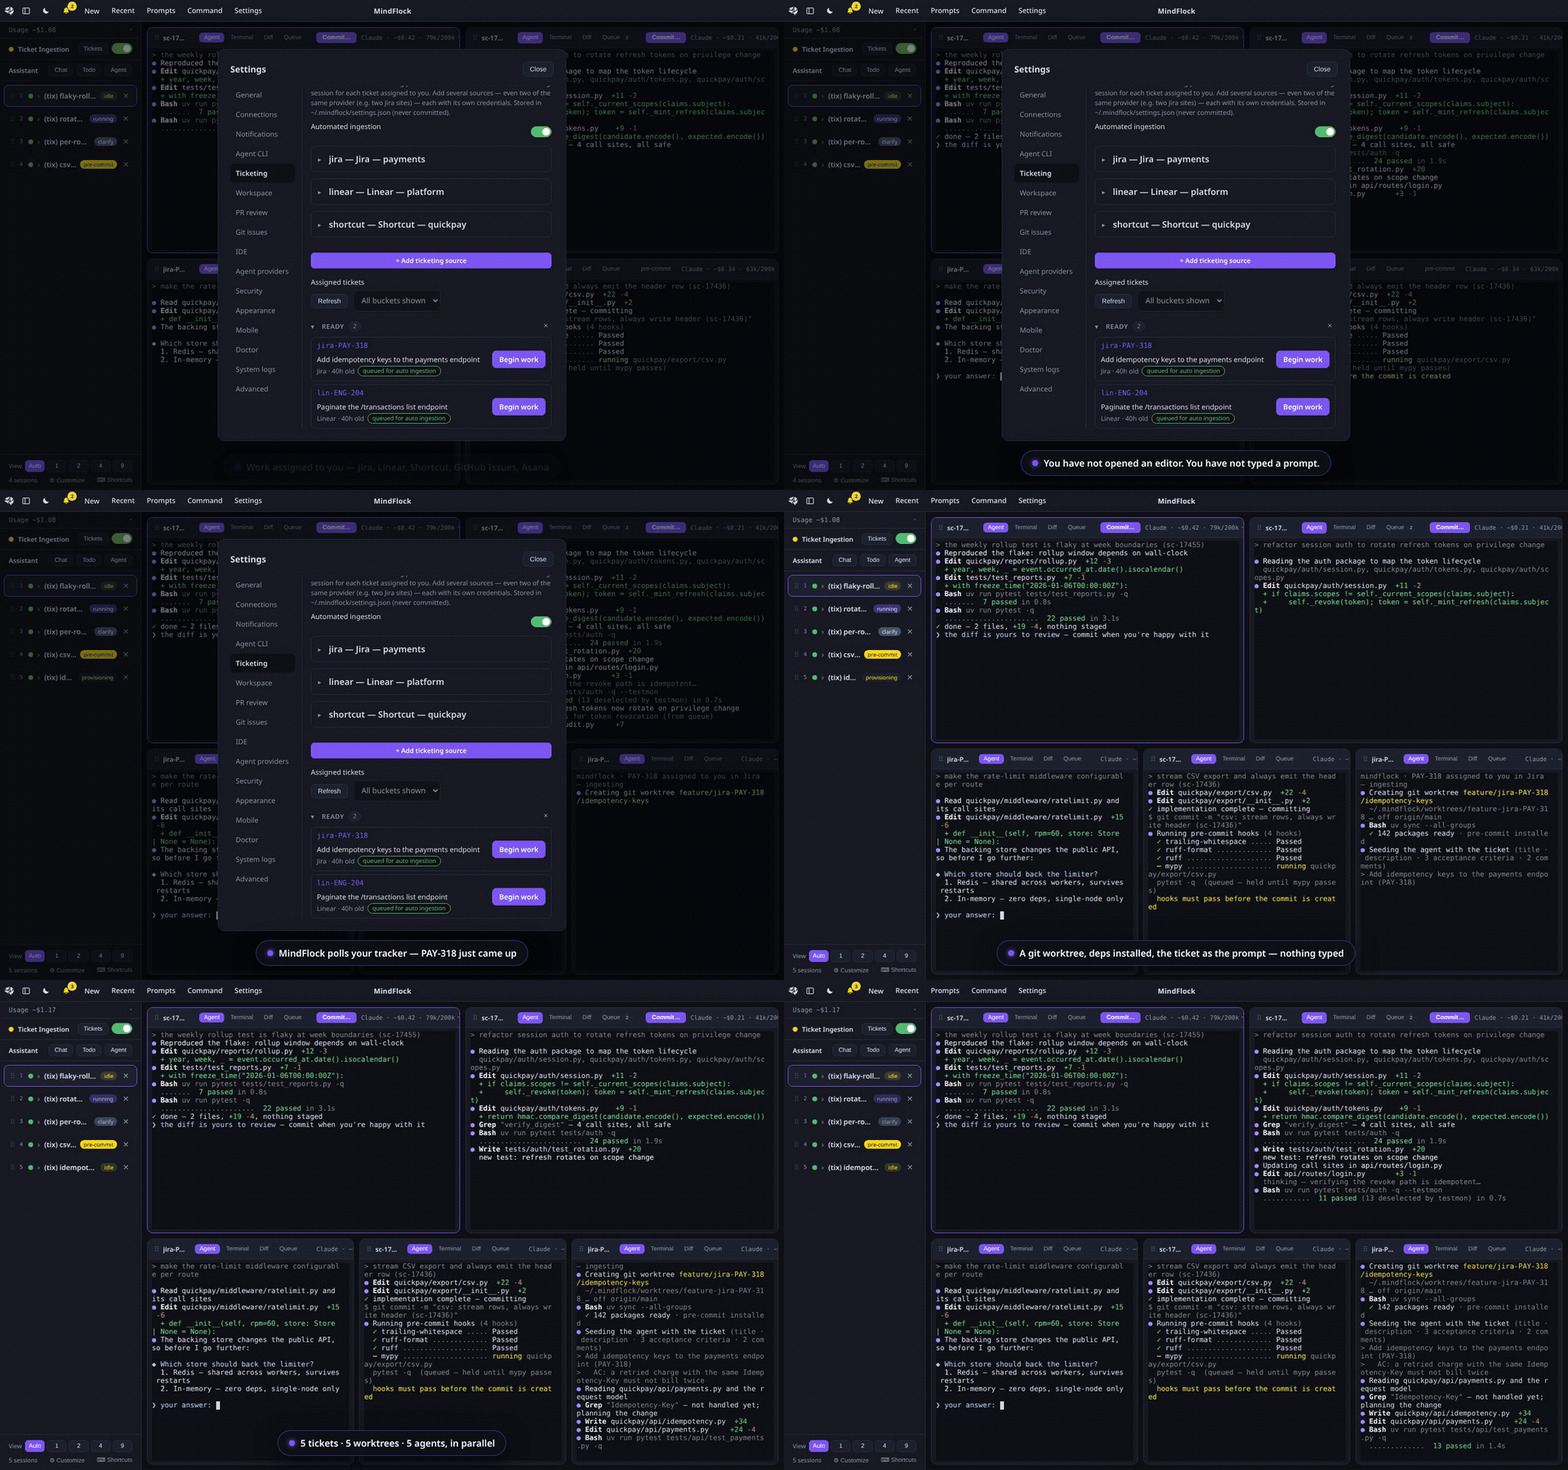
A Jira issue assigned to you becomes its own git worktree, installed
environment and seeded agent — with nothing typed — next to four other sessions
that arrived the same way. A recording of the shipped app; the tickets, repo,
diffs and terminal output are sample data.
What is MindFlock?
Work assigned to you in Jira, Linear, GitHub Issues, Shortcut, or Asana
becomes an isolated AI coding session: its own git worktree on its ownfeature/<ticket>/<slug> branch, dependencies installed, and an agent already
seeded with the ticket's title, description, acceptance criteria and comments.
Nothing typed.
Two caveats worth knowing before you read further: dependency install is
auto-detected for Python/uv repos (uv sync --all-groups, pre-commit install)
and every other stack declares its own setup_commands; and provisioned
sessions — the ones ingestion creates — launch Claude Code. Any agent CLI can
drive sessions you start yourself.
You come in at the end that needs a human: read the diff, then drive it home
with one click each — commit (in your terminal, so you watch the hooks), push,gh pr create, merge. Pull requests that come back with review comments become
sessions the same way, on the PR's own branch, with every unresolved inline
review comment in the prompt (outdated threads and top-level PR conversation are
skipped).
Parallel orchestration, worktree isolation and tmux are how it works — see
How It Works. The point is that the work arrives on its own and
leaves as a pull request.
What is not automatic — because a pipeline you can't trust is worse than
none. MindFlock never commits, pushes, opens or merges a PR by itself: every one
of those is your click, you write the commit message, and gh pr create --fill
takes the PR text from your commits. It never writes to your tracker — no
comments, no status transitions. It polls (every 20 s) rather than listening for
webhooks, works one ticket at a time, and only picks up review comments on your
own PRs.
What it looks like in use
Numbers from the author's own use, not a benchmark. Three different things, kept
apart on purpose, because the interesting one is the smallest.
What MindFlock itself has run — 38 days, 2026-06-22 → 2026-07-29, on one
private production repo:
| Tickets provisioned into sessions with nothing typed | 38 |
| Median time from provisioning to a merged pull request | 22 hours |
| Own pull requests triaged for review comments | 42 — the ones with nothing actionable were skipped automatically; the rest came back as sessions |
| Agent CLIs the pipeline drove | 2 (claude, ccc) — of 5 driven on this machine overall |
The ticket figure counts distinct tickets: the pipeline's dedup state holds
47 records, of which 7 were throwaway test tickets and 2 were re-runs of the same
ticket. Log rotation means the PR-session count is a floor, not a ceiling.
The workload it was built to serve — the author's day job. This predates
MindFlock by two years and is not a claim about it:
| Tickets closed in the last 12 months | 626 (~52/month) |
| Merged pull requests authored in that repo since June 2024 | 2,232 |
| Merged PRs in the last 99 days | 230 (~2.3/day) |
Agent volume on this machine — 13.5 B tokens over 46 logged days
(~294 M/day), as of 2026-07-29. A large share of that is MindFlock building
MindFlock, so read it as "what supervising this many agents costs", not as
day-job output.
MindFlock has been built and used daily since May 2026; it has been running
ticket → agent → pull request in production since 22 June. It did not make the
ticket throughput go up — that was already high. It changed who does the typing.
How is this different?
Every tool below is a good way to start an AI coding session. The difference
is that in MindFlock you don't start them — your tracker does.
| MindFlock | Claude Squad | Conductor | Claude Code Agent Teams | |
|---|---|---|---|---|
| Ticket → session, automatically | Jira · Linear · GitHub Issues · Shortcut · Asana | — | — | — |
| Reviewed PR → session, automatically | unresolved inline review comments become the prompt | — | — | — |
| Git workflow | one-click commit → push → PR → merge (gh) |
commit + push branch | per-task diff + review | manual (agent runs git) |
| Agent CLIs | Any — declared in a TOML file | Several, bundled (Claude Code, Codex, Gemini, aider, OpenCode) | Claude Code, Codex, Cursor, OpenCode | Claude only |
| Session isolation | git worktree + tmux | git worktree + tmux | git worktree | git worktree |
| Agent-state detection | deterministic — provider-defined hooks (working / idle / needs-input) | inferred from the tmux pane | built-in, per supported agent | Claude-native |
| Interface | Cross-platform desktop app + phone UI | Terminal TUI | Native macOS app | Built into the CLI |
| Platforms | Linux, macOS, Windows (WSL2) | macOS, Linux | macOS only | Anywhere Claude Code runs |
| Remote / phone control | tailnet + QR, full action bar | — | — | — |
Comparison as of July 2026; these tools move fast. If a cell is out of date, please open an issue or PR and we'll correct it.
The top two rows are the ones that matter. Everything else is a feature race;
those two change what your day looks like:
- Work comes to the agents. MindFlock polls your tracker for tickets
assigned to you and GitHub for your PRs that came back with review comments,
then provisions a worktree and launches a seeded agent for each. The ticket's
acceptance criteria are mined out of its markdown and handed to the agent; a
ticket is never worked twice. - The whole git loop is guided. Every session carries a one-click
commit → push → PR → merge action bar (viagh) and live workflow-stage
badges, so you drive the change home without leaving the app. - Provider-agnostic by design. A coding agent in MindFlock is just a TOML
file — binary, launch args, prompt seeding, activity-detection hooks, model
pricing — so it drives any CLI (Claude Code, Codex, Antigravity, aider,
OpenCode, Cline, Goose, or one nobody's heard of) with the same working / idle /
needs-input detection and token + cost tracking. Adding an agent is a config
change, not a patch. - Supervise from anywhere.
mindflock serve tailscaleprints a QR code;
the mobile UI carries the same guided action bar, so you can unblock an agent
from your phone.
When another tool may fit better:
- Conductor is a native macOS (SwiftUI)
app — if you're Mac-only and specifically want a native client, it's a solid
pick. - Claude Code's built-in Agent Teams + worktrees are free and already
installed. If you only ever use Claude and live in the terminal, you may not
need a separate app. - Claude Squad is a mature
multi-agent TUI that also drives several CLIs. If you'd rather stay in the
terminal than run a desktop app, it's the closer fit.
Features
- 🎫 Ticket & PR-review ingestion — polls Jira, Linear, GitHub Issues,
Shortcut or Asana (several sources at once, including two of the same
provider) for work assigned to you, and GitHub for your PRs that came back
with review comments. Each one gets a worktree, an installed environment and
an agent seeded with the ticket — title, description, mined acceptance
criteria, comments. Read-only against your tracker: it never comments or
moves a ticket's status. - 🔀 Guided git workflow — one-click commit → push → PR → merge, driven by
theghCLI, with live workflow-stage badges
(provisioning → agent → pre-commit → committed → pushed → PR open). The
commit runs in the session's own terminal, so you watch the hooks. - 🔌 Provider-agnostic — every coding-agent CLI is just a TOML file (Claude
Code, Codex, Antigravity, aider, OpenCode, Cline and Goose bundled; add your
own — though sessions that ingestion provisions launch Claude Code). Shared
hook-based activity detection (working / idle / needs-input) and token & cost
tracking apply to all of them. - 🖥️ Desktop app (Electron) — a draggable terminal grid with Agent /
Terminal / Diff / Queue tabs per session, workflow-stage badges, and guided
next-step buttons, in a window that follows each OS's own chrome conventions
(native traffic lights on macOS, frameless with our own – □ ✕ elsewhere). - 📱 Phone UI —
mindflock serve tailscaleprints a QR code; the mobile
UI at/mcarries the same guided git action bar, so the full flow drives
from a phone. Auth-token protected — never open to the LAN unauthenticated. - 🌳 Isolated workspaces — every session gets its own git worktree, so
agents never step on each other (or on you). - ⚡ Terminal-first, too — the
mindflockCLI drives the same sessions as
the app (new,ls,attach,rm,open,events), so terminal and UI
stay one system. - 🧩 Extensible — shell hooks on every session event, a
WS /api/events
stream, and in-process Python + ES-module addons.
Quick Start
Install first — one command — then pick the half you came for.
The point: let your tracker start the sessions
On a fresh install you connect a tracker in the desktop app under Settings →
Ticketing — a token, plus the repo that source's tickets should land in — and
flip the Ticket Ingestion switch, which sits in the sidebar by default. From
then on MindFlock polls for tickets assigned to you and turns each one into a
real session: an isolated git worktree on its own feature/… branch with the
agent already seeded with the ticket, appearing in the session grid within
seconds, carrying its stage badge and the guided
commit → push → PR → merge bar.
There is nothing else to install or configure — no config file, no extra
service, and it behaves the same headless. The switch is the on/off control and
it remembers across restarts, so ingestion is never a surprise. It polls rather
than listening for webhooks, so expect a ticket to take up to ~20 s to show up.
Review sessions additionally leave a pull request alone until the PR itself is at
least 15 minutes old — a branch you just pushed doesn't get jumped on.
Prefer a file to a dialog? config.toml.example is the
headless equivalent, and python -m backend.ticket_ingestion runs the pipeline
standalone — see docs/ingestion-pipeline.md.
Or start one by hand
From zero to a supervised agent session (this CLI flow is verified in CI on
every push byscripts/quickstart-verify.sh):
mindflock doctor                       # 1. everything installed + authenticated?
cd ~/code/your-repo                    # 2. the repo you want the agents to work on
mindflock serve                        # 3. start the server (the app can also do this for you)
mindflock new . -p "fix the failing tests"   # 4. (new terminal) spawn a session
mindflock ls                           # 5. watch it: TITLE REPO STATUS ACTIVITY STAGE DIFF COST
Open the MindFlock desktop app — the session is a live terminal; each one
is an isolated git worktree, with Diff view and guided
commit → push → PR → merge buttons. mindflock attach <title> drops your
terminal into the same tmux session.
mindflock serve binds localhost only; run mindflock serve tailscale to opt
into phone/tailnet access — an auth token + QR code are printed, and scanning
the QR opens the phone UI at /m.
Download
-0078D6?style=for-the-badge&logo=windows&logoColor=white)


Each button downloads the newest release · all versions, checksums, and the Python wheel
| What you get | Anything else? | |
|---|---|---|
| Windows | MindFlock-Setup.exe — the app and the engine (which runs inside WSL2). |
Set up WSL2 first — see the note below. With a working WSL2 distro in place, the installer does the rest. |
| macOS | MindFlock.dmg (universal — Apple silicon & Intel). Drag to Applications. |
Nothing. First launch offers Install the engine — one click, no terminal. |
| Linux | MindFlock.AppImage. chmod +x it and run. |
Same — first launch installs the engine for you. |
The app auto-starts the engine every time after that — no terminal, no manual
steps. If the engine is missing, the app's waiting page says so and shows the
exact command.
The engine runs inside WSL2, so a Linux distribution must be fully installed
and launchable first — not just wsl --install half-run. In PowerShell:
wsl --install     # if WSL isn't set up yet — then REBOOT your PC
wsl -l -v         # verify a distro (e.g. Ubuntu) is listed
wsl               # verify this drops you into a Linux shell (first run asks you to create a user), then type: exit
Only once wsl opens a Linux shell should you run MindFlock-Setup.exe. A
partially set-up WSL — installed but with no distro, or with a reboot still
pending — is the single most common Windows install failure.
MindFlock has no Apple Developer ID or Windows Authenticode certificate (both
are paid, per-year subscriptions). The macOS build is signed, but with a
free self-signed certificate — enough to keep macOS from re-asking for folder
permission on every launch, not enough to satisfy Gatekeeper. So on first
launch:
macOS — "Apple could not verify MindFlock is free of malware."
That dialog has no Open button, and the old Control-click → Open
shortcut was removed in macOS Sequoia. To open it anyway (you only do this
once):
- Drag MindFlock into your Applications folder and try to open it. The
warning appears — click Done to dismiss it. - Open the menu → System Settings… → Privacy & Security.
- Scroll down to the Security section. You'll see a line like
"MindFlock was blocked to protect your Mac." with an Open Anyway
button next to it. Click it. - Confirm with Open Anyway again and authenticate with Touch ID or your
password. MindFlock launches, and macOS remembers the choice — you won't be
asked again.
Prefer the terminal? This does the same thing in one line:
xattr -dr com.apple.quarantine /Applications/MindFlock.app
The first time MindFlock reads a folder under Documents, Desktop,
Downloads, or an external drive, macOS asks "MindFlock would like to access
files…" — click Allow. Because the app is signed, that grant sticks; it
won't ask again for that folder.
- Windows — SmartScreen's "Windows protected your PC". Click More
info → Run anyway. - Linux — no prompt; AppImages aren't signed by convention.
Every release ships a .sha256 beside each installer (and SHA256SUMS for
the Python artifacts), and the builds are produced in public by
the Release workflow straight from the tag —
so you can check both the bytes and what produced them.
Installation
Most people want the download buttons above. This section is the
same thing spelled out, plus every other way in.
Two pieces: the server/CLI (runs the engine) and the desktop app
(the one client, Electron — electron/README.md). On
Windows the .exe installs both; elsewhere it's two commands.
1. Server + CLI
On Linux, macOS, or inside WSL on Windows (the Windows installer runs this for
you, inside your default distro):
curl -LsSf https://raw.githubusercontent.com/MindFlock/MindFlock/main/install.sh | sh
No repo clone, no Python setup needed — the installer brings
uv (no root), installs the mindflock command,
and finishes with mindflock doctor so anything still missing (git, tmux,claude) is listed with the exact install command for your platform.
Prefer your own tooling? (uv / pipx / from source)Note on
curl | sh: it isn't a blind one — the uv installer it fetches
is version-pinned and sha256-verified before it runs, and the requested
branch/tag is resolved to a full commit SHA that is printed and pinned for
the install, an audit trail for what actually ran. Threat model and
disclosure contact: SECURITY.md.
# uv
uv tool install "mindflock[web] @ git+https://github.com/MindFlock/MindFlock"

# pipx
pipx install "mindflock[web] @ git+https://github.com/MindFlock/MindFlock"

# from a clone (contributors)
git clone https://github.com/MindFlock/MindFlock
cd MindFlock
uv sync --group web
2. Desktop app
Use the download buttons, grab any past build from
Releases, or build it
yourself:
cd electron && npm install && npm run dist
It finds — and auto-starts — the server by itself.
Requirements
| Requirement | Notes |
|---|---|
| OS | Linux, macOS (Apple silicon & Intel), Windows via WSL2 (the app runs natively on Windows; the engine lives in WSL2 — native Windows has no tmux/PTYs) |
git ≥ 2.17, tmux ≥ 2.4 |
On PATH; checked, with versions, by mindflock doctor |
| A coding-agent CLI | claude (Claude Code) by default |
gh (GitHub CLI) |
For the push/PR/merge workflow |
| Optional | cursor (IDE integration), tailscale (phone access) |
How It Works
  Jira · Linear · GitHub Issues · Shortcut · Asana ──┐
  your own PRs that came back with review comments ──┴──►  ingestion pipeline
                                                           poll · filter · dedup
                                                                    │
                                                                    ▼
                                                        ┌───────────────────────┐
                                                        │    session engine     │
                                                        │  git worktree+branch  │
                                                        │  deps · seeded agent  │
                                                        └───────────────────────┘
                                                                    │
             desktop app (Electron) · phone UI at /m  ◄──────────────┤
                          │                     FastAPI (backend.web)
                          ▼
        you read the diff ──►  commit → push → PR → merge   (one click each, gh)
                                                    │
                                                    ▼
                                              pull request
| Component | Package | What it does |
|---|---|---|
| Session engine | backend.session, backend.config, backend.cmd, backend.log |
Instance lifecycle (start/pause/resume/kill), git worktree management, tmux/PTY plumbing, persisted state in ~/.mindflock/. |
| Server + UI | backend.web |
FastAPI server + the UI the desktop app renders: draggable terminal grid, Agent/Terminal/Diff/Queue tabs per session, workflow-stage badges with guided next-step buttons, token/cost usage, IDE integration, phone UI at /m, addon framework. |
| Ingestion pipeline | backend.ticket_ingestion |
Polls your ticketing service (Jira, Linear, GitHub Issues, Shortcut, Asana) for assigned work and GitHub for reviewed PRs; validates, provisions a workspace, and launches a seeded agent session per ticket / per PR. |
| Provider framework | backend.providers |
Pluggable coding-agent CLIs (Claude built in; aider/codex and others bundled; add your own via TOML). Shared hooks-based activity detection, model pricing, and rolling token/cost usage history. |
Something not working? Run mindflock doctor and check
TROUBLESHOOTING.md — it's indexed by the exact error
text the tool prints.
Usage
Running the server
The desktop app auto-starts the server when it isn't running; these commands
are for headless/manual use:
mindflock serve              # localhost only (127.0.0.1) — the default
mindflock serve tailscale    # bind 0.0.0.0: tailnet mobile URL + QR + auth token
mindflock serve --port 9000  # custom port (default 8765)
Run mindflock serve from inside the git repository you want to manage — the
startup banner prints which repo that is (and warns if it's the MindFlock
checkout itself). mindflock doctor (also served at GET /api/doctor) checks
every dependency and prints a platform-appropriate fix for anything missing.
In the app, + New creates a session (worktree + tmux + agent); click a
session to type into its live terminal. The phone UI lives at /m (scan the
startup QR).
Terminal session control
With a server running, the same sessions can be driven straight from any
terminal — the CLI talks to the server's API (auto-discovered on port 8765, or--host/--port / MINDFLOCK_HOST/MINDFLOCK_PORT):
mindflock new                    # session on the current repo (title = basename)
mindflock new ~/code/webapp -p "fix the failing tests"
mindflock ls                     # TITLE REPO STATUS ACTIVITY STAGE DIFF COST (--json for scripts)
mindflock attach webapp          # tmux attach to the agent's terminal (prefix ok; needs a real TTY)
mindflock rm webapp --yes        # end a session, keep its worktree (prompts without --yes)
mindflock open webapp            # open the workspace in the configured IDE
mindflock events --follow        # live event stream (great for hook debugging)
See docs/cli.md for the full command reference.
Ticket-ingestion pipeline
Configure it from the app's ⚙ Settings dialog (Ticketing / Repository /
GitHub sections) — values are saved to ~/.mindflock/settings.json (mode0600, never committed). No file editing needed. Add as many sources as you
like, including two of the same provider (two Jira sites, say), each with its
own credentials and target repo. Then flip the sidebar's Ticket Ingestion
switch; it stays off across restarts until you do, and stays on after.
python -m backend.ticket_ingestion # run from the repo root
For headless/scripted runs you can instead use a config.toml (an optional
advanced override): copy config.toml.example toconfig.toml and fill in your values. Every field resolves throughenv var → ~/.mindflock/settings.json → config.toml → default, so the
Settings UI, an environment variable, or the file all work.
Or toggle it from the web UI sidebar (Ticket Ingestion bar), which runs
it as a managed subprocess and tails its log. The pipeline is a singleton per
directory (.mindflock-pipeline.lock); a second copy exits cleanly.
Extensions & hooks
Every session event (created, status/activity/stage changed, paused, deleted…)
flows through a server-side event bus with three extension seams:
- Shell hooks — drop an executable in
~/.mindflock/hooks/<event>/
(env vars + JSON envelope on stdin — e.g. a desktop notification when an
agent needs input). - WebSocket — subscribe an external tool to the
WS /api/eventsstream. - In-process addons — a Python
Addon+ an ES module the UI loads
generically (the bundled notify addon is the worked example).
See docs/extensions.md for the full guide.
Configuration & state
| Path | Contents |
|---|---|
~/.mindflock/ |
Engine config + session state (config.json, state.json, worktrees/) and settings.json (the web Settings store: API keys, repo/ticketing config, provider + platform settings; mode 0600, never committed) |
~/.mindflock-assistant/ |
Assistant workspace, provider TOMLs, pricing/usage caches, scroll-speed, exit markers |
./config.toml |
Optional advanced override for the pipeline + workspace provisioning (gitignored; superseded by settings.json / env vars — see config.toml.example) |
./state.json |
Pipeline dedup state (processed stories/PRs; different file from the engine's ~/.mindflock/state.json) |
./workspaces/ |
Provisioned story/PR workspaces, _base_* canonical clones, _testmon_refresher |
./logs/ |
pipeline.log, ticket-ingestion.log |
See docs/configuration.md for the full reference.
Uninstalling
uv tool uninstall mindflock removes the venv and the mindflock shim, but
not the worktrees MindFlock registered inside your repositories, nor the
activity hooks it merged into their .claude/.codex settings — which keep
firing (and keep re-creating ~/.mindflock-assistant) after the engine is
gone. Undo those first:
mindflock uninstall --dry-run   # see exactly what would be removed
mindflock uninstall             # worktrees, hooks, scratch files (keeps settings + history)
mindflock uninstall --purge     # …and delete ~/.mindflock + ~/.mindflock-assistant
uv tool uninstall mindflock     # finally, the engine itself
On macOS the desktop app additionally leaves /Applications/MindFlock.app,~/Library/Application Support/MindFlock, ~/Library/Logs/MindFlock and~/Library/Preferences/ai.mindflock.desktop.plist. Full details in
docs/cli.md.
Documentation
| Doc | Contents |
|---|---|
| docs/architecture.md | System overview, components, data flow, on-disk state map |
| docs/extensions.md | Extension guide: shell hooks, /api/events WebSocket, in-process addons, window.mindflock client API |
| docs/configuration.md | config.toml reference, ~/.mindflock/ + ~/.mindflock-assistant/, environment variables |
| docs/session-engine.md | Instance lifecycle, git worktrees, tmux/PTY, provisioned mode |
| docs/cli.md | mindflock CLI: serve, doctor, uninstall, and terminal session control (new/ls/attach/rm/open/events) |
| docs/web-api.md | Complete HTTP + WebSocket API reference |
| docs/web-ui.md | Frontend guide: grid, tabs, stages, shortcuts, mobile, addons |
| docs/providers.md | Provider framework, adding a CLI via TOML, pricing & usage tracking |
| docs/ingestion-pipeline.md | Story + PR ingestion flows, state, testmon refresher |
| docs/development.md | Dev setup, test suite, project layout, known issues |
Development
git clone https://github.com/MindFlock/MindFlock
cd MindFlock
uv sync --group web --group dev   # web = FastAPI server deps, dev = pytest
uv run mindflock doctor           # checks git/tmux/gh/agent CLI
uv run mindflock serve            # localhost:8765, from a repo you want to manage
Run the test suite (unit + property-based [hypothesis] + integration):
uv run pytest
See docs/development.md for the full test map and
project layout.
Contributing
Contributions are welcome — bug reports, docs fixes, and code alike. Please
read CONTRIBUTING.md first. There's no CLA to sign: just
add a Signed-off-by line to your commits with git commit -s, certifying
you wrote the patch under the
Developer Certificate of Origin.
Project status — solo maintainer. MindFlock is built and maintained by one
person in evenings and weekends. It is offered as-is under Apache-2.0; issues
and pull requests are read and reviewed on a best-effort basis, and there is no
support SLA. Bug reports (withmindflock doctoroutput) and PRs are very
welcome — just expect a hobby-project response time.
If MindFlock is useful to you, a ⭐ helps other people find it.
License
Licensed under the Apache License 2.0 — free and open source.
The MindFlock name and logo are trademarks; a license to the code is not a
license to the marks. See TRADEMARKS.md for the trademark
policy.
Yorumlar (0)
Yorum birakmak icin giris yap.
Yorum birakSonuc bulunamadi