linko
Health Warn
- No license — Repository has no license file
- Description — Repository has a description
- Active repo — Last push 0 days ago
- Low visibility — Only 5 GitHub stars
Code Pass
- Code scan — Scanned 12 files during light audit, no dangerous patterns found
Permissions Pass
- Permissions — No dangerous permissions requested
No AI report is available for this listing yet.
mitm proxy && llm visualization
Linko - Transparent MITM Proxy for LLM Traffic Analysis
![]()
Linko includes a built-in MITM (Man-in-the-Middle) proxy that intercepts HTTPS traffic and decrypts it for analysis. It also supports visualizing LLM API messages.
Note: Linko currently only supports macOS.
Installation
Homebrew (Recommended)
brew tap monsterxx03/tap
brew install linko
Manual
Download the latest release from the Releases page and install manually.
MITM Proxy Working Principle
Linko's MITM proxy works as a transparent proxy (transparent MITM).
Unlike traditional HTTP proxies that require applications to manually configure proxy settings (e.g., http_proxy=127.0.0.1:8080), Linko uses macOS's firewall rules (pfctl) to redirect network traffic at the system level.
How It Works
Traffic Redirection via pfctl: Linko configures macOS's
pffirewall to redirect outgoing HTTPS traffic (port 443) to the local MITM proxy (port 9890). This happens at the kernel level, so applications are unaware their traffic is being intercepted.Certificate Generation: Linko generates a CA certificate that signs on-the-fly certificates for each intercepted domain, enabling decryption of HTTPS traffic.
Transparent Interception: Since the redirection happens at the network layer, no application configuration is needed. All HTTPS traffic from all applications flows through the MITM proxy automatically.
This is called "transparent" because the proxy is invisible to applications—they think they're communicating directly with the remote server.
Step 1: Generate CA Certificate
linko gen-ca
This generates a CA certificate and private key in ~/.config/linko/certs/:
ca.crt- CA certificateca.key- CA private key
Step 2: Trust the CA Certificate
macOS:
# Add to system keychain (requires admin privileges)
sudo security add-trusted-cert -d -r trustRoot -k /Library/Keychains/System.keychain ~/.config/linko/certs/ca.crt
Step 3: Start MITM Proxy
sudo linko mitm
The MITM proxy server starts on port 9890 by default. This command requires sudo because it sets up firewall rules to redirect HTTPS traffic (port 443) through the MITM proxy.
Whitelist (Optional)
By default, MITM intercepts all HTTPS traffic on your system. You can use --whitelist to restrict interception to specific domains only:
sudo linko mitm --whitelist "api.anthropic.com,api.minimaxi.com"
Supported whitelist formats:
- Exact match:
api.anthropic.com - Wildcard:
*.anthropic.com(matches any subdomain)
Traffic to domains not in the whitelist will pass through without interception.
Step 4: Access Admin Interface
Open your browser and navigate to:
http://localhost:9810
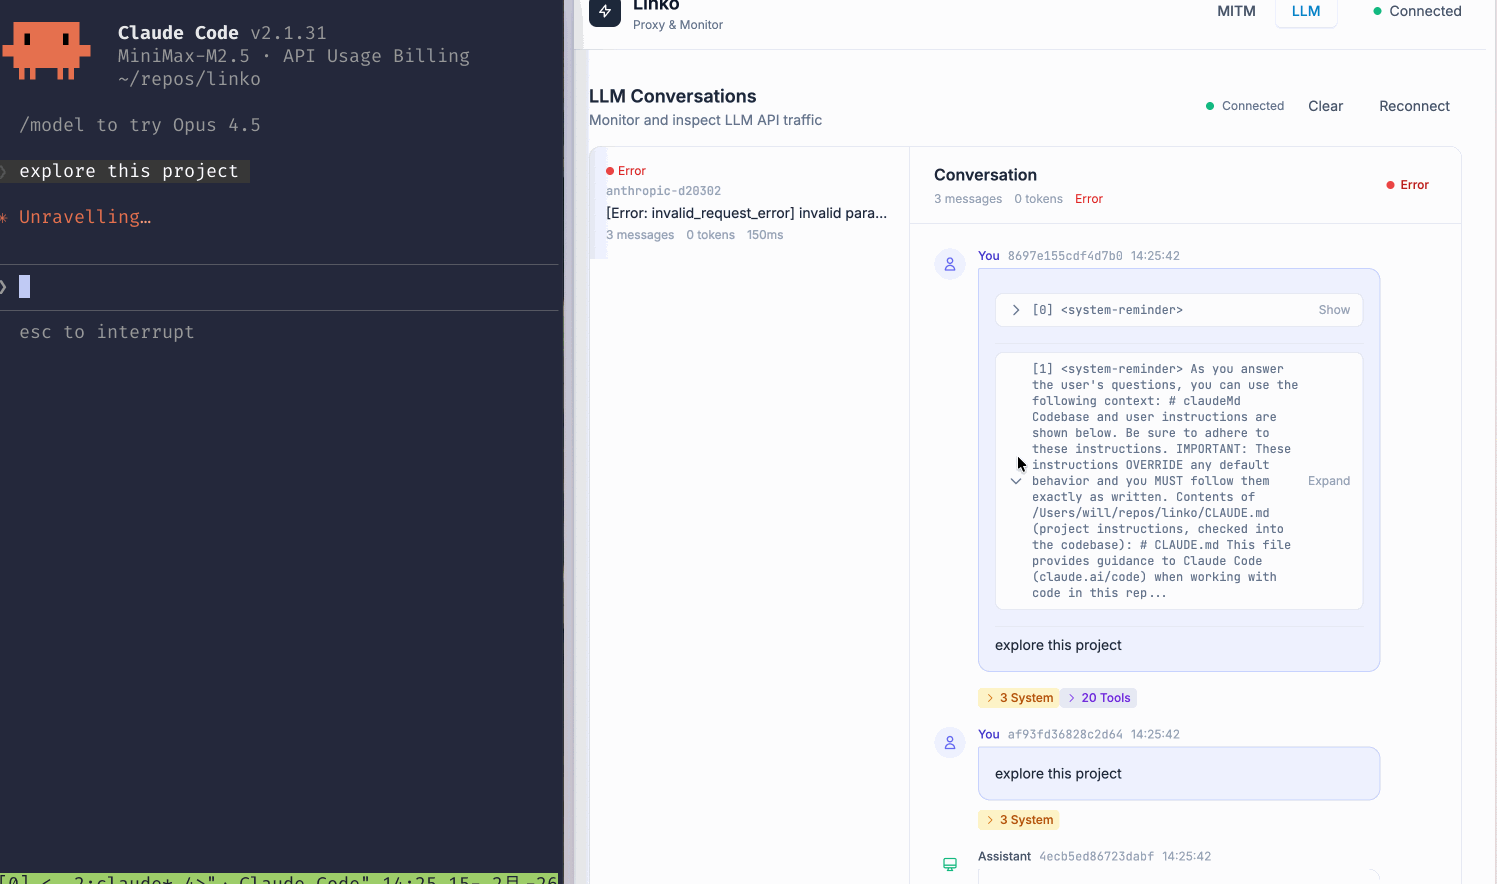
Go to the MITM Traffic page to view intercepted HTTPS traffic in real-time.
Testing MITM Proxy with curl
Verify that MITM is working by checking the certificate:
curl -v https://api.anthropic.com
In the output, you should see the certificate is issued by Linko CA:
SSL certificate chain:
 0. s:CN=api.anthropic.com
   i:C=US O=Linko MITM CA
If you see a certificate chain starting with "Linko MITM CA", the traffic is being intercepted successfully.
Using with Claude Code
If you want to inspect Claude Code's HTTPS traffic through MITM, you need to disable TLS certificate verification due to self-signed CA:
NODE_TLS_REJECT_UNAUTHORIZED=0 claude
This allows Claude Code to work with the MITM proxy's self-signed certificates.
Using with Gemini CLI
If you want to inspect Gemini CLI's HTTPS traffic through MITM, you need to disable TLS certificate verification:
NODE_TLS_REJECT_UNAUTHORIZED=0 gemini
Using with OpenCLAW
If you want to inspect OpenCLAW's HTTPS traffic through MITM, add the following to ~/Library/LaunchAgents/ai.openclaw.gateway.plist in the EnvironmentVariables dict, then restart the gateway:
<key>EnvironmentVariables</key>
<dict>
    <key>NODE_TLS_REJECT_UNAUTHORIZED</key>
    <string>0</string>
</dict>
launchctl stop ai.openclaw.gateway && launchctl start ai.openclaw.gateway
LLM Message Visualization
Linko can parse and display LLM API requests and responses.
Custom LLM Provider Matching
By default, Linko automatically detects requests to known LLM providers. You can use --anthropic-match and --openai-match to add custom API endpoints:
sudo linko mitm --anthropic-match "api.example.com/v1/messages" --openai-match "api.myai.com/v1/chat/completions"
Multiple patterns can be separated by commas:
sudo linko mitm --anthropic-match "api.example.com/v1/messages,api2.example.com/v1/anthropic"
Pattern format: hostname/path - requests matching the hostname and path prefix will be parsed as the corresponding LLM API type.
When you make requests to supported LLM providers through the MITM proxy, the admin interface will display:
- Conversation ID
- Model name
- Messages (user/assistant/system)
- Tool calls
- Streaming deltas
Supported LLM APIs
| Provider | API | Supported |
|---|---|---|
| Anthropic | Messages API | Yes |
| OpenAI | Chat Completions API | Yes |
| OpenAI | Responses API | Not yet |
| Google Gemini | Generate Content API | Yes |
| Google Gemini | Cloud Code API | Yes |
For OpenAI-compatible APIs (e.g., OpenAI, Azure OpenAI, Ollama, DeepSeek), Linko supports the /chat/completions endpoint.
TUI Traffic Monitor
Linko includes a real-time terminal-based traffic monitor built with Bubble Tea. It connects to the Admin API via Server-Sent Events (SSE) and displays MITM traffic in a TUI interface.

Start TUI
Make sure MITM proxy is running first, then launch the TUI:
linko tui
By default, it connects to http://localhost:9810/api/mitm/traffic/sse. You can specify a different server with the -s flag:
linko tui -s http://localhost:9810/api/mitm/traffic/sse
Keyboard Shortcuts
| Key | Action |
|---|---|
↑ / ↓ / j / k |
Navigate through traffic list |
Enter |
Expand traffic details |
g / G |
Jump to top / bottom |
/ |
Search/filter traffic |
Tab |
Toggle between Headers and Body view |
u / d |
Page up / down |
c |
Clear all traffic |
d |
Delete selected traffic |
r |
Reconnect to server |
q |
Quit |
Features
- Real-time traffic streaming via SSE
- Auto-reconnect on connection loss
- View request/response headers and body
- Search and filter traffic
- Delete individual traffic entries
- Color-coded status indicators
Command Reference
| Command | Description |
|---|---|
linko gen-ca |
Generate CA certificate for MITM |
sudo linko mitm |
Start MITM proxy, intercepts all HTTPS traffic (requires sudo) |
sudo linko mitm --whitelist "domain1,domain2" |
Start MITM proxy with whitelist (requires sudo) |
linko mitm -h |
Show MITM command help |
linko tui |
Start TUI traffic monitor (requires MITM running) |
Troubleshooting
Certificate not trusted:
- Make sure you've added the CA certificate to your system trust store
- Restart your browser after trusting the certificate
Traffic not showing:
- Ensure MITM proxy is running with sudo
- Check firewall rules are properly configured
Connection errors:
- Some applications use certificate pinning and won't work with MITM
- You may need to disable certificate pinning for specific apps
Reviews (0)
Sign in to leave a review.
Leave a reviewNo results found