contentPipe
Health Warn
- License — License: MIT
- Description — Repository has a description
- Active repo — Last push 0 days ago
- Low visibility — Only 7 GitHub stars
Code Pass
- Code scan — Scanned 12 files during light audit, no dangerous patterns found
Permissions Pass
- Permissions — No dangerous permissions requested
This tool is an AI-powered content pipeline designed for WeChat Official Accounts. It automates the entire content creation lifecycle, from topic scouting and research to writing, image generation, formatting, and publishing.
Security Assessment
The overall risk is rated as Medium. The code scan across 12 files found no dangerous patterns, no hardcoded secrets, and it does not request dangerous system permissions. However, it inherently makes external network requests. It relies on an OpenClaw Gateway to route LLM requests, uses a local FastAPI web server, and supports webhook integrations with platforms like Discord, Feishu, and WeChat. While the code itself appears clean, it manages sensitive external API tokens (like WeChat publisher credentials) and processes user content through third-party AI models.
Quality Assessment
The project is highly active, with its last code push occurring today. It is properly licensed under the standard MIT license, making it legally safe to use and modify. However, community trust and visibility are currently very low. With only 7 GitHub stars, the tool has not yet been widely adopted or battle-tested by a large open-source audience. Additionally, its requirement of an "OpenClaw managed-service plugin" environment means the setup might be complex and documentation might be tailored to a specific niche.
Verdict
Use with caution: the code appears safe and is actively maintained, but its low community adoption and reliance on passing sensitive workflows through external AI gateways warrant additional manual review before processing highly sensitive content.
AI-powered content pipeline for WeChat Official Accounts (微信公众号). Scout → Research → Write → Direct → Format → Publish. Built on OpenClaw.
ContentPipe
AI 图文内容生产流水线:从选题、调研、写作、配图、排版到发布,全流程可视化、可审核、可回退。
ContentPipe 是一个面向公众号 / 图文平台的内容生产系统。它把一篇内容拆成多个清晰节点:
- Scout:选题与切入角度
- Researcher:事实核查与证据包
- Writer:唯一作者人格(成稿生成 + 审核聊天改稿)
- Director:配图规划与视觉风格
- Image Gen:生图
- Formatter:排版与模板适配
- Publisher:发布或导出
每个节点都支持:
- 暂停审核
- 继续对话
- 局部修改
- 重跑当前节点
- 断点续跑
界面截图
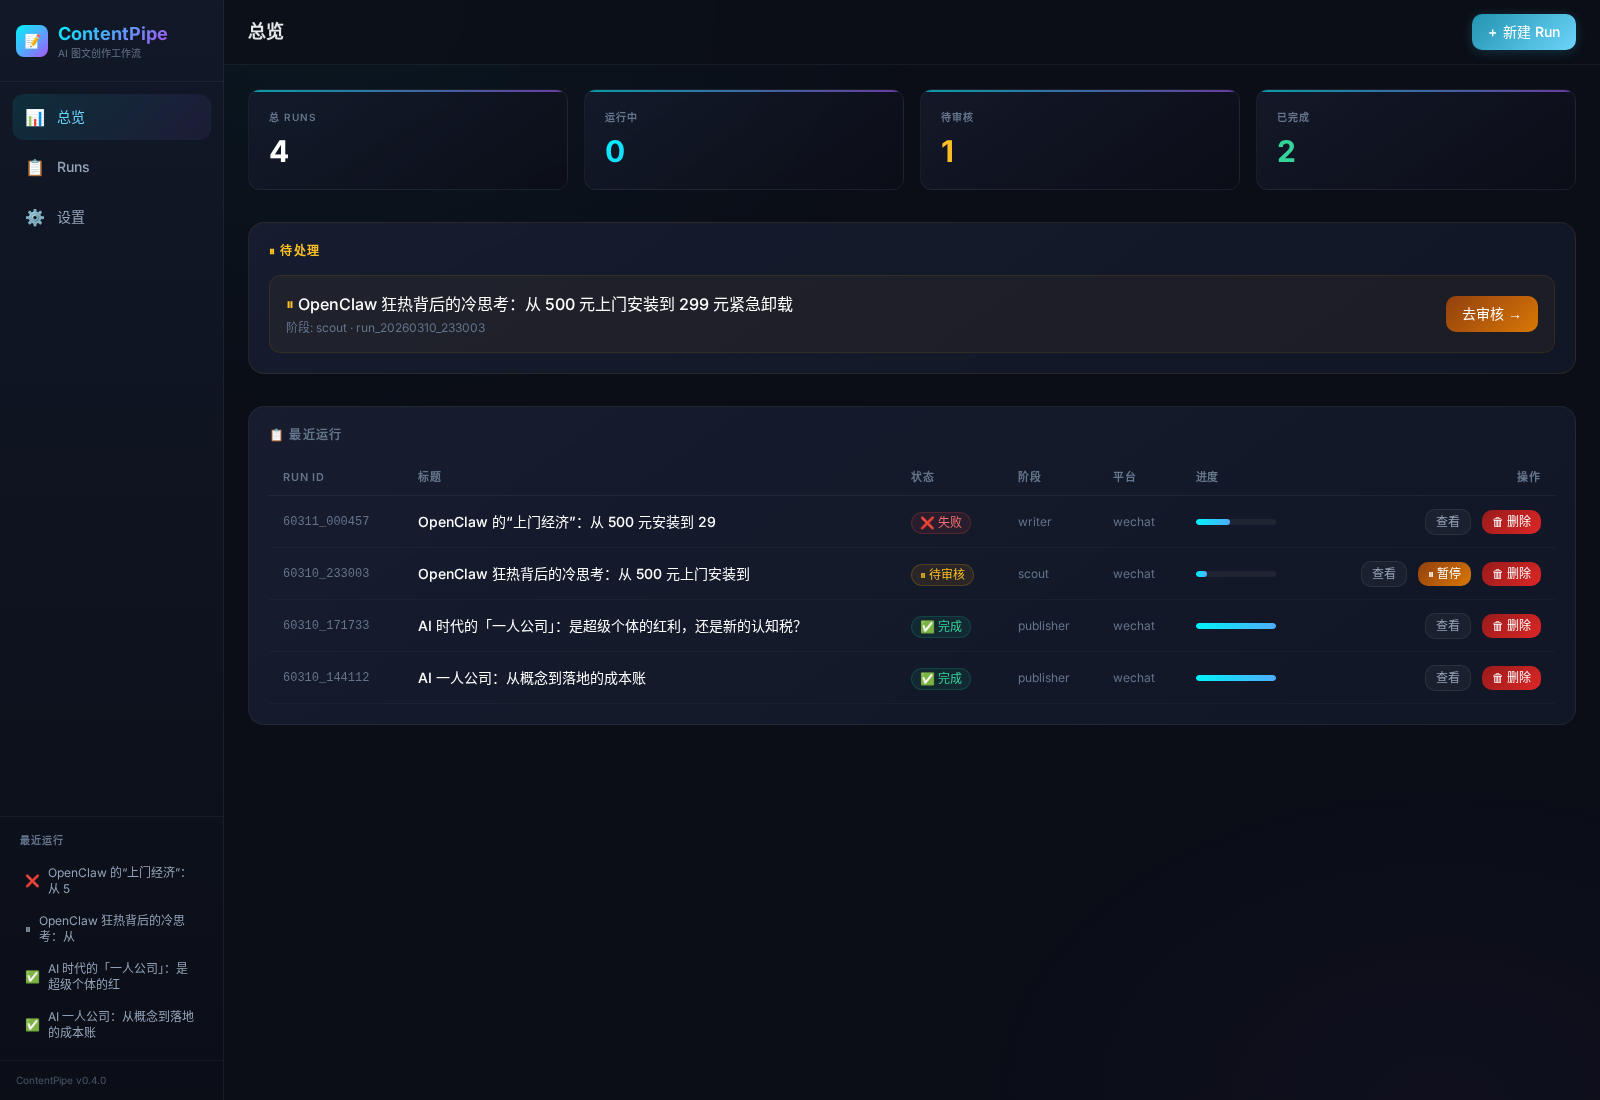
当前 Web 控制台总览页:展示运行统计、待审核任务、最近 runs,以及侧边栏快捷导航。
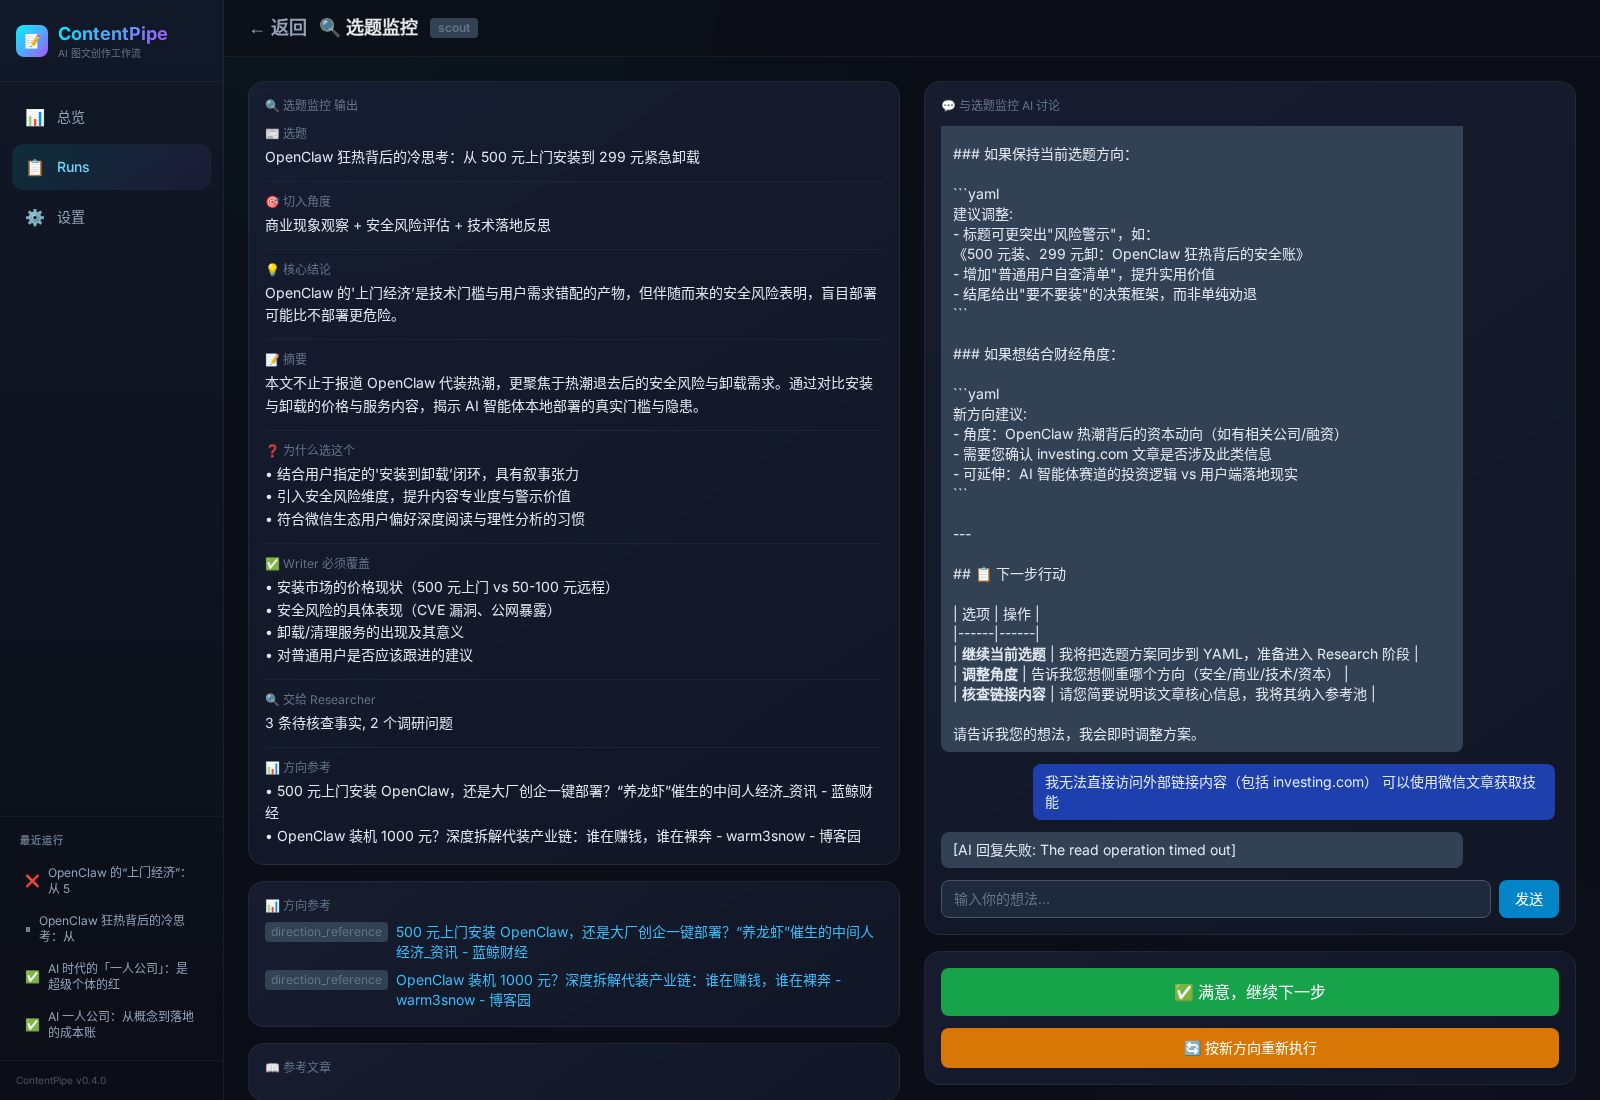
Scout(选题监控)审核页:左侧展示结构化选题结果,中间是节点输出卡片,右侧是与 AI 的交互式讨论区,可直接调整选题、角度、摘要和写作要求。
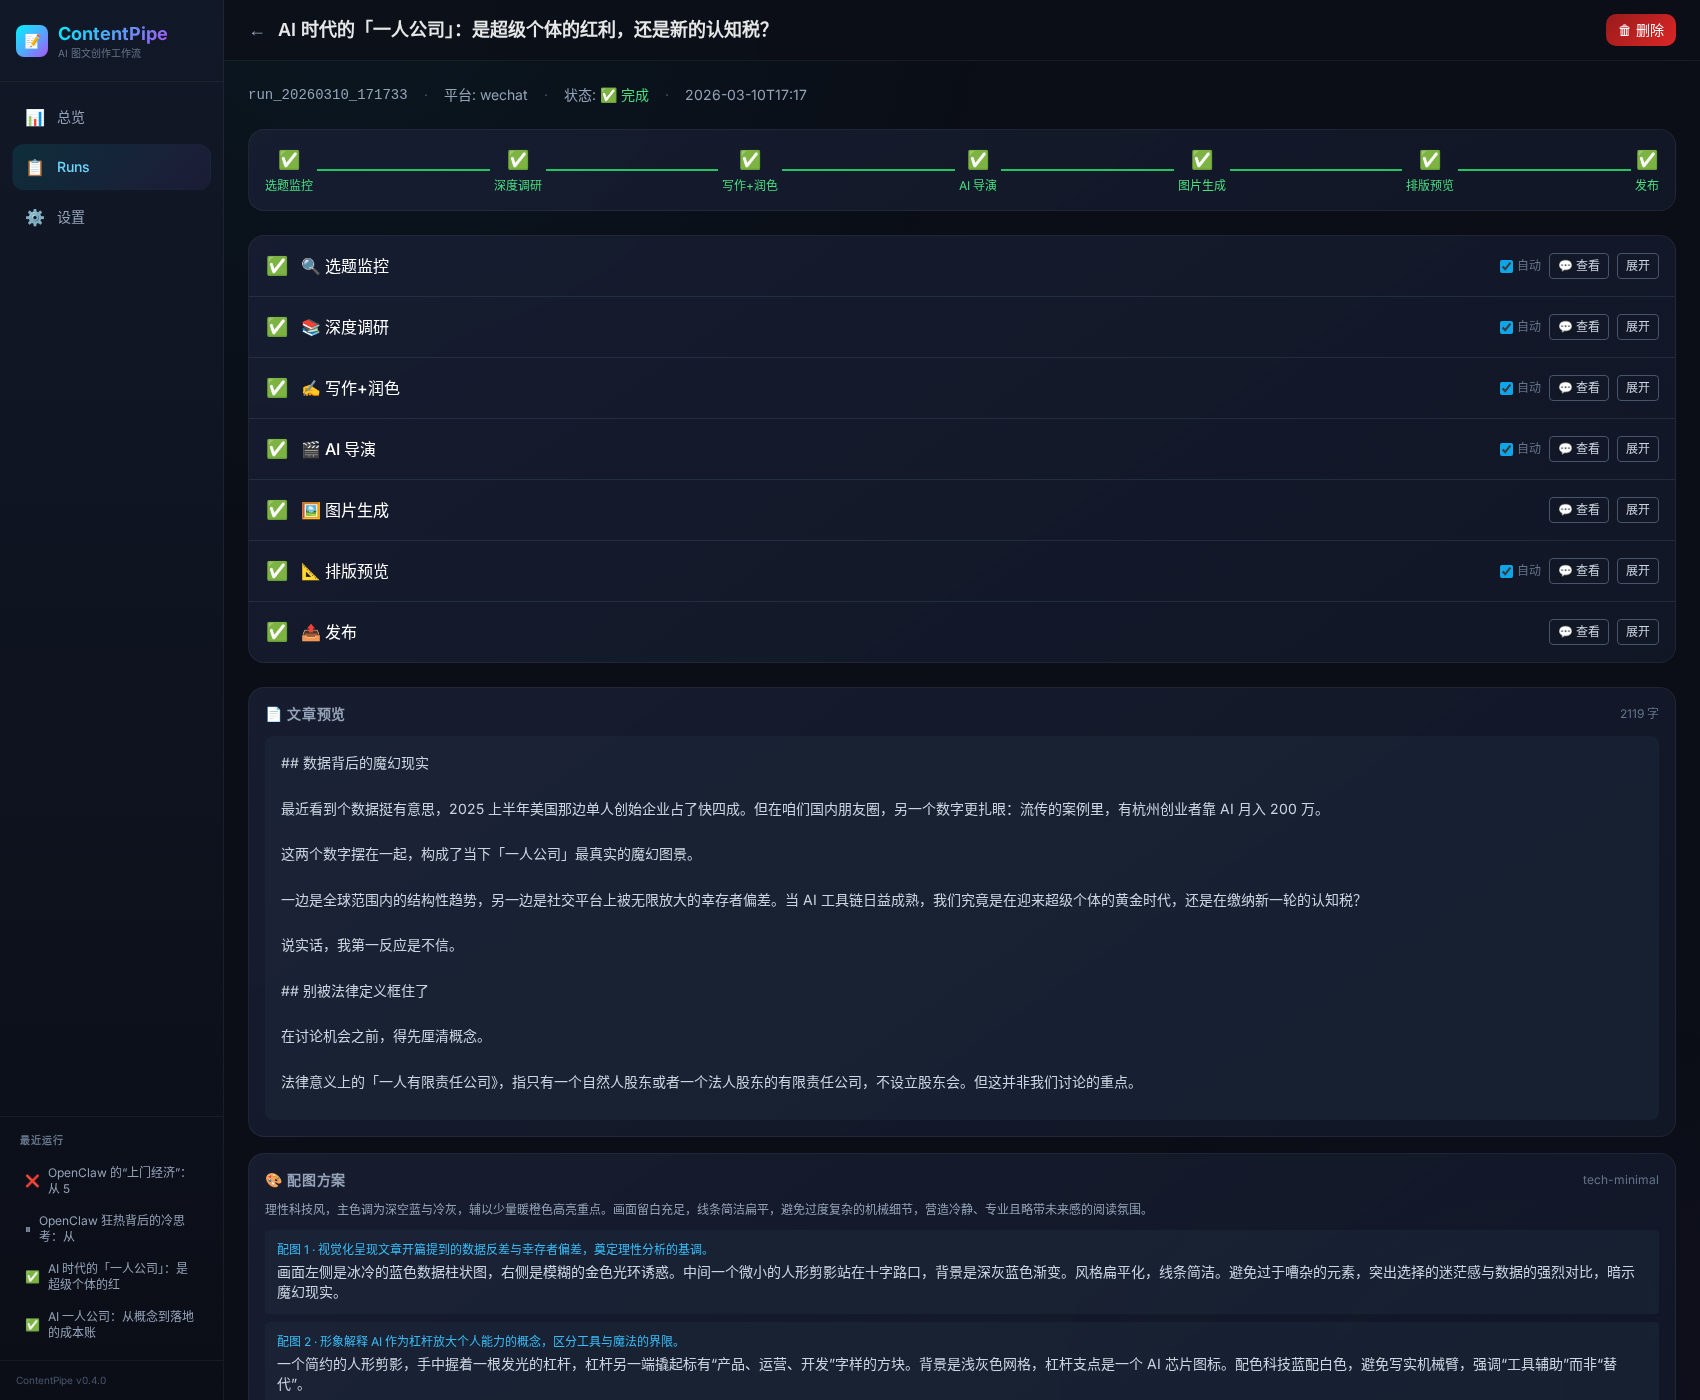
Run 详情页:展示一篇内容从选题监控、深度调研、写作、AI 导演、图片生成、排版预览到发布的完整 7 节点流水线状态,并可查看文章预览与各阶段产物。
1. 当前形态
本仓库当前以 OpenClaw managed-service plugin 方式组织:
- 插件目录:
plugins/content-pipeline/ - Web 服务:FastAPI(默认
http://localhost:8765) - LLM 调用:通过 OpenClaw Gateway
- 多平台通知:支持 Discord / 飞书 / KOOK / 企业微信等所有 OpenClaw 已接入平台,通过
platform:target格式配置
说明:仓库内保留了
SKILL.md,用于让 OpenClaw agent 理解如何调用/管理这个插件服务;核心运行形态是 后台服务 + Web 控制台。
2. 功能概览
2.1 交互式 Pipeline
scout → researcher → writer → director → image_gen → formatter → publisher
| 节点 | 作用 | 是否可审核 |
|---|---|---|
| Scout | 热点扫描、选题提案、切入角度、writer brief | ✅ |
| Researcher | 事实核查、数据点、风险与禁写项 | ✅ |
| Writer | 连续主 session 负责写稿/追问/改稿;fresh 结构 LLM 负责整理正文、反 AI 对抗与正式落盘,Python 做最终提交仲裁 | ✅ |
| Director | 规划配图位置、风格、目的、描述 | ✅ |
| Image Gen | 根据规划生成图片 | ⚙️ |
| Formatter | 将 Markdown 转为平台 HTML,并插图 | ✅ |
| Publisher | 公众号 / 小红书导出或发布 | ⚙️ |
注:微信公众号发布默认目标是草稿箱,不是直接群发。未配置
WECHAT_APPID/WECHAT_SECRET时,Publisher 仅本地保存,不会真正调用微信发布接口。
2.2 关键特性
- Per-node session:每个节点独立会话,执行记录与审核聊天共享上下文
- 逐轮提交仲裁:每个节点在执行/审核/重试后都要经过 Python 读回正式产物,完成最小提交判定、提交并刷新左侧结果
- 图文精确匹配:使用
after_section定位,把图片插入指定段落下方 - 模板适配:支持深色/浅色模板的内联样式输出
- 导向式审核:在 Web UI 中查看节点输出卡片、文章、配图方案、预览
- 图片管理:支持替换、删除指定配图,并同步左侧视觉方案
- 服务化运行:支持健康检查、启动脚本、systemd 开机自启、多平台通知
3. 架构
3.1 总体结构
OpenClaw Gateway
├─ LLM 请求转发
├─ Discord message API(可选)
└─ blank-agent 路由(contentpipe-blank)

ContentPipe Service (FastAPI)
├─ Web UI(Jinja2 + HTMX)
├─ REST API
├─ SSE 事件推送
├─ Run 状态持久化
└─ Pipeline 节点执行
3.1.1 blank-agent 执行平面
在 llm_mode=gateway 下,ContentPipe 通过一个低污染执行平面来承载节点的正式产物修改:
- Gateway 请求显式路由到
contentpipe-blank - 每个节点保留独立 session key
- 同一个节点的初始执行与后续审核追问共享同一个主 session / 主提示词
- 节点可以直接修改自己的正式产物文件(
edit或write都可以) - Python 在每一轮 LLM 运行后都负责读回正式产物,做最小提交判定、提交、更新 state 与刷新 UI
- 若最小提交判定失败,Python 会把失败反馈送回对应节点继续修复
- 更深层的内容 / schema 校验可作为下一阶段补齐
- Pipeline 下游节点只消费正式产物文件,不依赖聊天解释文字
当前实现状态:
- Scout / Researcher / Director / Formatter 审核聊天已接到“直接修改正式产物 → Python 读回提交”的主链路
- Writer 使用“连续主 session + fresh 结构 helper”模式:主 session 负责改稿,结构 helper 落正式正文
当前正式约定:
- agent id:
contentpipe-blank - 安装命令:
./start.sh install-agent - 生效命令:
openclaw gateway restart
3.1.2 内置 skill 单源策略
ContentPipe 未来的能力增强(公众号阅读、URL 读取、搜索、发布知识等)统一收口到:
plugins/content-pipeline/skills/
原则:
- skill 随插件版本一起发布
- 不采用“插件内置 + 运行时外装”双轨制
contentpipe-blank只暴露 ContentPipe 所需的 skill allowlist- Python pipeline 只保留编排、state、validator、持久化和确定性发布步骤
详细规范见:
docs/SKILL-POLICY.mddocs/BUILTIN-SKILLS.md
当前已内置的最小 skills:
contentpipe-wechat-readercontentpipe-url-readercontentpipe-web-researchcontentpipe-social-researchcontentpipe-style-referencecontentpipe-wechat-draft-publisher
3.2 目录结构
content-pipeline/
├─ README.md
├─ SKILL.md
├─ openclaw.plugin.yaml
├─ start.sh
├─ .gitignore
├─ config/
│  ├─ pipeline.yaml
│  ├─ template-mapping.yaml
│  └─ styles/
├─ docs/
│  ├─ ARCHITECTURE.md
│  ├─ schema-scout.yaml
│  ├─ schema-researcher.yaml
│  └─ schema-writer-context.yaml
├─ prompts/
├─ scripts/
│  ├─ nodes.py
│  ├─ tools.py
│  ├─ formatter.py
│  ├─ publisher.py
│  ├─ hot_news.py
│  ├─ jimeng.py
│  ├─ image_engines/
│  └─ web/
│     ├─ app.py
│     ├─ notify.py
│     ├─ events.py
│     ├─ run_manager.py
│     ├─ routes/
│     ├─ templates/
│     └─ static/
├─ templates/
│  └─ wechat/
└─ output/
   └─ runs/
3.3 状态持久化
每个 run 目录下会保存:
state.yamltopic.yamlresearch.yamlarticle_draft.mdarticle_edited.mdvisual_plan.jsonformatted.htmlchat_<node>.jsonimages/*
正式产物目录固定为:
plugins/content-pipeline/output/runs/<run_id>/
在 blank-agent 模式下,节点最终产物也必须直接写入这条正式路径;不再兼容旧的临时/漂移写法(例如 workspace 根下的 runs/...)。
默认 .gitignore 会忽略 output/runs/,避免把运行产物、聊天记录、图片和测试数据提交到公开仓库。
4. 作为 OpenClaw 插件安装
4.0 快速安装(5 步完成)
# ① 克隆到 OpenClaw workspace 的 plugins 目录
cd ~/your-openclaw-workspace/plugins   # 替换成你的 workspace 路径
git clone https://github.com/PPPPanda/contentPipe.git content-pipeline
cd content-pipeline

# ② 安装 Python 依赖
python3 -m venv .venv
source .venv/bin/activate
pip install -r requirements.txt

# ③ 创建本地配置(填入你的密钥和偏好)
cp .env.example .env.local
# 编辑 .env.local,至少填写:
#   CONTENTPIPE_AUTH_TOKEN=你的访问密码
#   OPENCLAW_GATEWAY_URL=http://localhost:18789(默认值)

# ④ 注册 blank agent + 重启 Gateway
./start.sh install-agent
openclaw gateway restart

# ⑤ 启动 ContentPipe
./start.sh start
打开 http://localhost:8765,看到 Setup 向导即安装成功。
4.0.1 安装后还需要做什么?
| 步骤 | 说明 | 必须? |
|---|---|---|
| Setup 向导 | 首次访问 Web UI 会自动进入,引导你选择模型和通知频道 | ✅ |
| 通知频道 | 在设置页选择通知目标(飞书/Discord/KOOK/企微),点"测试发送"验证 | 推荐 |
| 开机自启 | ./start.sh install-service,生成 systemd service |
推荐 |
| 微信发布 | 在设置页填写 WECHAT_APPID / WECHAT_SECRET + 添加 IP 白名单 |
可选 |
| 图片引擎 | 设置页选择图片生成方式(API / 浏览器) | 可选 |
| 鉴权 | .env.local 设置 CONTENTPIPE_AUTH_TOKEN,Web UI 会要求登录 |
推荐 |
4.0.2 目录放在哪?
ContentPipe 作为 OpenClaw 插件,推荐放在 workspace 的 plugins/ 下:
your-openclaw-workspace/
├─ AGENTS.md
├─ SOUL.md
├─ plugins/
│  └─ content-pipeline/    ← 本项目
│     ├─ openclaw.plugin.yaml
│     ├─ start.sh
│     ├─ scripts/
│     ├─ skills/
│     └─ config/
也可以放在任意位置,只要 ./start.sh install-agent 能正确注册 skill 路径到 Gateway。
4.0.3 Gateway chatCompletions 端点
ContentPipe 通过 Gateway 的 /v1/chat/completions 端点调用 LLM。如果你的 Gateway 是默认配置,这个端点可能没有启用。
新版 Gateway(2026.3.24+)采用 agent-first model contract:
- 请求体
model应传openclaw/<agentId>或openclaw/default- 具体 provider/model(如
dashscope/qwen3.5-plus)应放在x-openclaw-modelheader
检查方法:
curl -s -o /dev/null -w "%{http_code}" http://localhost:18789/v1/chat/completions
# 如果返回 404,说明端点未启用
启用方法(在 ~/.openclaw/openclaw.json 中添加):
{
  "gateway": {
    "http": {
      "endpoints": {
        "chatCompletions": { "enabled": true }
      }
    }
  }
}
然后重启 Gateway:openclaw gateway restart
4.1 系统依赖
- Python 3.10+
- OpenClaw Gateway(已启用 chatCompletions 端点)
- 可选:飞书 / Discord / KOOK / 企微通知
- 可选:微信公众号 / 小红书发布配置
4.2 Python 依赖
建议使用虚拟环境:
python3 -m venv .venv
source .venv/bin/activate
pip install fastapi uvicorn sse-starlette python-multipart jinja2 pyyaml httpx
如果你打算启用更多能力,还可能需要:
playwrightpillow- 相关浏览器驱动 / 浏览器 relay 环境
5. 配置
5.1 主配置:config/pipeline.yaml
关键字段:
pipeline:
  default_platform: "wechat"
  llm_mode: "gateway"   # public/default path
  default_llm: "dashscope/qwen3.5-plus"
  gateway_url: "http://localhost:18789"
  gateway_agent_id: "contentpipe-blank"
  llm_overrides:
    scout: "anthropic/claude-sonnet-4-6"
    researcher: "anthropic/claude-sonnet-4-6"
    writer: "openai-codex/gpt-5.4"
    de_ai_editor: "anthropic/claude-sonnet-4-6"  # 内部 polish
    director: "anthropic/claude-opus-4-6"
    director_refine: "dashscope/qwen3.5-plus"
5.2 环境变量
常用环境变量:
OPENCLAW_GATEWAY_URL=http://localhost:18789
CONTENTPIPE_PORT=8765
CONTENTPIPE_HOST=0.0.0.0
CONTENTPIPE_NOTIFY_CHANNEL=<discord_channel_id>
CONTENTPIPE_PUBLIC_BASE_URL=http://localhost:8765
CONTENTPIPE_AUTH_TOKEN=change-me
CONTENTPIPE_LOG_LEVEL=INFO

WECHAT_APPID=...
WECHAT_SECRET=...
OPENAI_API_KEY=...
DASHSCOPE_API_KEY=...
ANTHROPIC_API_KEY=...
⚠️ 如果你希望 Publisher 真正把内容创建到微信公众号草稿箱,必须显式配置环境变量:
WECHAT_APPIDWECHAT_SECRET同时还需要把当前服务端出口 IP 加入微信公众号后台的 IP 白名单,否则会报
invalid ip ... not in whitelist。如果这两个环境变量未配置,ContentPipe 只能完成本地排版与产物保存,不会真正发布到任何公众号后台。
说明:
CONTENTPIPE_NOTIFY_CHANNEL— 通知目标频道,格式platform:target(如feishu:oc_xxx、discord:123456、kook:789)。为空时不发送通知CONTENTPIPE_PUBLIC_BASE_URL— 通知消息里的回链地址CONTENTPIPE_AUTH_TOKEN非空时,Web UI / API 会开启鉴权(浏览器登录或请求头X-ContentPipe-Token)- 发布相关密钥建议只通过环境变量或本地未跟踪配置注入
5.3 推荐配置方式(.env.local)
复制示例文件:
cp .env.example .env.local编辑
.env.local,填入真实值:WECHAT_APPID=wx_your_app_id_here WECHAT_SECRET=your_app_secret_herestart.sh会自动加载.env.local也可以直接在 Web 设置页填写微信公众号凭据:
- ContentPipe 会把
WECHAT_APPID/WECHAT_SECRET写入.env.local - 页面只显示
*****掩码,不回显明文 - 设置页会显示当前服务出口 IP,方便复制到公众号后台白名单
- ContentPipe 会把
⚠️ 安全提醒:
.env.local已加入.gitignore,不会被提交- 不要把真实凭证写进
pipeline.yaml或代码- 如果凭证已泄露,立即去公众号后台重置 AppSecret
5.4 微信公众号发布前置条件
除了配置 WECHAT_APPID 和 WECHAT_SECRET,还必须:
添加 IP 白名单
- 登录公众号后台:
mp.weixin.qq.com - 进入:设置与开发 → 开发接口管理 → 基本配置 → IP 白名单
- 添加当前服务器出口 IP
- 登录公众号后台:
获取当前出口 IP
curl -s https://api.ipify.org验证白名单是否生效
curl "https://api.weixin.qq.com/cgi-bin/token?grant_type=client_credential&appid=$WECHAT_APPID&secret=$WECHAT_SECRET"- 成功返回:
{"access_token":"...","expires_in":7200} - 失败返回:
{"errcode":40164,"errmsg":"invalid ip ... not in whitelist"}
- 成功返回:
6. 启动方式
6.1 使用启动脚本(推荐)
./start.sh start
./start.sh status
./start.sh logs
./start.sh stop
./start.sh restart
./start.sh install-agent
start.sh 会自动优先使用以下 Python 解释器:
CONTENTPIPE_PYTHON(若显式指定).venv/bin/pythonvenv/bin/pythonpython3
启动前会检查当前解释器是否可导入 uvicorn;如果不行,会直接报错并提示你切换到项目 venv,而不是用系统 Python 悄悄启动失败。
6.1.1 一键注册 contentpipe-blank(Gateway 模式必做)
如果你要使用 llm_mode=gateway 的低污染 blank-agent 执行平面,先运行:
./start.sh install-agent
openclaw gateway restart
这会:
- 创建/修正
contentpipe-blank - 设置独立
workspace/agentDir - 将工具权限设为全开(
allow=[],deny=[]) - 把插件内置 skills 目录注册到
skills.load.extraDirs - 给
contentpipe-blank写入 ContentPipe 专用 skill allowlist - 若存在 main agent 的
auth-profiles.json,自动复制到 blank agent
默认路径:
- workspace:
~/.openclaw/workspace-contentpipe-blank - agentDir:
~/.openclaw/agents/contentpipe-blank/agent
可通过环境变量覆盖:
CONTENTPIPE_AGENT_ID=contentpipe-blank \
CONTENTPIPE_AGENT_WORKSPACE=~/.openclaw/workspace-contentpipe-blank \
CONTENTPIPE_AGENT_DIR=~/.openclaw/agents/contentpipe-blank/agent \
CONTENTPIPE_AGENT_MODEL=anthropic-sonnet/claude-sonnet-4-6 \
./start.sh install-agent
6.1.2 首次部署 Checklist(推荐照着跑)
新版 Setup 向导 Step 1 已加入 P0 安装预检,会检查:
contentpipe-blankagent 是否存在- Gateway 是否能路由到该 agent
skills.load.extraDirs是否包含 ContentPipe skills 目录- (本机 Gateway 时)skills 路径是否真实存在
如果这些检查不过,向导不会放行到下一步,避免首个 run 在 scout 阶段直接翻车。
cp .env.example .env
# 编辑 .env,至少填 CONTENTPIPE_AUTH_TOKEN / OPENCLAW_GATEWAY_URL

./start.sh install-agent
openclaw gateway restart
./start.sh start
./start.sh status
curl http://127.0.0.1:8765/api/health
检查项:
CONTENTPIPE_AUTH_TOKEN已设置- OpenClaw Gateway 可访问,且鉴权 token 正常
contentpipe-blank已创建- Gateway 已重启,agent 配置已生效
http://127.0.0.1:8765/api/health返回 healthy
6.2 直接启动 uvicorn
cd scripts
../.venv/bin/python -m uvicorn web.app:app --host 0.0.0.0 --port 8765
如果你的虚拟环境不在 .venv/,请替换成对应路径。不要默认依赖系统 python3,否则在云端很容易出现 uvicorn 模块缺失。
6.3 健康检查
curl http://localhost:8765/api/health
curl http://localhost:8765/api/info
6.3.1 Gateway 模式常见坑
如果你启用了 llm_mode=gateway,但发现:
- 节点一直输出解释文字而不是正式 YAML / Markdown / JSON
- blank-agent 没生效
- 刚添加完
contentpipe-blank但运行表现还是老配置
优先检查这几项:
- 是否已经运行:
./start.sh install-agent - 是否已经重启 Gateway:
openclaw gateway restart config/pipeline.yaml中是否仍指向:llm_mode: "gateway"gateway_agent_id: "contentpipe-blank"
- 正式产物是否落在:
plugins/content-pipeline/output/runs/<run_id>/
6.4 开机自启(systemd)
一键安装 systemd service,开机后自动启动:
./start.sh install-service
脚本会自动检测当前用户、Python 路径、安装目录,生成并安装 service 文件。
sudo systemctl start contentpipe    # 启动
sudo systemctl stop contentpipe     # 停止
sudo systemctl restart contentpipe  # 重启
journalctl -u contentpipe -f        # 查看日志
ContentPipe 是独立外部服务,不依赖 Gateway。只需网络就绪即可启动,崩溃后自动重启(
Restart=always)。
6.5 生产部署 / 反向代理 / HTTPS
如果你要把它部署给别人使用,推荐的最小方案是:
- ContentPipe 只监听内网(127.0.0.1 或局域网)
- 用 Nginx / Caddy 做反向代理
- 打开
CONTENTPIPE_AUTH_TOKEN - 通过 HTTPS 暴露外部访问
- 把
CONTENTPIPE_PUBLIC_BASE_URL设成最终对外域名
示例(Nginx):
server {
    listen 80;
    server_name contentpipe.example.com;
    return 301 https://$host$request_uri;
}

server {
    listen 443 ssl http2;
    server_name contentpipe.example.com;

    ssl_certificate     /path/to/fullchain.pem;
    ssl_certificate_key /path/to/privkey.pem;

    client_max_body_size 25m;

    location / {
        proxy_pass http://127.0.0.1:8765;
        proxy_set_header Host $host;
        proxy_set_header X-Forwarded-For $proxy_add_x_forwarded_for;
        proxy_set_header X-Forwarded-Proto $scheme;
        proxy_set_header Upgrade $http_upgrade;
        proxy_set_header Connection "upgrade";
    }
}
对应 .env 建议:
CONTENTPIPE_AUTH_TOKEN=change-me
CONTENTPIPE_PUBLIC_BASE_URL=https://contentpipe.example.com
OPENCLAW_GATEWAY_URL=http://127.0.0.1:18789
如果只在本机使用,可以不配反代和 HTTPS;但只要要给别人访问,就建议必须开 HTTPS + 鉴权。
7. Web UI
主要页面:
/:Dashboard/runs:运行列表/runs/{run_id}:运行详情/runs/{run_id}/review?node=scout:节点审核页/runs/{run_id}/preview:排版预览/settings:配置页面
7.1 审核页能力
在节点审核页中,你可以:
- 查看结构化卡片
- 与当前节点 AI 对话
- 修改标题 / 切角 / 写法
- 重跑节点
- 在 Director 页面替换 / 删除图片
- 在 Writer 页面直接编辑文章
- 在 Formatter 页面查看最终预览
8. API 概览
📄 完整 API 文档: docs/API.md(63 个端点,含请求/响应示例)
系统
| 方法 | 路径 | 说明 |
|---|---|---|
| GET | /api/health |
健康检查 |
| GET | /api/info |
插件信息 |
| GET | /api/system/status |
系统全景(Gateway、Run 统计、通知状态) |
| GET | /api/system/engines |
图片引擎及可用状态 |
| POST | /api/system/test-llm |
测试 LLM 连接 |
| POST | /api/system/test-notify |
发送测试通知 |
| GET | /api/system/logs |
查看日志 |
配置管理
| 方法 | 路径 | 说明 |
|---|---|---|
| GET | /api/config |
读取完整配置 |
| PATCH | /api/config |
部分更新配置 |
| GET/PUT | /api/config/models |
各角色 LLM 模型 |
| GET/PUT | /api/config/notify |
通知频道 |
| GET/PUT | /api/config/image-engine |
图片引擎 |
| GET/GET/PUT | /api/config/prompts[/{name}] |
Prompt 管理 |
Run 管理
| 方法 | 路径 | 说明 |
|---|---|---|
| GET | /api/runs |
列出 run |
| POST | /api/runs |
创建 run |
| GET | /api/runs/{id} |
查看详情 |
| POST | /api/runs/{id}/start |
启动 pipeline |
| POST | /api/runs/{id}/cancel |
取消执行 |
| DELETE | /api/runs/{id} |
删除 run |
| POST | /api/runs/{id}/clone |
克隆 run |
| GET | /api/runs/{id}/timeline |
执行时间线 |
| POST | /api/runs/{id}/auto-approve |
切换全自动模式 |
审核 / 交互
| 方法 | 路径 | 说明 |
|---|---|---|
| GET | /api/runs/{id}/chat/history |
获取聊天记录 |
| POST | /api/runs/{id}/chat |
与当前节点对话 |
| POST | /api/runs/{id}/review |
审批继续 |
| POST | /api/runs/{id}/reject |
驳回重跑 |
| POST | /api/runs/{id}/rollback |
回退到指定节点 |
| POST | /api/runs/{id}/nodes/{node}/rerun |
重跑节点 |
产物 / 图片
| 方法 | 路径 | 说明 |
|---|---|---|
| GET | /api/runs/{id}/artifacts |
列出所有产物文件 |
| GET/PUT | /api/runs/{id}/artifacts/{file} |
读取/修改产物 |
| GET/PUT | /api/runs/{id}/visual-plan |
导演视觉方案 |
| GET | /api/runs/{id}/article |
获取文章 |
| POST | /api/runs/{id}/images/upload-cover |
上传封面 |
| POST | /api/runs/{id}/images/upload-placement |
上传配图 |
| GET | /api/runs/{id}/preview/html |
排版预览 |
| GET | /api/runs/{id}/diff |
产物 diff |
SSE 实时推送
| 方法 | 路径 | 说明 |
|---|---|---|
| GET | /sse/{id} |
HTMX 事件流 |
| GET | /api/runs/{id}/events |
JSON SSE(供 Agent 订阅) |
OpenClaw AI 工具
ContentPipe 注册了 11 个 AI 工具,OpenClaw LLM 可直接调用。详见 docs/API.md #9。
9. 代码审查结论(当前版本)
在公开前做过一轮仓库级检查,当前需要特别注意:
已处理
- ✅ 忽略
output/runs/运行产物 - ✅ 忽略日志、缓存、虚拟环境
- ✅ Discord 通知频道改为环境变量注入,不再硬编码公开仓库默认值
- ✅ Gateway 地址支持环境变量覆盖
仍建议后续继续优化
scripts/tools.py/scripts/publisher.py中有部分发布逻辑重复,可进一步收敛scripts/nodes.py体积较大,建议未来按节点拆分模块- 插件清单目前是仓库内的 manifest 文档;如果要做成真正 OpenClaw 原生 TS 扩展,还需要补注册层
- 发布器能力仍偏平台定制,公开 release 前建议补一份最小 demo 配置
- 小红书适配设计见:
docs/XHS-ADAPTATION.md
10. 开发说明
10.1 本地检查建议
python3 -m compileall scripts
python3 -m uvicorn web.app:app --host 0.0.0.0 --port 8765
curl http://localhost:8765/api/health
10.2 推荐提交流程
git status
git add .
git commit -m "feat: ..."
git push origin main
10.3 如果你要新接入平台
通常需要改动:
config/pipeline.yamltemplates/formatter.pypublisher.py- 对应节点 prompt
11. 路线图
已完成
- 交互式多节点 pipeline
- 实时同步(每轮 LLM 运行后都经 Python 读回 / 最小提交判定 / 刷新)
- Writer 三层上下文 + 连续主 session + fresh 结构 LLM
- 图文精确匹配
- Director 配图管理
- 基础插件化(服务清单、健康检查、通知)
- 微信公众号模板市场研究与 dark-mode safe 规则收敛(
docs/WECHAT-TEMPLATE-MARKET-RESEARCH.md) - 11 个领域 × 2 个版本的微信公众号模板骨架(22 个模板文件)
待完成
- 真正的一键发布链路
- 定时任务 / cron 编排
- 更完整的公开安装流程
- 更多平台模板
- 更细粒度的权限和配置注入
12. License / 开源配套文件
仓库当前已经补齐以下公开发布基础文件:
LICENSE(MIT)CONTRIBUTING.mdSECURITY.md
如果你准备正式 release,建议下一步继续补:
CHANGELOG.md- GitHub Release notes
- 部署示例截图 / demo 数据
Reviews (0)
Sign in to leave a review.
Leave a reviewNo results found