claude-overlay
Health Uyari
- License — License: MIT
- Description — Repository has a description
- Active repo — Last push 0 days ago
- Low visibility — Only 6 GitHub stars
Code Gecti
- Code scan — Scanned 2 files during light audit, no dangerous patterns found
Permissions Gecti
- Permissions — No dangerous permissions requested
Bu listing icin henuz AI raporu yok.
A floating, screen-aware Claude Code chat for Windows - it reads your screen to answer, and runs on your own Claude subscription (no API key).
Claude Overlay

Talk to Claude Code without ever leaving the app you're in — and let it actually see your screen.
Windows 10 / 11 only (for now) · runs on your existing Claude subscription — no API key

Claude Overlay is a frameless, always-on-top chat window that floats over
everything you do. Hit a hotkey, ask a question, and Claude looks at your real
screen — every monitor — to answer. No copy-pasting error messages, no
describing what you're staring at, no alt-tabbing to a browser. And because it
runs the full Claude Code agent
under the hood, it doesn't just chat — it can read, edit, and run things for you,
right where you work. Point it at the slide deck, document, or spreadsheet you have
open and it can change the file you're looking at — you never have to tell it
where the file lives or even alt-tab away.
Best of all, it costs nothing extra: it drives your own claude CLI login,
so it uses your existing Claude subscription — no API key, no metered billing.
⭐ If a screen-aware Claude that floats over your work sounds useful, star the repo — it helps other people find it.
✨ Why you'll want it
- 👁️ It sees what you see. Auto-captures each monitor on every message and
labels primary vs. secondary — just ask "what's wrong here?" and it looks. - 🪟 Never breaks your flow. Always-on-top and frameless; summon or dismiss it
from anywhere with Ctrl+Alt+Space, and it collapses to a tiny draggable orb
when you're not using it. - 🧠 A real agent that acts, not a chatbot. Full Claude Code (Opus 4.8) — it
edits files, runs commands, and can even reach into the app on your screen (say,
fix the wording on your open slide), not just answer questions. - 💸 No API key, no extra cost. Runs on your existing Claude subscription.
- 🖼️ Screenshots and pasted images. Snap a screen on demand, or paste any
image with Ctrl+V to ask about it. - ⚡ Live, polished UI. Responses stream token-by-token with clean tool-call
chips, an in-place model switcher, and a context-usage meter. - 🎨 Looks the part, crisp anywhere. Styled after the Claude desktop app,
DPI-aware on HiDPI displays, resizable from any edge, with live Ctrl +/– zoom. - 🔒 Local & private. Runs entirely on your machine against your own login.
Where a floating overlay wins
The CLI and the desktop app are perfect when you're already in a terminal or a chat
window. The overlay earns its place by floating over whatever you're doing, seeing
it, and acting on it — so it shines exactly where those can't:
- ✍️ Edit what's right in front of you. Don't just ask about the open
document — ask it to change it. Fix a typo on the current slide, tighten a
paragraph in your draft, fill a cell, or reword a heading. Because it's a full
Claude Code agent with a shell, it can drive the app you already have open (e.g.
via PowerShell/COM automation) to edit the file you're looking at — no file
path needed. It works this out at run time rather than from a built-in
integration, so it's not infallible: sanity-check important documents first
(see the Security note near the end of this README).

Ask it to fix the open slide — it edits the deck you already have open, no file path given.
- 🖥️ Mid-presentation. Stay in full-screen slideshow. Summon the overlay to
fact-check a number, translate a term, or field an audience question on the spot —
then dismiss it without ever leaving the deck. - 🌐 Reading in another language. On a foreign-language page, PDF, or slide, ask
it to translate or explain what's on screen, in place — no copy-pasting into a
separate translator tab. - 📄 Skimming something long. "TL;DR this", "what does it say about X?" — about the
article, whitepaper, or PDF you're looking at, without selecting or pasting a word. - 🧩 Any GUI with no terminal. A cryptic error dialog, a settings panel, a BI
dashboard, a spreadsheet formula — point your screen at it and ask. It works over
apps that have no command line and nothing to copy. - 🖥️🖥️ Across monitors. It captures every screen, so ask it to reconcile the spec
on one monitor against the figure or table on the other. - 🎥 On a call or screen-share. A discreet, always-on-top helper to look things up
about what's being shown — without alt-tabbing away from the meeting.
Not using it? It collapses to an orb that floats out of the way — click to bring it back.
How it works
Overlay (Tkinter UI)  →  claude-agent-sdk  →  spawns the `claude` CLI  →  Anthropic
        ▲ screenshots (Pillow ImageGrab, one image per monitor)
- UI — Tkinter (ships with Python; no extra GUI runtime).
- Brain —
claude-agent-sdkspawns your installedclaudeCLI as a subprocess
and talks to it. It is not a direct API client, so the CLI is required. - Eyes — Pillow
ImageGrabsnapshots each monitor separately; the prompt
labels which is the primary vs secondary screen, and Claude reads each
with itsReadtool. The window hides itself during capture.
Prerequisites
You need three things. The included setup.cmd handles #2 and #3 for you — it
auto-installs the Claude Code CLI if it's missing and installs the Python packages.
1. Windows 10 / 11
The app uses Win32 APIs (DPI awareness, rounded corners, multi-monitor capture),
so it currently runs on Windows only.
2. Claude Code CLI — installed and logged in
The overlay has no brain of its own; it drives the claude command line.
Easiest: just run setup.cmd (below) — it installs the CLI for you with the
official native installer if you don't already have it. To install it yourself:
- Native installer — recommended, no Node.js (PowerShell):
(orirm https://claude.ai/install.ps1 | iexwinget install Anthropic.ClaudeCode). It auto-updates itself. - npm (needs Node.js 18+):
npm install -g @anthropic-ai/claude-code
Log in with your own Claude account (Pro/Max subscription — no API key needed):
run claude and follow the browser prompt once.
Verify — this must print a version number:
claude --version
If it says "command not found", the CLI isn't installed / on PATH yet.
3. Python 3.10+
Install from https://www.python.org/downloads/ and tick
"Add python.exe to PATH" in the installer.
Verify:
python --version
Install
⚡ Let Claude install it (once you have the CLI)
It's an agent — so it can set itself up. With the claude CLI installed (step 2),
just run this from wherever you want it to live:
claude "Set up Claude Overlay for me: clone https://github.com/shengyanlin/claude-overlay, make sure Python 3.10+ is installed (install it if missing), pip install its requirements.txt, then launch it with pythonw. Tell me the hotkey once it's running."
Claude will ask before each step. Prefer to do it yourself? 👇
By hand
git clone https://github.com/shengyanlin/claude-overlay.git
cd claude-overlay
pip install -r requirements.txt
Or on Windows just double-click setup.cmd: it checks Python,
auto-installs the claude CLI if it's missing (and offers to log you in), then
installs the Python packages — so a fresh machine is one double-click from ready.
Dependencies: claude-agent-sdk, pillow, keyboard.
Run
- Make sure
claude --versionworks and you've logged in (claude→/login). - Start it (any of):
- Double-click
Start Claude Overlay.cmd— launches with no console window. pythonw claude_overlay.py— no console.python claude_overlay.py— keeps a console open for logs (good for debugging).
- Double-click
- The window appears (and a global hotkey registers). Type and hit Enter — it
auto-captures your screen each message, so you can ask about whatever's in front
of you right away. - Press Ctrl+Alt+Space anytime to show / hide the window; not using it? Hit
– to collapse it to a small floating orb.
Put it on your Desktop (optional)
Double-click Create Desktop Shortcut.cmd to drop a Claude Overlay shortcut
— with the orb icon — on your Desktop, so you can launch it like any other app.
Don't just drag
Start Claude Overlay.cmdto your Desktop — it's a portable
launcher that must stay next toclaude_overlay.py. The shortcut points back to it
in place, which is why it keeps working.
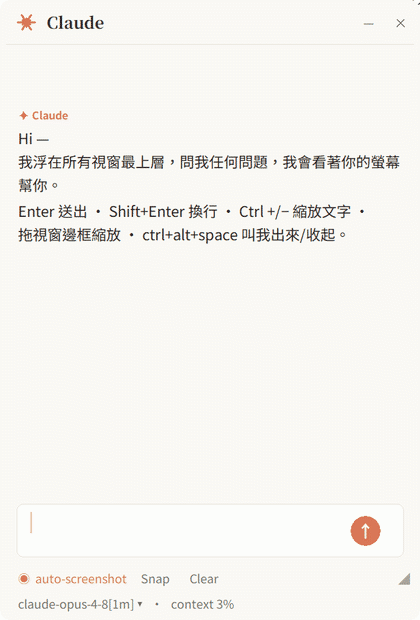
Controls
| Action | How |
|---|---|
| Send message | Enter (or click the ↑ button) |
| New line | Shift+Enter |
| Stop a running reply | click Stop (the ↑ becomes ■ while busy) |
| Attach screen to next msg | Snap |
| Paste an image | Ctrl+V (click 📎 to clear) |
| Toggle auto-screenshot | ◉ / ○ auto-screenshot (orange = on) |
| Switch model | click the statusline (model ▾) |
| Zoom text in / out | Ctrl + / Ctrl − (or Ctrl + mouse-wheel); Ctrl 0 resets |
| New conversation | Clear |
| Collapse to a Claude orb | –, or double-click the title bar |
| Expand from the orb | click the orb (drag it to move) |
| Quit | ✕ |
| Show / hide from anywhere | Ctrl+Alt+Space (global hotkey) |
| Move | drag the title bar |
| Resize | drag any edge or corner (or the ◢ grip) |
Configuration
All settings are constants at the top of claude_overlay.py:
MODEL— defaults to"claude-opus-4-8"(Opus 4.8, 200K context). Append the[1m]suffix for the 1M-context variant (also one click away in the in-app model
switcher). Don't useNone: the Agent SDK resolvesNoneto an older model, not
the CLI's interactive default.PERMISSION_MODE—"bypassPermissions"by default (see security note below).
Use"acceptEdits","default", or"plan"to add confirmation / read-only.WORKING_DIR— folder Claude operates in (default: your home directory).THEME—"light"(warm paper) or"dark".HOTKEY— global show/hide hotkey (defaultctrl+alt+space).AUTO_SCREENSHOT_DEFAULT,FONT_SANS/SERIF/MONO,CORNER_RADIUS,ORB_SIZE,HIDE_SCREENSHOT_TOOL,WINDOW_ALPHA— see inline comments.
⚠️ Security note
The default PERMISSION_MODE = "bypassPermissions" makes this a fully
autonomous agent: Claude can edit files and run commands in WORKING_DIR
without asking, and it can see your screen. Combined with screen vision, that
also lets it act on the app you have open — e.g. edit the document or slide
deck on your screen via Windows/COM automation, and (with autosave on) persist
those edits straight to the original file. That's the magic, but it also means it
can change important documents without a confirmation step — double-check before
you let it loose on anything you can't afford to lose. If you don't want that, setPERMISSION_MODE to "acceptEdits" (asks before edits), "default" (asks before
most actions), or "plan" (read-only) before running.
Contributing
Issues and PRs are welcome — bug reports, feature ideas, and especially help making
it cross-platform (macOS/Linux capture + windowing). See
CONTRIBUTING.md for how to get started.
License
MIT © shengyanlin
Built with Claude Code. If it earned a spot on your screen, leave a ⭐ — it genuinely helps.
Yorumlar (0)
Yorum birakmak icin giris yap.
Yorum birakSonuc bulunamadi