obsidian-llm-hub
Health Uyari
- License — License: MIT
- Description — Repository has a description
- Active repo — Last push 0 days ago
- Low visibility — Only 6 GitHub stars
Code Uyari
- process.env — Environment variable access in esbuild.config.mjs
- process.env — Environment variable access in src/core/cliProvider.ts
Permissions Gecti
- Permissions — No dangerous permissions requested
This is an Obsidian plugin that acts as a comprehensive AI assistant. It integrates with multiple large language models to provide chat, semantic search, and multi-step workflow automation directly within a personal notes vault.
Security Assessment
Risk Rating: Medium. The tool requires access to sensitive data to function correctly, specifically reading user environment variables to fetch API keys for various LLM providers. It inherently makes outbound network requests to external AI APIs. Because the plugin features a "Workflow Builder" and directly interacts with your file vault, it has broad permissions to read, write, and modify local files. No hardcoded secrets were detected, and no dangerous system-level permissions are requested, but users should be aware that AI models are granted access to edit personal notes.
Quality Assessment
The project is actively maintained, with its most recent updates pushed today. It uses the standard, permissive MIT license and includes clear documentation. However, it suffers from extremely low community visibility. Currently sitting at only 6 GitHub stars, the project has not undergone broad peer review. As a result, community trust and confidence in the tool's long-term reliability are currently minimal.
Verdict
Use with caution — the plugin is actively maintained and reasonably structured, but its extensive file system access and low community adoption warrant caution until it receives broader public review.
Obsidian plugin for AI chat, workflow automation, and semantic search — supports Gemini, OpenAI, OpenRouter, Grok, Ollama, and CLI backends
LLM Hub for Obsidian
![]()
Free and open-source AI assistant for Obsidian with Chat, Workflow Automation, and Semantic Search (RAG). Supports multiple LLM providers — use whichever AI fits your needs.
Use any LLM provider: Gemini, OpenAI, Anthropic, OpenRouter, Grok, local LLMs (Ollama, LM Studio, vLLM), or CLI tools (Gemini CLI, Claude Code, Codex CLI).
Highlights
- Multi-Provider LLM Chat - Use Gemini, OpenAI, Anthropic, OpenRouter, Grok, local LLMs, or CLI backends
- Vault Operations - AI reads, writes, searches, and edits your notes with function calling (Gemini, OpenAI, Anthropic)
- Workflow Builder - Automate multi-step tasks with visual node editor and 25 node types
- Semantic Search (RAG) - Local vector search with dedicated search tab, PDF preview, and result-to-chat flow
- AI Discussion - Multi-model debate arena with parallel responses, voting, and winner determination
- Edit History - Track and restore AI-made changes with diff view
- Web Search - Access up-to-date information via Google Search (Gemini)
- Image Generation - Create images with Gemini or DALL-E
- Discord Integration - Connect your LLM to Discord as a chat bot with per-channel model/RAG switching
- Encryption - Password-protect chat history and workflow execution logs
Supported Providers
| Provider | Chat | Vault Tools | Web Search | Image Gen | RAG |
|---|---|---|---|---|---|
| Gemini (API) | ✅ Streaming | ✅ Function calling | ✅ Google Search | ✅ Gemini Image models | ✅ |
| OpenAI (API) | ✅ Streaming | ✅ Function calling | ❌ | ✅ DALL-E | ✅ |
| Anthropic (API) | ✅ Streaming | ✅ Tool use | ❌ | ❌ | ✅ |
| OpenRouter (API) | ✅ Streaming | ✅ Function calling | ❌ | ❌ | ✅ |
| Grok (API) | ✅ Streaming | ✅ Function calling | ❌ | ❌ | ✅ |
| Local LLM (Ollama, LM Studio, vLLM) | ✅ Streaming | ❌ | ❌ | ❌ | ✅ |
| CLI (Gemini, Claude, Codex) | ✅ Streaming | ❌ | ❌ | ❌ | ✅ |
[!TIP]
Multiple providers can be configured simultaneously. Switch models freely during chat — each provider has its own API key and settings.
[!TIP]
CLI Options let you use flagship models with just an account - no API key needed!
- Gemini CLI: Install Gemini CLI, run
geminiand authenticate with/auth- Claude CLI: Install Claude Code (
npm install -g @anthropic-ai/claude-code), runclaudeand authenticate- Codex CLI: Install Codex CLI (
npm install -g @openai/codex), runcodexand authenticate
Gemini Free API Key Tips
- Rate limits are per-model and reset daily. Switch models to continue working.
- Gemma models and Gemini CLI don't support vault operations in Chat, but Workflows can still read/write notes using
note,note-read, and other node types.{content}and{selection}variables also work.
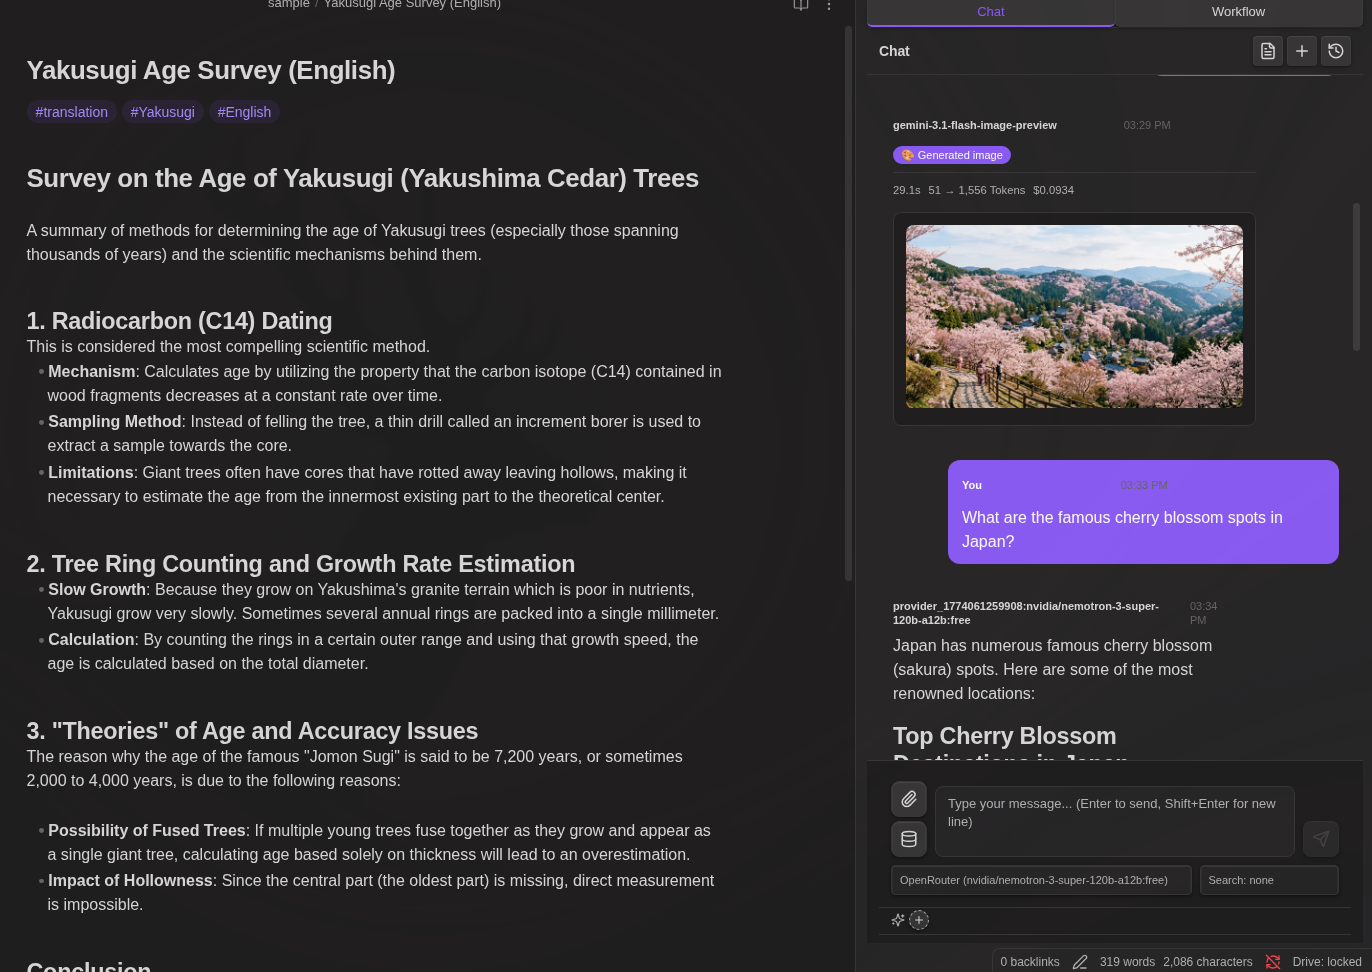
AI Chat
The AI Chat feature provides an interactive conversation interface with your chosen LLM provider, integrated with your Obsidian vault.
Opening Chat:
- Click chat icon in ribbon
- Command: "LLM Hub: Open chat"
- Toggle: "LLM Hub: Toggle chat / editor"
Chat Controls:
- Enter - Send message
- Shift+Enter - New line
- Stop button - Stop generation
- + button - New chat
- History button - Load previous chats
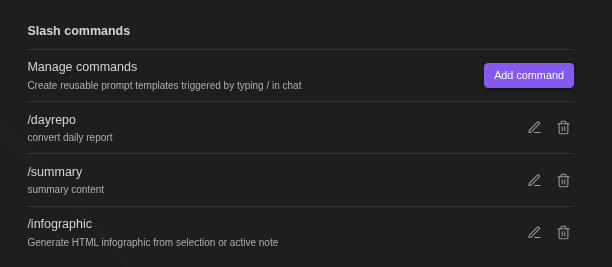
Slash Commands
Create reusable prompt templates triggered by /:
- Define templates with
{selection}(selected text) and{content}(active note) - Optional model and search override per command
- Type
/to see available commands
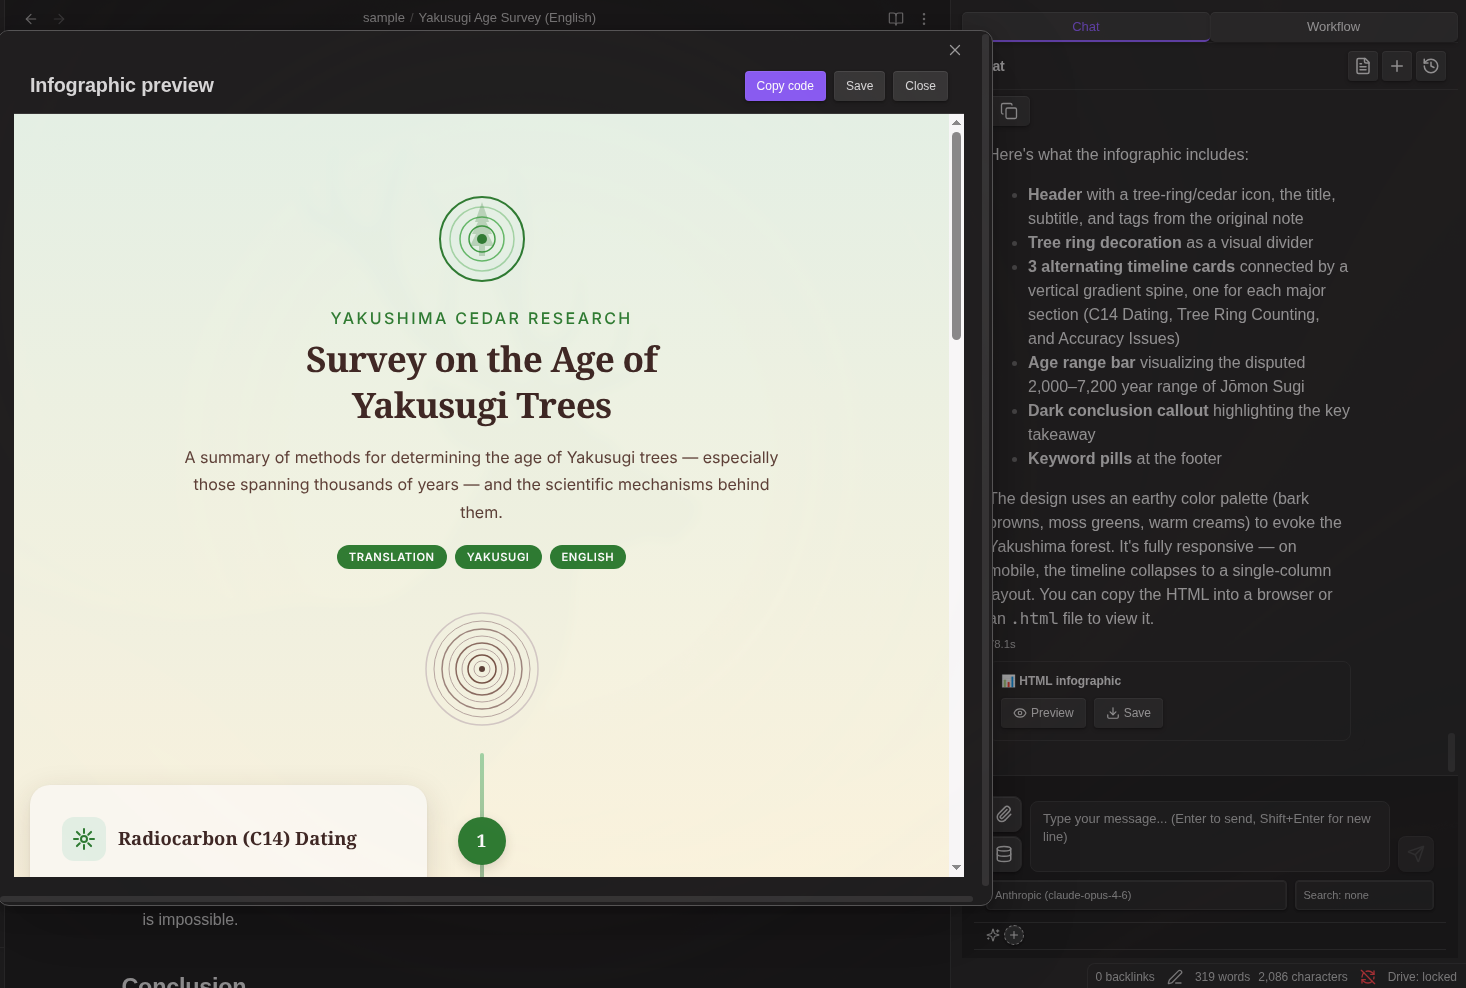
Default: /infographic - Converts content to HTML infographic
@ Mentions
Reference files and variables by typing @:
{selection}- Selected text{content}- Active note content- Any vault file - Browse and insert (path only; AI reads content via tools)
[!NOTE]
How{selection}and{content}work: When you switch from Markdown View to Chat View, the selection would normally be cleared due to focus change. To preserve your selection, the plugin captures it when switching views and highlights the selected area with a background color in the Markdown View. The{selection}option only appears in @ suggestions when text was selected.Both
{selection}and{content}are intentionally not expanded in the input area—since the chat input is compact, expanding long text would make typing difficult. The content is expanded when you send the message, which you can verify by checking your sent message in the chat.
[!NOTE]
Vault file @mentions insert only the file path - the AI reads content via tools. This doesn't work with Gemma models (no vault tool support). Gemini CLI can read files via shell, but response format may differ.
File Attachments
Attach files directly: Images (PNG, JPEG, GIF, WebP), PDFs, Text files
Function Calling (Vault Operations)
The AI can interact with your vault using these tools:
| Tool | Description |
|---|---|
read_note |
Read note content |
create_note |
Create new notes |
propose_edit |
Edit with confirmation dialog |
propose_delete |
Delete with confirmation dialog |
bulk_propose_edit |
Bulk edit multiple files with selection dialog |
bulk_propose_delete |
Bulk delete multiple files with selection dialog |
search_notes |
Search vault by name or content |
list_notes |
List notes in folder |
rename_note |
Rename/move notes |
create_folder |
Create new folders |
list_folders |
List folders in vault |
get_active_note_info |
Get info about active note |
bulk_propose_rename |
Bulk rename multiple files with selection dialog |
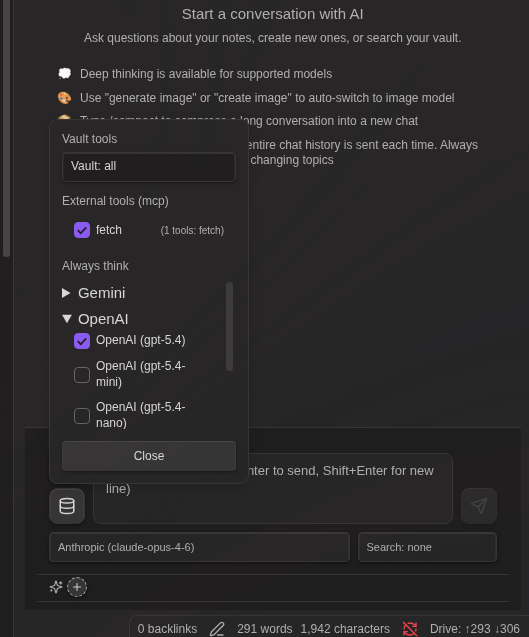
Vault Tool Mode
When the AI handles notes in Chat, it uses Vault tools. Control which vault tools the AI can use via the Database icon (📦) below the attachment button:
| Mode | Description | Tools Available |
|---|---|---|
| Vault: All | Full vault access | All tools |
| Vault: No search | Exclude search tools | All except search_notes, list_notes |
| Vault: Off | No vault access | None |
When to use each mode:
- Vault: All - Default mode for general use. The AI can read, write, and search your vault.
- Vault: No search - Use when you already know the target file. This avoids redundant vault searches, saving tokens and improving response time.
- Vault: Off - Use when you don't need vault access at all.
Automatic mode selection:
| Condition | Default Mode | Changeable |
|---|---|---|
| CLI models (Gemini/Claude/Codex CLI) | Vault: Off | No |
| Gemma models | Vault: Off | No |
| Web Search enabled | Vault: Off | No |
| Normal | Vault: All | Yes |
Why some modes are forced:
- CLI/Gemma models: These models do not support function calling, so Vault tools cannot be used.
- Web Search: By design, Vault tools are disabled when Web Search is enabled.
Safe Editing
When AI uses propose_edit:
- A confirmation dialog shows the proposed changes
- Click Apply to write changes to the file
- Click Discard to cancel without modifying the file
Changes are NOT written until you confirm.
Edit History
Track and restore changes made to your notes:
Automatic tracking - All AI edits (chat, workflow) and manual changes are recorded
File menu access - Right-click on a markdown file to access:
- Snapshot - Save current state as a snapshot
- History - Open edit history modal
Command palette - Also available via "Show edit history" command
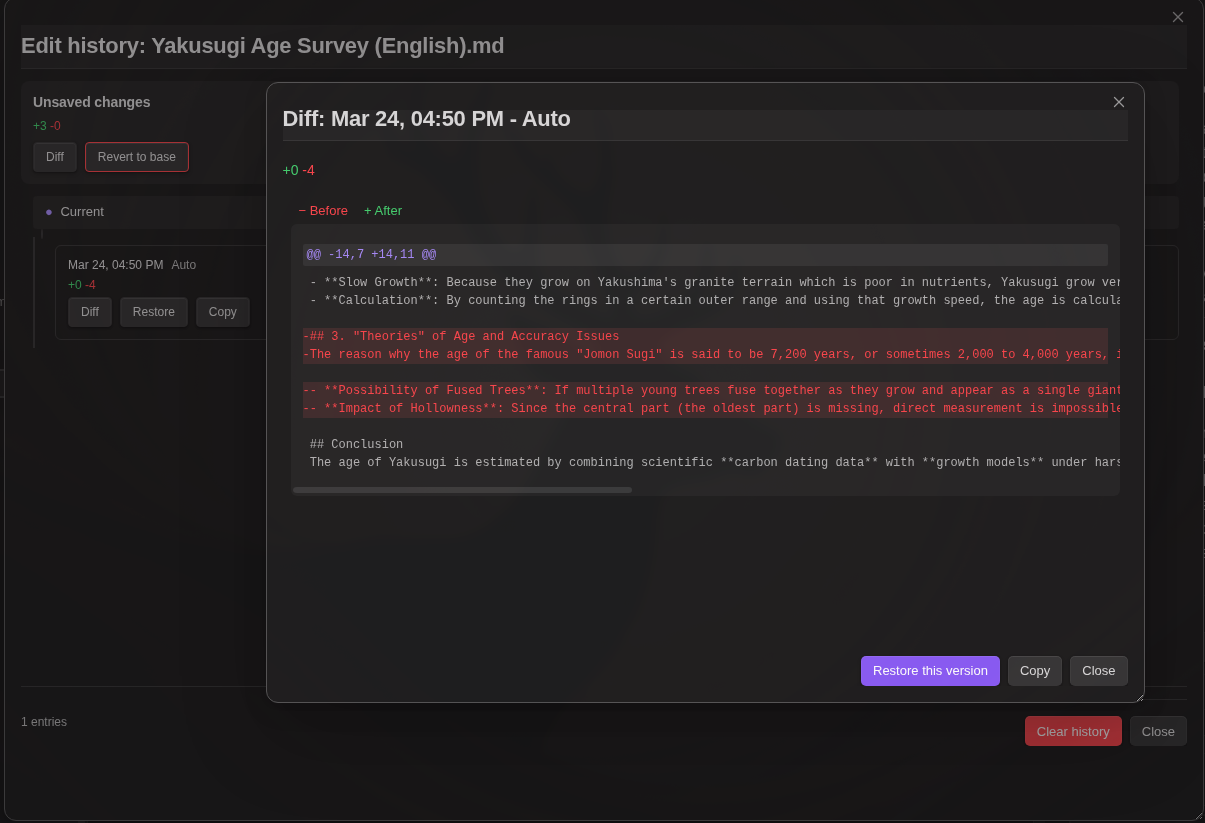
Diff view - See exactly what changed with color-coded additions/deletions
Restore - Revert to any previous version with one click
Copy - Save a historical version as a new file (default name:
{filename}_{datetime}.md)Resizable modal - Drag to move, resize from corners
Diff display:
+lines existed in the older version-lines were added in the newer version
How it works:
Edit history uses a snapshot-based approach:
- Snapshot creation - When a file is first opened or modified by AI, a snapshot of its content is saved
- Diff recording - When the file is modified, the difference between the new content and the snapshot is recorded as a history entry
- Snapshot update - The snapshot is updated to the new content after each modification
- Restore - To restore to a previous version, diffs are applied in reverse from the snapshot
When history is recorded:
- AI chat edits (
propose_edittool) - Workflow note modifications (
notenode) - Manual saves via command
- Auto-detection when file differs from snapshot on open
Storage: Edit history is stored in memory and cleared on Obsidian restart. Obsidian's built-in file recovery covers persistent version tracking.
MCP Servers
MCP (Model Context Protocol) servers provide additional tools that extend the AI's capabilities beyond vault operations.
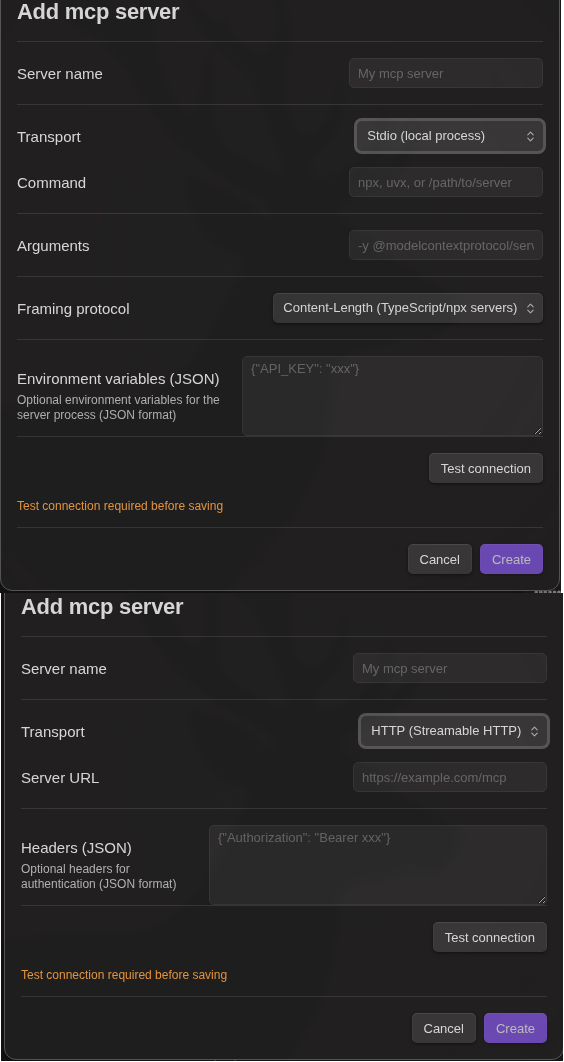
Two transport modes are supported:
HTTP (Streamable HTTP):
- Open plugin settings → MCP Servers section
- Click Add server → select HTTP
- Enter server name and URL
- Configure optional headers (JSON format) for authentication
- Click Test connection to verify and retrieve available tools
- Save the server configuration
Stdio (Local process):
- Open plugin settings → MCP Servers section
- Click Add server → select Stdio
- Enter server name and command (e.g.,
npx -y @modelcontextprotocol/server-filesystem /path/to/dir) - Configure optional environment variables (JSON format)
- Click Test connection to verify and retrieve available tools
- Save the server configuration
Note: Stdio transport launches a local process and is desktop-only. Test connection is required before saving.
Using MCP tools:
- In Chat: Click the Database icon (📦) to open tool settings. Enable/disable MCP servers per conversation.
- In Workflows: Use the
mcpnode to call MCP server tools.
Tool hints: After successful connection test, available tool names are saved and displayed in both settings and chat UI for easy reference.
MCP Apps (Interactive UI)
Some MCP tools return interactive UI that allows you to interact with the tool results visually. This feature is based on the MCP Apps specification.
How it works:
- When an MCP tool returns a
ui://resource URI in its response metadata, the plugin fetches and renders the HTML content - The UI is displayed in a sandboxed iframe for security (
sandbox="allow-scripts allow-forms") - Interactive apps can call additional MCP tools and update context through a JSON-RPC bridge
In Chat:
- MCP Apps appear inline in assistant messages with an expand/collapse button
- Click ⊕ to expand the app to full screen, ⊖ to collapse
In Workflows:
- MCP Apps are displayed in a modal dialog during workflow execution
- The workflow pauses to allow user interaction, then continues when the modal is closed
Security: All MCP App content runs in a sandboxed iframe with restricted permissions. The iframe cannot access the parent page's DOM, cookies, or local storage. Only
allow-scriptsandallow-formsare enabled.
Agent Skills
Extend the AI with custom instructions, reference materials, and executable workflows. Skills follow the industry-standard agent skills pattern (e.g., OpenAI Codex .codex/skills/).
- Built-in skills - Obsidian-specific knowledge (Markdown, Canvas, Bases) included out of the box. Based on kepano/obsidian-skills
- Custom instructions - Define domain-specific behavior via
SKILL.mdfiles - Reference materials - Include style guides, templates, and checklists in
references/ - Workflow integration - Skills can expose workflows as function calling tools
- Script execution - Skills can expose scripts (
.sh,.py,.js,.ts,.rb) as function calling tools (desktop only) - Slash command - Type
/folder-nameto instantly invoke a skill and send - CLI mode support - Skills work with Gemini CLI, Claude CLI, and Codex CLI backends
- Selective activation - Choose which skills are active per conversation
Create skills the same way as workflows — select + New (AI), check "Create as agent skill", and describe what you want. The AI generates both the SKILL.md instructions and the workflow.
For setup instructions and examples, see SKILLS.md
Discord Integration
Connect your Obsidian vault's LLM to Discord as a chat bot. Users can chat with the AI, switch models, use RAG search, and activate slash commands — all from Discord.
Setup
1. Create a Discord Bot
- Go to the Discord Developer Portal
- Click New Application → enter a name → Create
- Go to Bot in the left sidebar
- Click Reset Token → copy the bot token (you'll need this later)
- Under Privileged Gateway Intents, enable Message Content Intent (required to read message text)
2. Invite the Bot to Your Server
- Go to OAuth2 in the left sidebar
- Under OAuth2 URL Generator, select the bot scope
- Under Bot Permissions, select:
- Send Messages
- Read Message History
- Copy the generated URL and open it in your browser
- Select a server and authorize the bot
3. Configure in Obsidian
- Open plugin settings → Discord section
- Enable Discord Bot
- Paste the bot token
- Click Connect (the plugin verifies the token before connecting)
- The status indicator shows whether the bot is connected
Configuration Options
| Setting | Description | Default |
|---|---|---|
| Enabled | Toggle Discord bot on/off | Off |
| Bot Token | Discord bot token from Developer Portal | — |
| Respond to DMs | Whether the bot responds to direct messages | On |
| Require @mention | In server channels, only respond when @mentioned (DMs always respond) | On |
| Allowed Channel IDs | Comma-separated channel IDs to restrict (empty = all channels) | empty |
| Allowed User IDs | Comma-separated user IDs to restrict (empty = all users) | empty |
| Model Override | Specify which model to use for Discord (empty = current selected model) | empty |
| System Prompt Override | Custom system prompt for Discord conversations | empty |
| Max Response Length | Maximum characters per message (1–2000, Discord's limit) | 2000 |
[!TIP]
Finding Channel/User IDs: In Discord, enable Developer Mode (Settings → Advanced → Developer Mode). Then right-click a channel or user and select Copy ID.
Bot Commands
Users can interact with the bot using these commands in Discord:
| Command | Description |
|---|---|
!model |
List available models |
!model <name> |
Switch to a specific model for this channel |
!rag |
List available RAG settings |
!rag <name> |
Switch to a specific RAG setting for this channel |
!rag off |
Disable RAG for this channel |
!skill |
List available slash commands |
!skill <name> |
Activate a slash command (may require follow-up message) |
!research <query> |
Run Gemini Deep Research (background, may take several minutes) |
!discuss <theme> |
Start AI Discussion with configured participants (background) |
!reset |
Clear conversation history for this channel |
!help |
Show help message |
Features
- Multi-provider support — Works with all configured LLM providers (Gemini, OpenAI, Anthropic, OpenRouter, Grok, CLI, Local LLM)
- Per-channel state — Each Discord channel maintains its own conversation history, model selection, and RAG setting
- Vault tools — AI has full access to vault tools (read, write, search notes) based on your plugin settings
- RAG integration — Semantic search can be enabled per channel via
!ragcommand - Slash commands — Activate plugin slash commands via
!skill - Deep Research — Run Gemini Deep Research via
!researchcommand. Runs in the background so you can continue chatting while it works. Results are posted to the channel when complete (requires Gemini API key) - Long message splitting — Responses exceeding Discord's 2000-char limit are automatically split at natural break points
- Conversation memory — Per-channel history (max 20 messages, 30-minute TTL)
- Auto-reconnect — Recovers from connection drops with exponential backoff
[!NOTE]
Conversation history is kept in memory only and is cleared when the bot disconnects or Obsidian restarts.
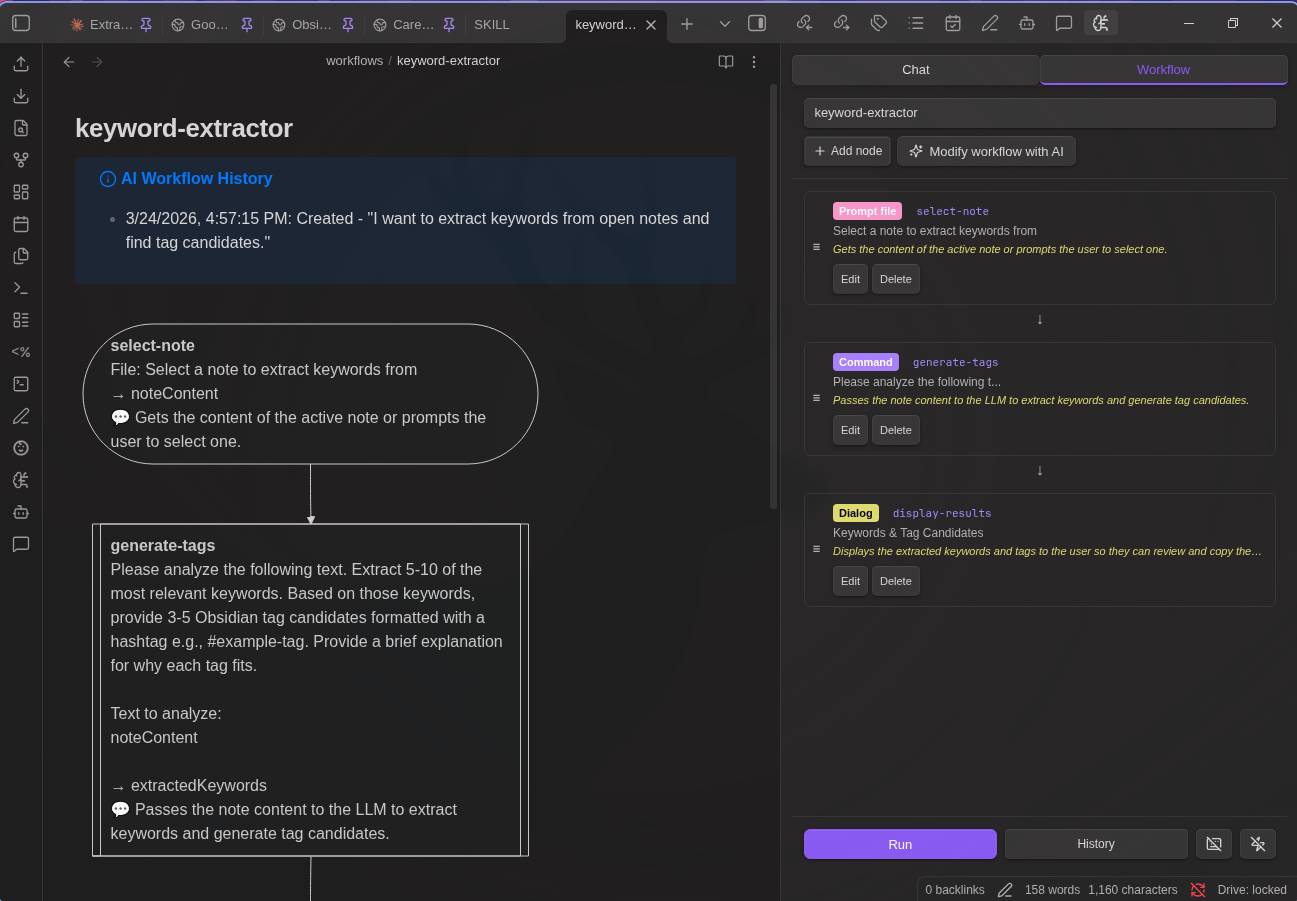
Workflow Builder
Build automated multi-step workflows directly in Markdown files. No programming knowledge required - just describe what you want in natural language, and the AI will create the workflow for you.
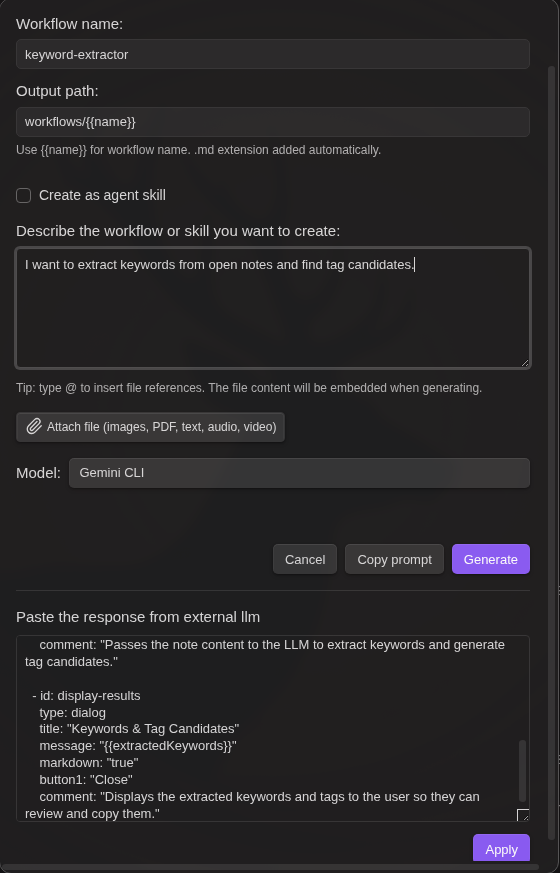
AI-Powered Workflow & Skill Creation
You don't need to learn YAML syntax or node types. Simply describe your workflow in plain language:
- Open the Workflow tab in the plugin sidebar
- Select + New (AI) from the dropdown
- Describe what you want: "Create a workflow that summarizes the selected note and saves it to a summaries folder"
- Check "Create as agent skill" if you want to create an agent skill instead of a standalone workflow
- Click Generate - the AI creates the complete workflow
Modify existing workflows the same way:
- Load any workflow
- Click the AI Modify button
- Describe changes: "Add a step to translate the summary to Japanese"
- Review and apply
Available Node Types
24 node types are available for building workflows:
| Category | Nodes |
|---|---|
| Variables | variable, set |
| Control | if, while |
| LLM | command |
| Data | http, json, script |
| Notes | note, note-read, note-search, note-list, folder-list, open |
| Files | file-explorer, file-save |
| Prompts | prompt-file, prompt-selection, dialog |
| Composition | workflow |
| External | mcp, obsidian-command |
| Utility | sleep |
For detailed node specifications and examples, see WORKFLOW_NODES.md
Hotkey Mode
Assign keyboard shortcuts to run workflows instantly:
- Add a
name:field to your workflow - Open the workflow file and select the workflow from dropdown
- Click the keyboard icon (⌨️) in the Workflow panel footer
- Go to Settings → Hotkeys → search "Workflow: [Your Workflow Name]"
- Assign a hotkey (e.g.,
Ctrl+Shift+T)
When triggered by hotkey:
prompt-fileuses the active file automatically (no dialog)prompt-selectionuses the current selection, or full file content if no selection
Event Triggers
Workflows can be automatically triggered by Obsidian events:
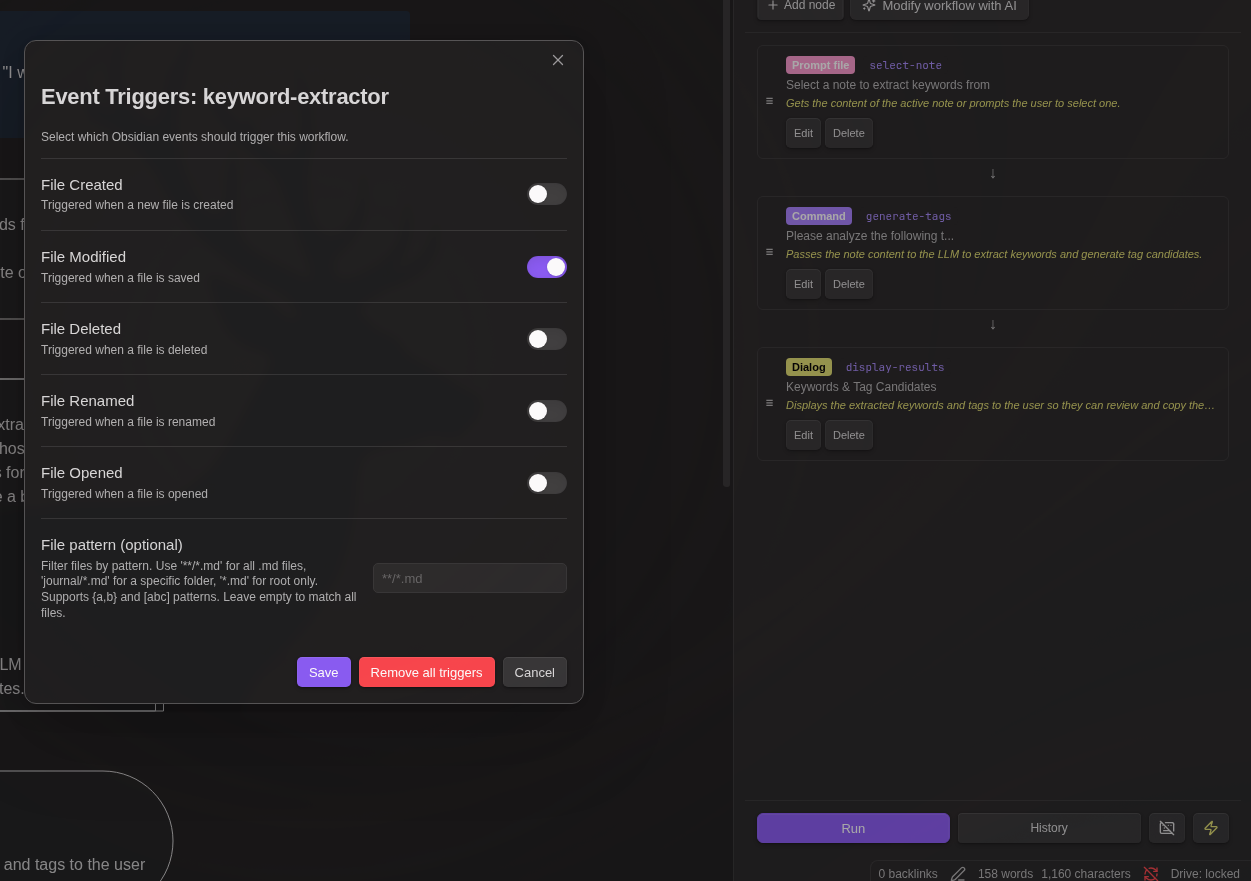
| Event | Description |
|---|---|
| File Created | Triggered when a new file is created |
| File Modified | Triggered when a file is saved (debounced 5s) |
| File Deleted | Triggered when a file is deleted |
| File Renamed | Triggered when a file is renamed |
| File Opened | Triggered when a file is opened |
Event trigger setup:
- Add a
name:field to your workflow - Open the workflow file and select the workflow from dropdown
- Click the zap icon (⚡) in the Workflow panel footer
- Select which events should trigger the workflow
- Optionally add a file pattern filter
File pattern examples:
**/*.md- All Markdown files in any folderjournal/*.md- Markdown files in journal folder only*.md- Markdown files in root folder only**/{daily,weekly}/*.md- Files in daily or weekly foldersprojects/[a-z]*.md- Files starting with lowercase letter
Event variables: When triggered by an event, these variables are set automatically:
| Variable | Description |
|---|---|
_eventType |
Event type: create, modify, delete, rename, file-open |
_eventFilePath |
Path of the affected file |
_eventFile |
JSON with file info (path, basename, name, extension) |
_eventFileContent |
File content (for create/modify/file-open events) |
_eventOldPath |
Previous path (for rename events only) |
Note:
prompt-fileandprompt-selectionnodes automatically use the event file when triggered by events.prompt-selectionuses the entire file content as the selection.
Common
Supported Models
Gemini
| Model | Description |
|---|---|
| Gemini 3.1 Pro Preview | Latest flagship model, 1M context (recommended) |
| Gemini 3.1 Pro Preview (Custom Tools) | Optimized for agentic workflows with custom tools and bash |
| Gemini 3 Flash Preview | Fast model, 1M context, best cost-performance |
| Gemini 3.1 Flash Lite Preview | Most cost-effective model with high performance |
| Gemini 2.5 Flash | Fast model, 1M context |
| Gemini 2.5 Pro | Pro model, 1M context |
| Gemini 3 Pro (Image) | Pro image generation, 4K |
| Gemini 3.1 Flash (Image) | Fast, low-cost image generation |
| Gemma 3 (27B/12B/4B/1B) | Free, no vault tool support |
Thinking mode: Use the Always Think toggles for supported chat models. Gemini 3.1 Pro always uses thinking mode and does not support disabling it.
Always Think toggle:
Click the Database icon (📦) to open the tool menu, and check the toggles under Always Think:
- Flash — OFF by default. Check to always enable thinking for Flash models.
- Flash Lite — ON by default. Flash Lite has minimal cost and speed difference with thinking enabled, so it is recommended to keep this on.
When a toggle is ON, thinking is always active for that model family regardless of message content. When OFF, the existing keyword-based detection is used.
OpenAI
| Model | Description |
|---|---|
| GPT-5.4 | Latest flagship model |
| GPT-5.4-mini | Cost-effective mid-tier model |
| GPT-5.4-nano | Lightweight, fast model |
| O3 | Reasoning model |
| DALL-E 3 / DALL-E 2 | Image generation |
Anthropic
| Model | Description |
|---|---|
| Claude Opus 4.6 | Most capable model, extended thinking |
| Claude Sonnet 4.6 | Balanced performance and cost |
| Claude Haiku 4.5 | Fast, lightweight model |
OpenRouter / Grok / Custom
Configure any OpenAI-compatible endpoint with custom base URL and models. OpenRouter provides access to hundreds of models from various providers.
Local LLM
Connect to locally running models via Ollama, LM Studio, vLLM, or AnythingLLM. Models are auto-detected from the running server.
Installation
BRAT (Recommended)
- Install BRAT plugin
- Open BRAT settings → "Add Beta plugin"
- Enter:
https://github.com/takeshy/obsidian-llm-hub - Enable the plugin in Community plugins settings
Manual
- Download
main.js,manifest.json,styles.cssfrom releases - Create
llm-hubfolder in.obsidian/plugins/ - Copy files and enable in Obsidian settings
From Source
git clone https://github.com/takeshy/obsidian-llm-hub
cd obsidian-llm-hub
npm install
npm run build
Configuration
API Providers
Add one or more API providers in plugin settings. Each provider has its own API key and model selection.
| Provider | Get API Key |
|---|---|
| Gemini | ai.google.dev |
| OpenAI | platform.openai.com |
| Anthropic | console.anthropic.com |
| OpenRouter | openrouter.ai |
| Grok | console.x.ai |
You can also add custom OpenAI-compatible endpoints.
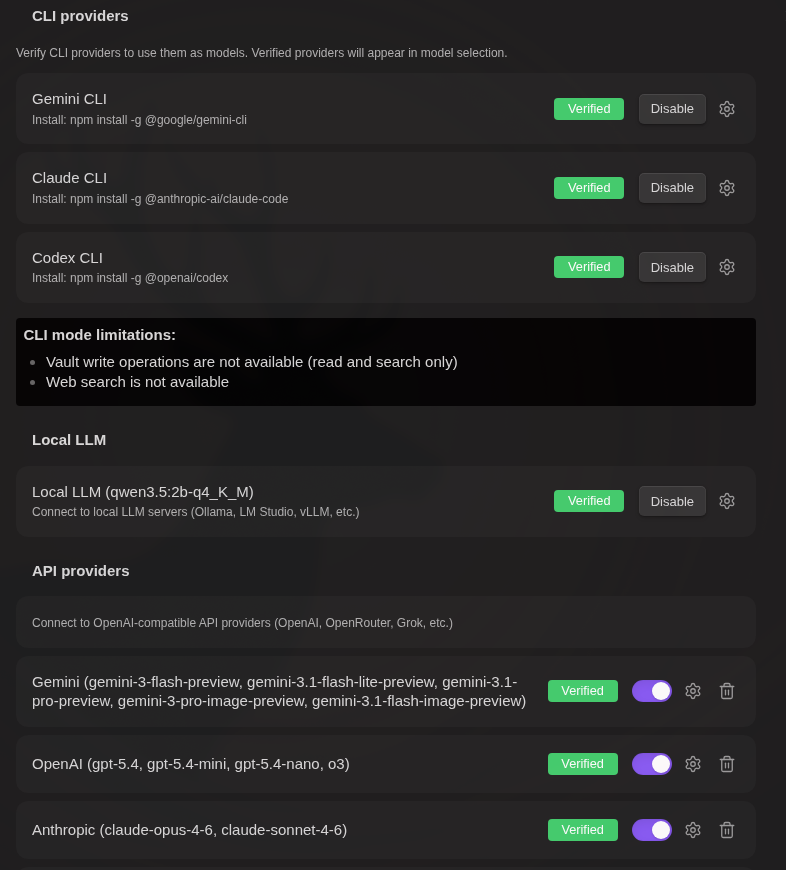
Local LLM
Connect to locally running LLM servers:
- Start your local server (Ollama, LM Studio, vLLM, or AnythingLLM)
- Enter the server URL in plugin settings
- Click "Verify" to detect available models
[!NOTE]
Local LLMs do not support function calling (vault tools). Use workflows for note operations.
CLI Mode (Gemini / Claude / Codex)
Gemini CLI:
- Install Gemini CLI
- Authenticate with
gemini→/auth - Click "Verify" in Gemini CLI section
Claude CLI:
- Install Claude Code:
npm install -g @anthropic-ai/claude-code - Authenticate with
claude - Click "Verify" in Claude CLI section
Codex CLI:
- Install Codex CLI:
npm install -g @openai/codex - Authenticate with
codex - Click "Verify" in Codex CLI section
CLI Limitations: No vault tool support, no web search, desktop only
[!NOTE]
CLI-only usage: You can use CLI mode without any API key. Just install and verify a CLI tool.
Custom CLI Path: If automatic CLI detection fails, click the gear icon (⚙️) next to the Verify button to manually specify the CLI path. The plugin searches common installation paths automatically, including version managers (nodenv, nvm, volta, fnm, asdf, mise).
Windows: How to find the CLI path- Open PowerShell and run:
Get-Command gemini - This shows the script path (e.g.,
C:\Users\YourName\AppData\Roaming\npm\gemini.ps1) - Navigate from the
npmfolder to the actualindex.js:C:\Users\YourName\AppData\Roaming\npm\node_modules\@google\gemini-cli\dist\index.js - Enter this full path in the CLI path settings
For Claude CLI, use Get-Command claude and navigate to node_modules\@anthropic-ai\claude-code\dist\index.js.
- Open a terminal and run:
which gemini - Enter the displayed path (e.g.,
/home/user/.local/bin/gemini) in the CLI path settings
For Claude CLI, use which claude. For Codex CLI, use which codex.
Node.js version managers: If you use nodenv, nvm, volta, fnm, asdf, or mise, the plugin automatically detects the node binary from common locations. If detection fails, specify the CLI script path directly (e.g., ~/.npm-global/lib/node_modules/@google/gemini-cli/dist/index.js).
[!TIP]
Claude CLI tip: Chat sessions from LLM Hub are stored locally. You can continue conversations outside of Obsidian by runningclaude --resumein your vault directory to see and resume past sessions.
Workspace Settings
- Workspace Folder - Chat history and settings location
- System Prompt - Additional AI instructions
- Tool Limits - Control function call limits
- Edit History - Track and restore AI-made changes

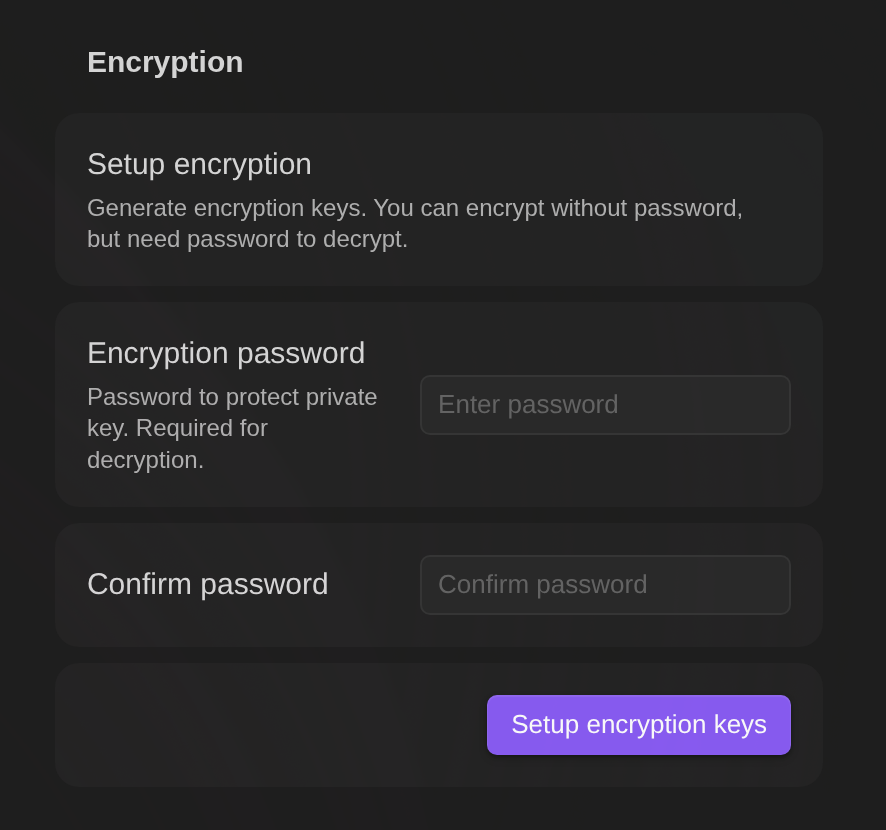
Encryption
Password-protect your chat history and workflow execution logs separately.
Setup:
- Set a password in plugin settings (stored securely using public-key cryptography)
- After setup, toggle encryption for each log type:
- Encrypt AI chat history - Encrypt chat conversation files
- Encrypt workflow execution logs - Encrypt workflow history files
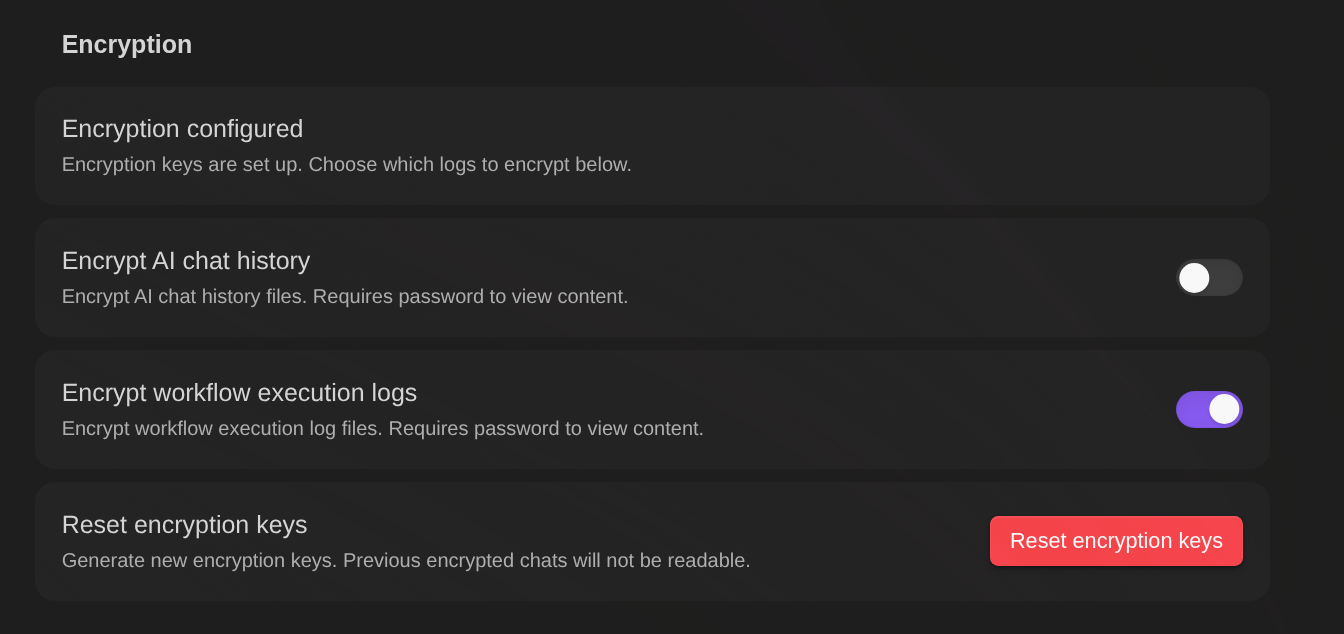
Each setting can be enabled/disabled independently.
Features:
- Separate controls - Choose which logs to encrypt (chat, workflow, or both)
- Automatic encryption - New files are encrypted when saved based on settings
- Password caching - Enter password once per session
- Dedicated viewer - Encrypted files open in a secure editor with preview
- Decrypt option - Remove encryption from individual files when needed
How it works:
[Setup - once when setting password]
Password → Generate key pair (RSA) → Encrypt private key → Store in settings

[Encryption - for each file]
File content → Encrypt with new AES key → Encrypt AES key with public key
→ Save to file: encrypted data + encrypted private key (from settings) + salt

[Decryption]
Password + salt → Restore private key → Decrypt AES key → Decrypt file content
- Key pair is generated once (RSA generation is slow), AES key is generated per file
- Each file stores: encrypted content + encrypted private key (copied from settings) + salt
- Files are self-contained — decryptable with just the password, no plugin dependency
#!/usr/bin/env python3
"""Decrypt LLM Hub encrypted files without the plugin."""
import base64, sys, re, getpass
from cryptography.hazmat.primitives import hashes, serialization
from cryptography.hazmat.primitives.kdf.pbkdf2 import PBKDF2HMAC
from cryptography.hazmat.primitives.ciphers.aead import AESGCM
from cryptography.hazmat.primitives.asymmetric import padding

def decrypt_file(filepath: str, password: str) -> str:
    with open(filepath, 'r') as f:
        content = f.read()

    # Parse YAML frontmatter
    match = re.match(r'^---\n([\s\S]*?)\n---\n([\s\S]*)$', content)
    if not match:
        raise ValueError("Invalid encrypted file format")

    frontmatter, encrypted_data = match.groups()
    key_match = re.search(r'key:\s*(.+)', frontmatter)
    salt_match = re.search(r'salt:\s*(.+)', frontmatter)
    if not key_match or not salt_match:
        raise ValueError("Missing key or salt in frontmatter")

    enc_private_key = base64.b64decode(key_match.group(1).strip())
    salt = base64.b64decode(salt_match.group(1).strip())
    data = base64.b64decode(encrypted_data.strip())

    # Derive key from password
    kdf = PBKDF2HMAC(algorithm=hashes.SHA256(), length=32, salt=salt, iterations=100000)
    derived_key = kdf.derive(password.encode())

    # Decrypt private key
    iv, enc_priv = enc_private_key[:12], enc_private_key[12:]
    private_key_pem = AESGCM(derived_key).decrypt(iv, enc_priv, None)
    private_key = serialization.load_der_private_key(base64.b64decode(private_key_pem), None)

    # Parse encrypted data: key_length(2) + enc_aes_key + iv(12) + enc_content
    key_len = (data[0] << 8) | data[1]
    enc_aes_key = data[2:2+key_len]
    content_iv = data[2+key_len:2+key_len+12]
    enc_content = data[2+key_len+12:]

    # Decrypt AES key with RSA private key
    aes_key = private_key.decrypt(enc_aes_key, padding.OAEP(
        mgf=padding.MGF1(algorithm=hashes.SHA256()), algorithm=hashes.SHA256(), label=None))

    # Decrypt content
    return AESGCM(aes_key).decrypt(content_iv, enc_content, None).decode('utf-8')

if __name__ == "__main__":
    if len(sys.argv) != 2:
        print(f"Usage: {sys.argv[0]} <encrypted_file>")
        sys.exit(1)
    password = getpass.getpass("Password: ")
    print(decrypt_file(sys.argv[1], password))
Requires: pip install cryptography
Warning: If you forget your password, encrypted files cannot be recovered. Keep your password safe.
Tip: To encrypt all files in a directory at once, use a workflow. See the "Encrypt all files in a directory" example in WORKFLOW_NODES.md.

Security benefits:
- Protected from AI chat - Encrypted files cannot be read by AI vault operations (
read_notetool). This keeps sensitive data like API keys safe from accidental exposure during chat. - Workflow access with password - Workflows can read encrypted files using the
note-readnode. When accessed, a password dialog appears, and the password is cached for the session. - Store secrets safely - Instead of writing API keys directly in workflows, store them in encrypted files. The workflow reads the key at runtime after password verification.
Semantic Search (RAG)
Local vector-based search that injects relevant vault content into LLM conversations. No external RAG server required — embeddings are generated and stored locally.
Setup:
- Go to Settings → RAG section
- Create a new RAG setting (click
+) - Configure embedding:
- Default (Gemini): Leave Embedding Base URL empty — uses Gemini Embedding API with your Gemini API key
- Custom server (Ollama etc.): Set Embedding Base URL and select a model
- Click Sync to build the vector index from your vault
- Select the RAG setting in the dropdown to activate it
| Setting | Description | Default |
|---|---|---|
| Embedding Base URL | Custom embedding server URL (empty = Gemini API) | empty |
| Embedding API Key | API key for custom server (empty = Gemini key) | empty |
| Embedding Model | Model name for embedding generation | gemini-embedding-2-preview |
| Chunk Size | Characters per chunk | 500 |
| Chunk Overlap | Overlap between chunks | 100 |
| PDF Chunk Pages | Number of PDF pages per embedding chunk (1–6) | 6 |
| Top K | Max chunks to retrieve per query | 5 |
| Score Threshold | Minimum similarity score (0.0–1.0) to include in results | 0.5 |
| Target Folders | Limit indexing to specific folders (empty = all) | empty |
| Exclude Patterns | Regex patterns to exclude files from indexing | empty |
Multimodal indexing (images, PDFs, audio, video) is automatically enabled when using Gemini native embedding models (
gemini-embedding-*). No manual configuration needed.
External Index:
Use a pre-built index instead of syncing from the vault:
- Enable Use external index toggle
- Set the absolute path to a directory containing
index.jsonandvectors.bin - Optionally set Embedding Base URL for query embedding (empty = Gemini API)
- The embedding model is auto-detected from the index file
How it works: When RAG is active, each chat message triggers a local vector search. Relevant chunks are injected into the system prompt as context. Sources are shown in the chat UI — click to open the referenced note.
RAG Search Tab
The RAG Search tab (between Chat and Workflow) provides a dedicated interface for searching and browsing your RAG index.
Search features:
- Select RAG setting, adjust Top K and score threshold per search
- Text results display with expandable accordion (click to show full text)
- PDF results display with inline PDF page preview (extracted chunk pages)
- Index settings (gear icon) — edit Chunk Size, Chunk Overlap, PDF Chunk Pages, Target Folders, and Exclude Patterns directly from the search tab. Includes a Sync button, progress bar, last-sync timestamp, and an indexed-files list with per-file chunk counts
Sending results to Chat:
- Select results with checkboxes (or "Select all")
- Click Chat with selected
- Results are added as attachments in the Chat input area
- The Chat RAG dropdown is automatically set to "none" to avoid duplicate RAG injection
Editing attachments:
- Click a text attachment label in the Chat input area to open it in a modal
- Edit the text and save — the attachment content is updated before sending
PDF result handling:
- Internal RAG (indexed by this plugin): PDFs are attached as extracted page chunks (the actual PDF pages)
- External RAG (pre-built index with extracted text): A per-result dropdown lets you choose "As text" (editable) or "As PDF chunk" (page extraction)
External file links: In search results, clicking a file path opens vault files in Obsidian, or opens external files with the OS default application.
If no RAG settings exist, the tab shows a setup guide with a link to plugin settings.
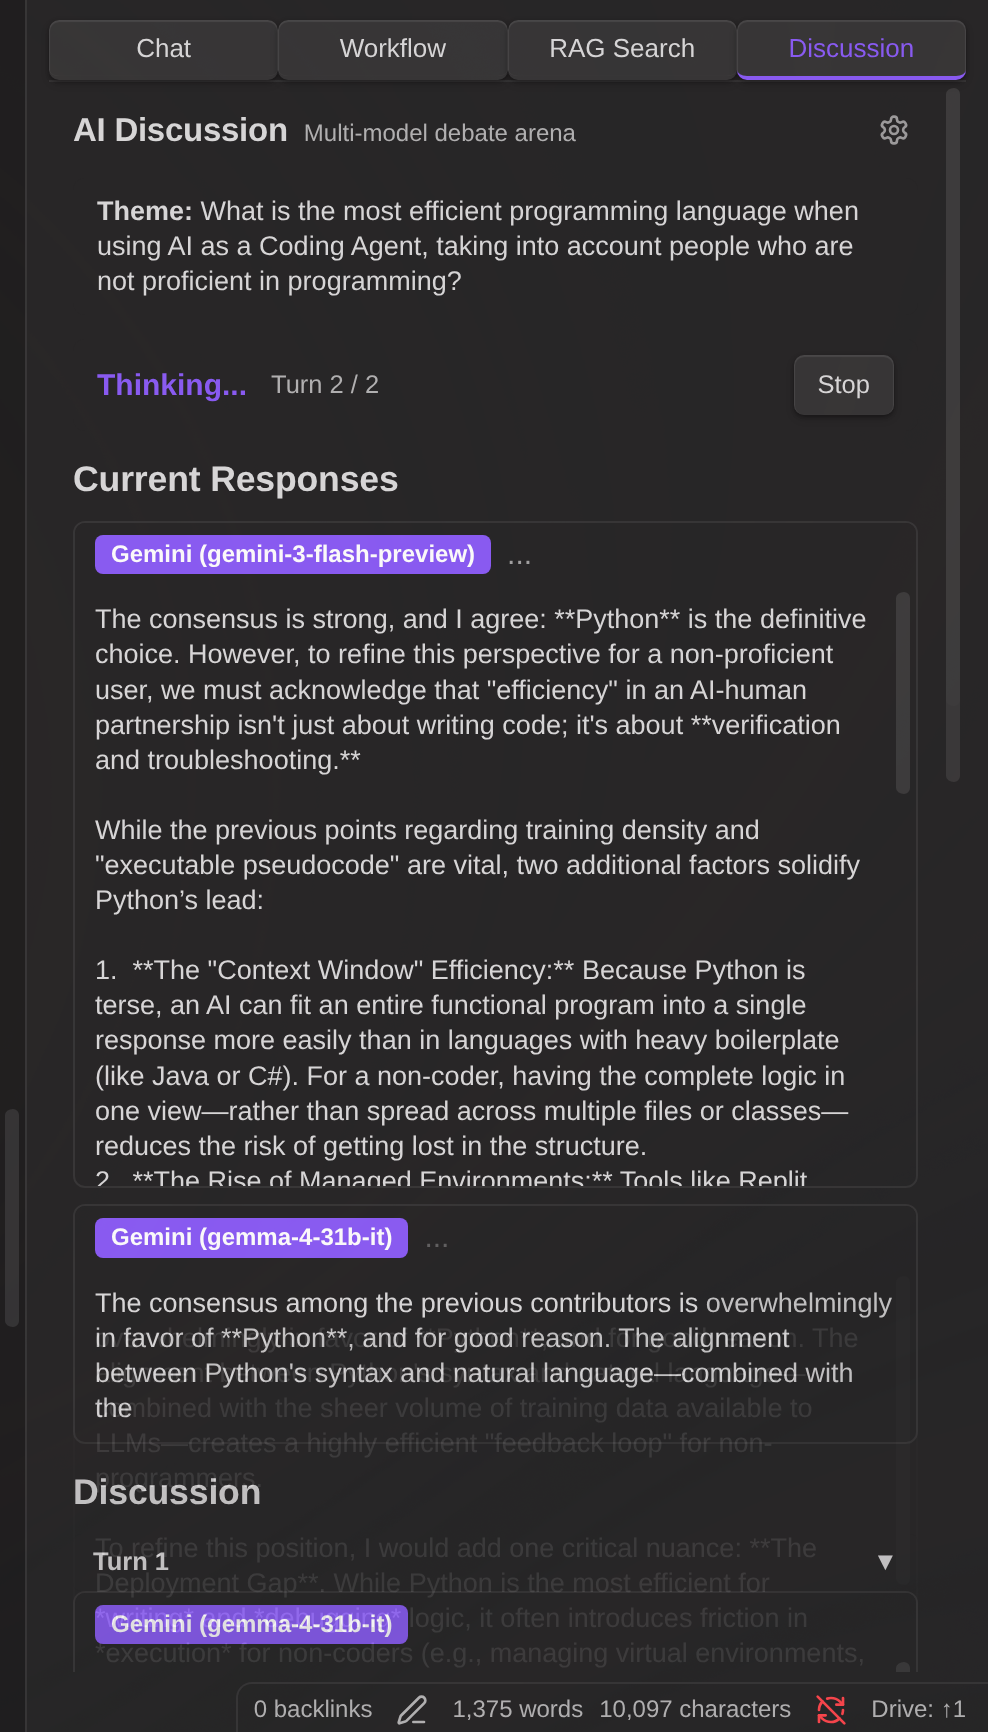
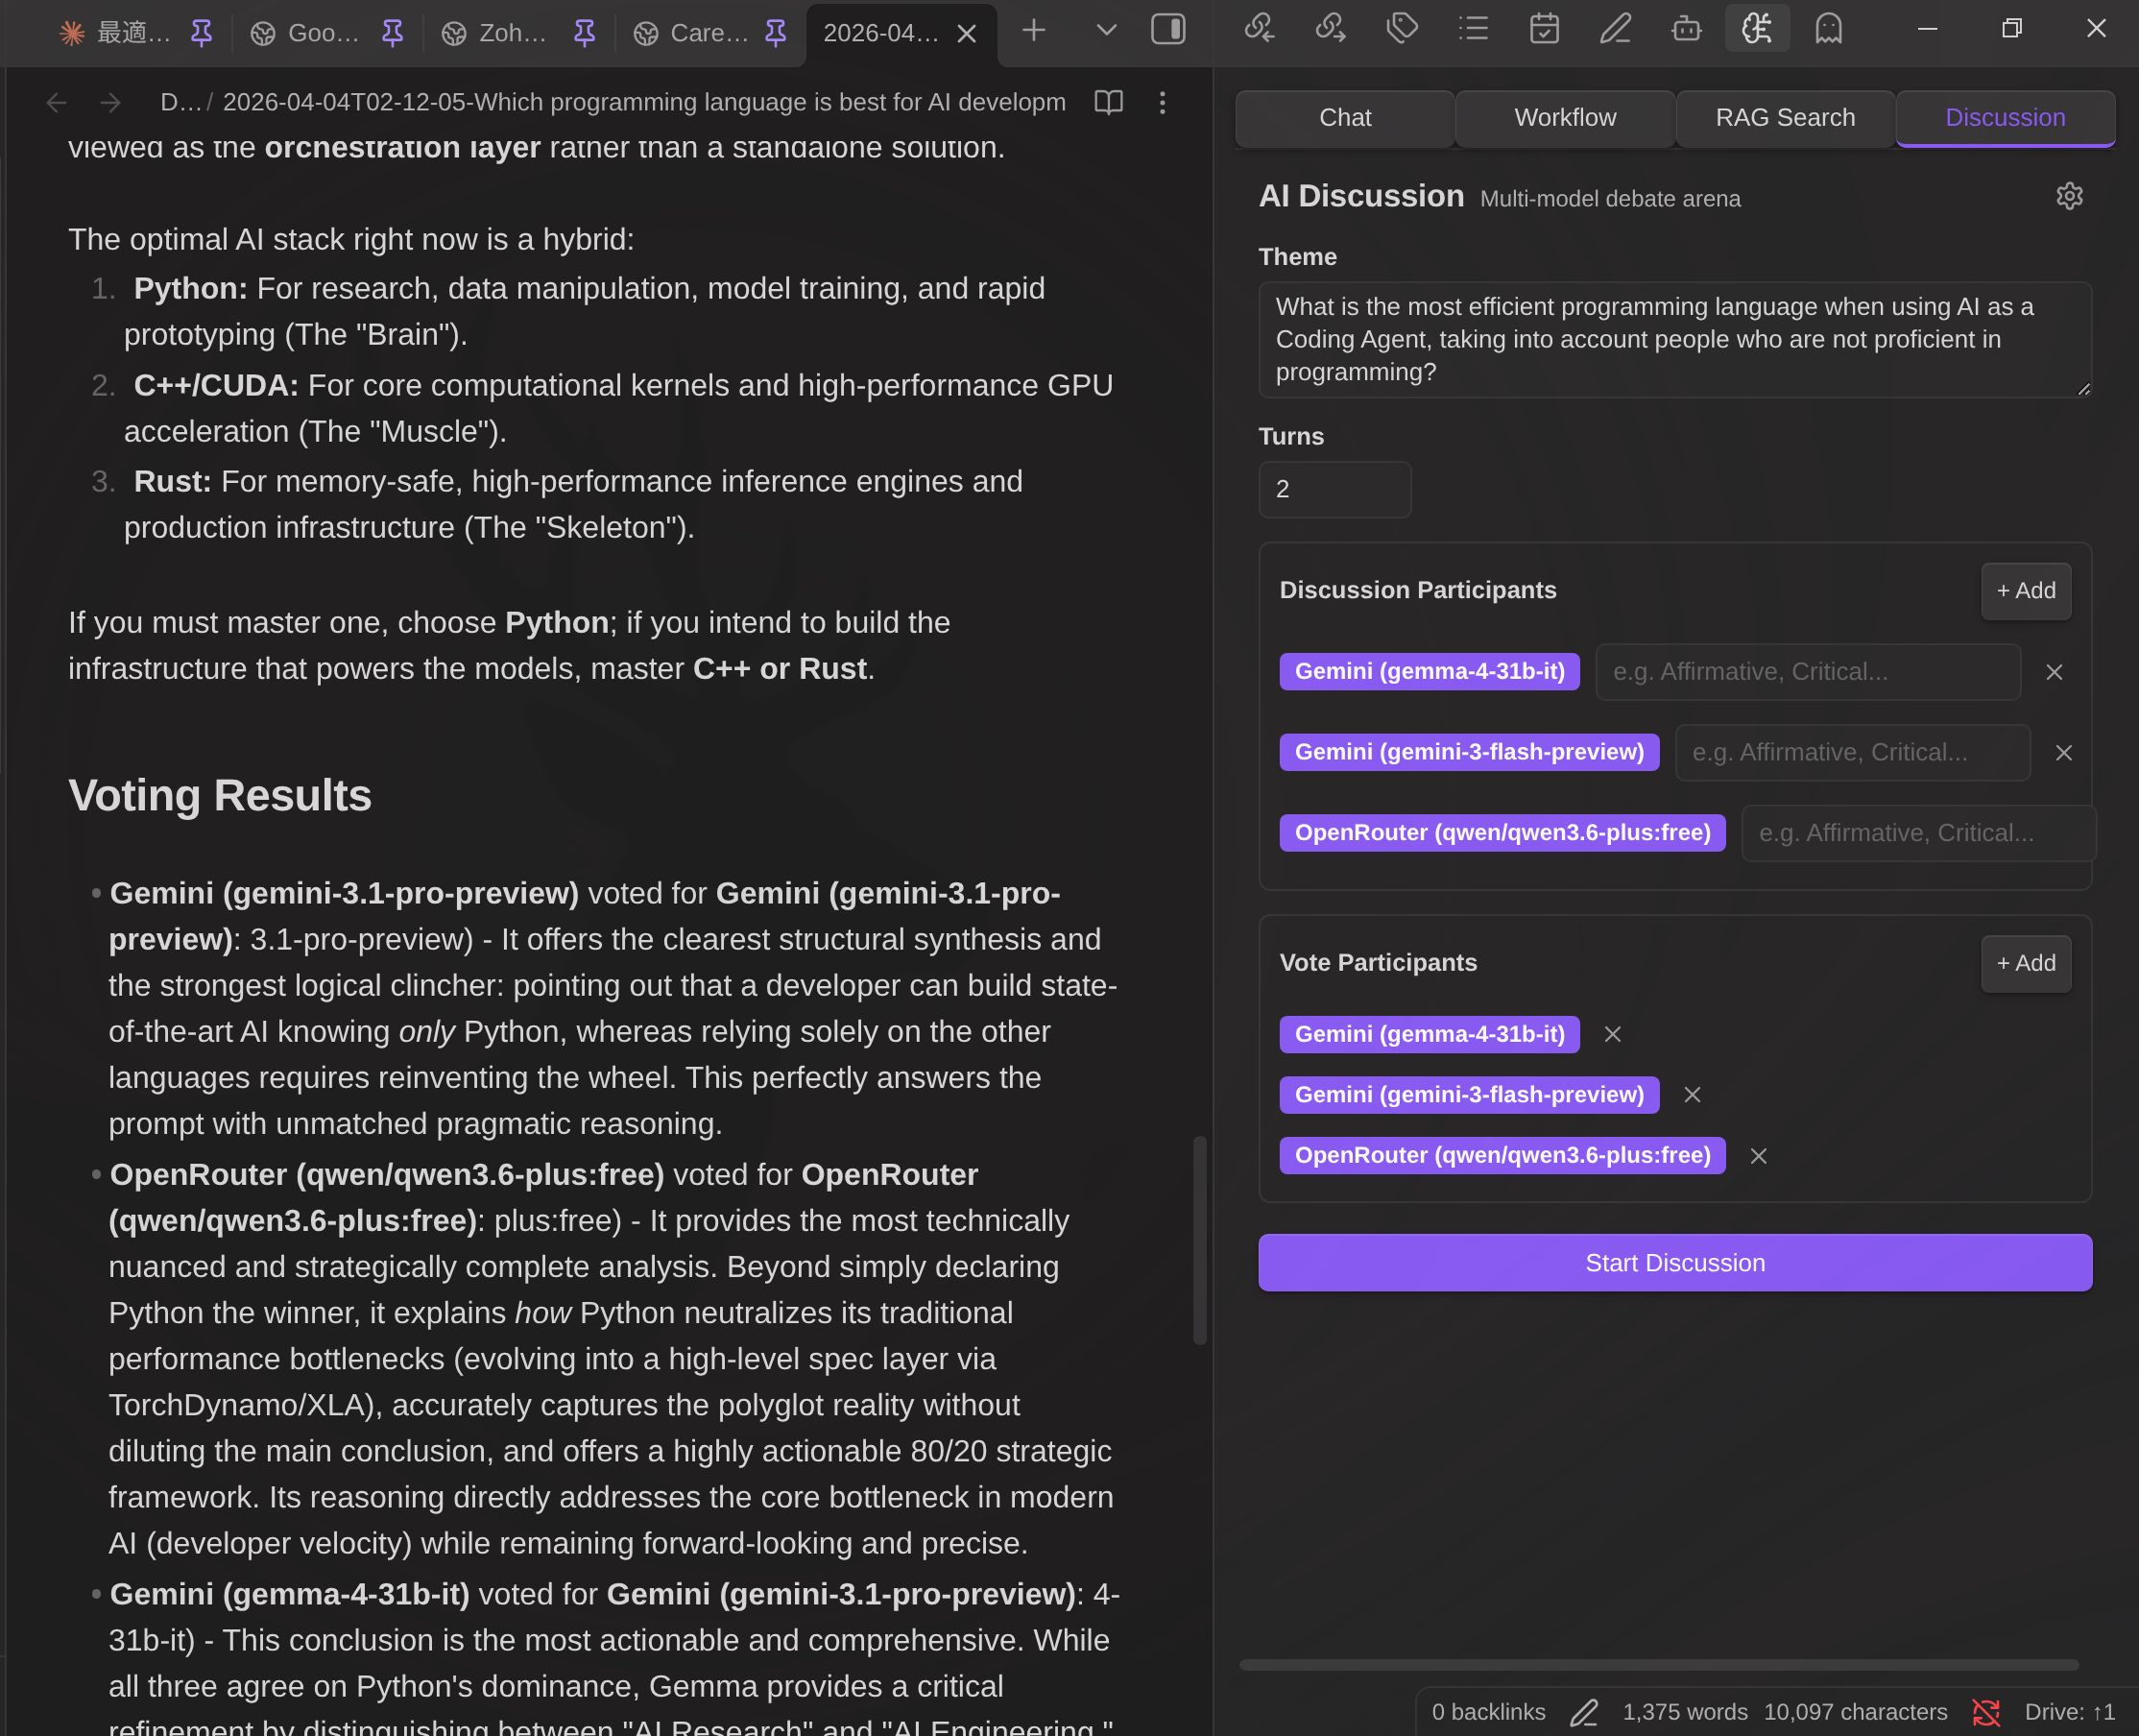
AI Discussion
The Discussion tab provides a multi-model debate arena where multiple AI models discuss a topic in parallel, draw conclusions, and vote on the best answer.
How it works:
- Open the Discussion tab
- Enter a discussion theme
- Add participants — choose any available model (API, CLI, Local LLM) or User
- Optionally assign roles to participants (e.g., "Affirmative", "Critical")
- Set the number of turns
- Click Start Discussion
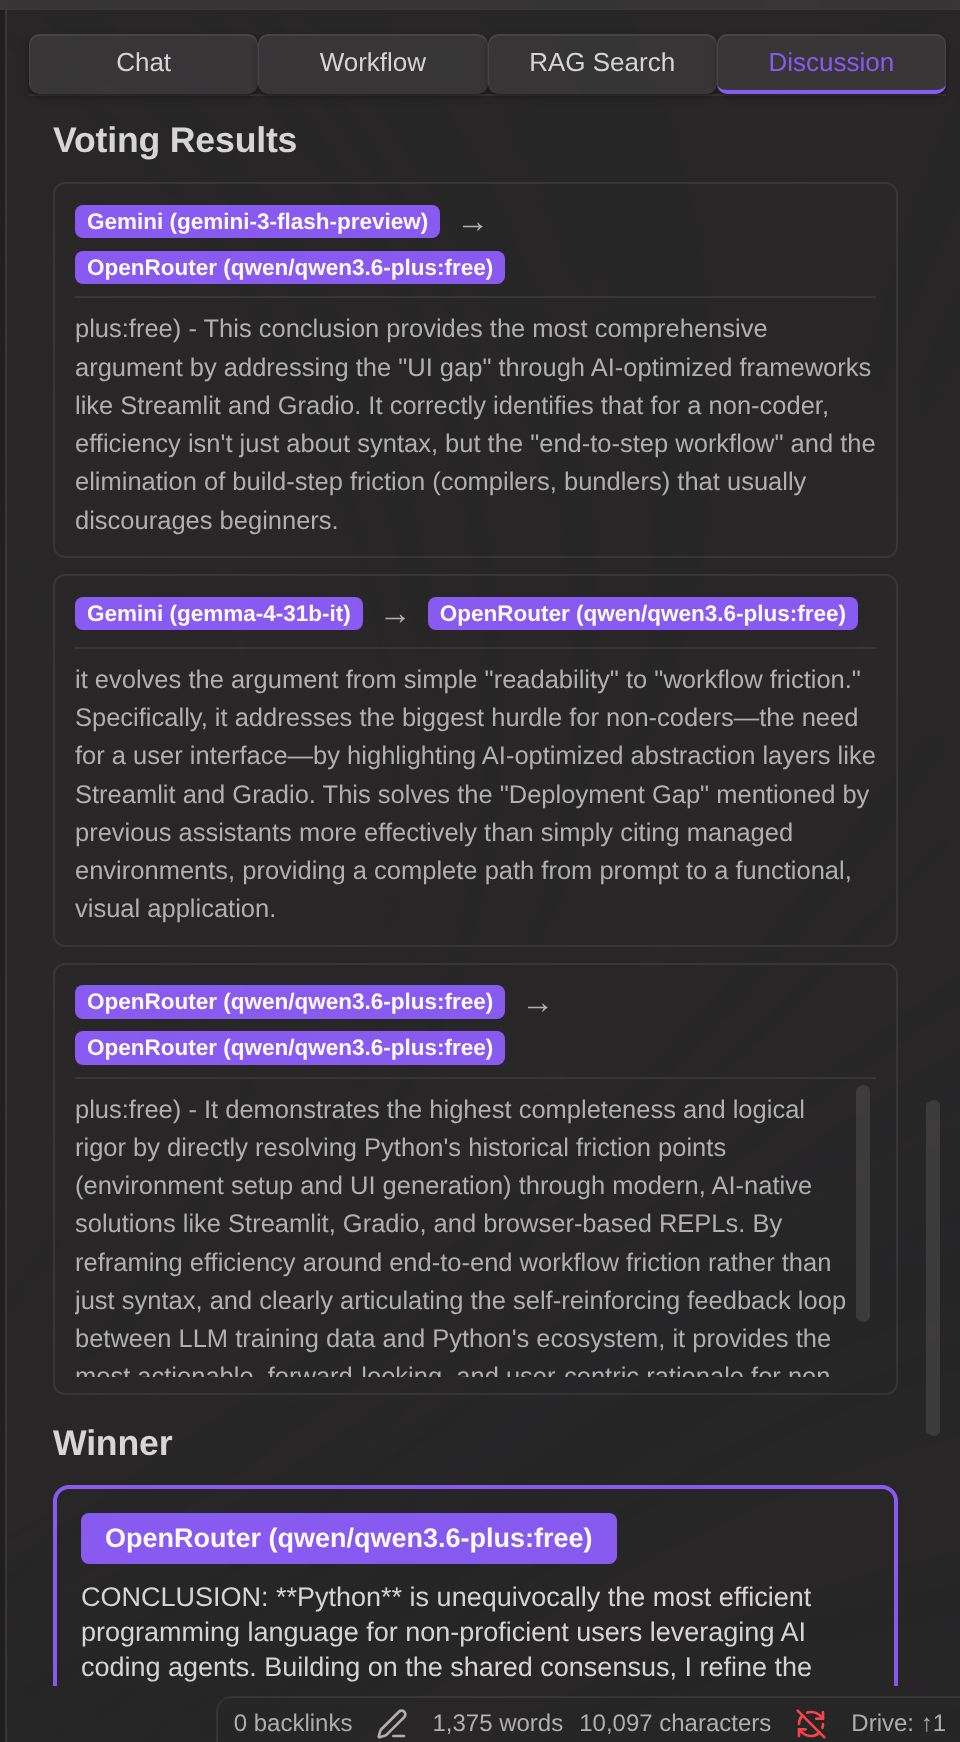
Discussion flow:
- Discussion turns — All participants respond in parallel. Each turn builds on previous responses.
- Conclusion — In the final turn, each participant provides their conclusion.
- Voting — Vote participants evaluate all conclusions and vote for the best one.
- Result — The winner (or draw) is announced. Save the full transcript as a Markdown note.
Features:
- Any model as participant — Mix models freely (e.g., Gemini vs Claude vs GPT)
- User participation — Add yourself as a participant or voter for human-in-the-loop discussions
- Role assignment — Give each participant a perspective (e.g., "Optimist", "Skeptic")
- Separate vote participants — Vote participants are auto-synced from discussion participants but can be customized independently
- Persistent configuration — Participants and voters are saved and restored across sessions
- Settings modal — Click the gear icon (⚙️) to configure system prompt, conclusion prompt, vote prompt, output folder, and default turns
- Save as note — Export the complete discussion (turns, conclusions, votes, winner) as a Markdown file
Slash Commands
- Define custom prompt templates triggered by
/ - Optional model and search override per command
Requirements
- Obsidian v0.15.0+
- At least one of: API key (Gemini, OpenAI, Anthropic, OpenRouter, Grok), local LLM server, or CLI tool
- Desktop only (for mobile, see Gemini Helper)
Privacy
Data stored locally:
- API keys (stored in Obsidian settings)
- Chat history (as Markdown files, optionally encrypted)
- Workflow execution history (optionally encrypted)
- RAG vector index (stored in workspace folder)
- Encryption keys (private key encrypted with your password)
Data sent to LLM providers:
- Chat messages and file attachments are sent to the configured API provider (Gemini, OpenAI, Anthropic, OpenRouter, Grok, or custom endpoint)
- When Web Search is enabled (Gemini only), queries are sent to Google Search
- Local LLM providers send data only to your local server
Data sent to third-party services:
- Workflow
httpnodes can send data to any URL specified in the workflow
CLI providers (optional):
- When CLI mode is enabled, external CLI tools (gemini, claude, codex) are executed via child_process
- This only occurs when explicitly configured and verified by the user
- CLI mode executes external CLI tools via child_process
Discord bot (optional):
- When enabled, the plugin connects to Discord via WebSocket Gateway and sends user messages to the configured LLM provider
- Bot token is stored in Obsidian settings
- Message content from Discord channels is processed by the LLM — configure allowed channels/users to restrict access
MCP servers (optional):
- MCP (Model Context Protocol) servers can be configured in plugin settings for workflow
mcpnodes - MCP servers are external services that provide additional tools and capabilities
Security notes:
- Review workflows before running -
httpnodes can transmit vault data to external endpoints - Workflow
notenodes show a confirmation dialog before writing files (default behavior) - Slash commands with
confirmEdits: falsewill auto-apply file edits without showing Apply/Discard buttons - Sensitive credentials: Do not store API keys or tokens directly in workflow YAML (
httpheaders,mcpsettings, etc.). Instead, store them in encrypted files and usenote-readnode to retrieve them at runtime. Workflows can read encrypted files with password prompt.
See each provider's terms of service for data retention policies.
License
MIT
Links
Support
If you find this plugin useful, consider buying me a coffee!
Yorumlar (0)
Yorum birakmak icin giris yap.
Yorum birakSonuc bulunamadi