AgentsBear
Health Uyari
- License — License: MIT
- Description — Repository has a description
- Active repo — Last push 0 days ago
- Low visibility — Only 7 GitHub stars
Code Gecti
- Code scan — Scanned 12 files during light audit, no dangerous patterns found
Permissions Gecti
- Permissions — No dangerous permissions requested
This tool provides a CLI and Web UI framework for defining and running autonomous, multi-agent AI pipelines from declarative YAML files. It acts as a wrapper around LangGraph and allows users to seamlessly run workflows using almost any LLM provider.
Security Assessment
Risk: Medium. The tool is designed to execute custom shell commands directly from YAML configuration files, which introduces inherent execution risks if untrusted pipeline files are loaded. It makes external network requests to interact with various LLM APIs. The automated code scan checked 12 files and found no dangerous code patterns, hardcoded secrets, or requests for overly broad system permissions. However, the ability to execute arbitrary shell commands via YAML still warrants caution.
Quality Assessment
The project is actively maintained, with its most recent code push occurring today. It is properly licensed under the standard MIT license. However, community trust and visibility are currently very low. The repository has only 7 GitHub stars, indicating that it has not yet been widely tested or reviewed by a broad user base.
Verdict
Use with caution — the code is currently safe and actively maintained, but the low community adoption and built-in ability to execute arbitrary shell commands mean you should carefully inspect any third-party YAML pipelines before running them.
Autonomous multi-agent pipelines from YAML. Any LLM. Zero boilerplate.

AgentsBear
Define · Run · Monitor AI Agent Pipelines
A CLI + Web UI framework for building fully autonomous AI agent pipelines from declarative YAML files.
No Python wiring. No boilerplate. Just describe your pipeline and run it.
What is AgentsBear?
AgentsBear lets you describe a multi-agent AI pipeline in a single .yaml file — the tools, prompts, parallelism, output schemas, and backends — and then run it with one command. Instead of writing Python code to wire up agents, you declare the structure and let AgentsBear compile and execute it on top of deepagents and LangGraph.
Pipelines are portable: share a single agent.yaml file and anyone with AgentsBear installed can run the exact same pipeline against their own inputs.
Key features:
- Declarative YAML pipelines — agent steps, parallel execution, sequential groups, conditionals, for-each loops, shell steps
- Any LLM provider — OpenAI, Anthropic, Google Gemini, Mistral, Groq, or any Ollama-compatible local model
- Custom shell tools — define tools as shell commands directly in YAML; no Python required
- Multiple backends — filesystem, in-memory, or null (no tool access)
- Context passing — outputs flow between steps via
depends_onand{context.step_id}templates - Output formats — JSON arrays/objects, markdown reports, saved to file
- Web UI — live pipeline builder, run monitor, logs viewer, and docs — all in the browser
- Visual pipeline builder — drag-and-drop canvas with zoom, pan, and YAML import/export
Why AgentsBear?
The Docker analogy
Think about what Docker did for infrastructure.
Before Docker, if you needed to test or deploy an application, you either set up a full virtual machine — provisioning an OS, installing dependencies, configuring networking — or you ran it directly on your machine and hoped the environment matched production. Both options were heavy, slow to reproduce, and painful to share.
Docker changed that with a simple idea: describe your environment in a config file, and let the tool handle the rest. A Dockerfile + docker-compose.yml replaced hundreds of lines of shell scripts and VM snapshots. You could share it with your team, run it on any machine, and get identical behaviour every time.
AgentsBear does the same thing for AI agent pipelines.
Before AgentsBear, if you needed a multi-step AI agent that audits 100 files in parallel, extracts IOCs, maps MITRE techniques, and writes a report — you either:
- Prompted Claude Code or Cursor interactively, babysitting each step manually, or
- Wrote hundreds of lines of Python: wiring LangGraph nodes, handling async execution, parsing outputs, managing prompt files, building logging
AgentsBear replaces all of that with a single agent.yaml. Describe the pipeline — the steps, the parallelism, the tools, the prompts, the outputs — and run it with one command. Share it with anyone. Run it on any machine. Get identical results every time.
Virtual Machine  →  Docker           (infrastructure)
Bespoke AI code  →  AgentsBear YAML  (agent pipelines)
AgentsBear vs everything else
| AgentsBear | Claude Code / Tasks / Agents | Writing from scratch (Python SDK, LangChain) | LangGraph / CrewAI directly | |
|---|---|---|---|---|
| Barrier to entry | One YAML file, one command | Zero — just type | Hundreds of lines of code | Graph theory + Python boilerplate |
| Parallelism | type: parallel — one line |
❌ Not structured — you prompt and hope | asyncio.gather() + manual wiring |
Manual node fan-out + edge config |
| Iterate over a list | type: for_each — one line |
❌ Not natively possible | Python for loop + async task management |
Manual fan-out nodes per item |
| Conditionals | type: conditional — one line |
❌ No structured branching | Python if/else in your orchestration code |
Manual conditional edges |
| 35 parallel scanner agents | 35 lines of YAML | ❌ You'd have to prompt each one manually | ~500 lines of Python | ~300 lines + graph config |
| Custom tools | Shell command in YAML — no code | ❌ Model-specific, session-bound | Python decorator + function body | Python decorator + function body |
| Prompt management | Files, inline text, or merged multi-file | Typed into the chat, lost after session | Scattered across Python string variables | Scattered across Python string variables |
| Output schema enforcement | Declared in YAML, auto-validated | ❌ Not enforced — model does what it wants | Manual JSON parsing + error handling | Manual parsing |
| Portability | Share one .yaml — runs anywhere |
❌ Session-bound, not shareable | Share entire Python codebase | Share entire Python codebase |
| Reproducibility | Fully deterministic — same YAML = same run | ❌ Varies with session state and model mood | Reproducible if env matches | Reproducible if env matches |
| Provider flexibility | Swap LLM with one line in YAML | ❌ Locked to the tool's provider | Code changes per provider | Provider-specific config |
| Local / offline | Fully local with Ollama, no changes | ❌ Cloud-only | Possible but manual setup | Possible but manual setup |
| Visual pipeline builder | ✅ Built-in drag-and-drop canvas | ❌ None | ❌ None | LangSmith (cloud, paid) |
| Run history + logs | ✅ Built-in Web UI | ❌ None | ❌ DIY logging | DIY or LangSmith (paid) |
| Learning curve | YAML — readable by anyone, no code required | Natural language chat | Python expertise required | Python + graph theory required |
The real cost of "just using Claude Code"
Claude Code, Cursor, and AI coding assistants are exceptional tools — for interactive, conversational work. But they have a fundamental mismatch with structured, repeatable, batch pipeline work:
- No structure — you can't define "run these 35 agents in parallel, then collect and merge their outputs." You describe it in prose and hope the model follows it faithfully every time.
- No persistence — your "pipeline" lives in a chat session. Close the window and it's gone. There's no
agent.yamlto version-control, share, or re-run. - No parallelism — interactive assistants are sequential by nature. Running 35 scanners in parallel on 200 files is not something you can express in a chat prompt.
- No output guarantees — you can ask for JSON, but there's no schema enforcement, no fallback handling, no structured collection across multiple agents.
- Not portable — you can't send your colleague a file and say "run this exact pipeline." You'd send them a conversation transcript and a prayer.
AgentsBear handles exactly the workloads where interactive assistants fall short: structured, parallel, reproducible, multi-agent pipelines that need to run reliably against real data.
The real cost of writing it from scratch
Writing a multi-agent pipeline in raw Python is absolutely possible. It's also:
- 500–1000 lines of code for what AgentsBear expresses in 50 lines of YAML
- Weeks of work to build async orchestration, prompt loading, output parsing, logging, schema validation, and a UI
- Fragile — tightly coupled to a specific LLM provider, Python version, and environment
- Not shareable — your colleagues need to understand your codebase before they can run or modify a pipeline
- No visual builder — you debug by reading code, not by looking at a graph
AgentsBear is the abstraction layer that eliminates all of that. The YAML is the source of truth. The execution engine, the parallelism, the logging, the UI — it's all handled.
Table of Contents
- Installation
- Quick Start
- Building Your Own Agent
- Folder structure
- The three real-world layouts
- Step-by-step: build an agent from scratch
- Adding custom tools
- Controlling tool access per step
- Using shell steps for data preparation
- Prompt writing tips
- Running agents in parallel
- Iterating with for_each
- Conditional branching
- Defining output schemas
- Passing context between steps
- collect modes for parallel and for_each
- YAML Pipeline Syntax
- CLI Reference
- Web UI
- LLM Providers
- Examples
- Documentation
- Acknowledgements
Installation
Requirements: Python 3.11 or higher, and at least one LLM API key (or a local Ollama instance).
From source (current method)
With pip + venv:
git clone https://github.com/Zeyad-Azima/AgentsBear
cd AgentsBear

# Create and activate a virtual environment
python3 -m venv .venv
source .venv/bin/activate        # macOS / Linux
# .venv\Scripts\activate         # Windows

# Install core — includes OpenAI + Anthropic providers
pip install -e .
With uv (recommended — faster):
git clone https://github.com/Zeyad-Azima/AgentsBear
cd AgentsBear

uv venv                          # Creates .venv automatically
source .venv/bin/activate
uv pip install -e .
With extra LLM providers
pip install -e ".[gemini]"          # Google Gemini
pip install -e ".[mistral]"         # Mistral AI
pip install -e ".[groq]"            # Groq (fast inference)
pip install -e ".[all-providers]"   # All providers
pip install -e ".[all]"             # All providers + dev tools
Set your API key
export ANTHROPIC_API_KEY="sk-ant-..."
export OPENAI_API_KEY="sk-..."
export GOOGLE_API_KEY="..."          # Gemini
export MISTRAL_API_KEY="..."
export GROQ_API_KEY="..."

# For local Ollama — no key needed, just set base_url in agent.yaml
Quick Start
1. Clone and install:
git clone https://github.com/Zeyad-Azima/AgentsBear
cd AgentsBear
python3 -m venv .venv && source .venv/bin/activate
pip install -e .
2. Import an example agent:
agentsbear import examples/files-summary/agent.yaml
3. Run it:
agentsbear run files-summary --input source=./my-project
4. That's it. AgentsBear prompts for any missing required inputs, then executes the full pipeline.
Or write your own pipeline in 30 seconds:
# my-agent.yaml
name: my-agent
version: "1.0"
model: anthropic:claude-sonnet-4-6

input:
  - name: source
    type: dir
    required: true

pipeline:
  - id: summarize
    type: agent
    system_prompt: "You are a helpful assistant. Summarize what you find."
    output:
      format: markdown
      save_to: "./summary.md"
agentsbear import my-agent.yaml
agentsbear run my-agent --input source=./my-project
Building Your Own Agent
Folder structure
Every AgentsBear agent lives in its own directory. The structure is always the same:
my-agent/
├── agent.yaml                  ← The pipeline definition (required)
│
├── prompts/                    ← System prompts — one file per agent role
│   ├── analyzer.md             ← System prompt for the "analyzer" step
│   ├── report_writer.md        ← System prompt for the "report" step
│   │
│   ├── shared/                 ← Shared prompt fragments merged with system_prompt_files
│   │   └── preamble.md         ← Common instructions injected into multiple agents
│   │
│   ├── scanners/               ← One prompt per specialist scanner agent
│   │   ├── sql_injection.md
│   │   ├── xss.md
│   │   └── ...
│   │
│   └── messages/               ← User-turn messages (the task sent to each agent)
│       ├── analyzer.md         ← Task message for the "analyzer" step
│       ├── scanner.md          ← Shared task message used by all scanners
│       └── report_writer.md
│
├── schemas/                    ← JSON schemas for output validation (optional)
│   └── findings.json
│
└── scripts/                    ← Helper shell scripts called by shell steps (optional)
    ├── parse_report.py
    └── unpack_finding.py
Convention:
prompts/<step_id>.mdis the system prompt.prompts/messages/<step_id>.mdis the user-turn task message. AgentsBear doesn't enforce this layout — it's just the pattern all examples follow, and it scales cleanly.
The three real-world layouts
Minimal — a simple single-agent pipeline:
files-summary/
├── agent.yaml
└── prompts/
    ├── explore.md
    ├── summarize.md
    ├── report.md
    └── messages/
        └── task.md
Standard — multiple roles with shared preamble:
malware-static-analyzer/
├── agent.yaml
└── prompts/
    ├── triage.md
    ├── obfuscation_analyzer.md
    ├── import_analyzer.md
    ├── persistence_detector.md
    ├── mitre_mapper.md
    ├── report_writer.md
    └── messages/
        ├── triage.md
        ├── analysis.md
        ├── enrichment.md
        └── report_writer.md
Advanced — for_each pipeline with specialist scanner groups, shared preamble, and helper scripts:
java-security-audit/
├── agent.yaml
├── schemas/
│   └── findings.json           ← Enforces JSON output structure
└── prompts/
    ├── comprehension.md        ← Round 0: understand the file
    ├── report_writer.md        ← Final: write the per-file report
    │
    ├── shared/
    │   └── preamble.md         ← Injected into every scanner via system_prompt_files
    │
    ├── scanners/               ← 35 specialist scanner prompts
    │   ├── sql_injection.md
    │   ├── xss.md
    │   ├── deserialization.md
    │   └── ...
    │
    └── messages/
        ├── scanner.md          ← Single shared task message for all 35 scanners
        └── report_writer.md
With scripts for shell steps:
java-validate-findings/
├── agent.yaml
├── prompts/  ...
└── scripts/
    ├── parse_report.py         ← Called by a shell step to split a report into findings
    └── unpack_finding.py       ← Called per-iteration to prepare finding context
Step-by-step: build an agent from scratch
Step 1 — Create the folder:
mkdir my-agent && cd my-agent
Step 2 — Write the system prompts:
mkdir -p prompts/messages

# System prompt — tells the agent its role
cat > prompts/analyzer.md << 'EOF'
You are a code analysis expert. Your job is to read the target file
and identify its purpose, dependencies, and key logic flows.

Return a JSON object with keys: purpose, dependencies, key_functions, complexity.
EOF

# Task message — the user-turn sent to the agent at runtime
cat > prompts/messages/analyzer.md << 'EOF'
## TARGET FILE
`{loop.file}`

## PROJECT ROOT
`{input.source}`

Analyse the target file now. Return JSON per your instructions.
EOF
Step 3 — Write agent.yaml:
name: my-agent
version: "1.0"
description: "Analyse every Python file in a project"
model: anthropic:claude-sonnet-4-6

backend:
  type: filesystem
  root: "{input.source}"

input:
  - name: source
    type: dir
    required: true
    description: "Project root directory"
  - name: output
    type: dir
    required: false
    default: "./reports"

pipeline:

  # Step 1 — find all Python files
  - id: find_files
    type: shell
    command: "find {input.source} -name '*.py' | sort"
    output:
      format: array
      split: "\n"
      strip_empty: true

  # Step 2 — analyse each file in parallel
  - id: analyse_files
    type: for_each
    over: "{context.find_files}"
    as: file
    concurrency: 4
    depends_on: [find_files]
    collect:
      mode: merge_arrays
    steps:
      - id: analyzer
        type: agent
        system_prompt_file: prompts/analyzer.md
        message_file: prompts/messages/analyzer.md
        output: json_object

  # Step 3 — write the final report
  - id: report
    type: agent
    depends_on: [analyse_files]
    system_prompt: |
      You are a technical writer. Summarise the analysis results into a
      structured markdown report. Be concise and organised.
    message: |
      ## Analysis Results
      ```json
      {context.analyse_files}
      ```
      Write the final project report now.
    backend: null
    output:
      format: markdown
      save_to: "{input.output}/project_report.md"
Step 4 — Import and run:
agentsbear import agent.yaml
agentsbear run my-agent --input source=./my-project
Adding custom tools
Tools are defined at the top level of agent.yaml under tools:. There are four tool types: shell, http, import yaml, and import python.
Shell tools
Run a shell command and return its output. Parameters are shell-escaped before substitution.
tools:
  - name: count_lines
    type: shell
    description: "Count the number of lines in a file"
    command: "wc -l < \"{target}\" | tr -d ' '"
    params:
      target:
        type: string        # string | int | float | bool
        required: true
        description: "Path to the file"
    returns: text           # text | json
    timeout: 30             # seconds (default: 30)
    cwd: "{input.source}"   # optional working directory (supports templates)
    env:                    # optional extra env vars (supports {env.VAR} templates)
      API_TOKEN: "{env.MY_TOKEN}"

  - name: find_pattern
    type: shell
    description: "Search for a regex pattern and return matching lines"
    command: "grep -nE \"{pattern}\" \"{target}\" 2>/dev/null | head -{limit}"
    params:
      target:
        type: string
        required: true
      pattern:
        type: string
        required: true
      limit:
        type: string
        required: false
        default: "50"
    returns: text
HTTP tools
Call an external API and return the response.
tools:
  - name: get_cve_info
    type: http
    description: "Fetch CVE details from the NVD API"
    method: GET             # GET | POST | PUT | DELETE | PATCH
    url: "https://services.nvd.nist.gov/rest/json/cves/2.0?cveId={cve_id}"
    headers:
      Authorization: "Bearer {env.NVD_API_KEY}"
    params:
      cve_id:
        type: string
        required: true
        description: "CVE ID e.g. CVE-2021-44228"
    returns: json           # json | text

  - name: post_report
    type: http
    description: "Post findings to a webhook"
    method: POST
    url: "https://hooks.example.com/report"
    headers:
      Content-Type: "application/json"
    body:
      text: "{message}"
    params:
      message:
        type: string
        required: true
    returns: text
Import tools from a YAML file
Share tools across multiple agents by keeping them in a standalone file.
tools:
  - import: tools/macos_tools.yaml        # import all tools from the file
  - import: tools/macos_tools.yaml        # or import only specific ones:
    names: [file_type, compute_hashes, entropy_check]
The imported file is a plain YAML list of shell/http tool definitions — same format as inline tools.
Import tools from a Python file
For tools that need Python logic, decorate functions with @tool from langchain_core.tools:
# tools/my_tools.py
from langchain_core.tools import tool

@tool
def parse_json_field(json_str: str, field: str) -> str:
    """Extract a field from a JSON string."""
    import json
    data = json.loads(json_str)
    return str(data.get(field, ""))
tools:
  - import_python: tools/my_tools.py       # import all @tool functions
  - import_python: tools/my_tools.py       # or specific ones:
    names: [parse_json_field]
Built-in tools available to agents (provided by deepagents via backend: filesystem):
| Tool | What it does |
|---|---|
read_file |
Read a file's content |
write_file |
Write content to a file |
edit_file |
Edit/patch a file |
glob |
Find files by pattern (e.g. **/*.java) |
grep |
Search file content for a regex pattern |
ls |
List files in a directory |
execute |
Run a shell command |
task |
Spawn a sub-task (deepagents internal) |
write_todos |
Track todos (deepagents internal) |
Use these exact names in allow_builtin: to restrict access.
Controlling tool access per step
pipeline:
  # Full access — all built-in tools + all custom tools
  - id: explorer
    type: agent
    backend:
      type: filesystem
      root: "{input.source}"
    # No tools field = unrestricted

  # Read-only — only specific built-in tools, only specific custom tools
  - id: analyst
    type: agent
    tools:
      allow_builtin: [read_file, glob, grep, ls]
      allow: [count_lines, find_pattern]   # custom tools by name

  # Pure synthesis — no tools at all, just LLM reasoning over injected context
  - id: report
    type: agent
    backend: null
    tools:
      allow_builtin: []
      allow: []
allow_builtin: null(or omittools:) — all built-in tools allowedallow_builtin: []— no built-in toolsallow: null(or omit) — all custom tools allowedallow: []— no custom tools
Using shell steps for data preparation
Shell steps run OS commands and feed their output into subsequent agent steps — great for discovery, parsing, and data transformation without involving an LLM:
pipeline:
  # Discover files with a shell command
  - id: find_files
    type: shell
    command: "find {input.source} -name '*.py' -not -path '*/test/*' | sort"
    output:
      format: array
      split: "\n"
      strip_empty: true

  # Parse a JSON file and extract a specific field
  - id: get_config
    type: shell
    command: "python3 -c \"import json,sys; d=json.load(open('{input.source}/config.json')); print(d.get('version','unknown'))\""
    output:
      format: text

  # Call a helper script
  - id: prepare_data
    type: shell
    command: "python3 scripts/prepare.py {input.source} {input.output}"
    output:
      format: json
The output of any shell step is available to later steps as {context.step_id}.
Prompt writing tips
| Tip | |
|---|---|
| System prompt | Define the agent's role, constraints, and exact output format. Be explicit about JSON keys and structure. |
| Task message | Use {input.x}, {loop.x}, and {context.step_id} to inject live data into the message at runtime. |
| Shared preamble | Put common instructions in prompts/shared/preamble.md and merge it with system_prompt_files: [prompts/shared/preamble.md, prompts/my_agent.md]. |
| Output schema | End your system prompt with the exact JSON structure you expect. The more specific, the more reliable the output. |
backend: null |
Use on report-writer steps that only need to synthesise context — no file access needed, faster and cheaper. |
depends_on |
Controls execution order. Also auto-appends the listed steps' outputs to the message — even when you provide your own message:. Use wait_for: instead if you need ordering without output injection. |
fallback_output |
Add to any step that might return nothing — prevents pipeline failure on empty model responses. |
| Inline vs file prompts | Use inline system_prompt: for short/simple prompts. Use system_prompt_file: for anything over 5 lines — keeps YAML readable. |
| Inject context | Use inject: to append a step's output to a prompt without restructuring the whole message. |
| Model per step | Override model: on individual steps to use a cheaper model for simple steps and a powerful one only for the final report. |
Running agents in parallel
Use parallel when steps are independent and can run at the same time. AgentsBear fans out all children, waits for all to finish, then makes their combined output available to downstream steps.
Children go under agents: — they don't need type: agent (it is implied). Each child can override model: to mix tiers.
pipeline:
  - id: gather_inputs
    type: shell
    command: "find {input.source} -name '*.java' | sort"
    output:
      format: array
      split: "\n"
      strip_empty: true

  # These three run simultaneously
  - id: checks
    type: parallel
    depends_on: [gather_inputs]
    collect:
      mode: merge_arrays        # merge_arrays | merge_objects | list | first
    agents:
      - id: security_scan
        model: claude-opus-4-6  # powerful model for critical work
        system_prompt_file: prompts/security.md
        message: "Files: {context.gather_inputs}\n\nScan for security issues."
        output: json_array

      - id: style_review
        model: claude-haiku-4-5-20251001   # cheaper — less critical
        system_prompt_file: prompts/style.md
        message: "Files: {context.gather_inputs}\n\nReview code style."
        output: json_array

  # Final step — access the merged parallel output via {context.checks}
  - id: report
    type: agent
    backend: null
    depends_on: [checks]
    system_prompt_file: prompts/report.md
    message: |
      All scan findings:
      {context.checks}

      Write the final review report.
Tip: The
parallelstep's ownid(e.g.checks) holds the merged result of all its children. Individual child IDs (e.g.security_scan) are also available in{context.security_scan}.
Iterating with for_each
Use for_each when you want to run the same pipeline logic over a list of items — files, URLs, CVEs, tickets, whatever. Each item runs as an independent execution.
pipeline:
  # Build the list first with a shell step
  - id: find_files
    type: shell
    command: "find {input.source} -name '*.py' | sort"
    output:
      format: array
      split: "\n"
      strip_empty: true

  # Iterate over every file
  - id: review_each
    type: for_each
    depends_on: [find_files]
    over: "{context.find_files}"    # resolves to the array from the shell step
    as: file                        # loop variable — access as {loop.file}
    concurrency: 2                  # how many items run in parallel at once
    collect:
      mode: merge_arrays            # collect all per-item outputs into one array
    steps:
      - id: review
        type: agent
        system_prompt_file: prompts/code_review.md
        message: |
          File: {loop.file}
          Review this Python file and return a JSON findings object.
        output: json_array
Loop variable helpers — when as: file is set:
| Template | Resolves to |
|---|---|
{loop.file} |
Full path to the current item |
{loop.file_name} |
Filename only (report.py) |
{loop.file_stem} |
Filename without extension (report) |
{loop.file_ext} |
Extension (.py) |
{loop.file_dir} |
Parent directory |
{loop.item} |
Full path — always available regardless of as: name |
{loop.item_name} |
Filename only — always available regardless of as: name |
{loop.item_stem} |
Stem — always available |
{loop.item_ext} |
Extension — always available |
{loop.item_dir} |
Parent dir — always available |
Inner steps can be a full mini-pipeline — including nested parallel, shell, and conditional steps:
  - id: audit_files
    type: for_each
    over: "{context.find_files}"
    as: file
    concurrency: "{config.concurrency}"   # {config.x} template also works
    depends_on: [find_files]
    collect:
      mode: merge_arrays
    steps:
      - id: comprehension
        type: agent
        system_prompt_file: prompts/comprehension.md
        message: |
          ## TARGET FILE
          `{loop.file}`
          Read this file and return a JSON summary.
        output: json_object

      - id: scanners
        type: parallel
        depends_on: [comprehension]
        collect: { mode: merge_arrays }
        agents:
          - id: sql_injection
            system_prompt_file: prompts/sql.md
            message_file: prompts/messages/scanner.md
            output: json_array
          - id: xss
            system_prompt_file: prompts/xss.md
            message_file: prompts/messages/scanner.md
            output: json_array

      - id: report
        type: agent
        backend: null
        depends_on: [scanners]
        system_prompt_file: prompts/report_writer.md
        message_file: prompts/messages/report_writer.md
        output:
          format: markdown
          save_to: "{input.output}/{loop.file_stem}_report.md"
          fallback_output: "# {loop.file_name}\nNo findings."
Conditional branching
Use conditional to take different paths based on a previous step's output. The condition block uses a structured operator — not a free-form expression.
pipeline:
  - id: triage
    type: agent
    system_prompt_file: prompts/triage.md
    message: "Triage this target: {input.target}"
    output: json_object     # e.g. {"severity": "high", "findings": [...]}

  - id: route
    type: conditional
    depends_on: [triage]
    condition:
      source: triage          # step ID whose output to check
      field: severity         # optional: dot-path into the output object
      operator: equals        # equals | contains | count_gt | count_gte | count_lt | count_eq | exists | not_exists
      value: "high"
    if_true:
      - id: deep_analysis
        type: agent
        system_prompt_file: prompts/deep_analysis.md
        message: "Triage result: {context.triage}\n\nPerform deep analysis."
    if_false:
      - id: light_summary
        type: agent
        system_prompt_file: prompts/summary.md
        message: "Triage result: {context.triage}\n\nWrite a brief summary."
All condition operators:
| Operator | Description |
|---|---|
equals |
str(value) == str(condition.value) |
contains |
value is in the output (list, string, or dict key) |
count_gt |
len(output) > N |
count_gte |
len(output) >= N |
count_lt |
len(output) < N |
count_eq |
len(output) == N |
exists |
output is not None, [], or {} |
not_exists |
output is None, [], or {} |
Examples:
# Branch if scanner found any findings
condition:
  source: scanners
  operator: count_gt
  value: 0

# Branch if a specific field equals a value
condition:
  source: triage
  field: threat_level
  operator: equals
  value: "critical"

# Branch if a list contains a specific string
condition:
  source: categories
  operator: contains
  value: "ransomware"
Defining output schemas
Declare an output_schema at the top level to tell agents what JSON structure to produce. AgentsBear injects the schema text into your prompts via {schema}.
schemas/findings.json:
[
  {
    "id": "FINDING-001",
    "title": "SQL Injection",
    "severity": "critical",
    "description": "User input passed directly to SQL query at line 42.",
    "cwe": "CWE-89",
    "line": 42,
    "recommendation": "Use parameterised queries."
  }
]
agent.yaml:
output_schema:
  type: json_array           # json_array | json_object
  schema_file: schemas/findings.json   # load from file — shown to agents via {schema}
  # schema_text: |           # or inline the schema directly
  #   [{"id": "...", "title": "..."}]
In your prompt — paste {schema} at the bottom so the agent mirrors the structure:
Return ONLY a JSON array of findings. No prose. No markdown fences.

Schema (follow exactly):
{schema}
Per-step save_to — save a step's output directly to a file:
- id: report
  type: agent
  output:
    format: markdown
    save_to: "{config.output_dir}/{input.file_stem}_report.md"
    fallback_output: "# {input.file}\nNo findings identified."
Passing context between steps
Every step's output is stored by its id and accessible in any later step via {context.<step_id>}. Steps run in pipeline order — if you need a step to wait for another, declare it with depends_on.
pipeline:
  - id: find_files
    type: shell
    command: "find {input.source} -name '*.go' | sort"
    output:
      format: array
      split: "\n"
      strip_empty: true

  # depends_on controls execution order
  # {context.find_files} injects the shell step's output into the message
  - id: comprehension
    type: agent
    depends_on: [find_files]
    system_prompt_file: prompts/comprehension.md
    message: |
      Files:
      {context.find_files}

      Read and summarise the codebase.
    output: json_object

  # This step uses output from two previous steps
  - id: security_check
    type: agent
    depends_on: [comprehension]
    system_prompt_file: prompts/security.md
    message: |
      Codebase summary: {context.comprehension}
      File list: {context.find_files}

      Scan for security issues.
    output: json_array

  - id: final_report
    type: agent
    backend: null
    depends_on: [security_check]
    system_prompt_file: prompts/report_writer.md
    message: |
      Findings: {context.security_check}
      Write the executive summary.
How depends_on actually works:
- Controls execution order — step runs only after all listed steps finish.
- Always appends the listed steps' outputs to the message as formatted context blocks — even when you provide your own
message:ormessage_file:. - When no
messageormessage_fileis provided, the entire message is auto-generated from thedepends_oncontext. - Use
{context.step_id}in your own message to pull in specific step outputs inline. Usewait_for:instead ofdepends_on:if you need ordering without output injection. depends_on: ["round_*"]is a wildcard — matches all step IDs starting withround_and collects their merged findings.
Wildcard depends_on:
- id: report
  type: agent
  depends_on: ["round_*"]    # collects output from round_01, round_02, ... round_36
  system_prompt_file: prompts/report_writer.md
  message_file: prompts/messages/report_writer.md
Dot-path into JSON output:
message: "Severity is: {context.triage.severity}"
# context.triage = {"severity": "high", "type": "malware"}
# → "Severity is: high"
collect modes for parallel and for_each
Both parallel and for_each merge their children's outputs using a collect block:
collect:
  mode: merge_arrays    # merge_arrays | merge_objects | list | first
| Mode | Behaviour | Use when |
|---|---|---|
merge_arrays |
Extends all JSON arrays into one flat array | Each child returns a json_array of findings |
merge_objects |
Merges all JSON objects into one dict | Each child returns a json_object with distinct keys |
list |
Returns a list where each element is one child's full output | You want to keep outputs separate |
first |
Returns only the first result | You just need one answer |
# parallel — merge all scanner findings into one flat array
- id: scanners
  type: parallel
  collect:
    mode: merge_arrays
  agents:
    - id: sql_injection
      output: json_array
    - id: xss
      output: json_array

# for_each — collect per-file reports as separate list items
- id: audit_files
  type: for_each
  over: "{context.find_files}"
  collect:
    mode: list
  steps:
    - id: report
      type: agent
      output: json_object
YAML Pipeline Syntax
Top-level fields
name: my-pipeline          # Unique identifier — used in CLI commands
version: "1.0"             # Free-form version string
description: "..."         # Optional description shown in agent list

model: anthropic:claude-sonnet-4-6   # Default model for all steps
base_url: "http://localhost:11434/v1" # Optional — for Ollama or custom endpoints

backend:                   # Default tool backend for all steps
  type: filesystem         # filesystem = real/virtual FS | memory = in-memory state | null = no tools
  root: "{input.source}"   # filesystem only — supports input/config/env templates
  virtual_mode: false      # filesystem only — read-only virtual FS (default: false)

input:                     # Declared inputs — prompted interactively if not supplied
  - name: source
    type: dir              # string | path | file | dir | bool | int | float
    required: true
    description: "Project root directory"
  - name: output
    type: dir
    required: false
    default: "./reports"

config:                    # Static key-value config referenced as {config.key}
  concurrency: 4
  output_dir: "./reports"

output_schema:             # Optional — used to validate final output
  type: json_array
  schema_file: schemas/findings.json   # load from file
  # schema_text: "[...]"               # or inline text

api_keys:                  # Per-provider API keys (supports {env.VAR} templates)
  anthropic: "{env.ANTHROPIC_API_KEY}"
  openai: "{env.OPENAI_API_KEY}"

pipeline:                  # List of steps — executed in order
  - id: step_one
    type: agent
    ...
Step types
agent — Single LLM agent
- id: comprehension
  type: agent
  model: anthropic:claude-sonnet-4-6    # Override pipeline-level default model
  base_url: "http://localhost:11434/v1" # Override base URL for this step
  model_kwargs:                         # Extra kwargs passed to the LangChain model
    temperature: 0
    max_tokens: 4096

  # Exactly one of these must be set:
  system_prompt_file: prompts/comp.md        # Load from file
  # system_prompt: "Inline prompt here"      # Or inline text
  # system_prompt_files: [shared/pre.md, comp.md]  # Or merge multiple files

  # Exactly one of these (or none — auto-generated from depends_on):
  message_file: prompts/messages/task.md     # Load from file
  # message: "Analyse {input.file} now."     # Or inline text

  depends_on: [previous_step]   # Wait for these steps AND auto-append their outputs to message
  wait_for: [other_step]        # Wait for these steps but do NOT inject their output

  backend:
    type: filesystem          # filesystem | memory | null
    root: "{input.source}"    # filesystem only
    # virtual_mode: false     # filesystem only — read-only virtual FS
  tools:
    allow_builtin: [read_file, glob, grep]  # Restrict built-in tools
    allow: [my_custom_tool]                 # Custom tools by name

  output: json_object
  # output:
  #   format: markdown          # text | json_array | json_object | markdown
  #   save_to: "{config.output_dir}/report.md"
  #   fallback_output: "No findings."
  #   fallback_on_parse_error: true

  # Append extra content to the message at runtime:
  inject:
    - step: triage              # Pull output from a step
      label: "Triage Results"   # Optional section header
      format: json              # raw | json | code_block
    - text: "Focus on: {loop.file_name}"   # Or inject inline text

  # Append extra content to the system prompt at runtime:
  system_prompt_inject:
    - step: schema_step
      format: code_block
      lang: json

  # Control what is printed to the terminal during execution:
  callbacks:
    live_tool_calls: true     # Print tool calls as they happen (default: true)
    live_llm_output: false    # Stream LLM tokens to terminal (default: false)
parallel — Run multiple agents simultaneously
- id: scanners
  type: parallel
  depends_on: [comprehension]
  collect:
    mode: merge_arrays    # merge_arrays | merge_objects | list | first
  agents:
    - id: sql_injection
      system_prompt_file: prompts/sql.md
      message_file: prompts/messages/scan.md
      output: json_array
    - id: xss
      system_prompt_file: prompts/xss.md
      message_file: prompts/messages/scan.md
      output: json_array
for_each — Iterate over a list of values
- id: audit_files
  type: for_each
  over: "{context.find_files}"   # List from a previous step's output
  as: file                       # Loop variable — use as {loop.file}
  concurrency: "{config.concurrency}"
  depends_on: [find_files]
  collect:
    mode: merge_arrays
  steps:
    - id: comprehension
      type: agent
      system_prompt_file: prompts/comprehension.md
      message: |
        ## TARGET FILE
        `{loop.file}`
      output: json_object

    - id: scanners
      type: parallel
      depends_on: [comprehension]
      agents:
        - id: sql_injection
          system_prompt_file: prompts/sql.md
          output: json_array
sequential — Run steps in strict order, sharing context
- id: analysis_chain
  type: sequential
  steps:
    - id: step_a
      type: agent
      ...
    - id: step_b
      type: agent
      depends_on: [step_a]
      ...
conditional — Branch based on a previous step's output
- id: branch
  type: conditional
  depends_on: [validator]
  condition:
    source: validator        # Step whose output to check
    operator: contains       # equals | contains | count_gt | count_gte | count_lt | count_eq | exists | not_exists
    value: "UNCONFIRMED"
  if_true:
    - id: gap_analysis
      type: agent
      ...
  if_false:
    - id: skip_notice
      type: shell
      command: "echo 'Confirmed — no further analysis needed'"
shell — Run a shell command as a pipeline step
- id: find_files
  type: shell
  command: "find {input.source} -name '*.java' | sort"
  output:
    format: array
    split: "\n"
    strip_empty: true
Context templates
AgentsBear uses {template} syntax everywhere — in prompts, commands, paths, and tool definitions:
| Template | Resolves to |
|---|---|
{input.source} |
Input parameter named source |
{config.concurrency} |
Config key concurrency |
{context.step_id} |
Full output of step step_id |
{context.step_id.field} |
Specific field from a step's JSON output |
{steps.step_id.output} |
Alias for {context.step_id} — both work |
{loop.file} |
Current loop variable in for_each |
{loop.item} |
Current loop item (when as: item) |
{env.API_KEY} |
Environment variable |
{schema} |
Rendered output schema text |
{date} |
Current date string |
{agent.id} |
Current step's id (available inside inject/system_prompt_inject) |
Custom tools
Define shell-based tools directly in your YAML — no Python required:
tools:
  - name: file_type
    type: shell
    description: "Identify file type using the 'file' command"
    command: "file -b \"{target}\""
    params:
      target:
        type: string
        required: true
        description: "Path to the file"
    returns: text

  - name: compute_hashes
    type: shell
    description: "Compute MD5 and SHA256 hashes"
    command: "echo \"MD5: $(md5 -q \"{target}\")\"; echo \"SHA256: $(shasum -a 256 \"{target}\" | awk '{print $1}')\""
    params:
      target:
        type: string
        required: true
    returns: text

  - name: entropy_check
    type: shell
    description: "Compute Shannon entropy — values >7.0 suggest packing or encryption"
    command: "python3 -c \"import math,collections; d=open('{target}','rb').read(); c=collections.Counter(d); e=-sum(v/len(d)*math.log2(v/len(d)) for v in c.values() if v); print(f'Entropy: {e:.4f}/8.0')\""
    params:
      target:
        type: string
        required: true
    returns: text
Agents can call these tools just like built-in tools. The agent receives the tool description and parameters, calls it, and gets the text output back.
Output handling
output: json_array          # Shorthand: json_array | json_object | markdown | text

# Full form:
output:
  format: markdown          # json_array | json_object | markdown | text
  save_to: "{config.output_dir}/{loop.file_stem}_report.md"
  fallback_output: |        # Used when agent returns no output
    # Report: {loop.file_name}
    No findings identified.
Collect modes (for parallel and for_each):
| Mode | Behaviour |
|---|---|
merge_arrays |
Extend all JSON arrays into one flat array |
merge_objects |
Merge all JSON objects into one dict |
list |
Return a list where each element is one step's output |
first |
Return only the first result |
CLI Reference
agentsbear <command> [options]
| Command | Description |
|---|---|
agentsbear import <path> |
Import an agent from a YAML file into the registry |
agentsbear run <name> |
Run an imported agent (prompts for inputs interactively) |
agentsbear list |
List all imported agents |
agentsbear validate <path> |
Validate a YAML file and print a full summary |
agentsbear info <name> |
Show details about an imported agent |
agentsbear remove <name> |
Remove an agent from the registry (prompts for confirmation) |
agentsbear new <template> [name] |
Scaffold a new agent from a template |
agentsbear web start |
Start the Web UI (default: http://127.0.0.1:5050) |
agentsbear web stop |
Stop the background Web UI server |
agentsbear web status |
Show whether the Web UI is running |
import options:
agentsbear import examples/java-security-audit/agent.yaml
agentsbear import agent.yaml --update      # Replace existing agent with same name
agentsbear import agent.yaml --no-copy     # Register in place, don't copy files
run options:
Inputs are passed as KEY=VALUE pairs with --input (repeatable):
agentsbear run java-security-audit \
  --input source=./myproject \
  --input file=./myproject/src/UserController.java \
  --model anthropic:claude-opus-4-6 \
  --base-url http://localhost:11434/v1 \
  --no-think \       # Disable Ollama extended thinking
  --dry-run \        # Show pipeline steps without executing
  --verbose \        # Print full LLM responses to terminal
  --quiet \          # Suppress all output except errors and saved paths
  --debug            # Save raw agent outputs to ./debug/
If you omit --input flags AgentsBear will prompt you interactively for each declared input.
new templates:
agentsbear new basic my-agent         # Single agent with filesystem access
agentsbear new scanner my-scanner     # Multi-round parallel scanner pipeline
agentsbear new researcher my-res      # Web research agent with report output
agentsbear new auditor my-auditor     # Comprehension + parallel scanners + report
agentsbear new blank my-blank         # Minimal YAML with all fields commented
remove options:
agentsbear remove my-agent            # Prompts for confirmation before removing
agentsbear remove my-agent --yes      # Skip confirmation prompt
agentsbear remove my-agent -y         # Short form
web options:
agentsbear web start                          # Background, opens browser, port 5050
agentsbear web start --port 8080              # Custom port
agentsbear web start --host 0.0.0.0          # Bind to all interfaces
agentsbear web start --fg                     # Foreground (blocking)
agentsbear web start --no-open               # Don't auto-open browser
agentsbear web stop                           # Stop the background server
agentsbear web status                         # Check if running
Validate before running:
agentsbear validate examples/java-security-audit-ollama/agent.yaml
✓ examples/java-security-audit-ollama/agent.yaml is valid

Name         java-security-audit
Version      3.0
Description  Comprehensive Java security audit — scans every .java file automatically

Total steps  106
  agent      71
  parallel   33
  for_each   1
  shell      1
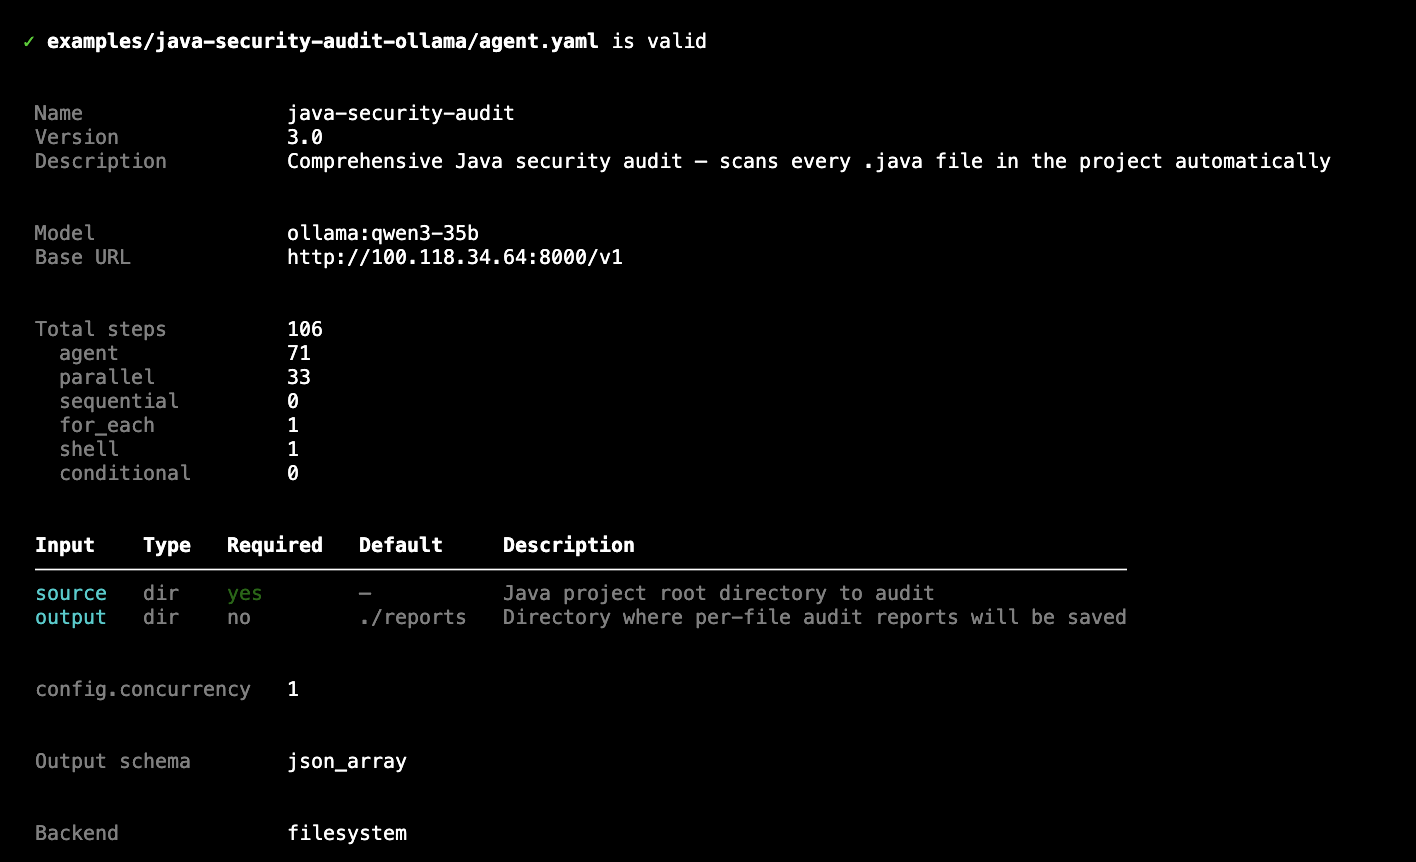
agentsbear validate — shows full pipeline summary before running
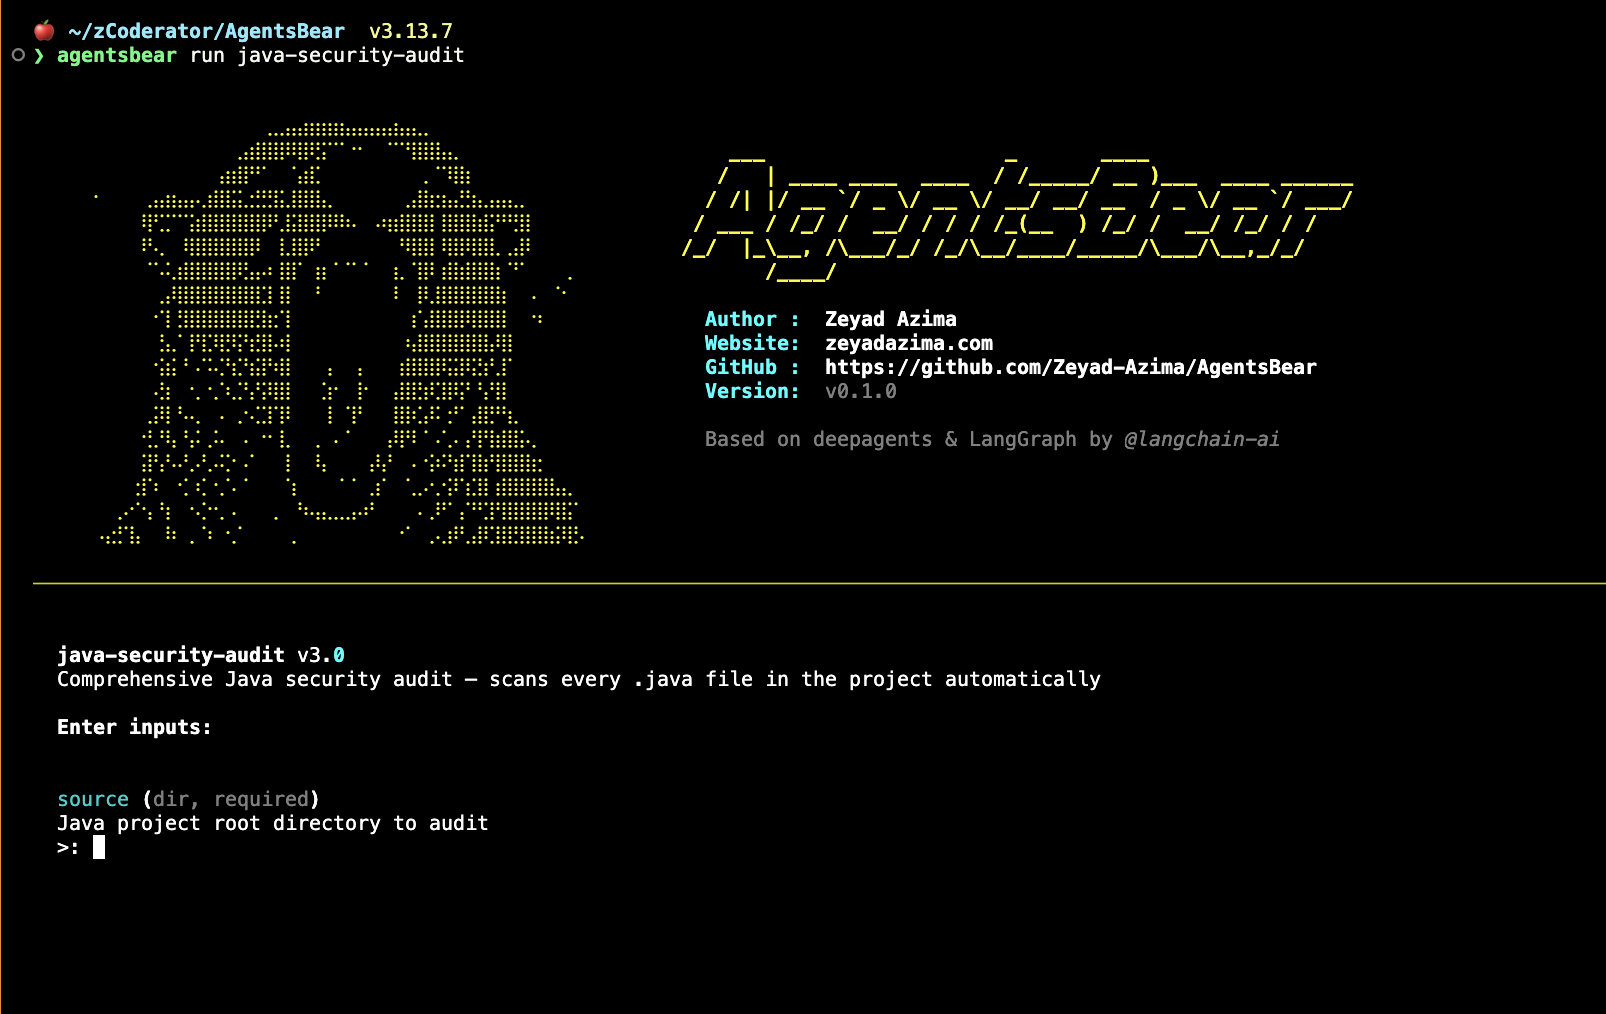
agentsbear run — ASCII splash, then interactive input prompts
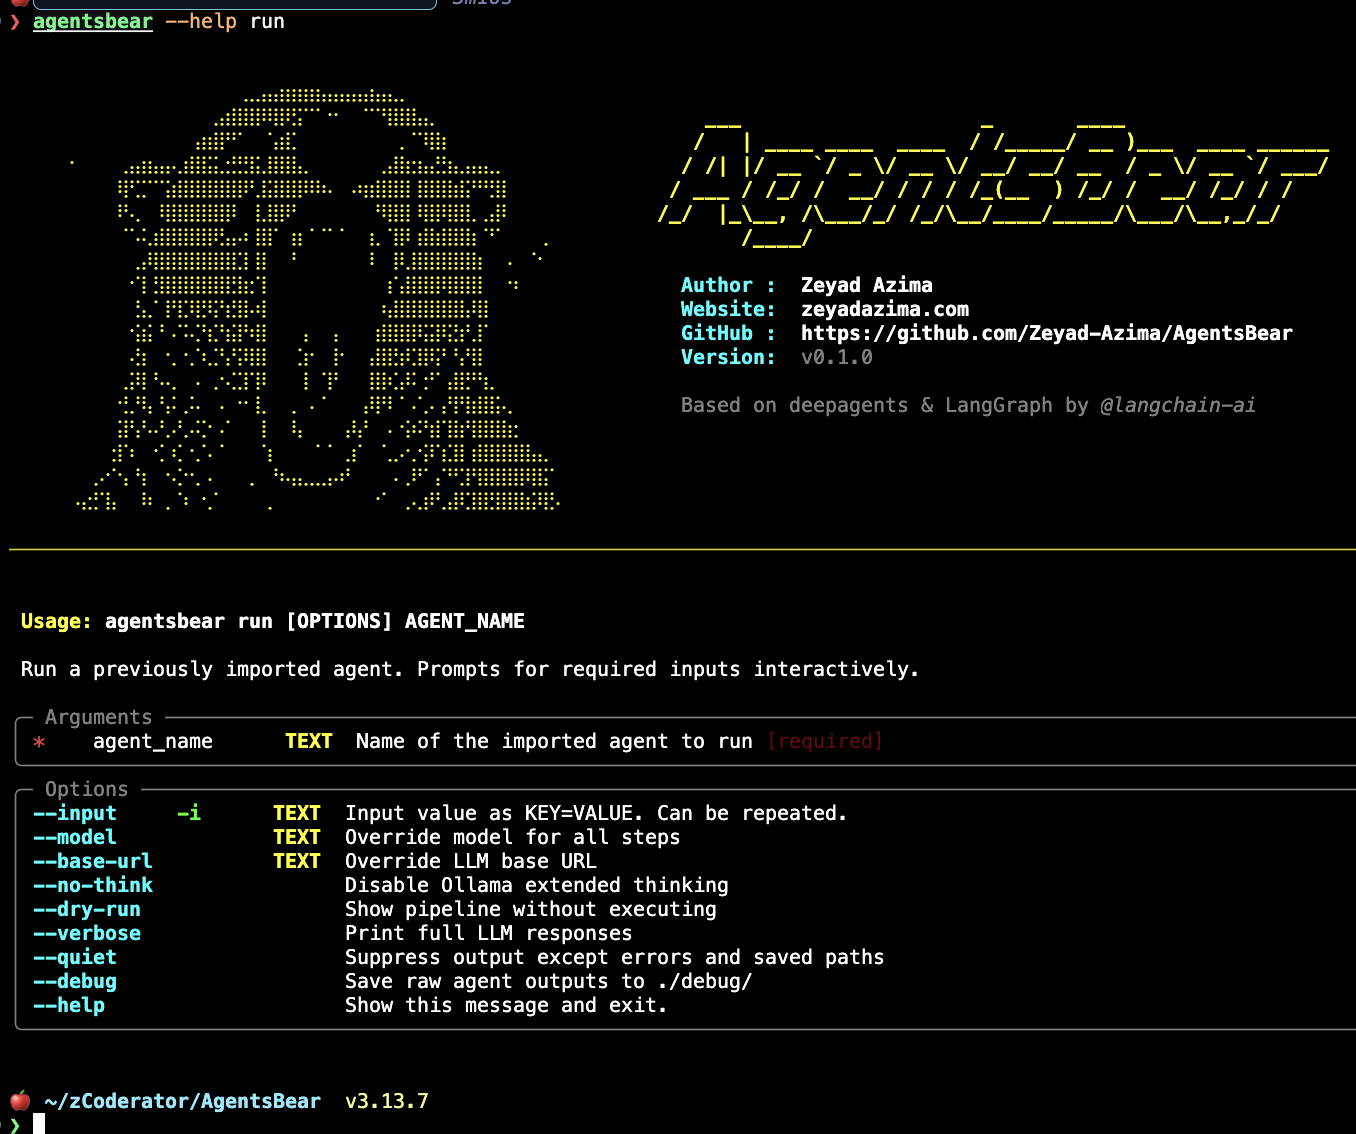
agentsbear run --help — full flag reference
Web UI
Start the Web UI with:
agentsbear web start
# Opens http://127.0.0.1:5050 automatically
The Web UI gives you a full visual interface for everything — no terminal needed after startup.
Agents, Runs & Logs
Agents — Browse, run, and remove all imported agents from one table.
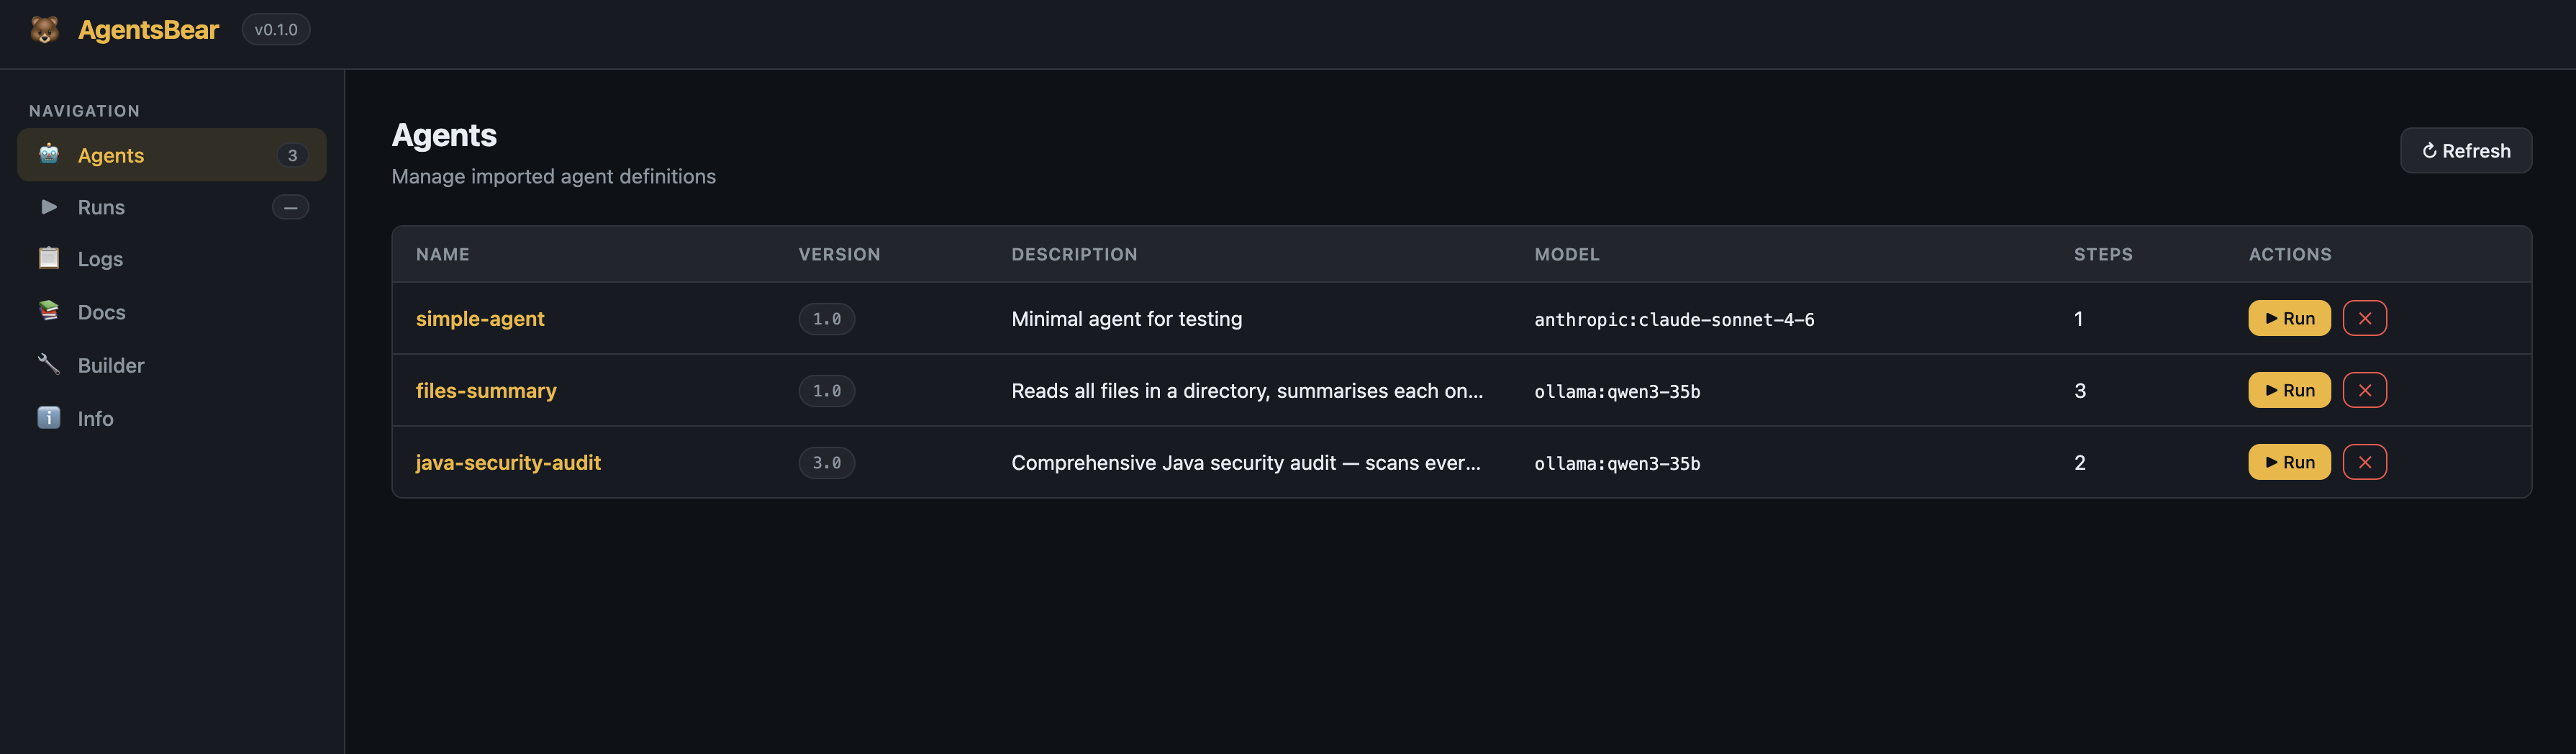
Agents page — all imported pipelines with version, model, step count, and quick Run button
Runs — Full execution history with status, duration, and a detail view showing each step's output.
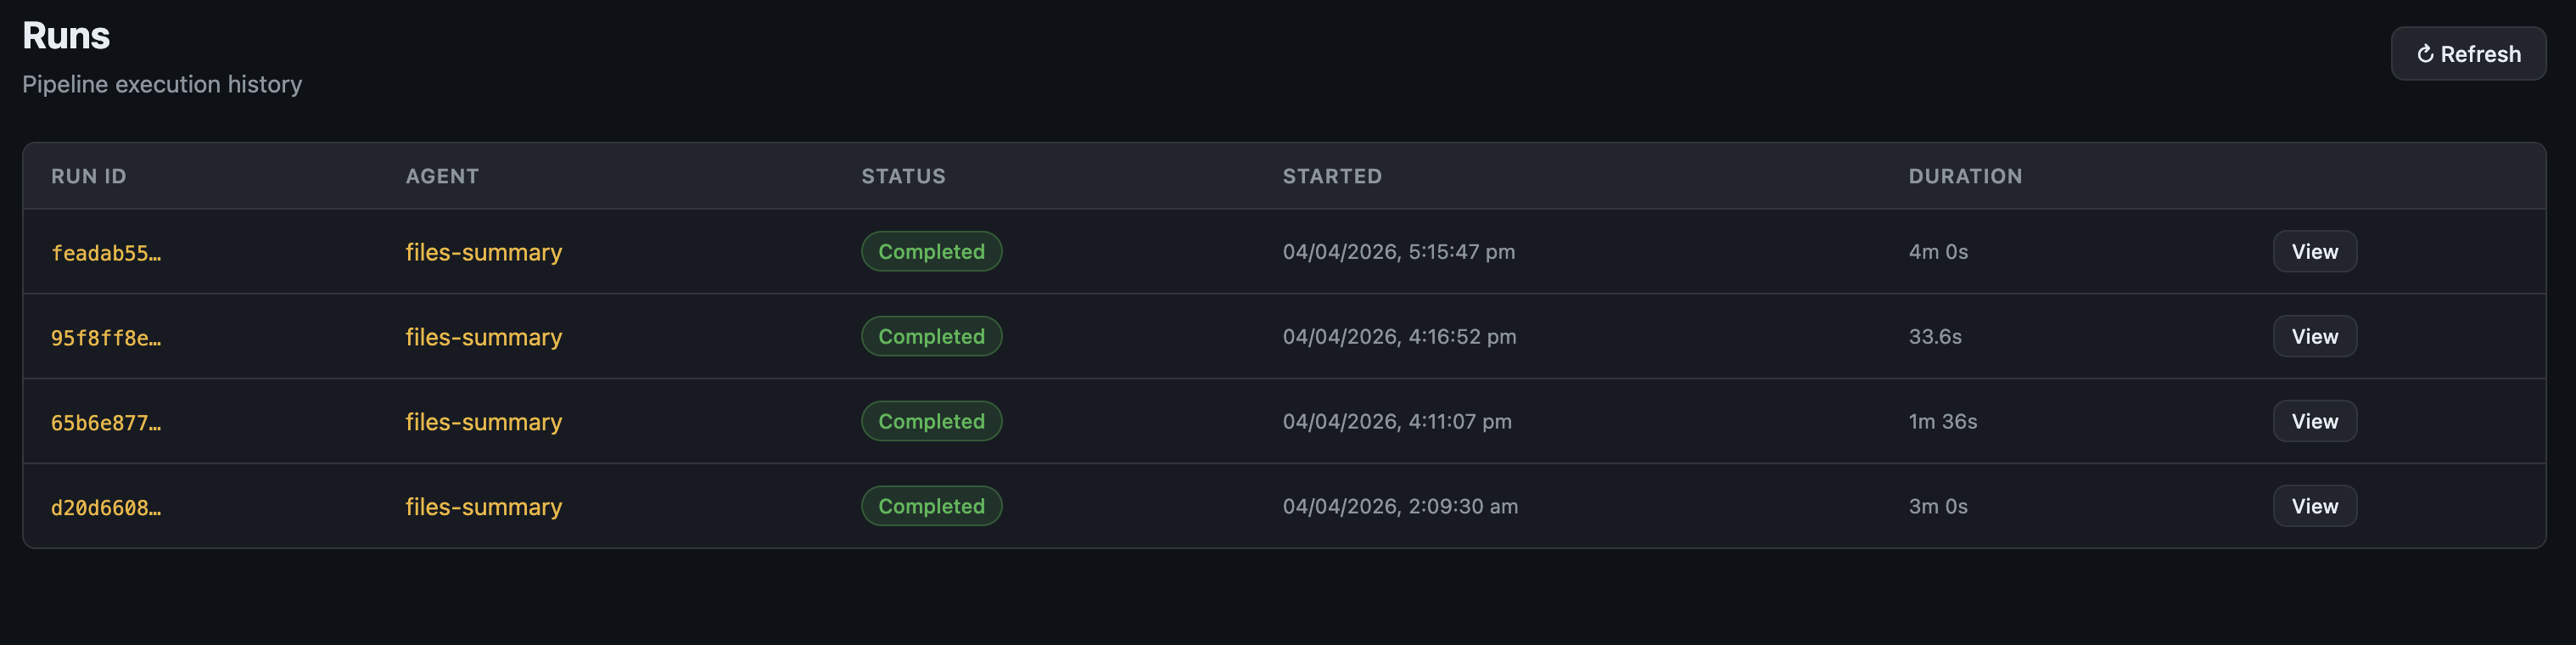
Runs page — pipeline execution history with status and duration
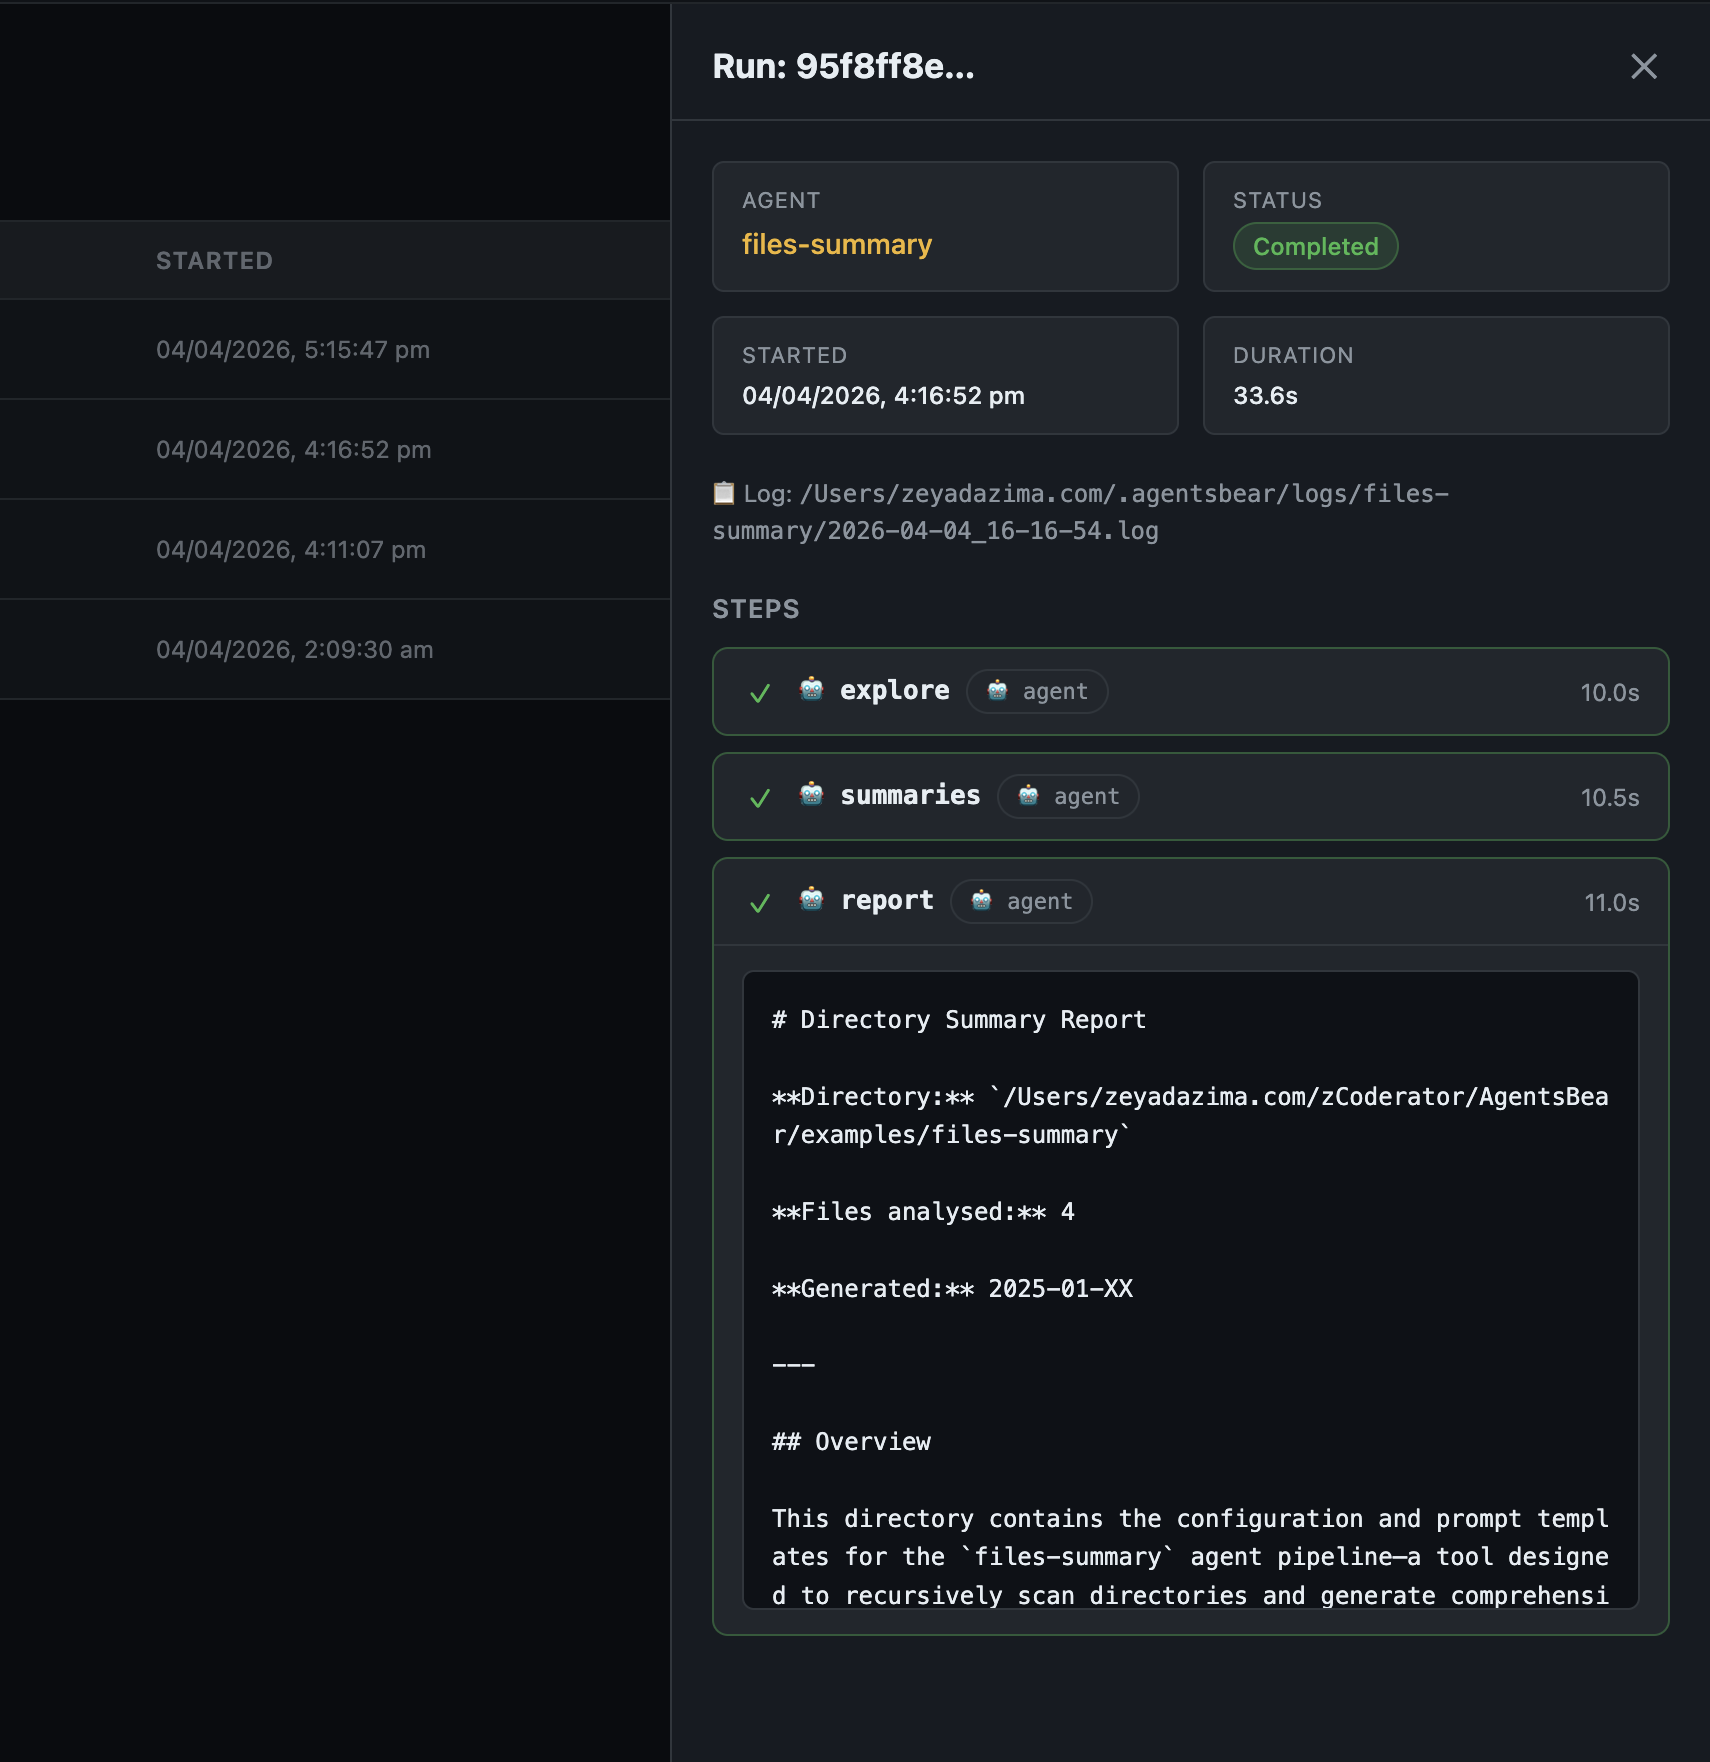
Run detail — per-step results and final output inline
Logs — Structured log files grouped by agent, with a searchable inline viewer.
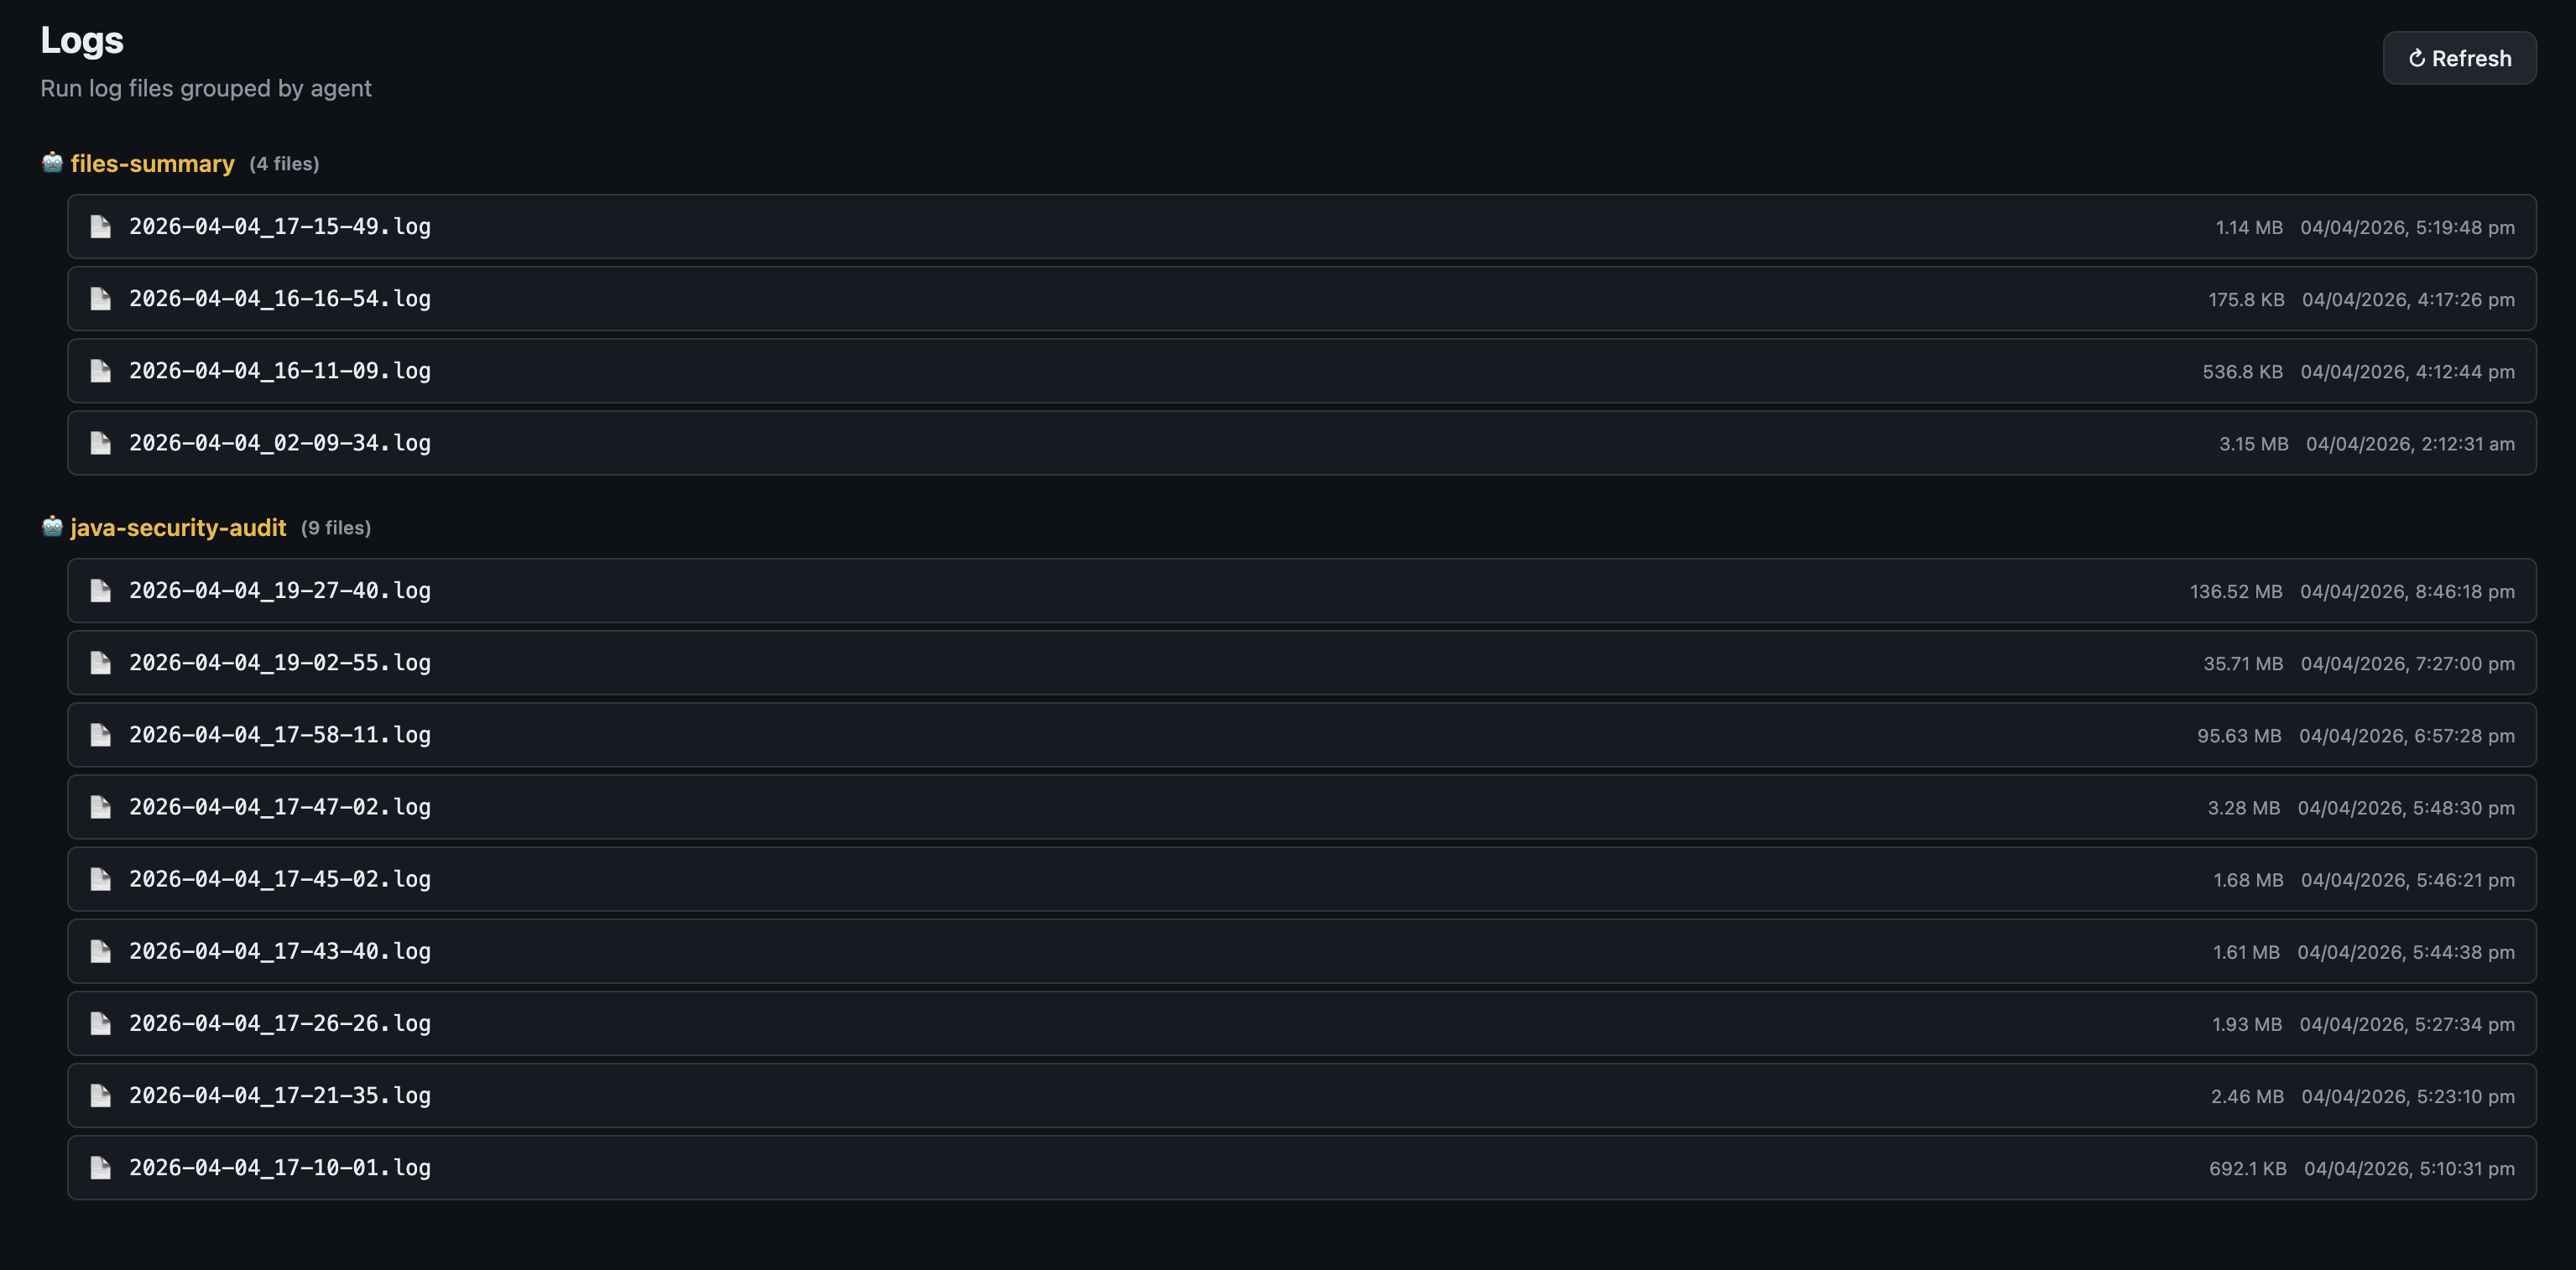
Logs page — run logs grouped by agent name
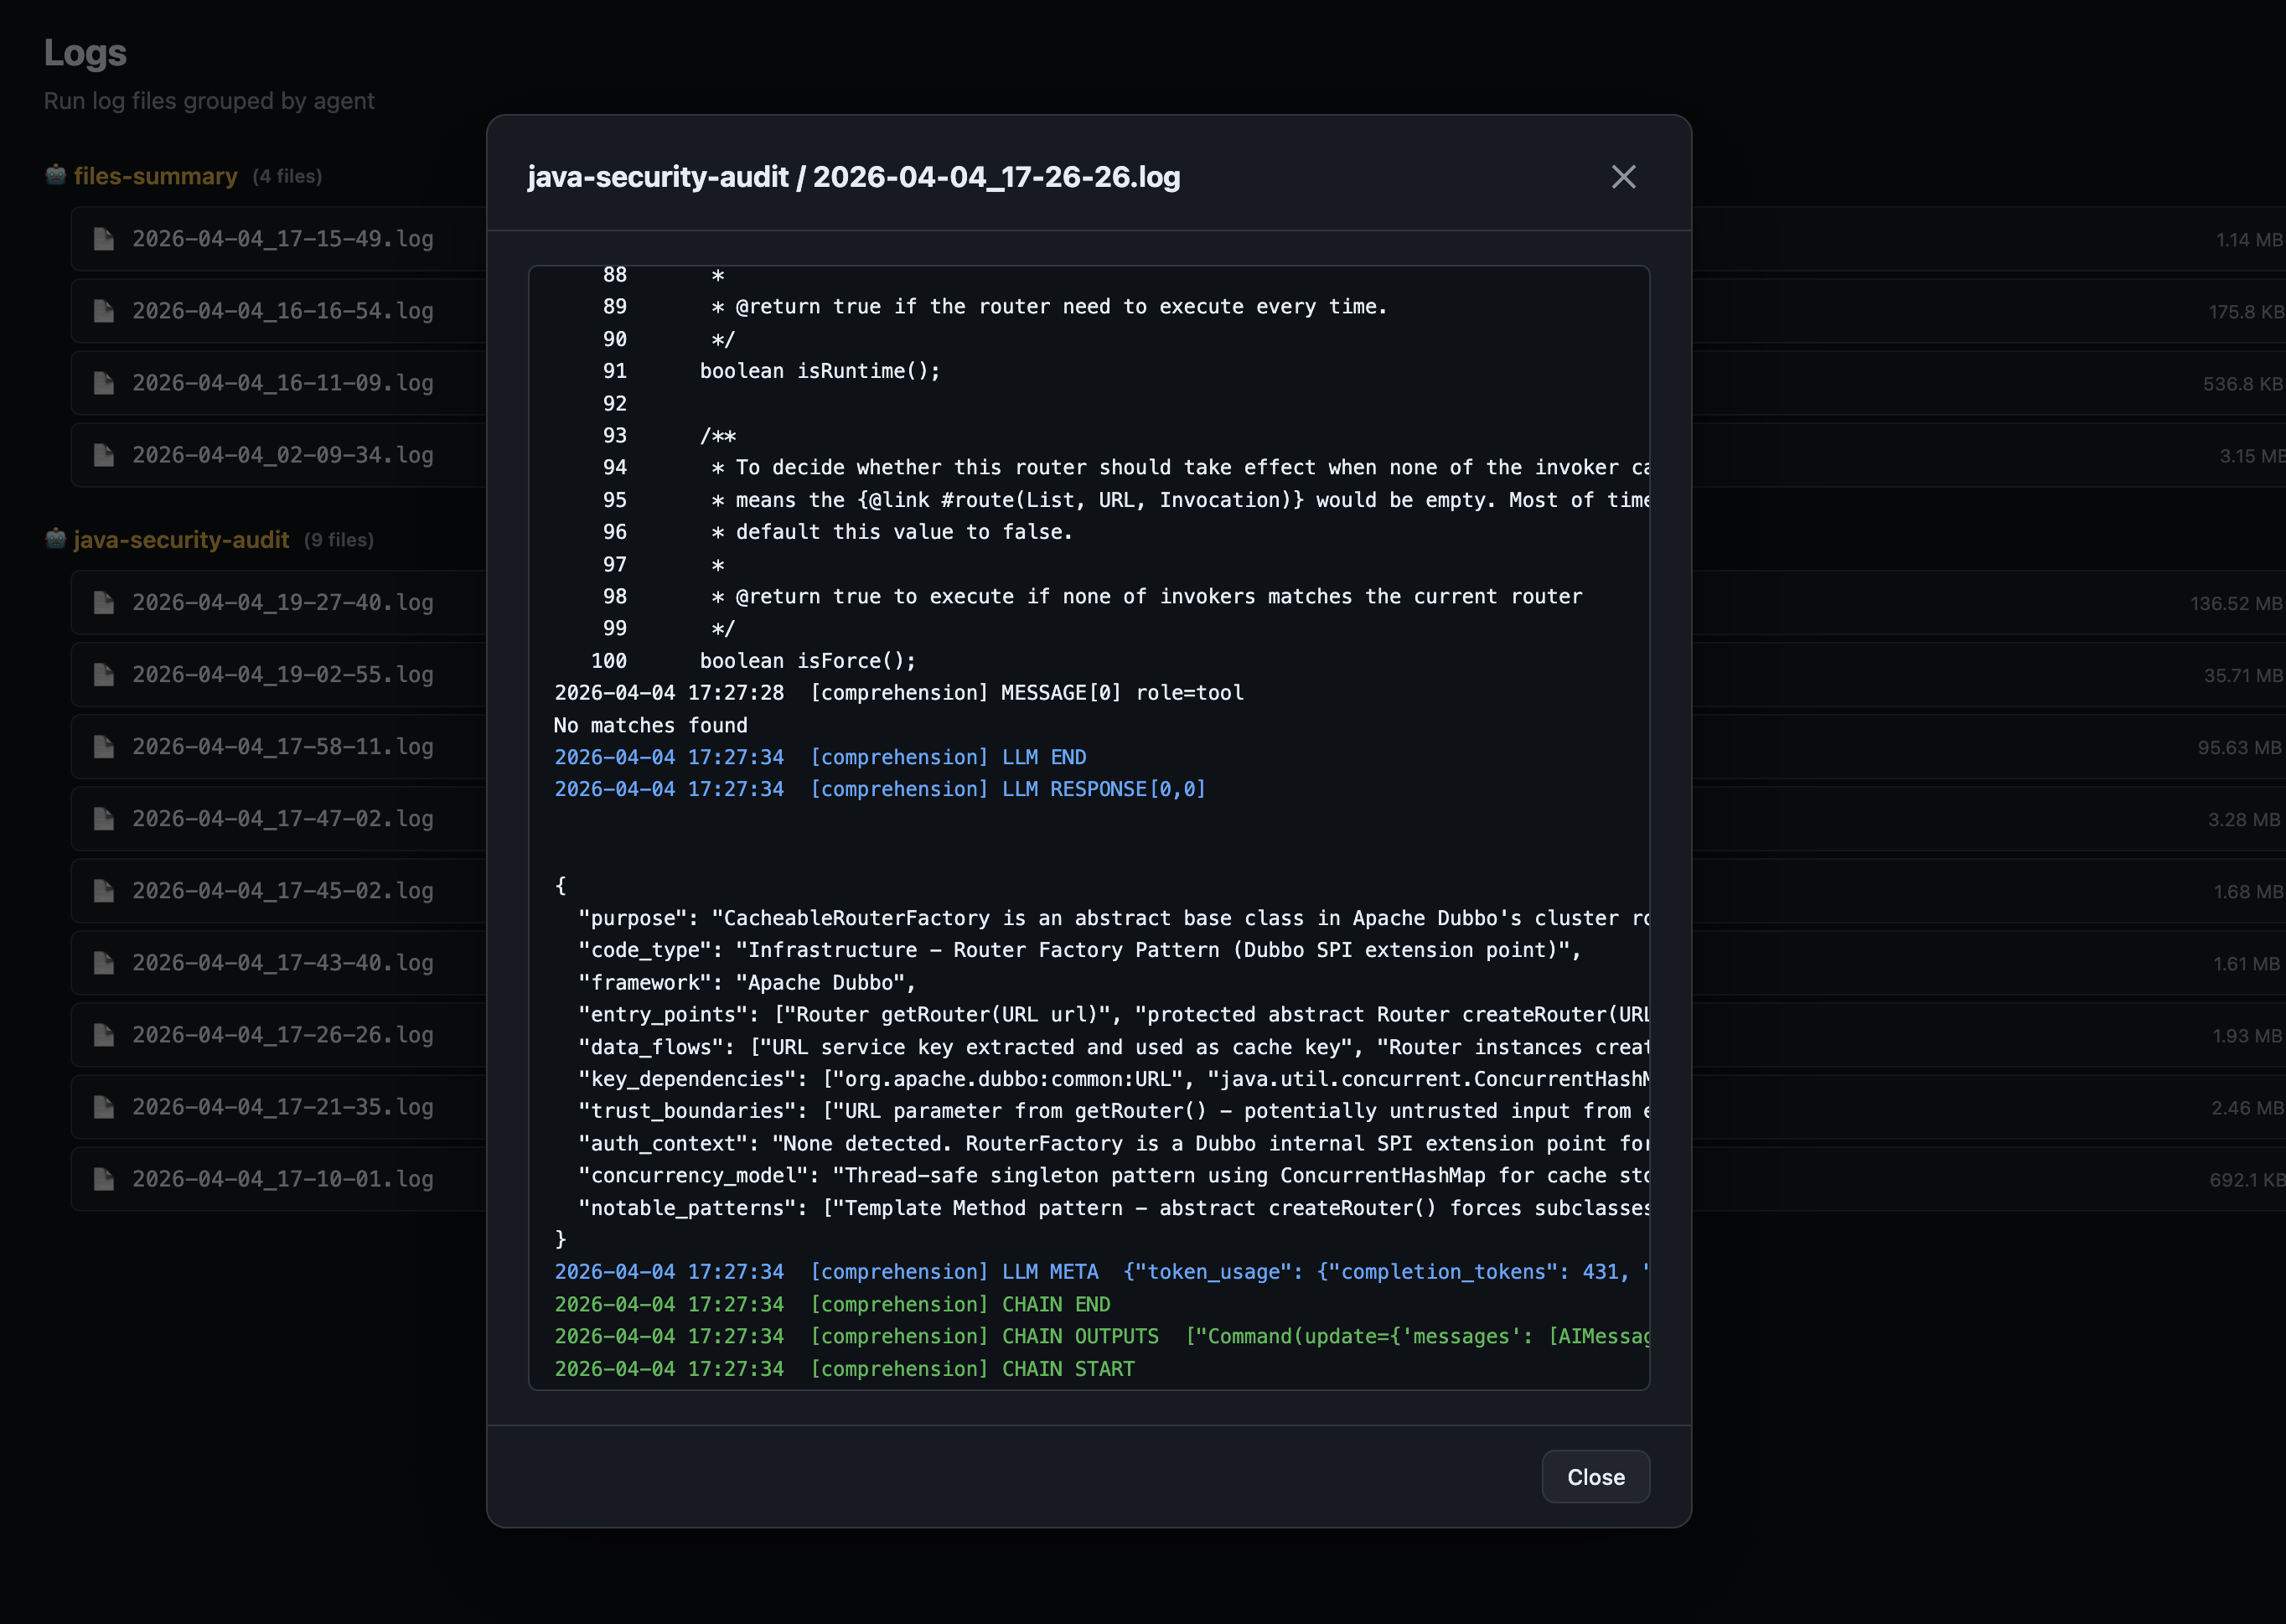
Log viewer — full structured log with LLM token counts and chain events
Docs — Full embedded documentation, always available in the sidebar.
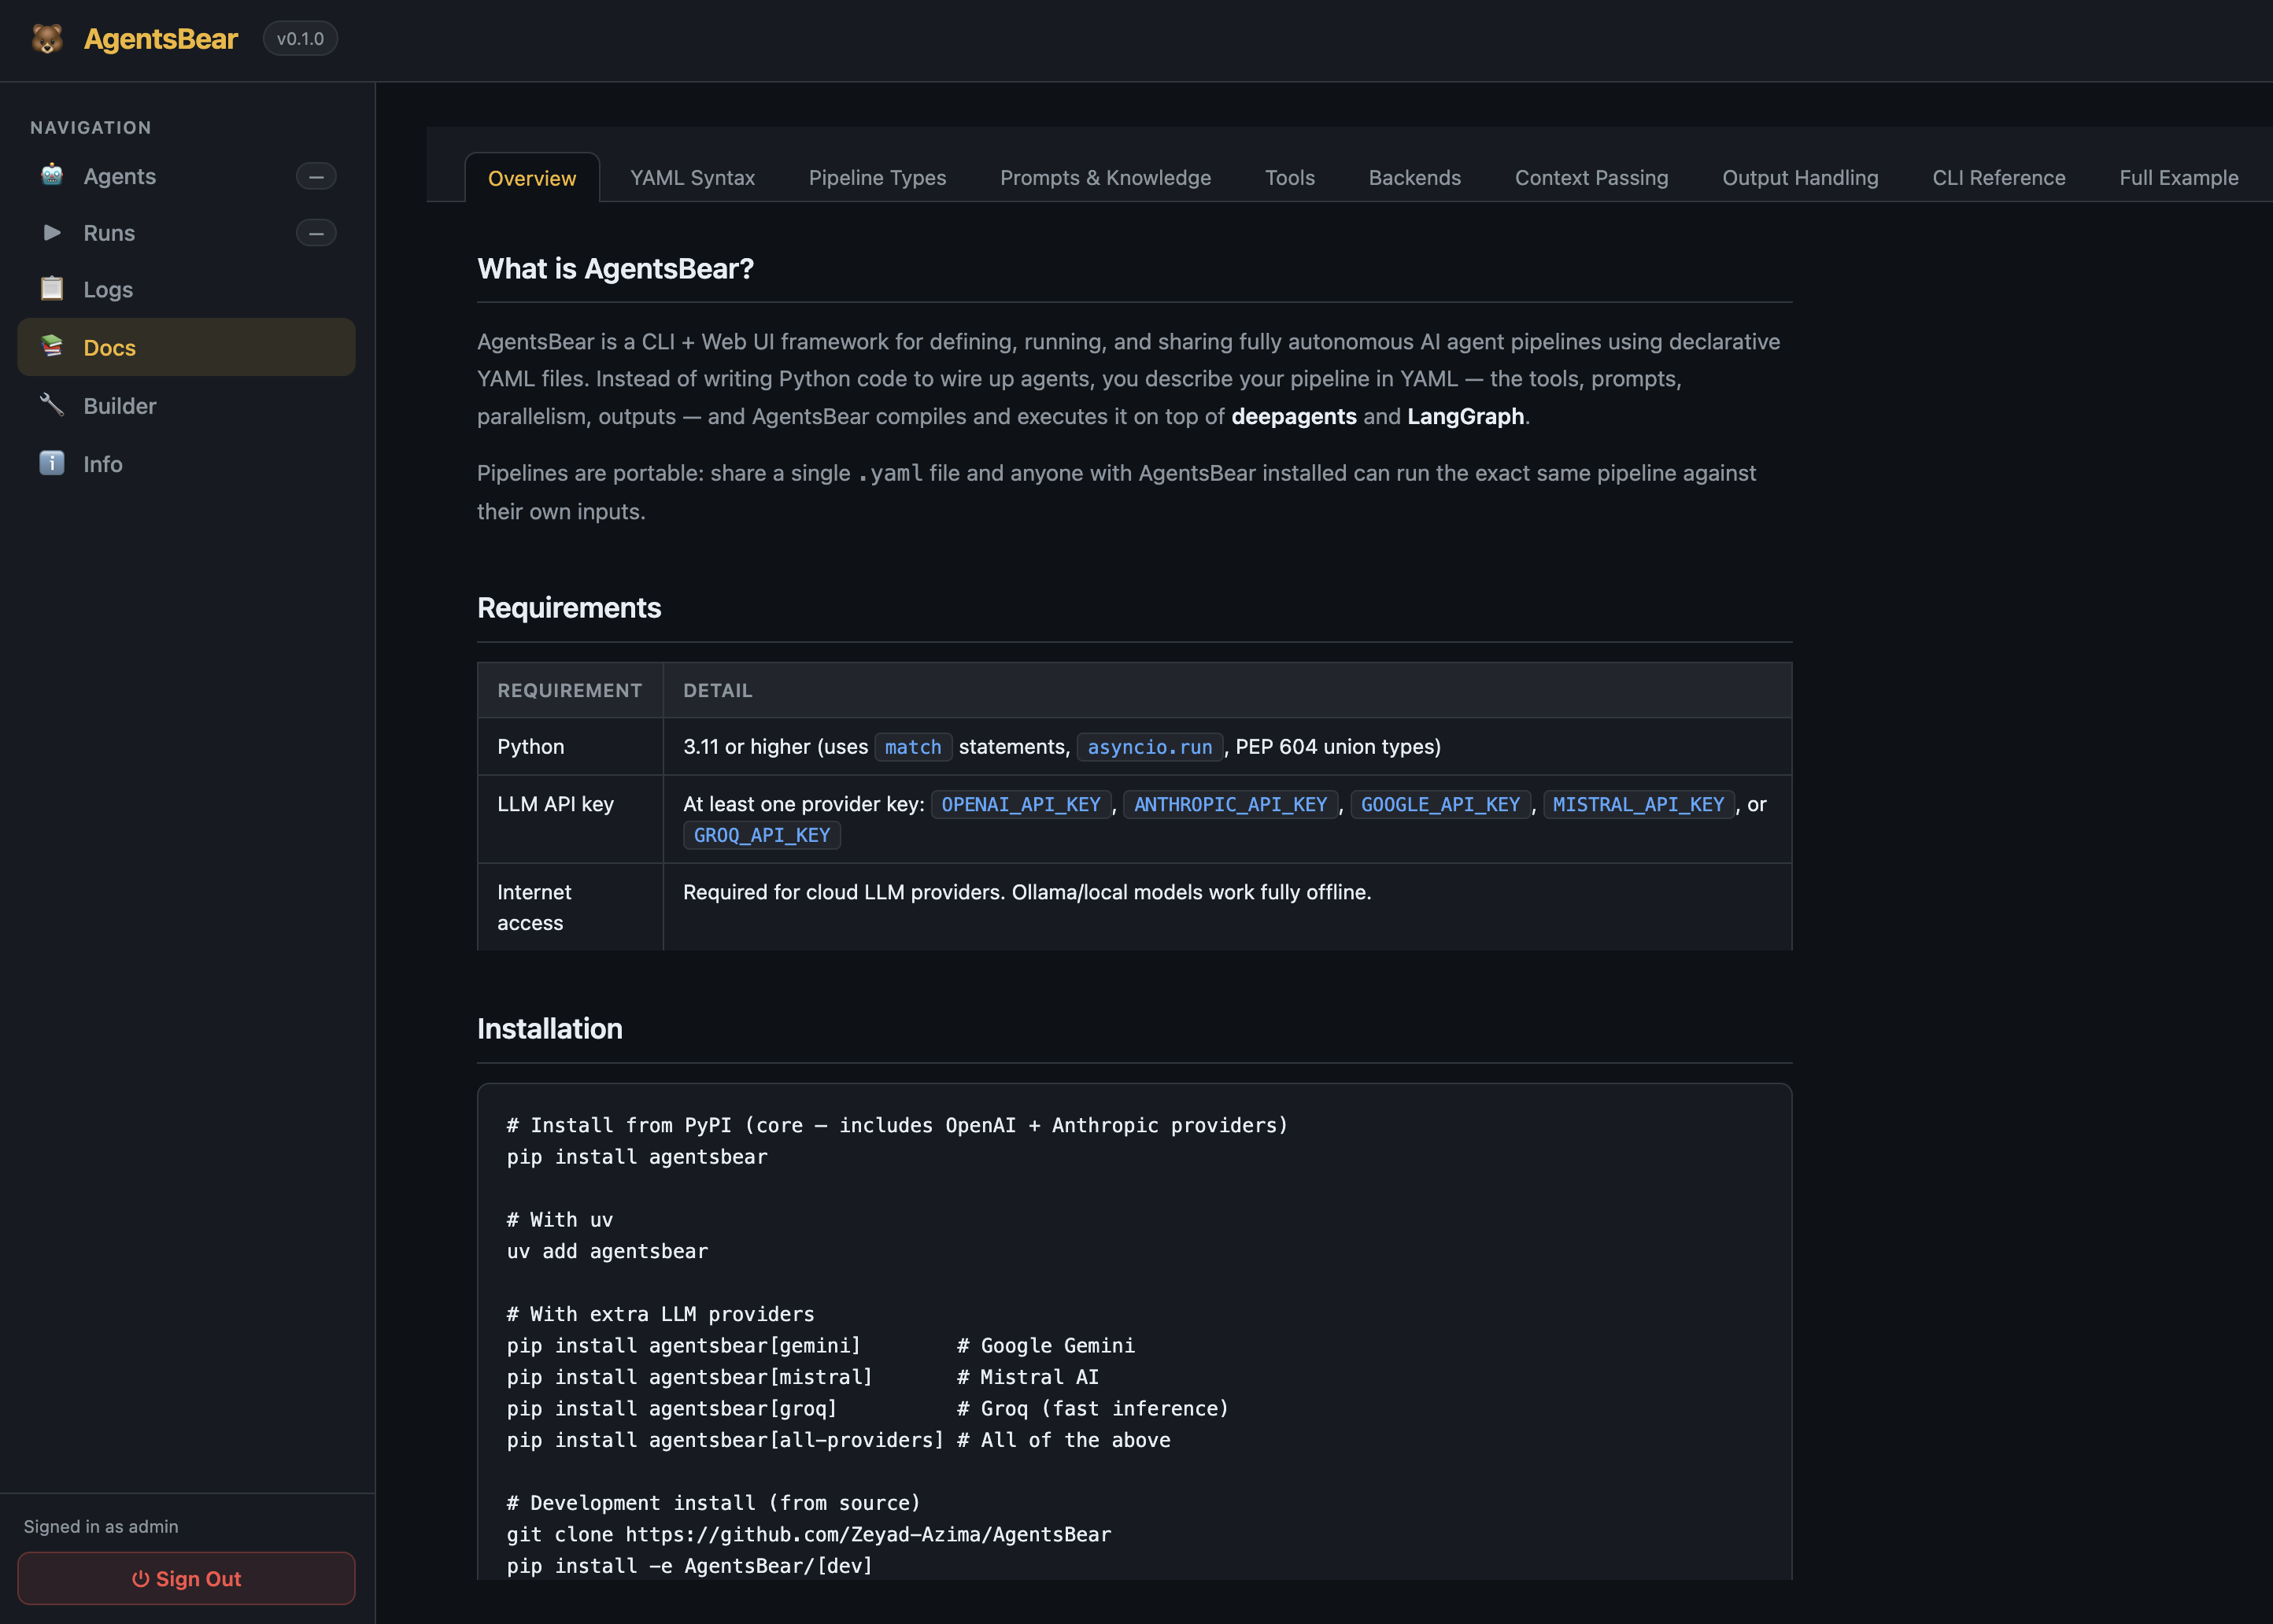
Docs — in-app reference for YAML syntax, pipeline types, tools, and examples
Pipeline Builder
The visual pipeline builder lets you design agents without writing YAML directly — or import an existing agent.yaml and explore it visually.
Canvas — Drag nodes, connect steps with ports, zoom and pan the full graph.
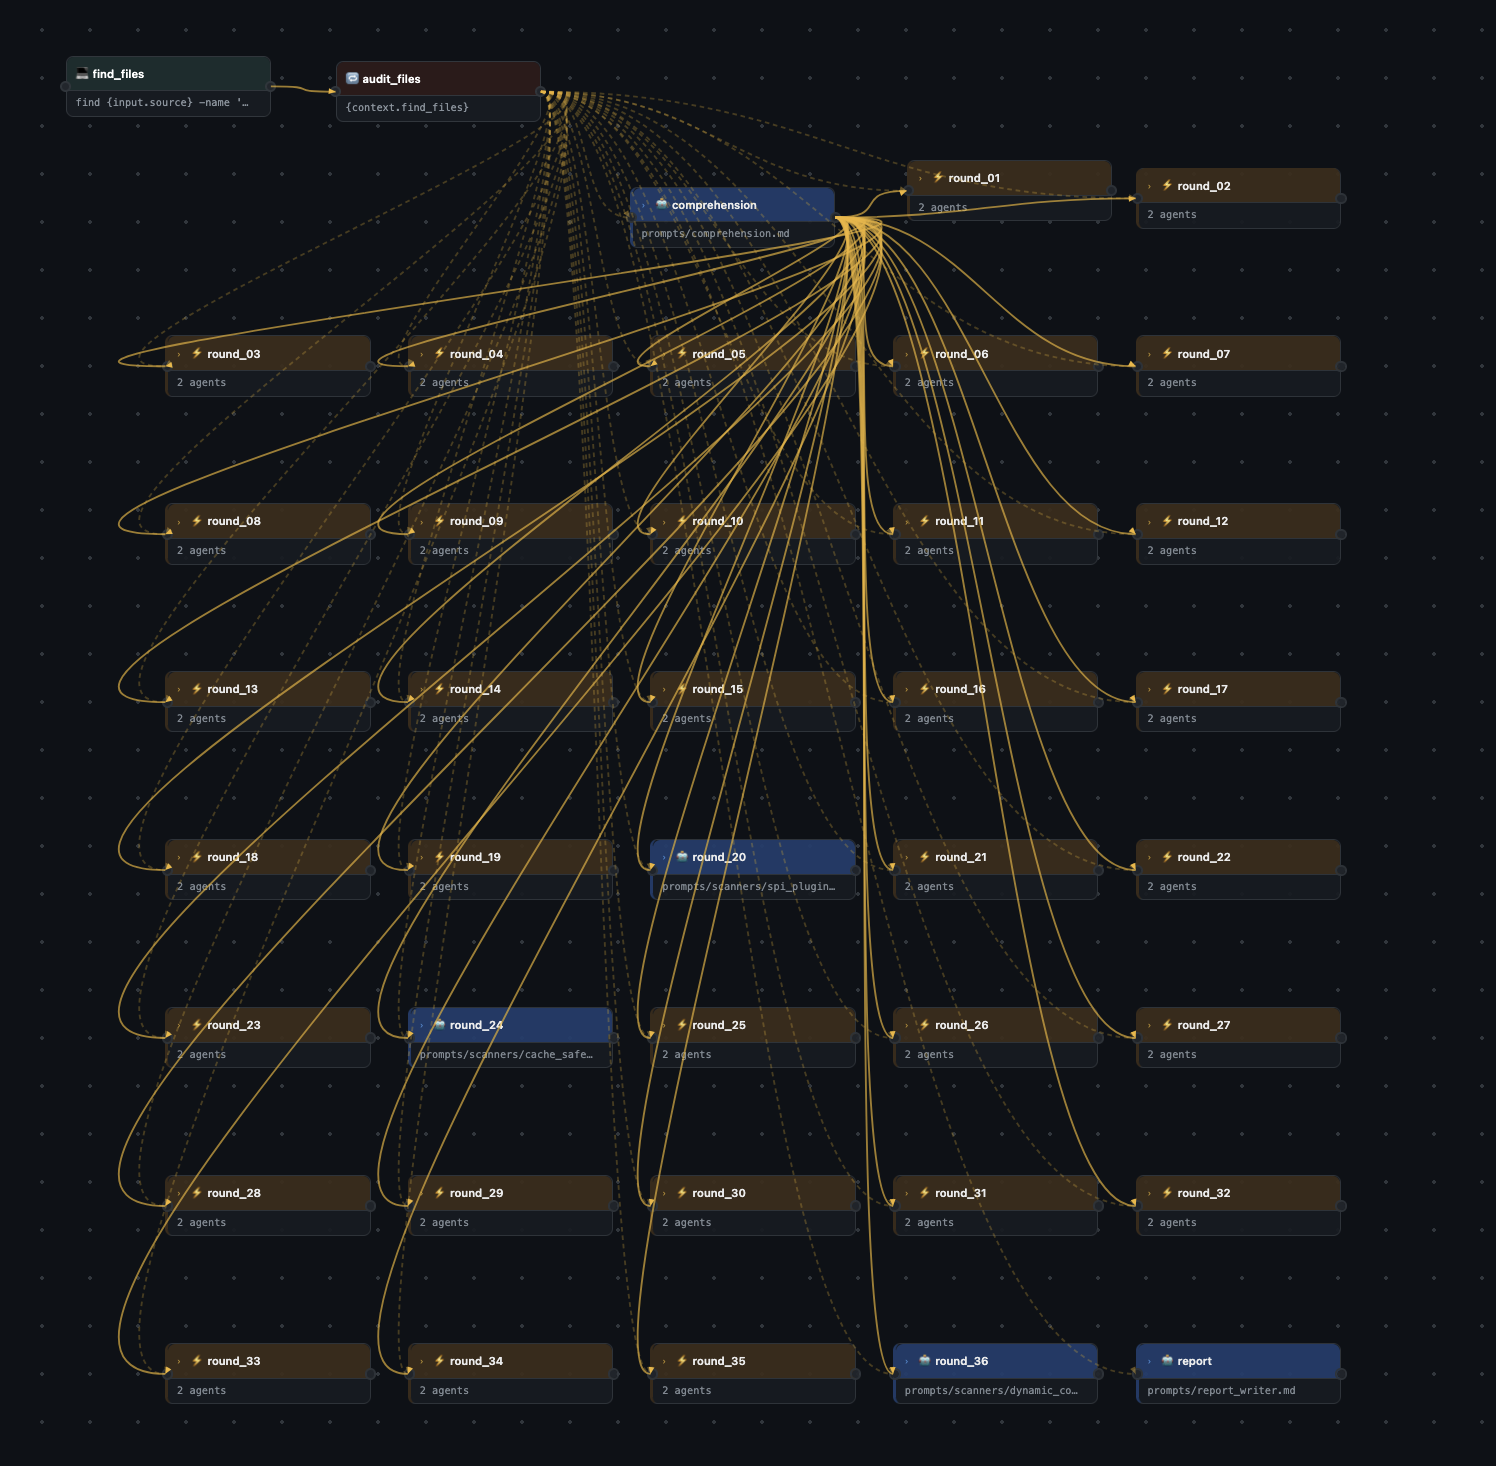
Pipeline canvas — the full java-security-audit pipeline (106 steps: 1 for_each, 1 comprehension agent, 35 parallel scanner rounds, 1 report writer)
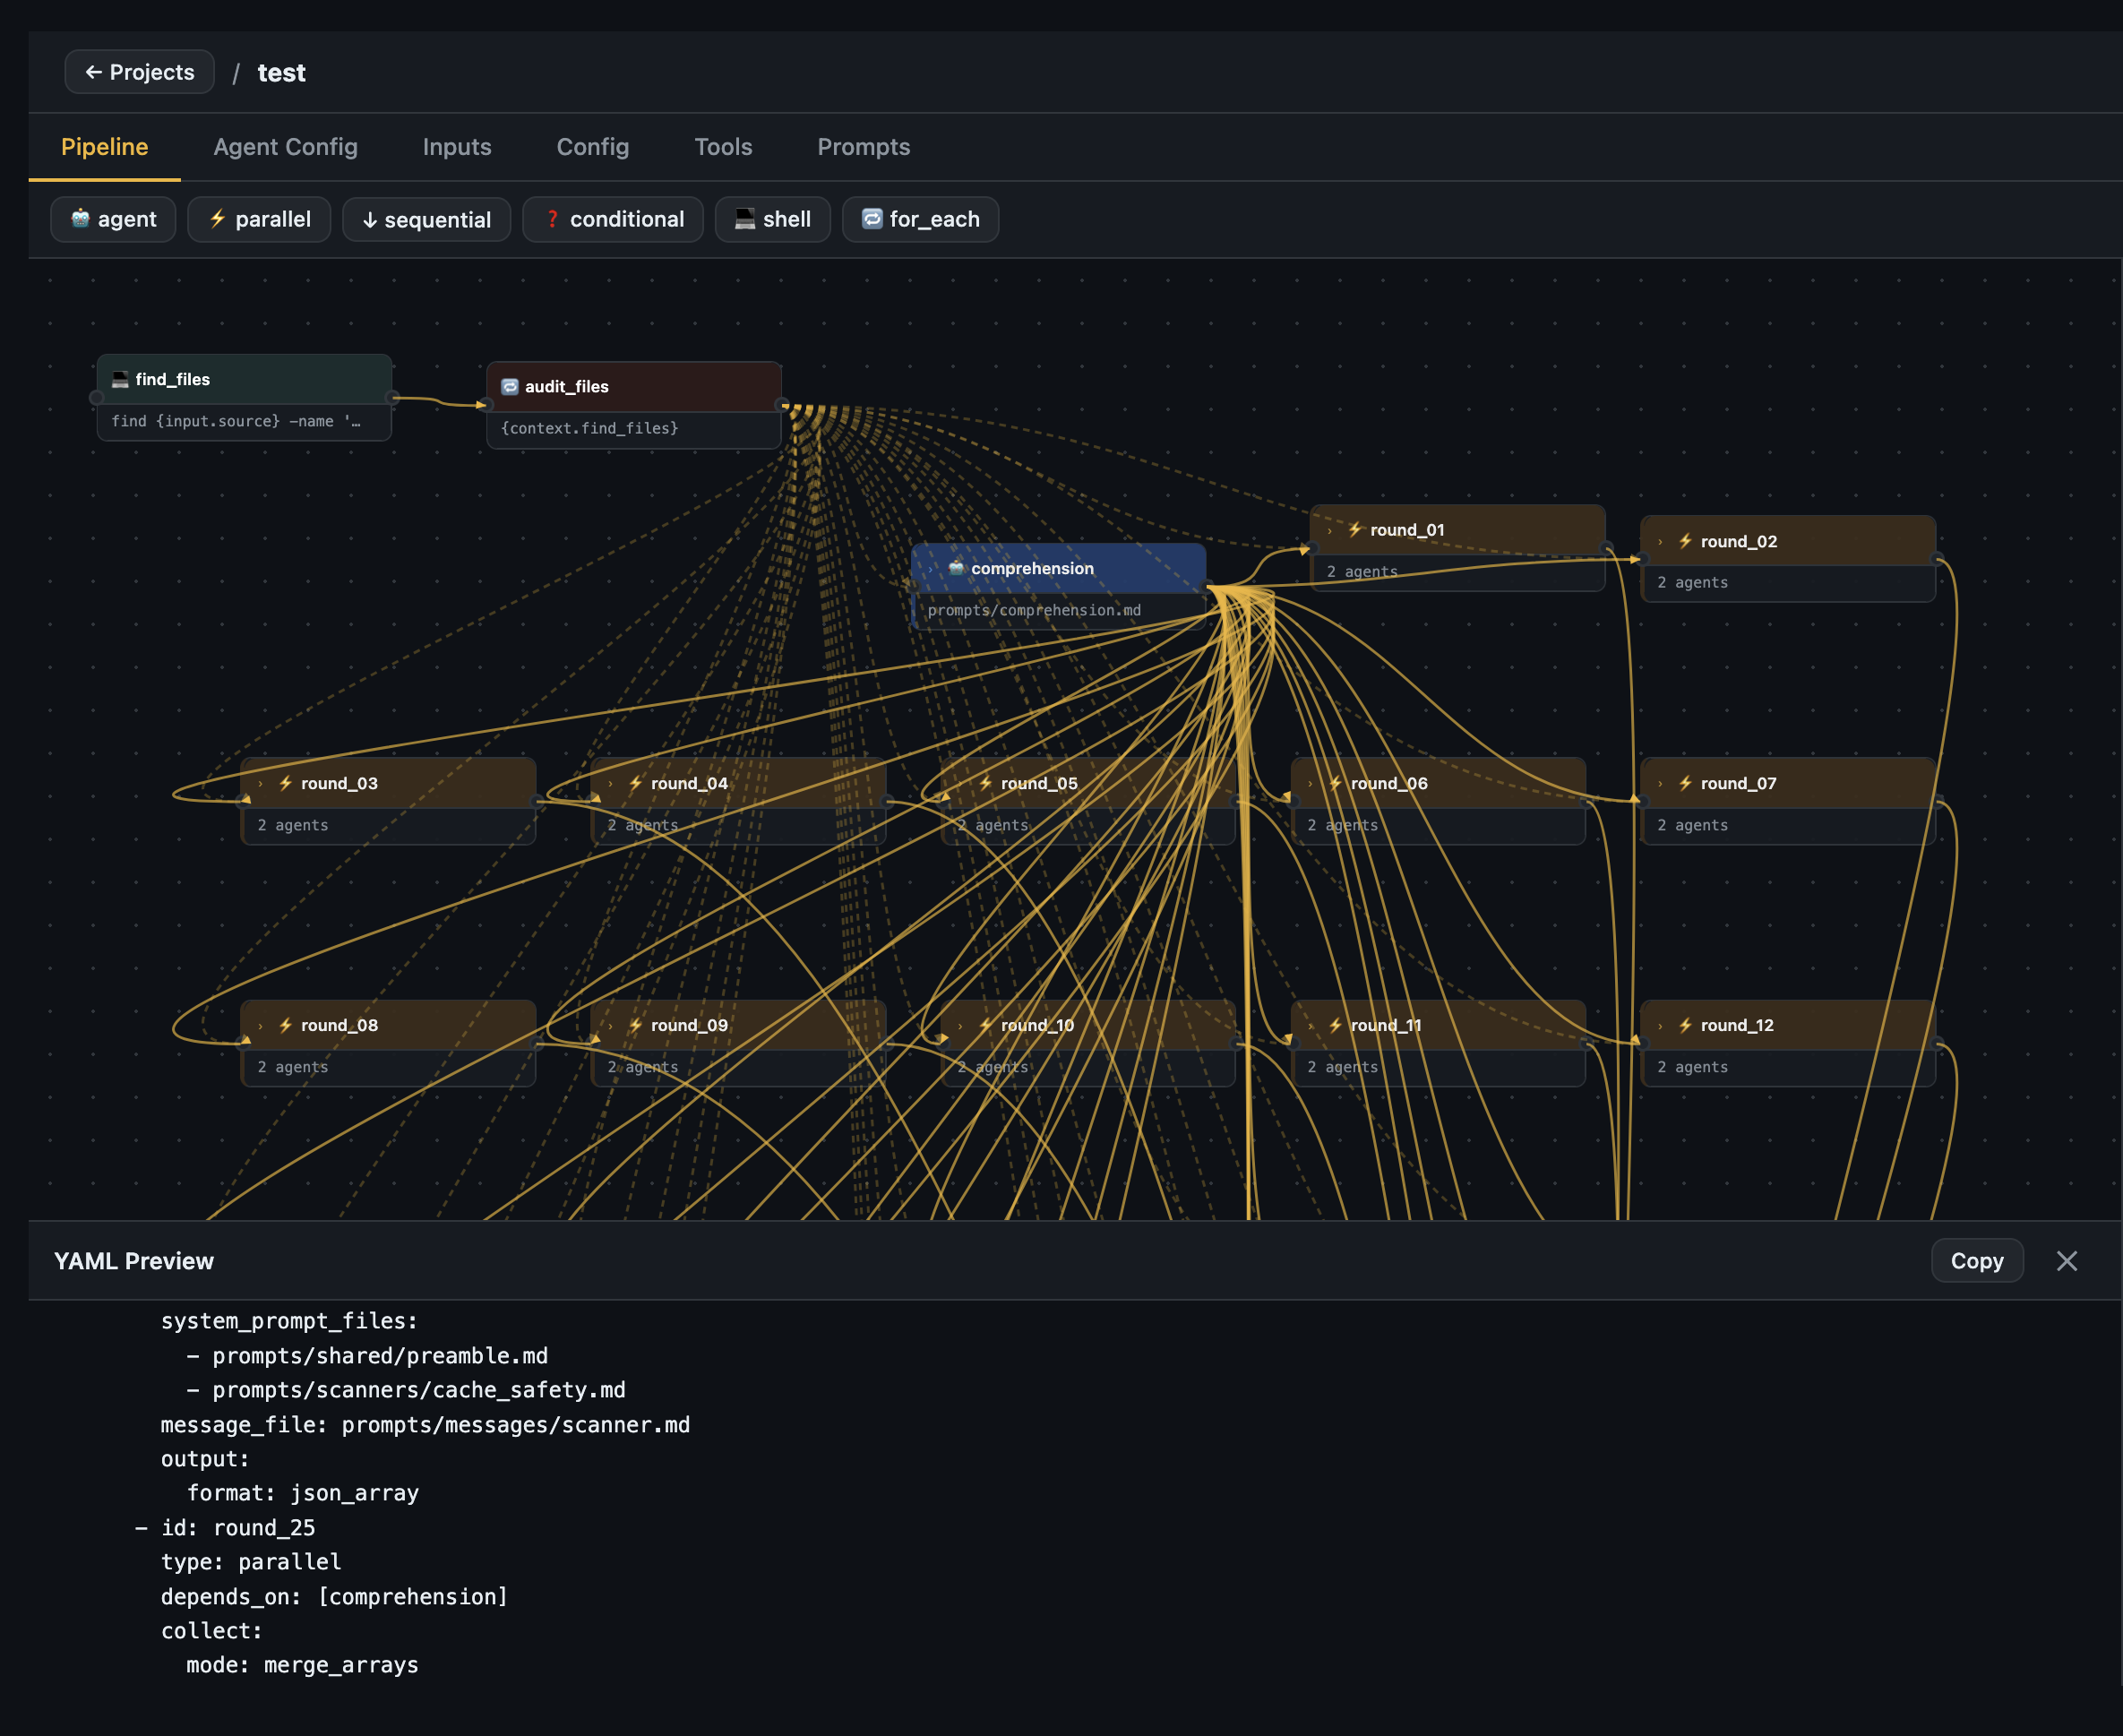
YAML preview drawer — live-generated YAML from the visual canvas, copy or export as ZIP
Node config panel — Click any node to configure it: model, backend, tools, prompts, output format, depends_on.
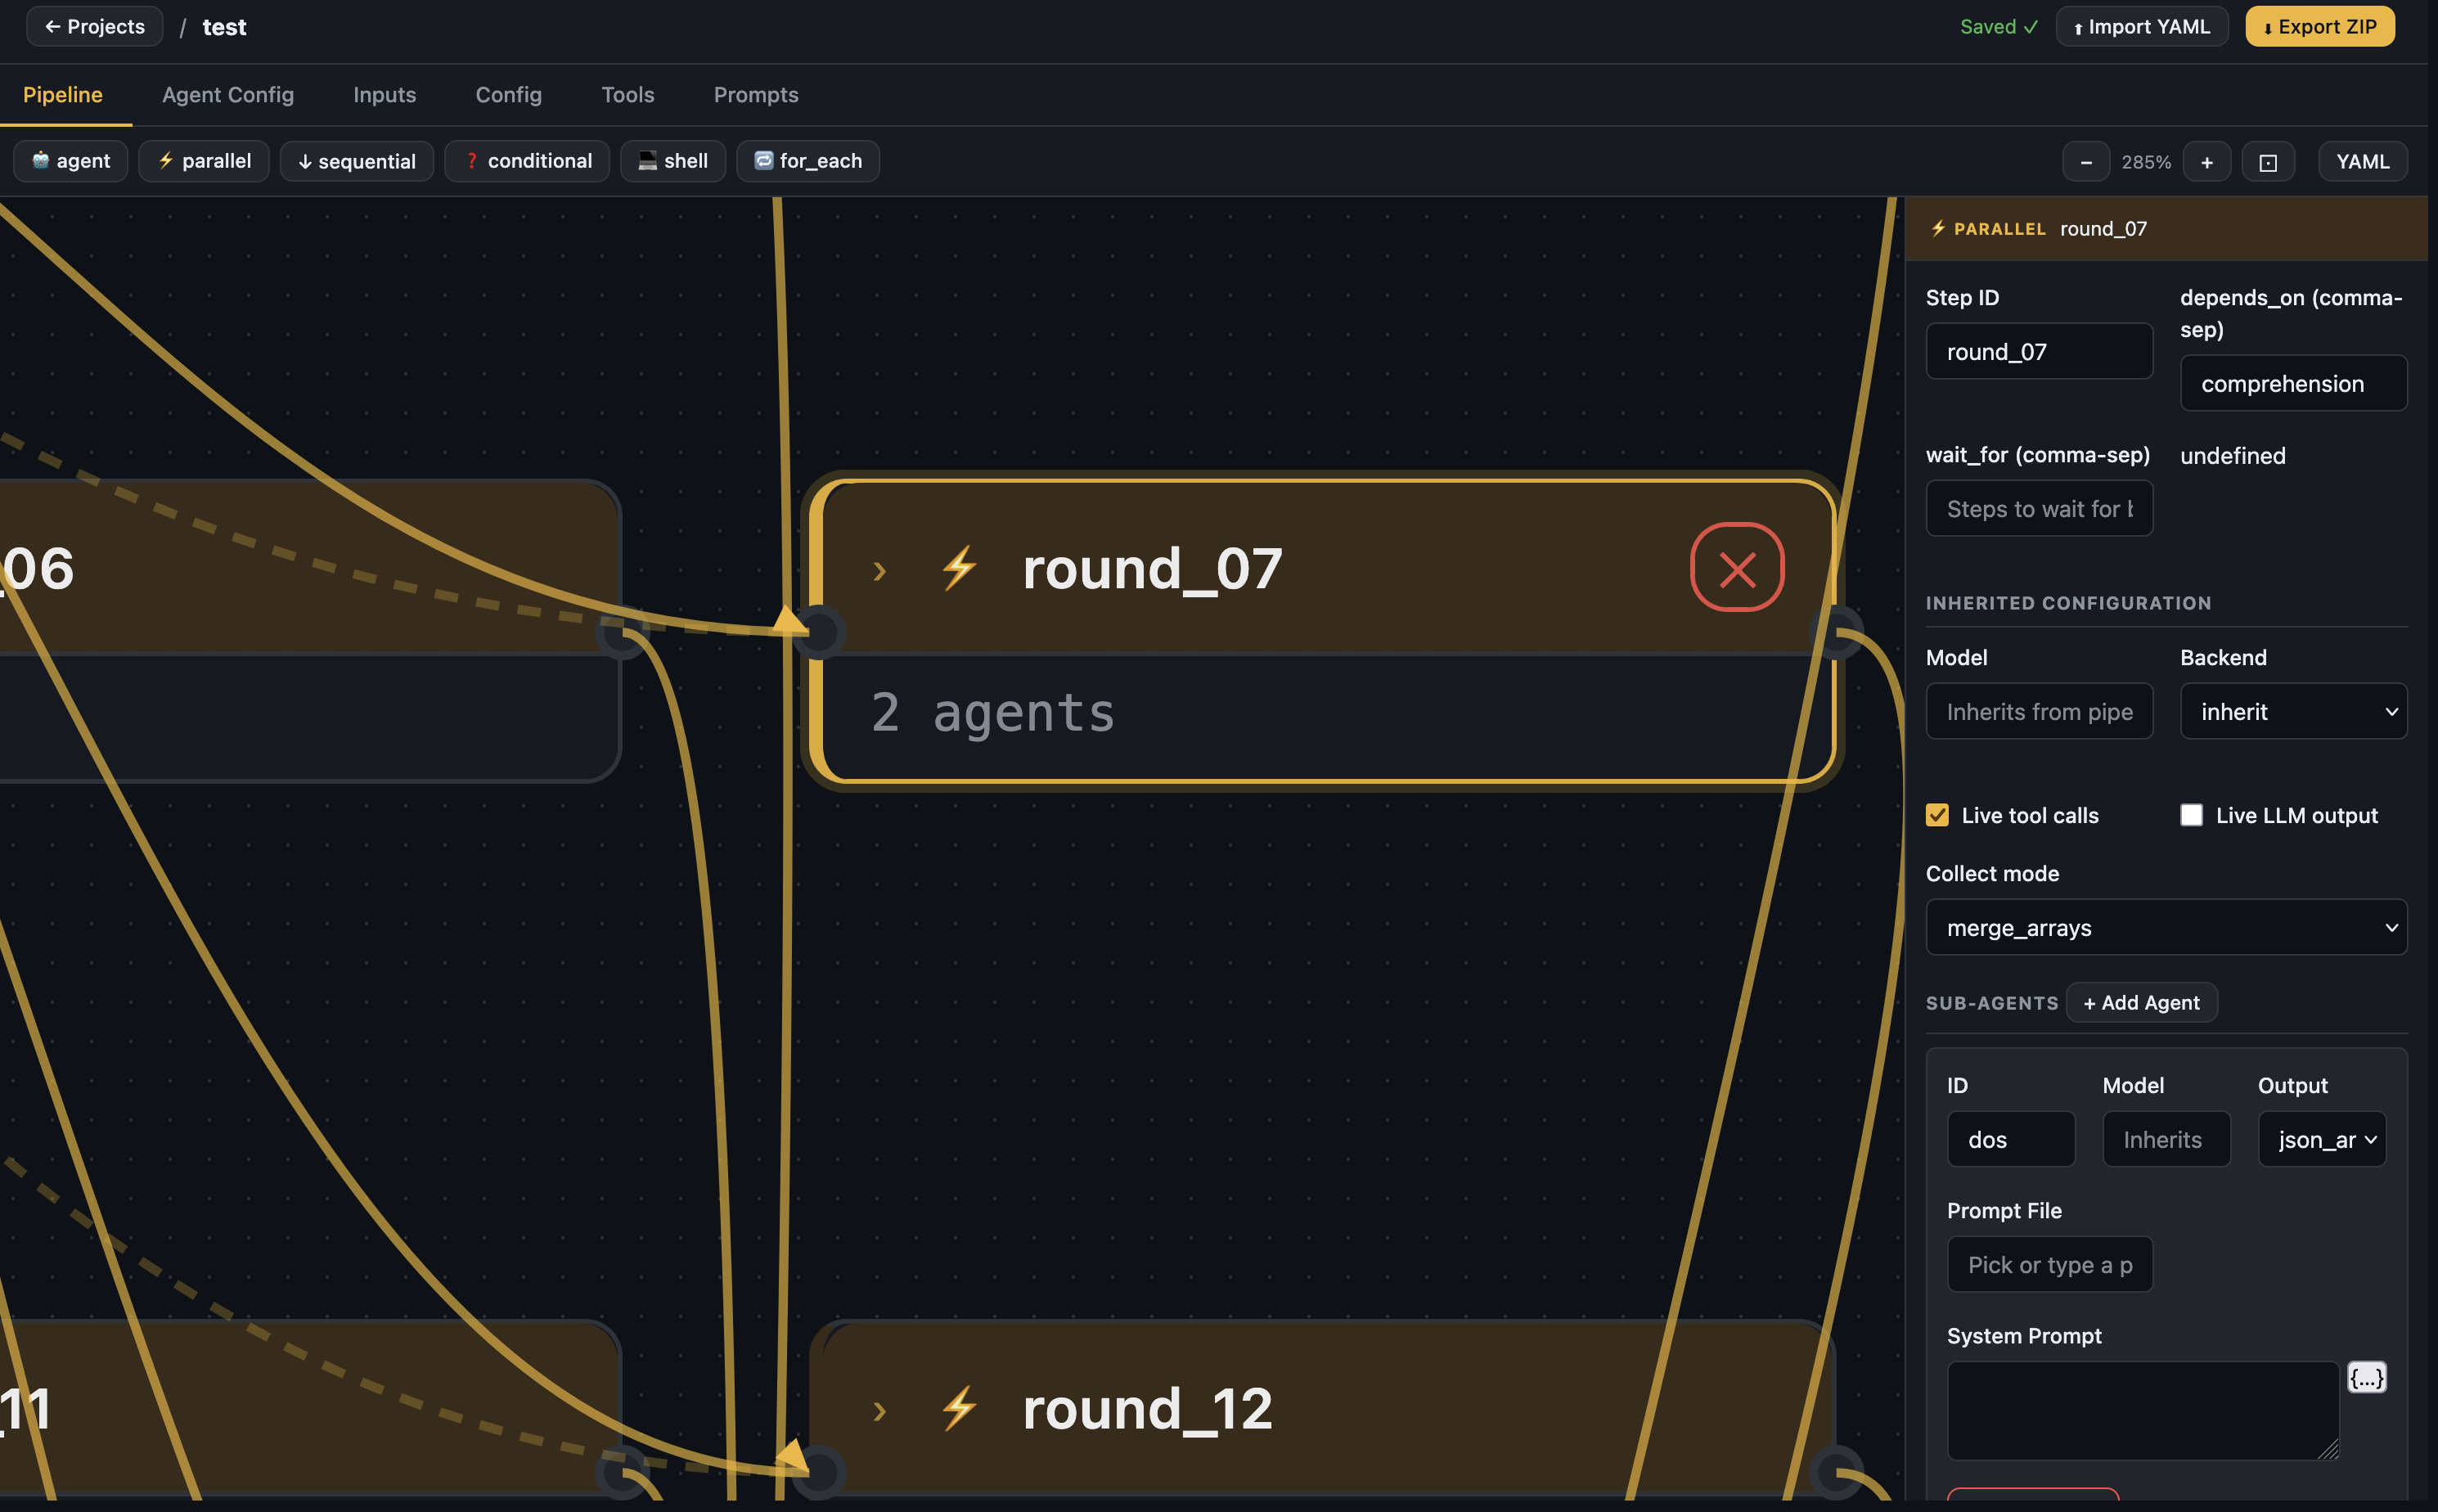
Node selected — parallel step config with sub-agents, collect mode, and inherited settings
Agent Config tab — Set the global pipeline name, version, model, base URL, backend, and output schema.
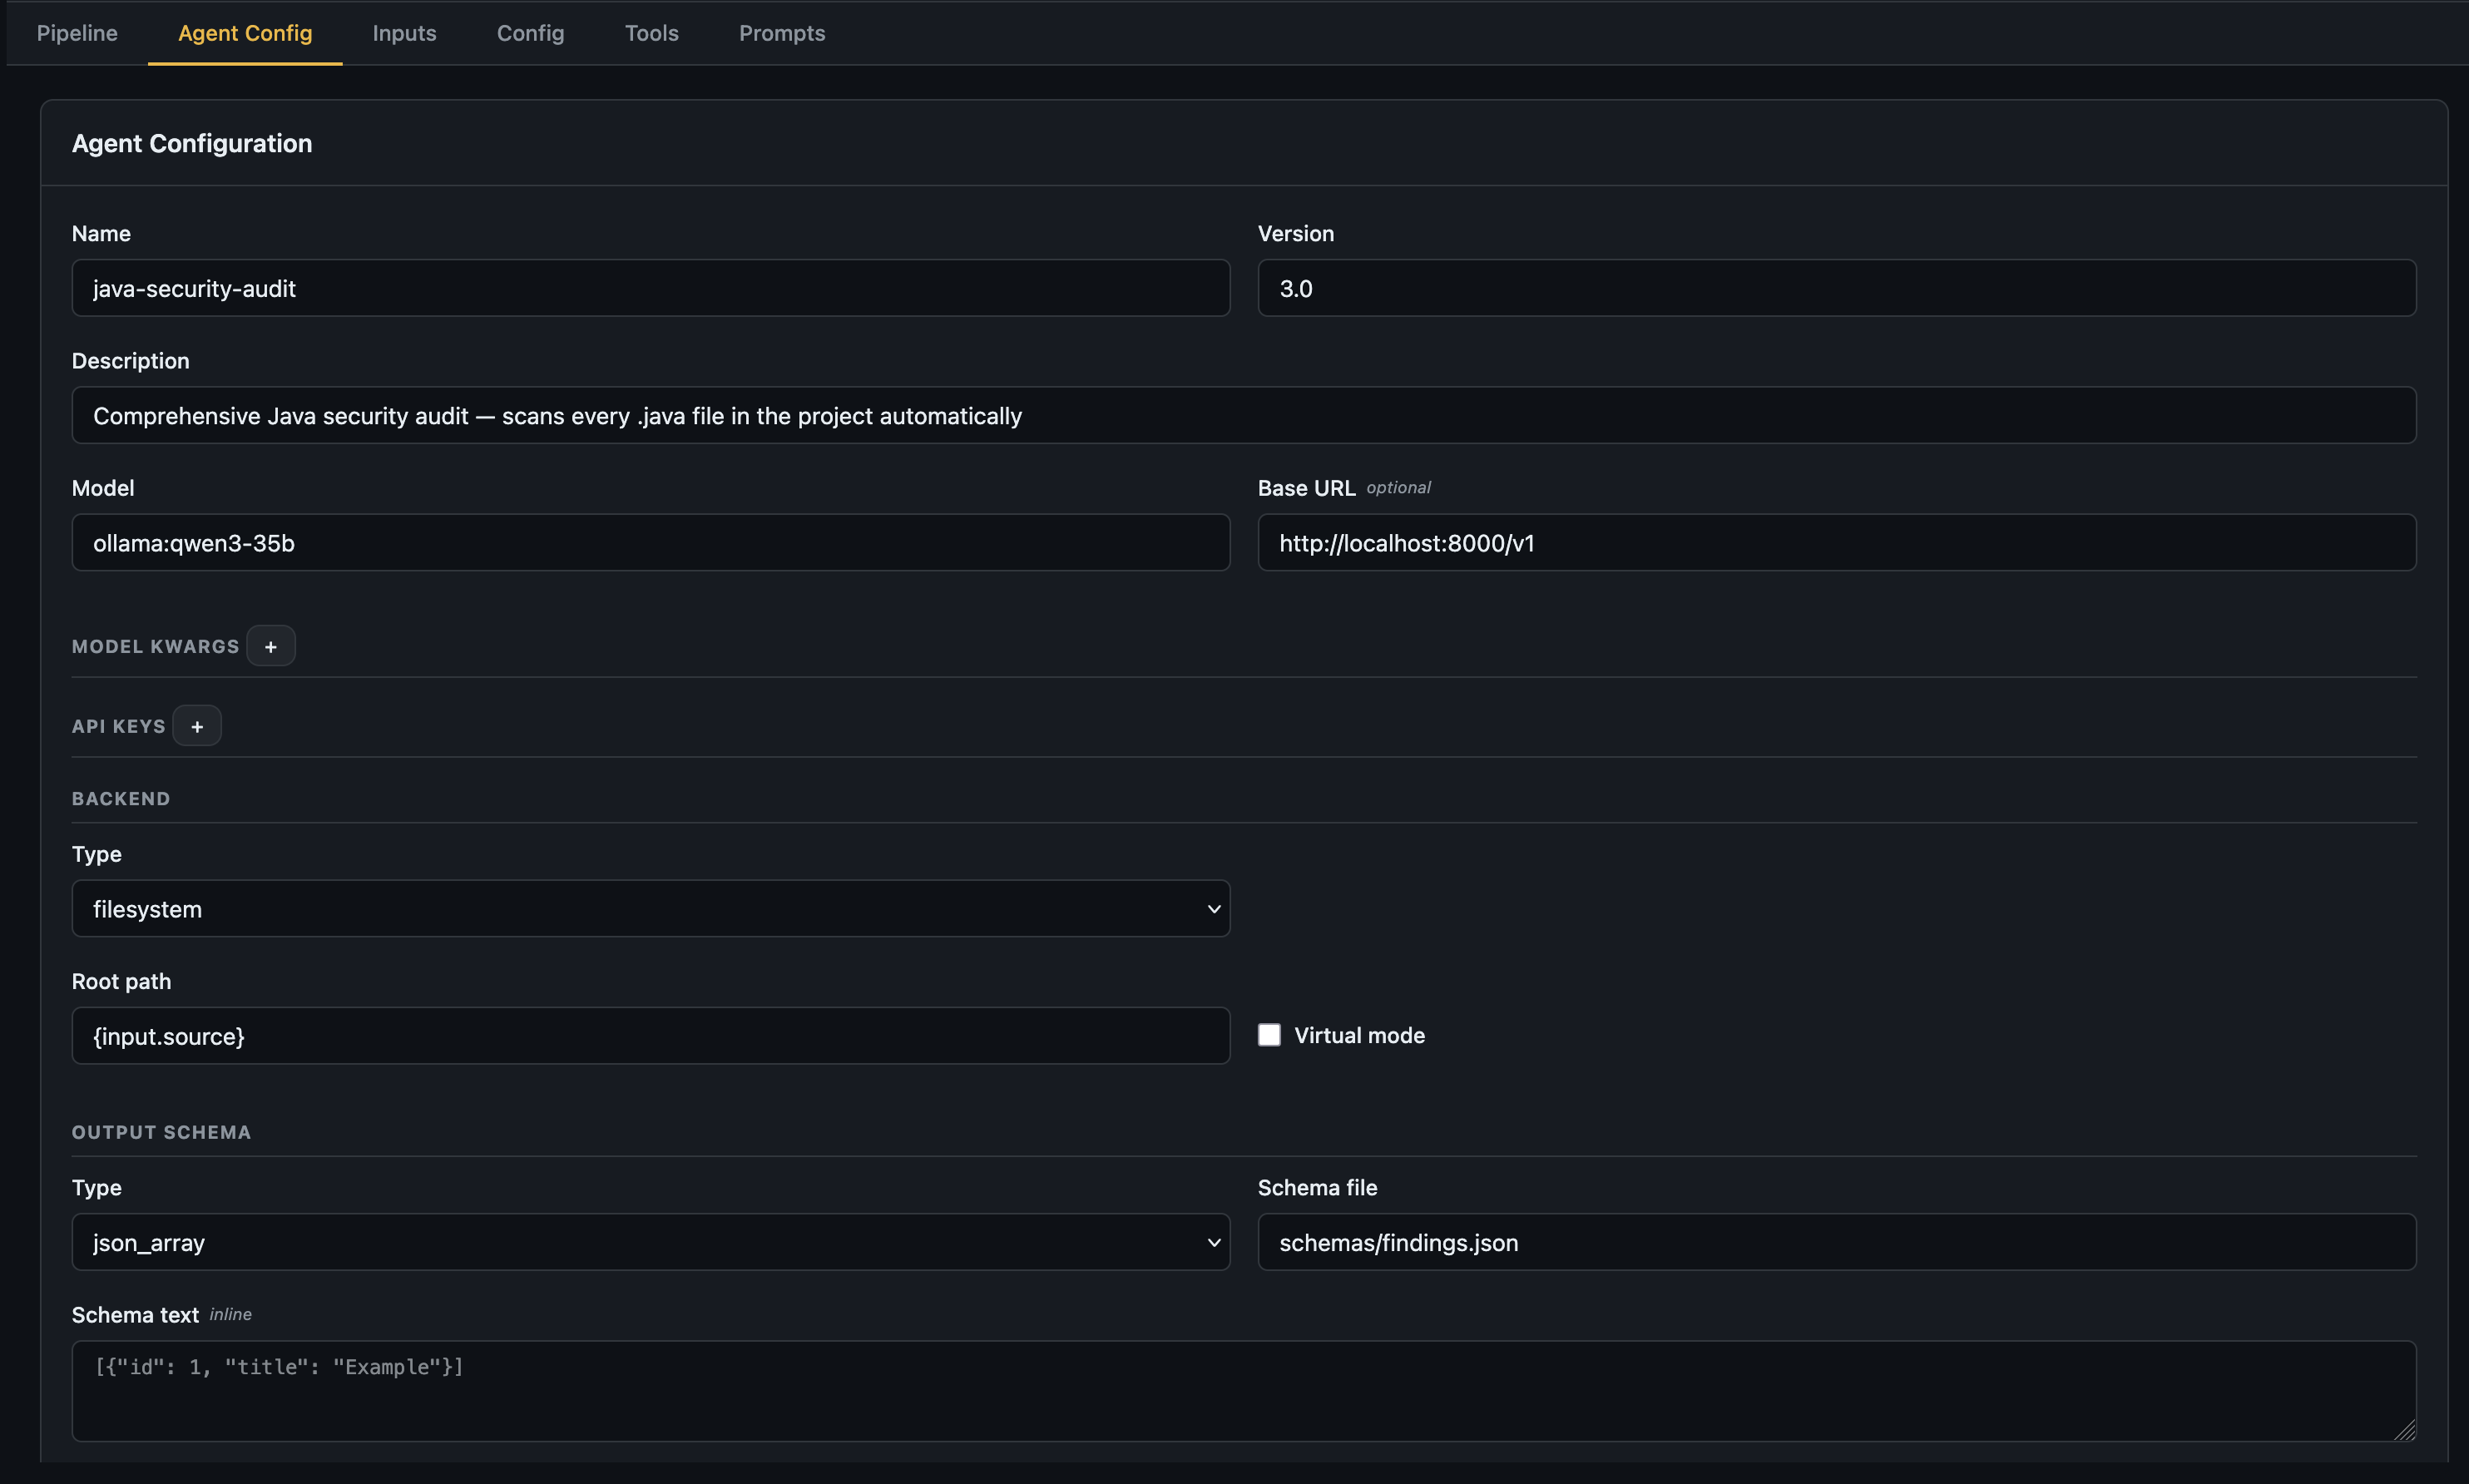
Agent Config — top-level pipeline settings including model, backend, and output schema
Inputs tab — Declare all pipeline inputs with name, type, required flag, default, and description.
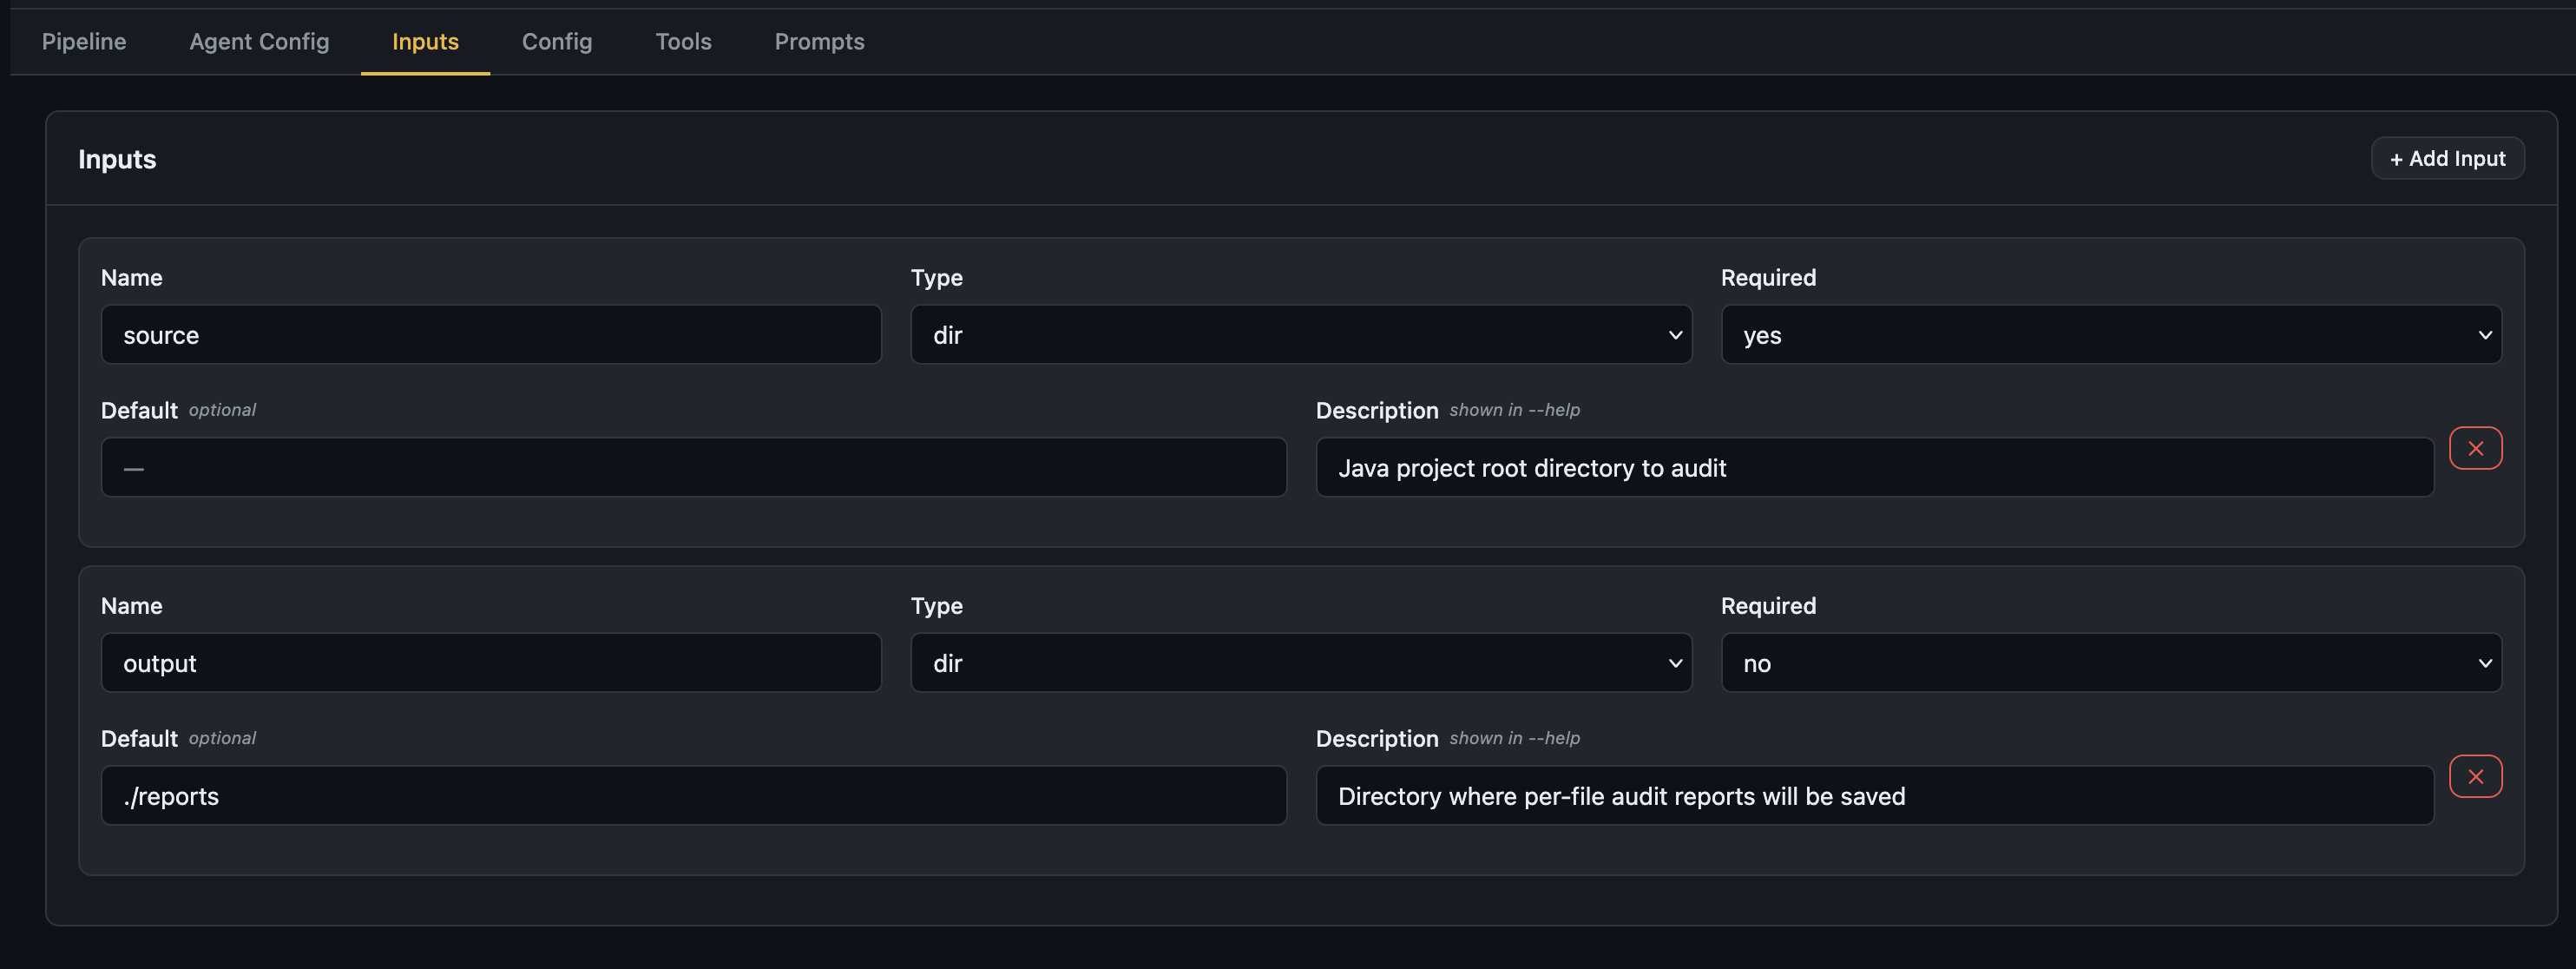
Inputs tab — declare what your pipeline expects at runtime
Config tab — Set static configuration keys referenced as {config.key} throughout the pipeline.

Config tab — static key-value config (e.g. concurrency, output_dir)
Builder dashboard — Manage all your builder projects.
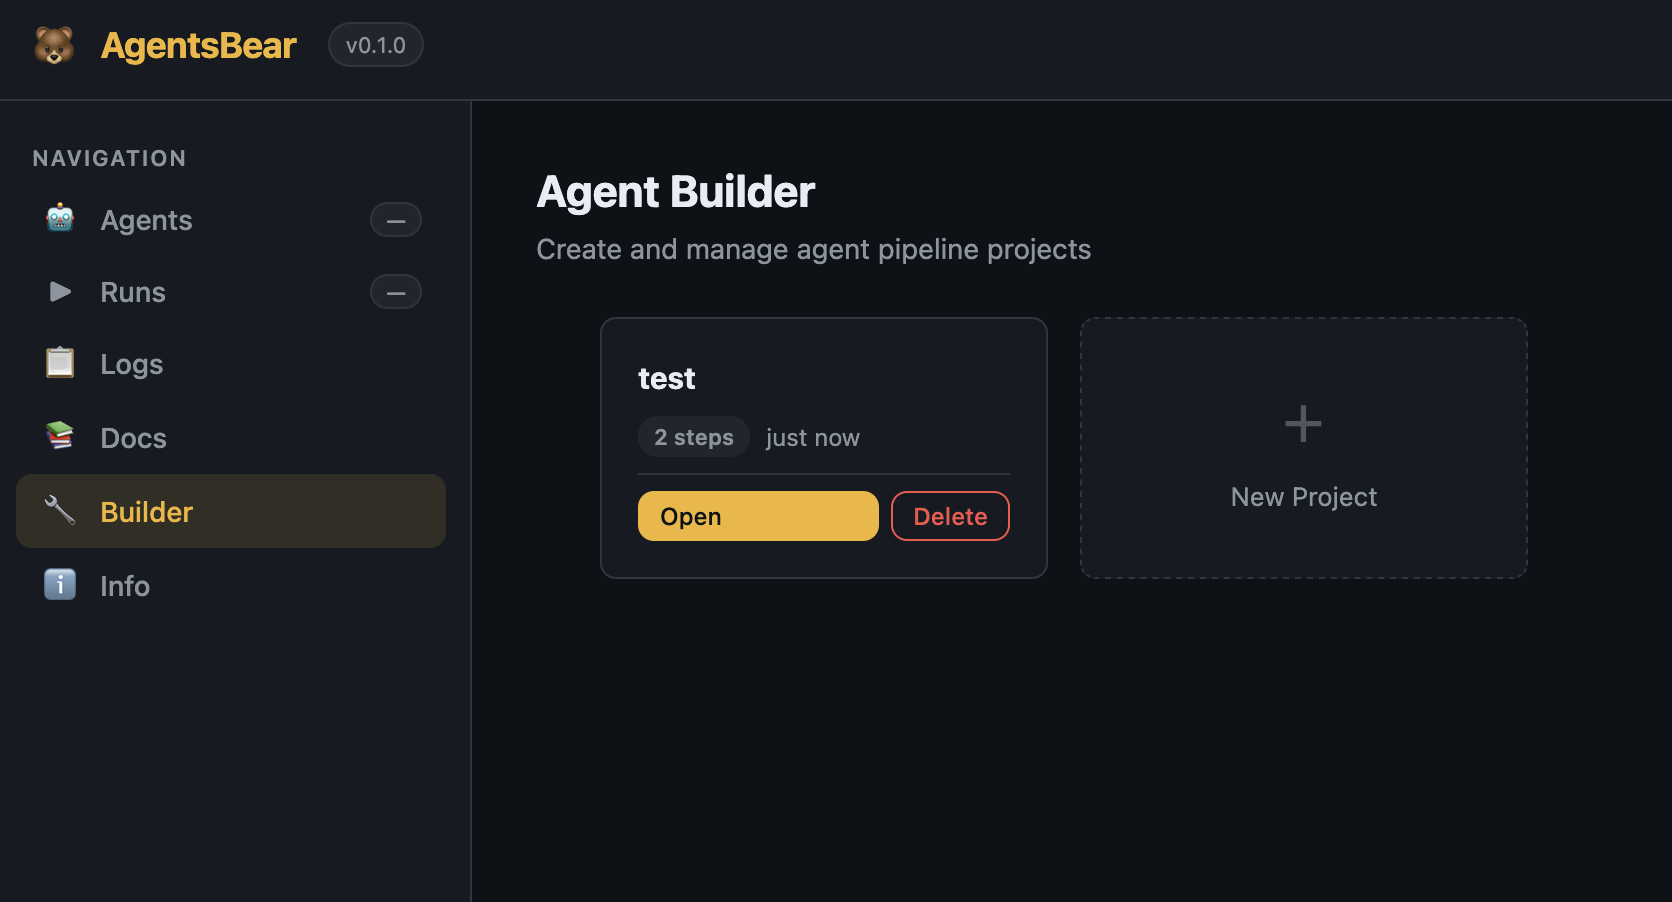
Builder dashboard — create, open, and delete pipeline projects
LLM Providers
AgentsBear supports any LangChain-compatible LLM. Specify the provider with a provider:model string:
| Provider | Format | Install |
|---|---|---|
| Anthropic | anthropic:claude-sonnet-4-6 |
included |
| OpenAI | openai:gpt-4o |
included |
| Google Gemini | gemini:gemini-2.0-flash |
pip install "agentsbear[gemini]" |
| Mistral | mistral:mistral-large |
pip install "agentsbear[mistral]" |
| Groq | groq:llama-3.3-70b-versatile |
pip install "agentsbear[groq]" |
| Ollama (local) | ollama:llama3.2 |
set base_url in YAML |
Ollama example:
model: ollama:qwen3-35b
base_url: "http://localhost:11434/v1"
No API key needed for local models — just have Ollama running.
Examples
Eight ready-to-run example pipelines are included under examples/:
| Example | Description |
|---|---|
files-summary |
Recursively summarise every file in a directory |
java-security-audit |
Full Java security audit — 35 parallel scanner rounds per file (Anthropic) |
java-security-audit-ollama |
Same audit, fully local with Ollama |
java-validate-findings |
Validate and deep-dive findings from an audit report |
malware-static-analyzer |
Static malware analysis — macOS-native tools, IOC extraction, MITRE ATT&CK mapping |
log-analyzer |
Structured log analysis and anomaly detection |
network-traffic-auditor |
PCAP / network traffic security audit |
devops-incident-responder |
Automated DevOps incident response pipeline |
Import and run any example:
agentsbear import examples/malware-static-analyzer/agent.yaml
agentsbear run malware-static-analyzer --input sample_dir=./suspicious-files
Documentation
Full reference documentation is in docs/:
| Doc | Description |
|---|---|
| 01 — Architecture | System layers, execution model, how steps run |
| 02 — YAML Syntax | Complete field-by-field YAML schema reference |
| 03 — Pipeline Types | All step types with full examples |
| 04 — Prompts & Knowledge | Prompt loading, templating, injection, schemas |
| 05 — Tools | Built-in tools, custom shell tools, tool restrictions |
| 06 — Backends | Filesystem, memory, null — when to use each |
| 07 — Context Passing | depends_on, {context.x}, inject items |
| 08 — Output Handling | Formats, save_to, collect modes, fallbacks |
| 09 — CLI Reference | All commands, flags, and environment variables |
| 10 — Java Audit Example | End-to-end walkthrough building the audit pipeline |
Acknowledgements
AgentsBear is built on top of the work of some outstanding open-source projects and teams. Huge thanks to:
LangChain AI — for building the entire ecosystem that makes this possible. AgentsBear runs on top of:
- deepagents — the deep research agent framework that powers every agent step
- LangGraph — the graph execution engine underneath it all
- langchain-core — the unified LLM interface and tool abstraction
LLM Provider SDK teams:
- Anthropic — Claude models
- OpenAI — GPT models
- Google — Gemini models
- Mistral AI — Mistral models
- Groq — Groq inference
- Ollama — local model serving
Python ecosystem:
- Typer — CLI framework
- Rich — terminal formatting and live output
- Pydantic — data validation
- Flask — Web UI backend
- PyYAML — YAML parsing
Built by Zeyad Azima
Yorumlar (0)
Yorum birakmak icin giris yap.
Yorum birakSonuc bulunamadi