RisalDash
Health Uyari
- License — License: MIT
- Description — Repository has a description
- Active repo — Last push 0 days ago
- Low visibility — Only 9 GitHub stars
Code Gecti
- Code scan — Scanned 6 files during light audit, no dangerous patterns found
Permissions Gecti
- Permissions — No dangerous permissions requested
Bu listing icin henuz AI raporu yok.
Beautiful real-time web dashboards for ESP32 / ESP8266 in a few lines of C++ — a modern ESP UI & ESPUI alternative. Offline-first AP + captive portal, WebSocket, 26 widgets, i18n (EN/RU/AR), and AI control via MCP.
RisalDash
![]()
![]()
Beautiful real-time web dashboards for ESP32 / ESP8266 — in a few lines of C++.
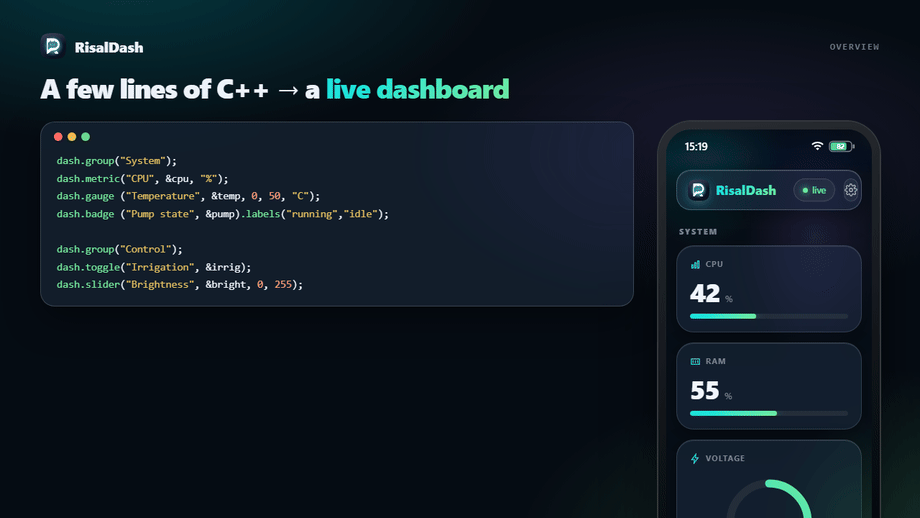
Describe widgets; RisalDash generates the HTML, CSS, JS and the WebSocket protocol for you.
The dashboard is served by the device itself in an OKLCH "liquid glass" style (translucent
cards, iOS-like status bar, a Settings gear for language/theme/accent, swipe-up multi-page
layouts), updates live over WebSocket, and works offline-first — including a captive portal
for first-boot Wi-Fi setup. Zero front-end code.
🌐 dash.risal.io · MIT · ESP32 + ESP8266
#include <RisalUI.h>
RisalUI dash("Greenhouse");

float temp = 24.3, volts = 12.1; int bright = 128; bool pump = false;

void setup() {
  dash.gauge ("Voltage", &volts, 0, 14, "V");
  dash.chart ("Temperature", &temp, "C");
  dash.slider("Brightness", &bright, 0, 255, [](int v){ analogWrite(LED_PIN, v); });
  dash.toggle("Pump", &pump, [](bool on){ digitalWrite(PUMP_PIN, on); });
  dash.begin();        // saved Wi-Fi → connect; first boot → captive setup portal
}

void loop() {
  temp = readTemp(); volts = readVolts();
  dash.update();       // pushes changed values to the browser
}
Why RisalDash
- Zero-Waste UI — the linker (
--gc-sections) strips widget types you don't use (0 bytes).
A type you do use adds its own C++ + CSS + JS once (~1.3–3.4 KB, measured on ESP32). - Offline-first first boot —
begin()raises a Wi-Fi access point with a captive portal;
the user picks a network and the credentials are saved to NVS. No internet, no app, no CDN
(system fonts, everything served from flash). - Real-time — values are pushed over WebSocket only when they change; controls send commands
back to your callbacks. - Widgets for everything — 26 types: displays, controls, layout (tabs/groups/span), plus
one-line sensor presets. - Multi-page + native chrome —
dash.layout()splits the UI into pages switched by a
swipe-up sheet of icon tiles; an iOS-style status bar (clock, Wi-Fi, battery) sits on top. - Settings on the device — a gear in the appbar opens Language / Theme / Accent, applied
live and remembered per browser.dash.lang("en"|"ru"|"ar")sets the default; Arabic flips to RTL. - Integrations — REST, Prometheus
/metrics, optional MQTT, OTA firmware update, and MCP
so an AI agent can read sensors and drive controls (every widget becomes a tool). - Brand-consistent — the same OKLCH design system as the app and dash.risal.io.
Before / After
A browser UI for an ESP usually means hand-writing HTML + CSS + JS and a WebSocket
protocol — easily 100+ lines for a couple of gauges. RisalDash is just the declaration.
server.on("/", HTTP_GET, [](AsyncWebServerRequest* r) {
  r->send(200, "text/html", R"HTML(
    <div id="t">--</div><label><input type="checkbox" id="p"> Pump</label>
    <script>
      let ws; (function c(){ ws = new WebSocket('ws://'+location.host+'/ws');
        ws.onmessage = e => { const s = JSON.parse(e.data); t.textContent = s.temp; p.checked = s.pump; };
        ws.onclose = () => setTimeout(c, 800); })();
      p.onchange = () => ws.send(JSON.stringify({ pump: p.checked }));
    </script>
    <style>/* gauge SVG, layout, theme, fonts, mobile… */</style>
  )HTML");
});
ws.onEvent([](/*…*/ AwsEventType ty, uint8_t* d, size_t n) {
  if (ty == WS_EVT_DATA) { /* parse JSON, find the key, apply to your var, call your callback */ }
});
void loop() {
  if (millis() - last > 250) {                       // throttle by hand
    String j = "{"; j += "\"temp\":" + String(temp) + ",\"pump\":" + (pump ? "true" : "false") + "}";
    ws.textAll(j); last = millis();                  // build + broadcast JSON by hand
  }
  // …now repeat all of this for every new widget, plus the CSS and the protocol.
}
After — RisalDash:
dash.gauge ("Temperature", &temp, 0, 50, "C");
dash.toggle("Pump", &pump, [](bool on){ digitalWrite(PUMP, on); });
dash.begin();                                        // + offline captive portal, i18n, OTA, MCP…
Install
Arduino IDE — Library Manager → search "RisalDash".
PlatformIO — platformio.ini:
lib_deps =
    RisalDash
    esp32async/ESPAsyncWebServer
    esp32async/AsyncTCP        ; ESP32
  ; esp32async/ESPAsyncTCP    ; ESP8266
Wi-Fi: first boot vs. fixed credentials
dash.begin();                          // saved creds → STA; otherwise captive setup portal
dash.begin("ssid", "password");        // connect to this network (falls back to the portal)
dash.beginAP("Greenhouse", "12345678");// plain dashboard over its own access point
dash.apName("Greenhouse-Setup");       // name of the captive-portal AP (optional)
On first boot the device appears as a RisalDash-Setup Wi-Fi. Connect to it — the setup page
opens automatically (captive portal). Pick your network, enter the password; the device reboots
and serves the dashboard on your Wi-Fi.
Widgets
All widgets bind to a variable by pointer and update live.
| Method | Binds | Notes |
|---|---|---|
metric(name, &float, unit) |
float* |
big number + bar; .decimals(n), .zone(warn, bad) |
gauge(name, &float, min, max, unit) |
float* |
circular gauge |
chart(name, &float, unit) |
float* |
live sparkline (30-point history) |
stat(name, &float, unit) |
float* |
read-only number; .decimals(n) |
progress(name, &int, unit) |
int* |
0–100 % bar |
badge(name, &int) |
int* |
0/1/2 → ok/warn/bad; .labels(a, b, c) |
led(name, &bool) |
bool* |
on/off indicator |
toggle(name, &bool, cb) |
bool* |
switch → cb(bool) |
slider(name, &int, min, max, cb) |
int* |
range → cb(int) |
button(name, label, cb) |
— | momentary action → cb() |
number(name, &int, min, max, step, cb) |
int* |
stepper |
select(name, "a,b,c", &int, cb) |
int* |
dropdown → index |
radio(name, "a,b,c", &int, cb) |
int* |
segmented → index |
text / password / time / color(name, &String, cb) |
String* |
text & native inputs |
date(name, &String, cb) |
String* |
custom calendar popover (no native input) |
label(name, &String) · log(name, lines) |
String* |
read-only text / event log |
image(name, &String) · ai(name, &String) |
String* |
image URL / assistant note |
table(title).row(label, &float, unit, dec) |
float* |
key/value rows |
Layout: group(title), separator(title), tab(title) (switchable panels), and.span(2) / .span(3) to widen any card (collapses on mobile).
Icons: .icon(RICON_THERMOMETER) puts an IoT glyph in the card header. Built-in set:
thermometer, water, flash, bulb, power, gauge, home, wifi, clock, signal, leaf, motion —
or pass any 24×24 SVG path. Only the icons you use are linked into flash.
Pages, status bar & appearance
Split the dashboard into pages — each dash.layout() starts one; the widgets after it
belong to that page, and a swipe-up sheet of icon tiles (or the bottom handle) switches pages:
dash.layout("Overview", RICON_HOME);
dash.metric("CPU", &cpu, "%");
dash.layout("Climate", RICON_THERMOMETER);
dash.slider("Target", &target, 16, 30);
Every page carries an iOS-style status bar (clock, Wi-Fi, battery) and an appbar Settings
gear (Language / Theme / Accent, remembered per browser). Set the defaults from the sketch:
dash.timezone(180);          // status-bar clock & portal default, minutes from UTC (+03:00)
dash.accent(2);              // 0 Aqua · 1 Blue · 2 Violet · 3 Amber · 4 Rose
dash.theme(RisalUI::DARK);   // DARK (default) | LIGHT | AUTO
Sensor presets
One line drops the right widgets, units and ranges for a known sensor:
dash.sensor("bme280", &temp, &hum, &pres);  // gauge °C + metric % + chart hPa
dash.sensor("ina219", &volts, &cur, &pwr);  // V / A / W
Built-in: bme280, bmp280, dht11, dht22, sht3x, ds18b20, bh1750, ccs811,ina219, acs712, pzem004t, hcsr04, vl53l0x, mq135, soil, mpu6050, mpu9250.
The widget is chosen by the quantity, not the sensor model.
Languages
dash.lang("ar"); // default: "en" | "ru" | "ar" — "ar" switches to RTL
The appbar Settings gear lets the user switch language (EN / RU / AR) live too. Only the
languages you reference are compiled in (Zero-Waste); widget titles stay yours, the library
chrome is translated.
Integrations & control
dash.enableMCP("risal_pat_token");   // GET /api/mcp/manifest → AI tools (see tools/risal-mcp-bridge)
dash.enableOTA();                    // GET/POST /update → firmware update over the air
dash.mqtt("broker.local", 1883, "greenhouse");  // needs -D RISAL_ENABLE_MQTT + PubSubClient
dash.enableHomeAssistant("greenhouse");          // Home Assistant MQTT auto-discovery (after mqtt())
| Endpoint | Purpose |
|---|---|
GET /api/state |
full state as JSON |
GET /api/set?key=value |
set a control |
GET /metrics |
Prometheus exposition |
GET /api/mcp/manifest?token= |
widgets as MCP tools (token-guarded) |
GET/POST /update |
OTA firmware upload (when enableOTA()) |
MCP — enableMCP(token) exposes GET /api/mcp/manifest, turning every widget into an AI
tool (read sensors, drive controls). The companion
risal-dash-mcp bridge connects a device to
Claude Desktop / Claude Code. 📝 Walkthrough: Control your ESP32 from an AI agent.
Home Assistant — after mqtt(), enableHomeAssistant() publishes MQTT discovery configs so
HA auto-creates entities (sensors, switches, numbers, binary sensors, buttons), all grouped under
one device. No YAML.
Examples
- Minimal — a few widgets over an access point.
- FirstBoot — captive-portal Wi-Fi provisioning (signal levels, timezone), then your network.
- Layouts — multi-page dashboard with the swipe-up page switcher +
accent()/timezone(). - AllWidgets — every widget type, grouped by purpose, plus a sensor preset.
Footprint
RisalDash is Zero-Waste: a widget type you never call is stripped by the linker, so it costs
nothing. Measured on ESP32 (Arduino) — flash added by the first use of each type (its C++ + CSS
- JS), over the bare ESPAsyncWebServer baseline:
| Widget | + flash | Widget | + flash |
|---|---|---|---|
led |
~1.3 KB | metric |
~2.3 KB |
badge |
~1.6 KB | table |
~2.4 KB |
ai |
~1.8 KB | slider |
~2.4 KB |
number |
~1.8 KB | gauge |
~3.1 KB |
toggle |
~2.0 KB | chart |
~3.4 KB |
Extra instances of a type you already use are a few bytes each. Unused types: 0 bytes — that's
the point.
Roadmap
Richer charts (multi-series / area / bar), more sensor presets, CSS/JS minify + gzip-in-PROGMEM,
Home Assistant auto-discovery, and a Wokwi simulation link. See dash.risal.io.
License
MIT © ZiyaraGo Technologies. Brand: Risal.
Yorumlar (0)
Yorum birakmak icin giris yap.
Yorum birakSonuc bulunamadi